Replacing the outer CV joint of a VAZ 2109 (2108, 21099)
You can replace the outer CV joint (angular velocity joint, “grenade”) on a VAZ 2109 (2108, 21099) without removing the wheel drive.
Necessary tools, accessories and spare parts
Soft metal drift
Key "30" (knob with head)
Key "17" (head or socket)
Pliers (preferably extendable)
Slotted screwdriver or circlip remover
New outer CV joint (they are the same for both wheel drives of the car)
New CV retaining ring
CV joint lubricant (CV joint-4 or equivalent) 40 g
New hub nut
If necessary, CV joint boot and clamps for it
Preparatory work
Place the car on a level surface and securely fix it (handbrake, wheel chocks)
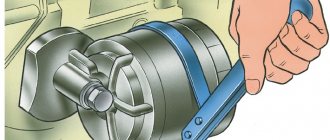
Using a thin chisel, we bend the edges of the wheel hub nut (they are bent to fix the nut in the groove of the CV joint shank)
We loosen the tightening of the front wheel hub nut (where the replacement will be made) using a “30” wrench
We jack up and hang both front wheels of the car (this way we remove the clamping force of the anti-roll bar on the suspension and thereby make it easier to dismantle the necessary parts)
We clean the parts of the front suspension and wheel drive from dirt
The procedure for replacing the outer CV joint of the front wheel drive of a VAZ 2109 (2108, 21099)
— Unscrew the wheel hub nut
We use the key at “30”. Remove the nut and washer underneath.
Unscrew the wheel hub nut using a “30” wrench
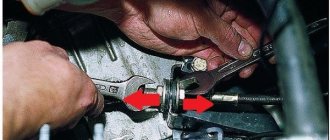
— Disconnect the ball joint
It is attached with two 17mm socket bolts to the bottom of the steering knuckle. Unscrew and remove the bolts.
Disconnect the front suspension ball joint
— Disconnect the shank of the outer CV joint from the wheel hub
We move the front strut towards ourselves, and pull the shank out of the hole in the hub. At the same time, we try to prevent the inner CV joint from being pulled out of the gearbox (we try not to move the drive towards ourselves too much). At this stage, it may be difficult to remove the shank from the hub since there is a splined connection that “sours” over time. To facilitate dismantling, you can hit a couple of times with a hammer through a wooden spacer (block) at the end of the shank.
Remove the CV joint shank from the hole in the wheel hub by moving the front strut towards you
— Remove the CV joint boot
Both clamps from the CV joint need to be removed - large and small. We use a screwdriver and pliers to disconnect the clamp lock. After removing the clamps, move the boot up along the “stick” of the drive (so as not to interfere).
Remove the CV joint boot clamp using a screwdriver
— We remove the outer CV joint (“grenade”) from the drive shaft
We turn the CV joint so that its inside is visible. We knock it off the drive shaft using a soft metal drift. We strike the clip. At the same time, we try to hold the drive so that it does not jump out of the gearbox. The separator and the balls inside it cannot be hit. Usually a couple of blows are enough, since the CV joint is attached to a spring retaining ring, which is easily compressed.
We knock the CV joint off the drive shaft using a soft metal drift and a hammer
Use a screwdriver or puller to pry up and remove the retaining ring. There is no need to remove the thrust ring.
CV joint thrust and retaining rings 2108, 2109, 21099
— Installing a new CV joint
We put new lubricant 20 grams into it. We install a new retaining ring on the drive shaft. We place the CV joint straight and hammer it onto the shaft with a hammer through a drift. We install the boot in place by first putting the remaining 20 grams of lubricant into it. We install clamps. We tighten the clamp locks with pliers. Before tightening, squeeze the air out from under the boot by squeezing it a little.
Notes and additions
The reason for replacing the outer CV joint on a VAZ 2109 may be the appearance of a crunching sound from the suspension when driving at low speed and simultaneously turning left (right). This indicates that the CV joint boot has lost its seal (ruptured) and dirt is getting inside the grenade. As a temporary measure to eliminate the crunching noise, you can try to wash the cavity of the CV joint (“grenade”) with diesel fuel or gasoline, dry it and apply new lubricant.
Replacement
If problems arise with grenades, you should determine which ones have problems. Next we will look at how to change the drive and how to remove it. Additionally, we recommend watching the repair manual video.
The procedure for replacing inner and outer CV joints differs from each other, therefore each stage should be considered separately.
Let's start with the internal.
Inner CV joint
Rubber boots are a vulnerable element of the grenade design. It is not uncommon that by replacing the boot, washing the grenade with gasoline and applying new lubricant, it is possible to solve the problem. If the wear of the CV joint is insignificant, such measures can replace a full repair.
But if you discover the breakdown late, you will have to completely replace the inner CV joints.
- Apply the handbrake and install chocks under the wheels.
- Unscrew the hub nut using a wrench and a socket. Carefully remove the punching elements from the nut with a punch. This way you will be able to preserve the carving on the garnet. The nut itself will need to be replaced with a new one during reassembly.
- The main thing here is to unscrew the nut, lowering the wheels to the ground. Otherwise, you risk breaking the differential and other gearbox components.
- Raise the car using a jack on the desired side, first loosening the wheel nuts. Remove the wheel.
- Drain the gearbox oil. This can be done earlier, at your convenience.
- Release the steering knuckle from the ball joint at the bottom. To do this, unscrew a pair of mounting bolts.
- Since you have already removed the hub nut and unscrewed the ball joint from the steering knuckle, proceed to removing the splined part of the grenade. To do this, pull the brake disc and strut assembly towards you. She has a decent ride. Just remember to turn the steering wheel all the way so that the tip of the steering wheel extends as far as possible.
- Pry the inner grenade with a pry bar, which will allow you to remove the drive.
- Having taken out the CV joint, look at the condition of the oil seal in the gearbox. If you find traces of leaks, be sure to replace the element.
The internal drive (CV joint) is designed to work with smaller angles, its boot is less susceptible to negative influences. Therefore, the internal grenade is changed quite rarely.
Outer CV joint
The outer grenade wears out more actively, so replacement is carried out more often.
Under no circumstances remove two CV joints from the gearbox at the same time. Otherwise, it will cause the gear to become misaligned. Remove one at a time or insert special inserts in place of the hinge.
- If you have extensive experience in such matters, it is quite possible to knock out an external grenade right under the car. This saves time and effort. But such a task requires increased attention and caution in actions.
- Ensure that the axle shaft is stationary or has limited movement. If this is not done, the axle shaft will move when the grenade clip is struck with a hammer. Because of this, the inner CV joint will simply come out of contact and split into parts inside the boot. Therefore, you will have to dismantle the unit completely, and this is a very difficult task.
- You can hold the axle shaft with your hands, but a more effective means is a hand vice or a gas wrench. It is better to enlist the support of a partner. This is the best option.
- Take a fairly heavy hammer with a short handle.
- If damaged, cut, turn or move the boot to the side so that it does not interfere with striking.
- The blows should be made sharp, but at the same time careful. There is no point in hitting the element with great force.
- Due to successive blows, the resistance of the locking ring should weaken, which will allow the outer grenade to be removed from the axle shaft.
- Thoroughly treat the seating area with gasoline, clean it with a rag and put a portion of new lubricant into the hinge.
- A new boot is put on the axle shaft and a brand new CV joint is mounted.
Dismantling work
To fix the boot to the axle shaft and body of the new grenade, many use ordinary plumbing clamps. The practice of VAZ 2109 owners shows that they are more convenient and more efficient than standard fasteners provided by the factory.
Changing CV joints is not the easiest task, but this stage cannot be called incredibly difficult either. The main thing is to use high-quality new grenades so that in the next few tens of thousands of kilometers you will forget about them. But they didn’t remind us of themselves.
Replacement of CV joints of VAZ 21099 Lada Samara
- Repair manuals
- Repair manual for VAZ 21099 (Lada) 1990-2008.
- Replacing CV joints
Note
If during operation when the vehicle turns, knocking noises are heard in the wheel drive, check the CV joints. Rock the drive shaft by hand. If there is play or the dirt covers are torn, the CV joint must be replaced. There is practically no point in disassembling the hinge: if the cover is torn, the dirt that has got into the hinge has already rendered the CV joint parts unusable. Hinge parts cannot be replaced individually.
↓ Comments ↓
1. Description of the car
1.0 Description of the vehicle 1.1 Appearance 1.2 Engine compartment 1.3 General data 1.4 Technical characteristics 1.5 Passport data
2. Vehicle operation
2.0 Vehicle operation 2.1 Safety rules and operating recommendations 2.2 Side doors 2.3 Trunk lid 2.4 Opening and closing the hood 2.5 Luggage compartment 2.6 Adjusting the front seats 2.7 Controls 2.8 Interior ventilation and heating 2.9 Eliminating fogging or frosting of windows
3. Vehicle maintenance
3.0 Vehicle maintenance 3.1 Checking the tightness of the engine and gearbox seals 3.2 Checking the tightness of the cooling system 3.3 Checking the tightness of the fuel system 3.4 Replacing the coolant 3.5 Replacing the oil filter and engine oil 3.6 Replacing the air filter filter element 3.7 Checking and adjusting the generator drive belt 3.8 Replacing the belt generator drive 3.9 Cleaning and flushing parts of the crankcase ventilation system 3.33. Replacing lamps
4. Car care
4.0 Car care 4.1 Car washing 4.2 Caring for and restoring body paint 4.3 Body lubrication 4.4 Cleaning drainage holes 4.5. Car storage 4.6 Preparing for winter use 4.7 Tips for starting the engine in severe frost 4.8 What is useful to buy for winter 4.9 Tips for winter use of the car
5. Problems along the way
5.0 Malfunctions along the way 5.1. Engine 5.2. Checking electrical equipment 5.3 Extraneous knocking noises appeared 5.4 Vibration and shock on the steering wheel 5.5. Brake problems 5.6 Wheel puncture
6. Chassis
6.0 Chassis 6.1. Front suspension 6.2. Rear suspension
7. Steering
7.0 Steering 7.1 Steering wheel 7.2 Steering column 7.3 Steering mechanism 7.4 Replacing steering rods
8. Brake system
8.0 Brake system 8.1 Front wheel brake 8.2 Rear wheel brake 8.3 Wheel cylinder 8.4 Brake drive
9. Electrical equipment
9.0 Electrical equipment 9.1 Relay and fuse box 9.2. Generator 9.3. Starter 9.4. Lighting and light signaling 9.5. Heater 9.6. Windshield wipers 9.7 Sound signal 9.8. Ignition system 9.9 Instrument panel (high)
10.0 Body 10.1 Replacing the front buffer 10.2 Replacing the rear buffer 10.3 Replacing the radiator trim 10.4 Replacing the front fender 10.5 Removing and installing the hood 10.6 Adjusting the hood 10.7 Adjusting the hood lock 10.8 Front door 10.9 Rear door
Determining the malfunction
First of all, when driving, there may be extraneous noise from the front. First you need to make sure that the CV joint boots are not torn and there are no cracks or oily marks on the surface. To check, just turn the steering wheel all the way and carry out a visual inspection behind the wheel.
Found any damage? Change the boot immediately so that stones, small particles, and water do not subsequently get into the CV joint mechanism. Otherwise, the hinge will quickly become unusable.
It is quite easy to determine the need to replace the hinge itself - during turning maneuvers the driver notices characteristic knocking noises. The presence of play during swinging of the drive shaft will help confirm this fact.
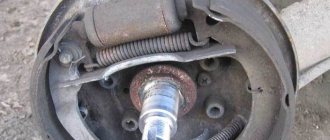
CV joints in a VAZ 2109 car
After front-wheel drive cars began to be produced, the question arose about effectively ensuring equality of angular velocities of the shafts - driving and driven. Further use of a crosspiece with four needle bearings in the cardan drive led to an increase in the dimensions of the unit, the price of the structure increased, and the torque began to be transmitted with great vibration; the greater the angle between the shafts, the stronger it was. Initially, the intended service life of CV joints is similar to the service life of a car, but after the start of operation it was revealed that wear still exists and the outer part of the unit wears out more. The use of a moisture- and frost-resistant material with good flexibility for the manufacture of the CV joint boot made it possible to protect the CV joints from rapid wear. But, nevertheless, the action of external factors, such as moisture, abrasive, constant deformations lead to a limitation of the service life of CV joints. In addition, there is a possibility that during operation and repair the boot may be damaged. Cracks may form on the protective rubber band, which is unacceptable for normal operation of the unit. The defect of the shaft and its curvature are less noticeable to the naked eye, but the use of the part in the future is unacceptable. Therefore, it is periodically necessary to monitor the condition of the outer CV joint on a VAZ 2109 vehicle, and, if necessary, carry out its timely repair or replacement.
How to disassemble the outer joint of a VAZ 2109 car
If you hear knocking noises in the front-wheel drive when cornering, you need to check the constant velocity joints. The presence of play when shaking the drive shaft by hand, or a torn boot indicates that the outer CV joint of the VAZ 2109 needs to be replaced. The design of the unit is quite complex, the parts are not interchangeable; when the boot breaks, dirt gets into the joint and renders it unusable. Therefore, the best option would be to replace the external CV joint of the VAZ 2109. However, if the protective cover is damaged, the lubricant needs to be replaced, and the joint is disassembled to assess the condition of the parts. To do this, the CV joint is disconnected from the car, and then:
- Using a special device, remove the clamps in the photo, positions 5 and 9, holding the protective cover pos. 8, which then moves on the wheel drive shaft. If the right wheel drive needs to be tightened or unscrewed.
Outer CV joint for VAZ 2109
- The joint is knocked off the shaft using a drift or hammer. In this case, force is applied to the clip pos. 3.
Advice: Do not attach pos. 2 load.
- The hinge is washed.
Elements of the outer CV joint of the VAZ 2109
Positions: 1 – body; 2 – hinge separator, 3 – outer CV joint cage; 4 – balls.
Tip: Before you start disassembling the product, you need to note the relative position of all parts of the assembly, except for the balls. For this, paint or touchstone is used.
- The outer hinge is secured in a vice.
- The cage and separator are tilted so that one ball comes out of the groove of the CV joint housing as much as possible.
- The soft metal ball is squeezed out of the separator using a screwdriver.
- All parts are rotated so that the adjacent ball is in the same position.
- All the balls are pulled out. They can be pulled out in a different sequence - through one.
Advice: Do not allow too much force to rotate the separator. This can lead to blocking of the balls and difficulty in further disassembling the assembly.
- The separator with the cage is installed so that the elongated windows of the separator are located against the protrusions of the structure body.
- The separator is pulled out along with the holder.
- The clip is removed from the separator. To do this, a clip protrusion is placed in the elongated window of the separator, which is then rolled out.
Tip: If the separator has identical windows in the outer hinge, then for its removal it does not matter which window to use.
- All CV joint parts are washed again.
- Their condition is visually inspected. There should be no cracks on the separator bridges, there should be no deep holes on the race tracks, large scuffs, or corrosion on all working surfaces of CV joint parts. The maximum wear on the working surfaces of the elements should not exceed 0.1 millimeter.
- If it is not possible to replace the outer CV joints of a part on a VAZ 2109 car, the entire assembly is replaced.
Assembling the outer CV joint of a VAZ 2109 car
The order of work is the reverse of disassembly, taking into account the following operations:
- All parts must be lubricated with CV joint grease before assembly.
- When installing a separator with a cage into the hinge body, ensure that the marks that were made before disassembling the unit match.
- Installation of balls into the separator must be done by tilting the cage approximately at an angle twice as large as the separator.
- The hinge is filled with CV joint-4 lubricant, volume 40 cm3.
- A new retaining ring is installed strictly in the center of the shaft into the groove. The groove is filled with grease.
- The shaft rests against the cage, while it is necessary to maintain the alignment of the ring relative to the cage and the shaft.
- The end of the shaft is sharply hit with a hammer so that the retaining ring is compressed and slips through the hole in the cage.
- “Excess” air is released from the cover. To do this, use a screwdriver to pull the seating belt of the cover away from the drive shaft.
- Mounting clamps are installed.
- The presence of cracks in the area of fixation and tightening with clamps, deformations, and traces of contact of clamps with the road surface are checked. If they are present, the clamps are replaced with new ones.
- After completing the work, the CV joint should turn without jamming, smoothly with hand effort.
Replacing the outer CV joint of a VAZ 2109 car
The instructions for car care for the VAZ 2109 suggest removing the outer CV joint on the raised part of the car and the removed wheel on the VAZ 2109. So:
- The hub nut needs to be unscrewed.
- Remove crankcase protection.
- Disconnect the ball joint from the lower suspension arm. If it is pressed in, both the support and the lever are unscrewed at the same time.
- Remove the ball joint.
The ball joint is removed
- The rack is moved to the side, while the CV joint must be bent. The pulley that enters the hub bearing must be at an angle to the drive shaft.
- The hinge shaft on which the splines are located must be knocked out of the bearing from the outside of the wheel. A metal spacer is used for this.
- The boot is removed.
- The grenade gets knocked off the drive shaft.
- All old grease is removed. An aerosol like WD-40 will help make this operation easier.
Advice: Replacing the outer CV joints of the VAZ 2109 is carried out simultaneously with replacing the rings - the retaining and thrust rings located inside the grenade. The entire assembly is lubricated generously with lubricant.
- Having installed the new CV joint on the drive shaft, it must be centered so that the fork fits in smoothly without jamming.
- Perform final pressing of the drive shaft.
- Install the hinge into the seat.
- Squeeze the boot with a clamp.
- Reassembling the entire assembly is done in reverse order.
Repair tool
To independently remove CV joints on a nine or any other car, you need to have the following tool on hand:
- A socket wrench for “30” or a socket with a strong wrench.
- Hammer and chisel.
- Balloon wrench.
- Set of spanners and sockets.
- Penetrating lubricant such as WD-40.
- Capacity of at least 5 liters.
- Marker or metal scriber.
- Jack, support and wheel chocks.
You may also need a grinder, drill, drill bits, and other attributes. The work can be complicated if the drives have never been removed - the threaded connections become dirty, which complicates disassembly.
Possible causes of crunching
An experienced driver can by ear determine the location of a car malfunction. This quality comes with age. However, it is very difficult to confuse the crunch of a grenade with another sound. Let's figure out what a CV joint is. On the outside it is made in the form of a bowl, and on the inside the body has semicircular grooves. There are six of them.
In the internal space there is a spherical fist (clip) with 6 grooves and a splined connection for the axle shaft. Rotation occurs through the force that the cage transmits to the body through the balls located in the separator. The balls, moving along the grooves, change the angle between the axes.
- low-quality or defective products, including counterfeit ones, have been identified;
- low-quality lubricants are used or they are absent;
- boot damage;
- driving on bad roads or aggressive driving style.
Each part has its own production resource. And over time, play appears in the hinges. The rolling of the balls, now more free, produces a sound reminiscent of crunching. It may appear when turning, sharp acceleration, or overcoming obstacles.
There are 2 grenades installed on the drive wheels (internal and external): the first transmits rotation from the gearbox, the second - from the axle shaft to the wheel hub. Therefore, if an extraneous sound occurs, you need to determine which CV joint is making the sound (located on the left or right, inside or outside).
The design of these grenades is the same, they differ only in size (the outer one is smaller). Outer CV joints wear out more intensively because the loads and turning angles are greater. Knowing the design and difference of grenades, which ones wear out, how quickly and why, the car owner will more carefully monitor the condition of the CV joints.
- As always, the first step is to install the wheel chocks and engage second gear.
- Then you need to loosen (tear off) the wheel nuts, as well as the hub nut.
- Install a jack and jack up the side of the car from which the CV joint will be replaced.
- Unscrew the nuts completely and remove the wheel.
- Unscrew the two bolts securing the lower ball joint to the steering knuckle.
- Turn the steering wheel as far as possible to the left (or to the right, depending on which side you are changing from).
- By pulling the steering knuckle with the strut, pull the splined end of the CV joint from the hub.
- Using a pry bar, remove the inner CV joint of the VAZ 2108 from the gearbox.
- Using a vice, secure the drive shaft, then remove the clamps and CV joint boot.
- Now it is necessary to knock the CV joint out of the shaft; for this I used a hammer and a soft metal attachment (copper or bronze).
11. When the old CV joint is removed, you can begin installing the new one.
12. Put on a new boot, fill the shaft with grease (as in the photo), then drive the CV joint onto the splines.
13. Using pliers, clamp the boot clamp on the drive shaft, and use a screwdriver to unscrew the outer edge of the boot, and only then clamp the outer clamp.
14. Install a new locking spline on the splines, then install the drive into the gearbox. In order for it to fit tightly into the grooves and lock into the side gear, using a wooden adapter and a hammer, lightly hit several times along the entire axis of the shaft.
All further actions are performed in reverse order. I recommend replacing the old hub nut with a new one.
That's all for me. Now that you know how to replace a VAZ 2108 CV joint with your own hands, I am sure that you can easily do this work yourself if necessary. Thank you for your attention.
I recommend watching the video on how to replace a VAZ 2108 CV joint with your own hands:
Preparatory work
Before replacing the CV joint boot or the grenade itself, you need to perform several preparatory steps. Without this, withdrawal is impossible
Please note that you cannot remove both inner joints at the same time - this will lead to destruction of the differential mechanism
If the bevel gears fall off, you will have to remove the gearbox and completely disassemble it. Preparation includes the following steps:
- Complete or partial drainage of oil from the gearbox. When removing the internal CV joints, oil will spill out; to prevent this from happening, it is necessary to drain at least 2/3 of the total volume.
- Unlocking the front wheel hub nut (or both, if two drives need to be repaired).
- Loosening the hub nut and wheel bolts. The hub must be unscrewed using a 30mm wrench with a large lever.
- Removing the wheel after installing the side to be repaired on the jack and support.
Having completed the preparatory work, you can begin directly replacing the VAZ-2109 CV joint.
How to remove a grenade from the drive?
The internal grenade is removed from the gearbox by light tapping. But one condition must be observed - if you remove two inner grenades from the box at once, do it one by one. First, take out one, replace it with a plug, then the second. Otherwise, the differential may simply fall apart. And for repairs you will need to completely disassemble the gearbox.
Now let's talk in more detail about how to change the external grenade on a VAZ-2109. This is not a very difficult matter, but it will require skill. The first thing you need to do is cut off the old boot - you won’t need it anymore, so you can remove it in this “barbaric” way. The clamps, of course, also need to be removed.
After this, clamp the shaft tightly in a vice so that the grenade is at the bottom. Position it so that it sits flat on the shaft - you can knock it down faster. Apply several sharp blows through the wooden spacer. The grenade should come off the shaft without any problems. You cannot strike with metal objects, as you can destroy the integrity of the element. When replacing grenades on a VAZ-2114, it is necessary to remove the drives completely, this will significantly simplify the repair.
Recommendations from professionals for repairing CV joints
In this subsection, we invite you to familiarize yourself with practical advice from professional craftsmen:
- If it is necessary to change the hinge, perform a complete replacement. The only exception may be the reinstallation of anthers and other small parts from this category. In addition to lubricants in the CV joint, you need to change all the clamps and, with a certain degree of perfectionism, monitor cleanliness during assembly;
- A hammer and a wooden stand are perfect for installing the CV joint in place. Carry out installation work carefully - movements should be smooth and not forceful. In other words, you place a wooden attachment against the part and knock until everything falls into place. If you do not use a “gasket”, there is a high probability of damage to the part, which will become unusable;
- Once the CV joint is installed, install the boot. First, use pliers to clamp the clamp onto the shaft. Equalize the pressure in the part - use a screwdriver to hook the edge of the boot and unscrew it. Now clamp the clamp from the outside. A plastic plug is placed at the end of the shaft.
All other steps are performed in reverse order, as during disassembly.
As a result, performing repair work when it is necessary to replace the VAZ 2109 CV joint may seem labor-intensive. If you have enough free time, try to figure it out yourself. Otherwise, it is better to turn to professional craftsmen. Any service station will replace your CV joint or boot in a short period of time, because this is a fairly common problem on any car.
Types of CV joints
Before you begin repairs, you need to find out exactly how the unit is designed.
The pair of drives on the VAZ 2109 is equipped with a total of 4 CV joints.
CV joint type
Peculiarities
There are 2 of them. They transmit torque to the axle shaft from the gearbox
There are also two of them. Installed on the ends of the axle shafts and transmit torque directly to the wheels
Outer
This arrangement of grenades allows the wheels to rotate during turns and constant operation of the suspension system. To put it simply, the outer CV joints are responsible for transmitting torque when cornering, and the inner ones are responsible for the vertical movement of the wheels. These are collisions with bumps, holes, roll in turns, etc.
Interior
What is a grenade?
A grenade is the colloquial name for a constant velocity joint, which allows motion to be transmitted from the vehicle's gearbox to the wheels. Pay attention to the design of the car's drive. From the gearbox, consisting of shafts and a differential, there are two rods, at the ends of which there are moving elements (CV joints). They allow movement to be transmitted to wheels that are lower than the differential axis.
It is with the help of movable hinges that it is possible to realize the rotation of the front wheels. Essentially, this is a kind of crosspiece that is installed on the cardan shafts. But the grenade is much stronger and more durable. Why a grenade? Yes, it’s just that this element is very similar to this projectile and nothing more. Consists of three parts - outer and inner cages, balls between them. A special lubricant is pressed inside.
How to independently determine problems with the constant velocity joint on the “nine”?
Lubrication Both types of hinges are structurally one unit, but the outer one breaks much more often due to high loads and rotation angles. Let's look at some signs of identifying a malfunction and ways to detect it:
- when trying to move the wheel hub in different planes, play is felt;
- when changing speed or starting off, the car moves jerkily;
- with the steering wheel turned to the maximum, start moving - the faulty outer joint makes a certain crunching sound;
- extraneous noise in straight-line motion indicates a problem with the internal joint.
Good diagnostic results are obtained by a technique that allows you to lift the car (at least jack it up). Here it is possible to rotate the wheel when the internal joint is maximally curved. It is in this way that you can hear the so-called hinge “crunch”, which allows us to speak with absolute certainty about the breakdown of the constant velocity joint.
Causes of CV joint failure
Unlike other cars, it is especially difficult for the VAZ-2109 to keep the grenade boot in working condition for a long period. The main reasons for its failure, first of all, can be unfavorable climatic and external factors. As a result, cracks will form on the parts, and further operation will be impossible. Through the torn mechanism, dust and dirt get inside the hinge, and because of this, the grenade parts wear out. It is not difficult to detect this: when the car is moving and when turning, the car makes a “crunching” sound, and this is already the first signal.
If, after you heard a suspicious crunch in your VAZ-2109, you came to the garage and found traces of grease on the hinge, then you immediately need to completely replace the CV joint along with the boot, since the parts of this mechanism cannot be interchanged.
Drive diagnostics
But a crunch can also appear when other suspension elements - balls, rod ends, bearings - are destroyed. Therefore, before replacing the CV joint on a VAZ-2109 with your own hands, do a complete diagnosis of the suspension and chassis. It is quite possible that it is not only grenades that will need to be repaired. In general, the diagnosis looks like this:
- Place the car on a viewing hole, overpass, or lift. It needs to be secured securely so that it does not roll off.
- Using a mounting spatula, check the drive play - if it is large, you can hear the balls knocking when moving, you will need to change the element.
- At the same time, check the condition of the ball joint - their reliability is not very high, and the roads leave much to be desired.
- Visually inspect the condition of the anthers on all grenades - they determine how long the drives will last.
Replacing CV joints VAZ 2108, 2109, 21099
Most car enthusiasts are very picky about their cars and notice any unusual sounds while driving. So, if knocking noises appear in the front part of the car during a turn, we can speak with great confidence about a malfunction of the CV joints - constant velocity joints. In such a situation, you should not hesitate, because the only thing that will save you from further problems is replacing this unit.
Task and design features
Let's first remember what task the CV joint (or, as people call it, a “grenade”) has. So, the main task of the constant velocity joint is to transmit rotation from one axle axis to another. At the same time, the unit has to work in very difficult conditions, because the angles of the semi-axes relative to each other are constantly changing. Moreover, the CV joint must guarantee normal operation of the wheel and its vertical movement on the shock-absorbing spring.
The design of the hinge is very simple. It consists of:
- the outer body, which has a bowl-shaped appearance with 6 grooves. The axle shaft comes out from the outer part of the CV joint;
- an internal rim, which has the shape of a sphere. There are also six grooves and a special spline connection;
— 6 balls, which are located between the holder and the inside of the casing.
The peculiarity of the CV joint is that the unit is structurally perfect. Initially there is not the slightest play in it, which is not difficult to check when purchasing a new component. As for the operating principle, it is very simple. The cage, through the balls inside the hinge, transfers the force to the body, simultaneously rotating it. In turn, the movement of numerous balls along existing grooves provides a lightning-fast response to changes in angle.
But nothing lasts forever. During operation, the balls constantly come into contact with other elements of the assembly, gradually breaking them. Over time, play appears, which is what causes such an unpleasant sound when the car turns.
How to determine a “sick” CV joint?
Often the units we are considering are installed in pairs on each wheel, so it is very difficult to reliably determine which of the CV joints has failed. But nothing is impossible. Today there are two popular methods:
— place the car on a level surface and swing the axle around the hinges one by one. If the unit is working properly, then even a small play is excluded. If a strong knock is noticeable during the rolling process, then the hinge is badly worn and requires replacement;
— drive a car along an uncongested section of the road with a lot of turns. When performing maneuvers, listen to the sounds the vehicle makes. If you hear a noise on the left when turning left, then the joint on that side is faulty (and vice versa).
Now we determine which CV joint is causing the problem. To do this, turn the steering wheel as far as possible to the left, and then to the right. If the hinge makes a knocking noise when turning right, then there is a problem with the right joint. If, on the contrary, when turning left, then you can safely “sin” on the left CV joint.
A faulty inner CV joint can be more accurately determined by taking a short trip along an uneven straight road. While driving, you need to drive into the hole with either one or the other wheel. From which side the creaking is heard is where the problem lies.
Causes of malfunction
As for the reasons for the failure of hinges, there are enough of them:
- low quality of material (possibly defective at the production stage);
— incorrect choice of lubricants for CV joints;
— dirt and dust getting inside the unit (usually caused by a break in the protective boot). As a rule, after this the CV joint does not “live” for a long time;
— careless and inept operation of the machine;
— the terrible state of domestic roads.
Features of replacing the hinge on the VAZ-2108
We will consider the process of replacing a CV joint using the example of a VAZ-2108 car. Your algorithm of actions should be as follows:
- Prepare the tools - a jack, a pry bar, keys (a standard set is enough), a hammer, a small block of soft metal (will act as a guide), lubricant for the CV joint, a new set (CV joint, clamps and boot).
- Secure the car with “boots” and turn on second speed.
- Remove the nut that secures the wheel and turn the wheel nut a few times.
- Place a jack and lift the part of the car on which the faulty hinge will be replaced.
- Unscrew the nuts completely and move the wheel to the side.
- Remove the ball joint bolts that secure it to the knuckle.
- Turn the steering wheel to the left (if you are changing the left CV joint) and to the right if the right one.
- Pull the steering knuckle and remove the splined edge of the hinge.
- Using a pry bar, remove the inner CV joint from the gearbox;
- Take a hammer and a prepared tool made of soft material. Using them, carefully knock the hinge out of the shaft.
- That's all - the old CV joint is in your hands. All that remains is to install a new node.
- Now you need to put on a new boot, fill the shaft with high-quality lubricant and stuff the hinge onto the splines.
- Take pliers, fix the boot clamp and use a screwdriver to unscrew the outer part of the boot. Only after this can the outer part of the clamp be clamped.
- Install the locking device, and then mount the drive in the gearbox. It is very important here that it fits well into the grooves and is securely fixed. This is quite simple to achieve - you need to knock it a little with a hammer (through the spacer, of course) along the shaft axis.
Your subsequent actions should be performed exclusively in the reverse order. In this case, it is advisable to remove the used hub nut, buy and install a new one. That's all. Now you can replace the CV joint on a VAZ-2108 with your own hands and save a lot on visiting a service station.
Shall we get started?
- Before replacing the mechanism, you need to drain all the oil from the gearbox. Let's not touch the jack yet! You need to place a brick under the rear wheel of the car, after this procedure we take the 30 socket and, accordingly, loosen the nut. Don't be alarmed, you may need about a half meter long piece of pipe half a meter long as a lever. Remember, we only need to loosen the nut, not remove it yet!
- Everything worked out? Go ahead! We lift the car with a jack, and only now completely remove the hub nut along with the washer. Now you can safely remove the wheel from the hub.
- Take the 13mm head and remove the two bolts that secure the ball to the hub. After this, we move the hub and remove the outer grenade from it. Then we attach a pry bar to the internal grenade and, using hammer blows, knock it out of the gearbox. By the way, if you still don’t have a pry bar at hand, a piece of pipe can replace it.
- When the grenade is removed, we clamp its shaft in a vice.
- We remove the clamps from the unusable boot. After that, we shoot down the outer grenade. Attention! In order not to damage it, you need to hit it along the edge. When this operation is completed, remove all old grease from the mechanism, wash it in gasoline or kerosene and wipe it well again, this way you can better remove traces of grease.
- Now we put a new boot on the drive shaft, and using a hammer we hammer the outer CV joint back, after thoroughly lubricating all the parts of the product. After that, we put it on and tighten it with a collar.
- Then we insert the grenade into the gearbox, driving it there. We place it in the hub and return the ball to its place. We put on the hub nut.
Attention! The hub nut does not need to be tightened with great force. After installing the wheels, tighten the bolts without applying much physical force.
- We remove the car from the jack, place a brick under the front wheel and tighten the nuts tightly.
- Well, now pour oil into the gearbox.
That's all. Congratulations! Replacing the boot on the VAZ-2109 is complete!
Replacing the CV joint on a VAZ-21099
As I habitually turned the steering wheel to the right to take a turn near the house, I heard a characteristic crunch: “It’s time to replace the CV joint on the VAZ 2109,” flashed through my head at the same time as the sound. Arriving at the garage, I immediately examined the car. Discovering the cause of the heartbreaking crunch did not take much time or trouble - the “dead” boot “took” the CV joint with it, everything is clear and understandable. The Russian auto industry did not scold then - too much had already fallen on it. I just decided to replace the failed CV joint on the VAZ with a better one, preferably not of domestic production - it would be calmer.
When choosing new CV joints for the VAZ 2109, my not new car, by the way, the hero of this celebration was the VAZ-21099, I decided to go with the German manufacturer. And so my choice fell on NOBEL CV joints for the VAZ. The reasons for this choice are quite clear. Firstly, the tripoid design of the internal
CV joint: it is quite common for foreign cars, but for Russian cars it is relatively new.
The main advantages of the NOBEL CV joint design:
— durability of the CV joint and low susceptibility to shock loads;
— NOBEL CV joint withstands greater torsional torque;
— a larger longitudinal stroke is structurally provided.
Secondly, NOBEL CV joints on VAZ (2109, 2110) are equipped with boots made of high-quality neopropylene, which, unlike traditional ones, better withstand the effects of aggressive environments and fuels and lubricants, low and high temperatures, road dirt and salt... which is more common in spring and autumn than relevant.
Thirdly, NOBEL hinges are made from high-quality material using technologies from world leaders in the automotive industry.
Fourthly, the estimated service life of NOBEL CV joints is 90,000 kilometers. And besides, they are more convenient to maintain and install.
As you can see, it is quite logical to give preference to this brand. So, a banal interest in everything new, combined with the good consumer properties of the product, gave its result - all the necessary spare parts were moved to the trunk of the “victim”. And they decided to carry out all the operations of dismantling old and installing new (replacement) CV joints independently. Read below to see what our efforts have led to.
1. In order to make a replacement