Tail lights of VAZ 2109 do not light up - repair and modification
The functioning of the rear lights of any car is necessary for road safety reasons. These devices at the rear of the car perform a lighting and information function (warn road users about the movement of the car).
- reversing lighting;
- side lighting;
- brake lights;
- turn signals;
- emergency alarm.
Rear view lights for VAZ 21099
The structure of the lighting devices is as follows:
- body made primarily of plastic (in some cases glass);
- lamp holder;
- latch for holding wires;
- diffuser of light rays for uniform illumination of the road surface. It is glued to the back of the product body, so if it breaks, it needs to be replaced along with the body.
The device of the rear light on VAZ 2109-2108 and 21099
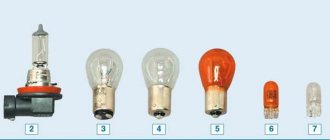
The following types of rear lights can be installed at the rear of a VAZ 2108 or 2109:
- incandescent lamps. Inexpensive, but they break down relatively quickly and are not bright enough. Such lamps burn with a yellow light, which is not very visible in unfavorable weather conditions;
- halogen bulbs. They are considered more modern and durable, since air is pumped out of their flask and inert gas is pumped in. There are models with H1 and H3 sockets on sale;
- LEDs. They burn with a cool white light and last several times longer than incandescent lamps. They are sold in strips and today often replace obsolete incandescent lamps.
LED tail lights for VAZ 2108
Replacing the low beam lamp for Lada 2108 (VAZ 2108)
The headlights on the VAZ 2109, however, as in models 2108 or 21099, are made in a single housing, which combines the following lighting devices:
- DRL;
- low beam;
- distant lighting;
- dimensions;
- turn signals.
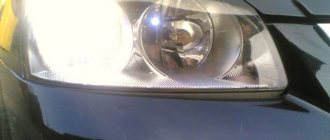
The low beam of VAZ 2108, 2109, 21099 should illuminate the road surface so that the driver can see road users at a short distance. The low beam lights up somewhat asymmetrically - when driving on the right, the left side of the road is illuminated a little worse.
The headlight of the VAZ 2114 is very similar to the headlights of the VAZ 2109 and consists of:
- plastic case. It contains other lighting elements. The lighting source is halogen, gas-discharge and other types of lamps;
- reflector. Forms a beam of light and can have a parabolic or other shape. It consists of plastic, and to create a reflective effect, a thin layer of aluminum is glued onto it;
- diffuser. Responsible for transmitting light flux and refracting it, and also protects lighting from external influences. Made from glass or plastic;
- contact board (lamp holder);
- sealing gasket. It is located between the car body and the headlight unit.
A brief overview of the design of automotive optics
The design of a regular headlight is not complicated. Most often, the headlight combines the following elements:
- light source (LED, metal halide, xenon and other lamps);
- reflector (reflective element);
- light-scattering element (corrugated glass);
- housing with fastening.
Headlights with super-bright diode lamps are very popular among car owners. Such headlights require a record low amount of energy and can work for a long time without interruption.
Headlights for VAZ 2109
Most often, headlights are considered in terms of their functionality, i.e. how well they perform their assigned functions - road lighting. However, headlights can highlight the appearance of a car and add personality to even the most ordinary design.
- How to remove a headlight on a VAZ 2110, 2111, 2112; dismantling and installing a headlight unit
In this article we will try to figure out which headlights are optimal for the VAZ-2109 car, methods for upgrading and tuning headlights, as well as common models of headlights and rear lights.
Reasons for failure
What are the reasons that the headlight does not light up:
- The fuse blows. This is due to shaking while driving or power surges. To repair the lighting system, you will only need to replace the fuse itself, which can be found according to the diagram presented on the cover of the unit;
- light bulbs burn out;
- the low beam relay becomes faulty;
- fuse contacts oxidize;
- deformation of the sockets of the headlight switch lever clamps occurs;
- The lever mechanism is jammed.
A breakdown may be accompanied by a lack of operation of the lighting system or its incorrect operation. Even if only one headlight (left or right) is broken, this will significantly reduce visibility and increase the likelihood of an accident.
Reasons for headlight failure
Replacement process
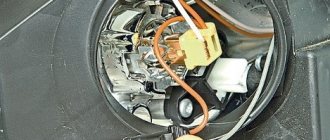
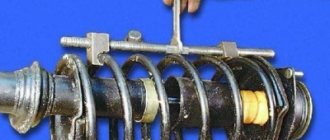
To replace the low beam headlights that do not light up in your VAZ 2108, 2109 or 21099, and install new lamps, first prepare a 10mm screwdriver. After that:
- Disconnect the power wires from the low beam headlight unit and turn signals.
- Press the hydraulic corrector clamps. This will allow you to turn it counterclockwise and remove it by pulling it towards you.
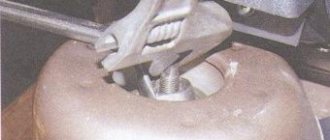
- Remove the block itself. To do this, unscrew 2 nuts on the left and right sides with a 10mm screwdriver. You can remove the block together with the turn signal housing.
- Disconnect the turn signal housing from the dismantled unit. To do this, unscrew 2 bolts from it.
Replacing light bulbs on a VAZ 2100
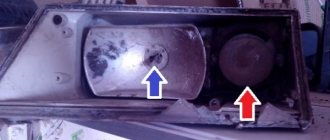
After this, you can replace the broken headlights with new ones. To check which parts of the headlight are not working, remove the circuit board and wipe the inside of the product. If the unit is damaged, it must be completely replaced. Replace the gasket if it is dry or torn. After installing a new bulb or other lighting system components, adjust the new optics to ensure optimal light beam range.
If you want more interesting articles on auto topics, subscribe to our channel at.
Repair and tuning of rear lights on the legendary Nines - VAZ 2109
Causes of failure of the rear parts of the lighting system and driver actions
You can find out what the breakdown may be and how to solve the problem below. We will talk about modified nines.
We make lens headlights for the VAZ 2109 ourselves
Possible malfunctions of brake lights and their elimination
- Due to a voltage drop, a short circuit may occur and the paws will burn out.
- If it's time to strip the wires because the contacts have oxidized and the terminals do not conduct current well enough.
- Often, in the event of a voltage drop, it may be necessary to remove and replace fuses.
- If the reverse sensor contacts are broken or damaged.
Removing the brake light switch sensor
In case of the problems listed above, the easiest way, of course, is to install a new lamp. This happens without any difficulty: you just need to turn off the lights, open the trunk and remove the wiring block. After this, holding the fixing elements that are installed on the sides, remove the panel and unscrew the lamp. In its place, install a new light device and assemble the assembly in the reverse order. If we talk about stops, both lamps and one of them may not work, that is, only in one headlamp.
If such a problem occurs, it is necessary to immediately diagnose:
- Check the fuse and, if necessary, replace it with a new one. Fixing a breakdown is not enough, because, as in the case of human diseases, a burnout may be a fault in the system that needs to be corrected. If this is not done, you can change the device until the end of the life of the VAZ 21099. One of the reasons may be a short circuit.
- If the wiring in the signal lamp sockets has oxidized, the lamp needs to be twisted a little in the socket to scrape off the damaged layer. To make the work done more effective, you can clean the contacts with sandpaper.
- If the lamps in the stops burn out, you need to replace it with a new one and check whether the system will work. And if the contacts are bad, they need to be cleaned both on the board and on the wire block.
- If the tracks in the headlight circuit board are burnt out, then you can remove the board and visually diagnose its integrity. If there are burnt tracks, they can be modified by replacing the wiring.
- The sensor is faulty or the electrical circuit is broken. First, you need to remove the red and white wires from the sensor and connect them with a piece of wire. If the brake lights come on, then the sensor needs to be replaced; if not, you need to check the electrical circuit. It needs to be checked for broken contacts.
Tools and materials
According to the current traffic regulations, fog lights can act as an alternative to low beams when used during the day.
If you install and adjust the PTF correctly, they will be able to additionally illuminate the side of the road. So, if visibility is poor, you will notice pedestrians and animals suddenly jumping out in time.
To carry out the work, you will need a certain set of devices.
| Element | Quantity |
| Power wire | The length is calculated based on the fact that it is enough to stretch from the fuse block to each PTF. The cross section must be 1.25 sq. mm. |
| Wide terminal | She's a mom. You will need 4 pieces |
| Narrow terminal | Also mom. Only need 1 piece |
| Terminal with hole in center | She will go to mass. Need 3 pieces |
| Relay with block and wires | One set is required, but you can take a pair for insurance |
| PTF power button | 1 piece |
| Fog lights | Two high quality headlights |
Especially for the VAZ 2109, you can purchase a fully assembled, ready-made kit for connecting the PTF. Its estimated cost, which may vary slightly depending on the region and store, is 1,500 rubles.
If you buy it, there will be no problems
Installation
Having prepared everything you need, you can begin the procedure of assembling new elements for your car.
- Install and connect the button with which you will turn the PTF on and off. In this regard, the owners of the Nine with a high panel are lucky, since there is already a regular place provided for fog lights, that is, for their button.
- Remove the grille that covers the speaker, unscrew the speaker itself and look for a couple of connectors inside. They are designed to connect the foglight activation button and the indicator for turning them on.
- Remove the plug from the panel, put your button in its place and connect it to the electrical connector. The speaker and grille can be returned to their rightful place.
- Now we go to the engine compartment. You need to unscrew the mounting block, or as it is also called the black box. Lift the cover to gain access to the connectors there.
- Next, you will need to conduct wiring from the fog lights, as well as from the installation location of the corresponding relay to the fuse mounting block. But you don’t need to touch the relay ground wires yet.
- Disconnect connectors Ш7 and Ш8 from the mounting block. They are located directly next to each other, but at the same time Sh7 is significantly wider than Sh8.
- Insert your prepared terminals into the connectors, based on the diagram provided. If your car does not have PTF, then these connectors will definitely be free.
Scheme
- Place the connectors back on the fuse block.
- Return the removed mounting block to its rightful place.
- The relay is mounted on the car body, and the relay ground must be installed under the mounting bolt used. Do not forget to thoroughly clean the contact area of paint before doing this, otherwise the grounding will not work properly.
- The power wires are connected to your fog lights from the purchased kit.
- In the immediate vicinity of the fog lights, it is necessary to connect the ground in a convenient, safe, protected place. Contact with the body of your car should be as reliable as possible. Otherwise, the headlights simply will not work or there will be problems with stability of operation.
- The installation of the fog lights themselves can be done by drilling holes in the metal insert. The optimal drilling location is near the mounting bolts that hold the bumper in place.
- Some models of bumpers, in addition to standard factory ones, provide in their design the presence of ready-made holes for mounting fog optics. To install them, use the brackets that must come with the PTF connection kit.
- Be sure to securely fix the fog lights so that they do not shake while driving.
- Many people make a big mistake by mounting fog lights directly on a plastic bumper. Because of this, at the slightest bumps, the headlights begin to shake, and you interfere with oncoming traffic. And the efficiency of the PTF with such an installation tends to zero.
The last stage of installing PTFs is to adjust them. Here it is better to trust the specialists, since correct adjustment of the glow requires a special stand, a flat area, knowledge of geometry and more. You can make the adjustment yourself, but it is quite difficult.
We recommend: Why the VAZ-2110 injector cooling fan does not turn on
There is practically nothing complicated about installing PTF on a VAZ 2109. If you purchase a kit and understand the device and connection diagram, then the procedure will take you literally a couple of hours.
PTF placement option
If you have no experience, but still have a desire to get fog lights for your own car, contact a good car service center. The optics will be installed there and adjusted immediately.
Choosing high-quality optics for the VAZ-2109
Modern headlights on the VAZ-2109 are very diverse, and it can be difficult to evaluate quality, appearance and their ratio to cost at the same time
It doesn’t matter which headlights you choose – the principles of choice are the same for everyone. To choose the right set of headlights, you should follow some tips:
When buying headlights, first of all pay attention to their appearance. Whether xenon or diode, the headlight should not “lobble”, its parts should be tightly fitted to each other; carefully check the tightness of the headlight
The sealant must be applied around the entire perimeter of the glass. If you find even the slightest omission, such a headlight is not suitable for use. If water gets in, a short circuit will most likely occur, and if the temperature changes, the headlight glass will fog up, worsening light emission. Similarly, headlights with deformed glass are not suitable for use - scratches, unevenness or even chips are unacceptable; Many car enthusiasts get carried away with tuning their car and do not notice that it significantly worsens safety. It is not advisable to choose headlights with tinted glass - a black film applied to them. Such headlights are practically invisible in the daytime, which can provoke a dangerous situation on the road; When choosing a manufacturer, be guided by what kind of headlights you want to purchase - standard or alternative. Standard headlights are made by Osvar. If you choose an unreliable manufacturer, the headlight may not be sealed tightly enough - in this case, the glass surface will often fog up.
For the most part, reliable headlights for the VAZ-2109 can be purchased within 10 thousand rubles for a set of front optics, and the price for rear lights varies from 1 to 4 thousand. Such a cost of headlights can really provide you with a quality purchase and a long time of use.
Detailed instructions for installing fog lights
If you decide to install fog lights on a VAZ, then first you should purchase the optics kit itself. As mentioned above, xenon can be installed in VAZ 2109 headlights with lenses; if you want to install it and connect it right away, then buy the appropriate kit. There is a huge variety of lens headlights on the market, so when buying lenses, pay attention to their build quality. They must be as durable and reliable as possible so that their operation does not cause problems later.
Replacement procedure
How to install and connect fog lights on a VAZ 2109?
The procedure is described using the example of a car with a high panel:
- First you need to mount and connect the foglight control button. If your “nine” is equipped with a high center console, then it already has space for mounting the corresponding button. If the panel is low, then this is also not a problem - it also has a corresponding place, to the right of the button for turning on the low beam and dimensions. Remove the grille located to the left of the steering wheel, after which you will gain access to the connector for turning on the PTF. The plug from the center console can be removed, and instead you need to install an optics control button that connects to the on-board network. Having done this, put the grille in place.
- Now you need to open the engine compartment and unscrew the mounting block. You need to bring the wiring from the PTF to it and connect it to the appropriate connectors. In addition, the wiring must go from the place where the relay will be installed to the block. Please note that the ground wire should not be touched.
- It is necessary to disconnect pins Ш7 and Ш8 from the block, which are located in close proximity to each other. It is necessary to install pre-prepared terminals into these connectors, using the diagram below. If you do not have fog lights, then these terminals should be free.
- Next, the block is put in place and the relay is installed; it can be installed on the car body. Mass is carried under the bolt. It should also be noted that before installation, the place where the contact will be must be thoroughly cleaned of paintwork, otherwise there will be no “ground”.
- After completing these steps, the power wires must be connected to the fog optics. The ground is connected, that is, the wire to the body, and it is desirable that the ground be as close as possible to the PTF, in a convenient and dry place. If the contact of the optics with the vehicle body is unreliable, this may lead to malfunctions of the headlights, and their overall functioning will be unstable.
- Now you need to install the fog lights themselves; to do this, you need to make the appropriate holes in the front bumper. It is best to drill near the bumper mounting screws. If there is a place in the bumper specially designated for these purposes, then PTFs are placed there. Ensure the best possible fixation of the optics on the bumper to prevent vibration and shaking. After everything is ready, all you have to do is adjust the light output.
1. Select a location to install the PTF control button.
2. Install the fog light relay in the engine compartment.
3. Connect the fog lights in accordance with the diagram.
We recommend: Replacing the Lada Xray engine (VAZ X-ray)
Types of lamps
All light bulbs that can be installed in the VAZ 2108, 2109 and 21099 are divided into 2 categories:
- How to independently improve the headlights on a VAZ-2114
- head lighting models. Placed on the front left and right headlights to illuminate the road ahead;
- additional lighting models. Represented by side lights, brake lights and other non-main light sources.
Types of automobile lamps
Ordinary incandescent light bulbs that are used in the VAZ 2109 are of the following types:
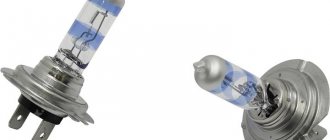
AKG 12-60/55 (60/55 W). They are halogen, equipped with 2 spirals for low and high lighting, and have an H4 base. Usually they light up in the headlights of a car. There are varieties on sale with a painted bulb (green, blue, yellow), however, when driving with them in rainy or foggy weather, such a bulb will only reduce visibility;
Car lamp AKG 12-60+55
- A 12-21-3 (21 W). One of the most popular headlights in VAZs. Installed in brake lights, turn signals, tail lights. There are different LED analogues for replacement;
- A 12-10 (10 W). Used on dimensions. Their analogues are SMD LEDs;
- A 12-4-1 (4 W). They are used in the left and right headlights, on side markers, and also to illuminate the storage compartment in the cabin;
- AC 12-5-1 (5 W). This model often lights up in the rear license plate lights of the car, as well as in the interior;
Automotive lamp A-12-5-1
A 12-5-2 (5 W). The model is used for left or right turn signals.
In addition to incandescent lamps, the VAZ 2109 widely uses LEDs as an advantageous replacement. LED lighting sources are several times more durable, shine brighter (while providing a cool glow), and are sold with various bases.
Replacing a side light bulb on a VAZ 2109
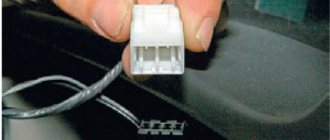
Headlight wires VAZ 2108, 2109, 21099
The headlights of VAZ 2108, 21081, 21083, 2109, 21091, 21093, 21099 cars are equipped with low/high beam headlight lamps, a marker lamp, and a turn indicator lamp.
Headlight wires VAZ 2108, 2109, 21099
Each of the headlight units is connected to two blocks (chips) of wires for these lamps. One main one is for the headlight itself, the other is additional for the turn signal section.
Pinout of headlight wires for VAZ 2108, 2109, 21099 cars and their modifications
Main wiring block
The shaped block (attached to the headlight in only one position) combines four wires. The pinout of the wires is as follows.
Right headlight
1 - Gray wire (+ for low beam). It comes from terminal “6” of block Ш5 (Х5) of the mounting block. Inside the headlight, a white wire continues in the lamp block.
2 - Green wire (+ for high beam). It comes from terminal “1” of block Ш5 (Х5) of the mounting block. Inside the headlight, the yellow wire continues in the lamp block.
3 - Black wire (common negative to the headlight). Mounts to the body next to the headlight. On cars up to 1998. The black wire to ground of the engine cooling system radiator fan switch sensor is connected to them. Inside the headlight, a black wire continues to the lamp socket.
4 - Yellow wire (+ to the side light bulb). Goes to pin “8” of block Ш6 (Х6). Inside the headlight, the blue wire continues to the side light lamp.
Left headlight
1 - Black-gray wire (+ for low beam). It comes from terminal “3” of block Ш5 (Х5) of the mounting block. Inside the headlight, a white wire continues in the lamp block.
2 - Black-green wire (+ for high beam). It comes from terminal “2” of block Ш5 (Х5) of the mounting block. Inside the headlight, the yellow wire continues in the lamp block.
3 - Black wire (common negative to the headlight). It is connected to the negative wire of the turn signal and mounted on the body next to the headlight.
4 - Yellow-black wire (+ to the parking light lamp). It comes from terminal “10” of block Ш6 (Х6). Inside the headlight, the blue wire continues to the side light lamp.
Additional wiring block
Square chip with a protrusion (inserted in one position only).
Right block headlight
Blue wire (+ to direction indicator). It comes from terminal “11” of the Ш6 (Х6) block of the mounting block.
Black wire (- to turn signal). It comes from the attachment point to the car body next to the headlight.
Left headlight
Black-blue wire (+ to turn signal). It comes from terminal “3” of the Ш6 (Х6) block of the mounting block.
Black wire (- to turn signal). It comes from the main headlight wiring block (then to the attachment point to the body next to the headlight).
Complete wiring diagrams for low/high beam headlights, side lights and turn signals
Connection diagram for direction indicators on VAZ 2108, 2109, 21099 cars Diagram for switching on the low and high beam headlights of VAZ 2108, 2109, 21099 cars Diagram for switching on external lighting (“dimensions”) for VAZ 2108, 2109, 21099 -
How the turn indicators for VAZ 21093 injector are connected
Notes and additions
The low and high beam headlights on VAZ 2108, 2109, 21099 cars and their modifications are turned on by the left steering column switch when the exterior lighting switch is on.
Lamp low/high beam halogen AK12-60+55 (H4)
Lamp size A12-4-1
Turn signal lamp A12-21-3
See “Lamps in the electrical equipment of the VAZ 21083 (21093, 21099)”.
Twokarburators VK - More information on the topic in our VKontakte group, on Facebook Twokarburators FS and on Odnoklassniki - Twokarburators OK
More articles on electrical equipment of VAZ 2108, 2109, 21099 cars
— Relay for low beam headlights of VAZ 2108, 2109, 21099 cars
— Relay of direction indicators for VAZ 2108, 2109, 21099 cars
— Turn signals of VAZ 2108, 2109, 21099 do not work
— Dimensions of VAZ 2108, 2109, 21099 do not light up, reasons
— The low or high beam headlights of VAZ 2108, 2109, 21099 do not light up, reasons
— Connection diagram for brake lights VAZ 2108, 2109, 21099
— Adjusting the headlights of VAZ 2108, 2109, 21099
— How to remove the headlight of VAZ 2108, 2109, 21099
— Headlights are dim, causes of malfunction
Tuning headlights for VAZ 2109
Every car enthusiast wants his equipment to become noticeable and original. You can upgrade any car, regardless of year and model. “Nine” is a popular car of the last century, produced by the Russian automobile industry. One of the reconstruction options is tuning the headlights on the VAZ 2109. The headlights on the VAZ 21099 and the headlights on the VAZ 2108 are the same.
Modernization of headlights
Car repairers believe that tuned headlights are more reliable than those installed at factories. Rework options:
- replacing standard optics with xenon;
- use of LEDs;
- covering lighting structures with tinted products.
Replacing lamps
Factory bulbs installed in a car do not last long. LED lamps have the following advantages over a conventional incandescent lamp:
- service life of at least 5 years;
- ergonomics;
- low power consumption;
- fast response.
At night, it is very important to have a good view of the road. Changing the optics often improves the light performance of devices
Xenon lamps are more powerful than diodes, but LED lamps are easy to maintain and have a low cost. Do not forget that unregulated xenon lamps emit a very powerful luminous flux. This can lead to a traffic accident, as the oncoming driver may be temporarily blinded by the bright light.
Painting
A common method of auto tuning is darkening the optics with a special varnish or painting. To complete the work you will need a can of black paint. Only materials with high temperature ratings are allowed. Regular paint will come off as a result of heating, and no tinting effect will remain.
The work is carried out in stages:
- The headlight is removed from the car.
- The optics are completely disassembled.
- Using a curved screwdriver, unscrew the screws that hold the headlight mask.
- The turn signal reflector is removed.
- The chrome paint is being cleaned off.
- Apply primer for plastic in three layers.
- After the primer has completely dried, paint is applied (auto mechanics recommend applying paint in 5 layers.)
- The structure is being assembled.
- The headlight glass is cleaned of old compounds.
- The glass is washed, wiped dry and treated with a degreaser.
- Black sealant is applied along the edges.
- The device is assembled and installed on the car.
- The connection is made to the circuit through the fuse block.
Film tinting
An inexpensive way to change the optics of a VAZ 2109 is to use a tint film. The result depends on the quality of the materials used. Good tint films have high light transmittance. This is an important indicator on which the lives of all road users depend. It is allowed to apply the film to the inner and outer surfaces of the headlight.
Making spectacular tuning on Lada Kalina: 5 steps to results
Applying a tinting film to the external surface is possible without removing the optics from the car. To do this, you need to prepare the surface: remove dust, dirt, the surface must be clean and dry. A notch is made and a piece of the required size is cut out. Soap and water are applied to the glass. The protective layer is removed from the film and applied to the headlight. The air is expelled. The surface is carefully wiped with a rag to remove any remaining liquid. This method is fast and simple. Even a car enthusiast who does not have special skills and knowledge can perform it.
The tinting film is easy to remove. But tuning VAZ 2109 headlights with film has its downsides:
- peeling of the material after some time;
- reducing the brightness of the emitted light;
- violation of traffic rules, which may result in a fine;
- Difficulties in passing technical inspection.
Rear foot improvement
Tuning the rear lights of the VAZ 2109 is simple. You can do this operation yourself or contact a specialized auto center. Modernization of rear stops is often necessary even for factory optics: contacts oxidize, lamps burn out. Several reconstruction options are possible:
Using LED overlays. LED strips can create a unique pattern and make a car stand out in traffic. Application of diode rings. LED strips will allow you to define the hind feet and make them more expressive. Tinting. You can tune car headlights using film or paint.
It is worth paying attention to the characteristics of the material: it must withstand high temperatures.
Changing the appearance of a car is an interesting activity. There are many types of tuning known
It is important to always remember that a car is a highly dangerous vehicle. The driver should always have a good view and lighting in the dark
General information about installing PTF on a VAZ-2109
To install fog lights on a VAZ-2109, you will need the following parts:
- wire with a cross section of 1.2 mm. sq. The wire must be long enough to extend from the fuse box to each headlight being installed;
- female terminal (wide) - 4 pcs;
- female terminal (narrow) - 1 pc.;
- terminal with a hole in the middle - 3 pcs;
- relay, block, wires;
- headlight activation button;
- two fog lights.
Automotive stores sell special kits for installing PTFs. The kits contain everything you need for successful installation and connection of headlights on a VAZ-2109.
If you couldn’t find a ready-made kit or like to do everything yourself, then you need to assemble the relay with a block and wires. There are four wires coming from the relay. Two power wires are crimped with wide female terminals. The remaining two are control contacts.
One of them is crimped with a narrow female terminal, the second with a hole - it makes a connection to ground.
The power group wires from the block to the headlight are crimped in this order: on one side there is a wide terminal, on the other there is a block for connecting to the PTF. The second wire in the block is the ground wire.
Video review of installing fog lights on a VAZ-2109:
Removing and replacing rear lights
- It is best to make the replacement before wiring problems begin.
- To work you need to remove the lights. On the VAZ 21099 it is hidden by a plastic decorative trim in the trunk.
- Now unscrew the fixing screws on the trim and remove them.
- Disconnect the block with wires and carefully remove it, being careful not to damage the board, because it sits tightly in place.
- Now, using a 10mm wrench, unscrew the 4 nuts securing the headlight housing. Remove the part from the machine. Now you can install the new part and calmly begin the replacement.
- The collection is done in reverse order (the author of the video is Automaniac1994).
Replacement of VAZ 2109 rear light boards
Comparison of xenon and diode headlights
The design of an LED headlight is much simpler than that of a xenon headlight, so low cost is added to the other advantages. Xenon lamps are a privilege of business-class cars, and despite their high light emission characteristics, their maintenance is very expensive. Just look at the cost of a separate ignition unit and control unit! In addition, when xenon headlights are on, they consume a huge amount of energy - when turned on at full power, they can drain the battery in just a few hours.
Xenon headlights
LED headlights have record low energy consumption. In addition, they are easy to install, lightweight and take up little space. A VAZ-2109 with diode headlights may not require maintenance for 10-15 years. In addition to all the advantages described above, LED headlights operate much faster than others. Considering all the positive qualities of LED lamps, in the future they are predicted to completely replace xenon and, especially, halogen headlights.
Now let's talk more about the process itself.
- the headlights need to be dismantled and then disassembled;
- then you should remove the additional reflector for the turn signal;
- remove chrome from the lamp with fine sandpaper;
- apply primer.
The primer must dry well; this will require waiting at least an hour. Special paint must be applied to the headlight in 2-3 layers, otherwise the paint may simply peel off. After this, it will take time again for the paint to dry completely, this will take about one hour.
Once the paint has dried well, you can completely assemble the rear optics. You need to approach the application of sealant with special responsibility. The old sealant must be completely removed, then the tail light must be degreased and the new sealant must be applied directly. This must be done carefully, since if the sealant is applied incorrectly, the headlight may fog up, which can lead to serious consequences.
In general, tuning headlights is not a particularly complicated process, but if you are afraid of making any mistakes, of course, you can buy tuning devices. However, the tuning process itself is interesting; every car enthusiast would like to do everything himself, putting his soul into this matter.
Tuning Far.VAZ 2109.
Sources
- ladaautos.ru/vaz-2109/poshagovyj-tyuning-far-vaz-2109.html
- infokuzov.ru/tuning/fary-vaz-2109
- okuzove.ru/kuzovnoj-tyuning/tyuning-far-vaz-2109-svoimi-rukami.html
- drive2.ru/b/518553324232900727/
Replacement process
The rear lights are attached to the body of a VAZ 21099, 2108 or 2109 car using 4 nuts. To dismantle the lighting system you will need:
- head at 8;
- extension.
The operating algorithm is as follows:
- To access the nuts, remove the 21099 luggage rack at the appropriate location (if the rack is installed).
- Disconnect the power plug that is attached to the board.
- Unscrew the 4 nuts using a wrench.
- When removing the last nut, hold the taillight outside to prevent it from falling and breaking.
- After removing all 4 nuts, remove the light.
When installing a new headlight on the rear of model 21099, do not forget to connect the wiring to ground, which is attached to one of the studs.
Step-by-step tuning of VAZ-2109 headlights
Are you the owner of a VAZ-2109 and want to perform headlight tuning yourself? You will learn further how to do this.
It is clear that any car owner wants to make his car special so that it is different and stands out among other cars, and it does not matter at all what brand of car we are talking about. And it is thanks to tuning that you can make your car unique
Now let's look at the nuances and elements of tuning VAZ-2109 headlights with our own hands.
If the appearance of the car is really important, then it is best to start tuning with optics. Headlights can fog up from the inside, which can also ruin the appearance of the car. This happens because the glass allows moisture to pass through, causing the contacts to oxidize and the lamp easily burns out.
Even if we take into account that this may not happen, in any case, due to fogging of the headlights, visibility on the road deteriorates, which increases the risk of an accident, therefore, tuned headlights are not just an external change, but also a necessity. For headlights and taillights, only two types of lamps are used:
- xenon;
- LED
In practice, LED lamps are most often chosen for taillights. And all because these devices are cheaper than xenon ones, but at the same time they are quite economical and quite durable. Here are the most basic advantages of LED lights for the VAZ-2109:
- Energy saving.
- Service life is about ten years.
- 2 times faster response than xenon.
But xenon lamps can only shine with high beam or only with low beam. In order for them to fully illuminate both the high beams and the low beams, you need to install bi-xenon there, and this is already quite expensive. If you prefer to drive at night, then, of course, it is better to install xenon lenses; they are mounted in different groups of sockets for car lamps.
To install such lenses, you will need to remove the outer glass, and then install the lens. But if you drive more often during daylight hours, then it is still better to install LED ones with an increased service life and good light. After listing all this, it seems that such headlights are the best option for a car, since they provide a sufficient amount of light. However, if you don’t want to change the front or rear lights, then it’s better to tune the ones you’re already using. If you still decide to change, then you need to be extremely careful so as not to fall for any kind of defect. A good-looking headlight does not mean high-quality work. The good news is that the rear lights on the VAZ-2109, unlike the front ones, can even be painted inside. Bringing this idea to life is quite simple.
How to install fog lights on a VAZ 2109?
So, the installation begins. To carry it out, you must first install the headlights in the intended location. After this, take the wire and connect it to the right fog lamp (positive terminal). Lead the wire into the engine compartment and connect it to the harness running under the radiator. Bring this to the left fog lamp of the VAZ 2109, and then make a connection with its lamp. Insulate all bare areas; for this it is best to use heat shrink.
Connection to standard mounting block 2109
Next, the wire must be brought to the installation site of the electromagnetic relay, whose normally open contacts serve to supply voltage to the fog lights of the VAZ 2109. The plus from the battery comes to one terminal through a 16 Ampere fuse, from the second it will be removed and go to the fog lights connected in parallel.
Two wires are connected to the contacts of the relay coil: one immediately to ground, and the second lead to the button in the cabin. Now all that remains is to supply negative power to both fog lights of the VAZ 2109, and apply positive power to the second contact of the button from the ignition switch (to prevent the fog lights from turning on when the ignition is off).
PTF connection - diagram for any car
Now I would also like to make a visual notification about the inclusion of fog lights on the VAZ 2109 on the dashboard. Unfortunately, not all modifications have an indicator lamp built into the panels. But you can cheat - if you have a carburetor, and there is a lamp indicating an engine error, then you can use it (as an option - a seat belt indicator).
This lamp must be connected to the break in the wire going to the ignition switch. You will get a closed circuit, but if the indicator lamp or relay coil fails, the fog lights on the VAZ 2109 will not turn on.
Choosing fog lights
Fog lamps on the VAZ-2109 are represented by models from several manufacturers. The highest quality and brightest are fog lights from Osram and Philips. Such headlights provide increased light output, have a long service life and are considered the best.
VAZ 2109 with fog lights
If you want to focus not so much on the brightness of your fog lights, but on their long-term service, feel free to choose the Philips EcoVision model. This model has an ideal price-quality ratio and is rightfully called the optimal choice in the class of fog lights for the VAZ-2109. Chinese fog lights have one advantage - low cost, but their build quality leaves much to be desired.
Remember that when choosing headlights for your car, you are responsible not only for your safety on the road, but also for the health and lives of other road users.
Features and design of PTF
Conventional headlights on the VAZ 21099 in bad weather work in such a way that they reflect light from raindrops or grains of snow, as a result of which the rays fall directly into the driver’s eyes. This, in turn, contributes to the deterioration of the visibility of the road surface. If we talk about PTFs, their design is somewhat different. Fog lights on the VAZ 2109, in accordance with the diagram, should be located close to the road surface, since fog does not fall on the asphalt. As a result, it turns out that the fog lights of the VAZ 2109 shine as if under fog, forming a flat beam of illumination, thus illuminating exactly the required section of the road.
PTF kit for domestic nine
We recommend: What kind of wheels does the KIA Sorento have?
Fog lights on the VAZ 2109 with or without xenon are placed in a symmetrical manner, necessarily below the main optics. That is, the headlights on the VAZ 2109 should be higher in any case. The distance of the PTF from the road surface should be 25 cm, and from the dimensions and turns the distance should be at least 40 cm. If you decide to install lensed PTF with or without xenon, these requirements should be taken into account. According to some car enthusiasts, installing xenon in the lenses of daytime running lights will replace fog lights, but this is a wrong opinion.
In order for PTFs with lenses to shine normally, they must be correctly adjusted. Please note that if the angle of the lights is too small, their use will be pointless. Moreover, such an adjustment can cause inconvenience to drivers of oncoming cars. As for lighting, it should be either yellow or white, which is why many car owners install xenon in their lenses. The use of red, green or blue light bulbs in PTF is not allowed, since their efficiency is minimal (the author of the video is the Kakto SO channel).