Careful disassembly of unfamiliar components and assemblies is the key to trouble-free assembly. In practice, it is not always possible to keep track of all the subtleties and nuances. Fortunately, the constant velocity joint cannot be called an overly complex unit, therefore, after reading our article and watching the accompanying videos, you will know how to assemble the inner CV joint.
In modern cars, only 2 types of designs are used for internal CV joints.
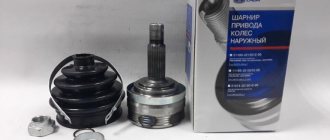
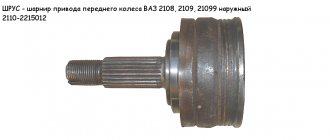
- “Retseppa” is used in the vast majority of external grenades, and on some cars as an internal CV joint (for example, Volkswagen Transporter T4). The unit consists of the following parts: a housing with a splined part that fits into the wheel hub, a separator, a race, balls and a retaining ring.
- “Tripod” is a three-pin joint that works in relatively small angles (up to 25º). Nevertheless, this is quite enough to compensate for suspension travel, displacement of the power unit and gearbox in turns, when driving over uneven surfaces, which is why the Tripod is most often used for the manufacture of internal CV joints. Structurally, it consists of a body in which running tracks are machined, a hinge with rollers and a locking ring.
Rzeppa
As an example, let's take the internal velocity joint of the VW Transporter T4. In order to assemble a ball CV joint, you need:
- fix the drive shaft in a vice;
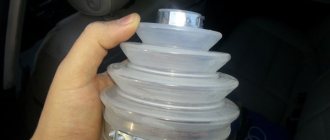
- put a boot with a metal shield on the shaft;
- install a limiting ring;
- the housing with the separator and inner race can be assembled separately. It is necessary to put the separator on the holder and place it inside the housing. Then, turning out the cage and separator, insert one ball at a time. The video shows the assembly process of a CV joint fixed in a vice. Initially, a race, separator and housing are put on the drive shaft. Then, as in the previous case, balls are inserted into the grooves one by one.
Tripod
It is much easier to assemble a tripod-type CV joint. All you need is:
- install the boot on the drive shaft in advance;
- place a hinge with rollers on the slots;
- fix the hinge by installing a retaining ring (there is a groove for it on the drive shaft);
- generously lubricate all rubbing pairs;
- install the housing;
- fix the anthers;
- manually develop the mechanism by making several turns in different directions.
For a visual representation, we suggest watching a video of the assembly of the outer and inner CV joints.
Important points when replacing
Useful tips that will not only help you assemble the inner CV joint correctly, but also extend the life of the joints and angular velocities in general.
- If you notice a torn boot in time and the CV joint has not yet begun to crunch before disassembly, you can get by by washing the unit and replacing the lubricant.
- Litol, grease or graphite grease cannot be used as a lubricant. Only special grease for CV joints is acceptable.
- If you disassembled the old CV joint to wash it and replace the lubricant, mark the location of the race and separator relative to the body. When removing the balls, arrange them so that you can then install them in their original places.
- Gasoline, a small brush and clean rags work well for washing.
- Factory crimp clamps are considered disposable. If you reinstall them, be prepared for the fact that when the wheel is turned out (especially in cold weather), the boot may come off. As a result, installing a new one or washing an old grenade will go down the drain. You can crimp such clamps with thin pliers.
Tags: problems with gearbox
Comments 72
guys, help me, I bought a new wheel drive shaft, installed everything on the VAZ2109 as the book says. But when I left and drove a couple of kilometers, at a small jump, the inner CV joint fell out. And I can’t turn it on. not a single transmission. What could be the reason... Thanks in advance
Thank you guys everyone, I'm very tired, I'm going to bed. I'll try again tomorrow
the main thing is not to lose heart =) everything will be fixed!
where can it get away from us! It’s just that today was my last day off (I was on sick leave) and the car is in a friend’s garage! and he needs it too!
Tomorrow I’ll take a look at my place and write back to you =) don’t stress yourself out too much - everything is fine there. Tomorrow let me know what you can do with the measurements and samples that I wrote to you =)
Thanks again everyone! Today I bought a new retaining ring, washed the flange on the grenade, sharpened it with a file and imagine it sat down! hooray! WE ALL WON! What would I do without you all!
The main task during assembly is to ensure that the holes inside these same gears are opposite the holes in the gearbox housing. this will be immediately clear - the slots will be visible upon inspection, or by touch with your hand.
in general: picture - www.mkad86.ru/acat/data/vaz/2109/v410.gif on it there is an axis drawn in the center, there are two gears on it (one is drawn at the bottom). they will not go anywhere, they will remain there. You insert the axle shafts into the gears (part number -2108-2303050) - so they can turn over, but they won’t fall apart.
I split my body like that...
I don’t even understand... in general, you can’t take out two drives, this is how you do it: take one out, put a chopper in its place... and then remove the other drive. Reassemble in the reverse order... If you don’t do this, then screw it... the differential simply falls apart
tough! well you're scary
there is a closed system of gears that are not supported by anything except the grenade shafts, you take out both grenades and it all falls apart...
Actually, there is a satellite axis there; they transmit torque from the differential gear to the gears that are fixed on the axle shafts. only these gears can turn there (indicated by the number 5 in the figure above). and nothing falls apart there.
you are right! They sell new boxes without choppers!
That's what I'm talking about. just before installing the axle shafts you have to set the satellites
Actually, there is a satellite axis there; they transmit torque from the differential gear to the gears that are fixed on the axle shafts. only these gears can turn there (indicated by the number 5 in the figure above). and nothing falls apart there.
oh well... the gear into which the CV joint goes is displaced
look below, I posted a picture there and explained everything
there is a closed system of gears that are not supported by anything except the grenade shafts, you take out both grenades and it all falls apart...
Nothing is falling apart anywhere. Grandfathers' tales from garages. Where did the chopsticks come from in the box?
I don’t even understand... in general, you can’t take out two drives, this is how you do it: take one out, put a chopper in its place... and then remove the other drive. Reassemble in the reverse order... If you don’t do this, then screw it... the differential simply falls apart
I removed and disassembled the box many times... the main thing is just to know that you need to set the satellites before installing the grenades. and the differential will fall apart if the grenades are loaded and hit with force =)
I didn’t know this! first chisel in my life!
I removed and disassembled the box many times... the main thing is just to know that you need to set the satellites before installing the grenades. and the differential will fall apart if the grenades are loaded and hit with force =)
it depends on the tension, it is quite possible that the gears moved freely...
How many times did I take it off, it was inserted immediately and easily! Usually it flies with acceleration! no problem! I trimmed the splines once! The non-hot metal can be removed very easily!
thanks, I'll try tomorrow
It’s hard to understand, but the first thing that comes to mind is: the satellite has fallen, you can’t remove both grenades
did you have a transmission without both drives?
yes but I put 1
When you initially installed it, were there any plugs there?
no bare box from repair! what kind of plugs could there be?
did you have a transmission without both drives?
he completely removed it and disassembled it. but one drive has already climbed in, and the second one doesn’t want to go all the way =(
look, maybe something got inside - they usually insert a piece of wood to prevent the satellites from moving away from the right places.
what kind of satellites?! I'm a boxed tree!
The pinions are gears inside the differential itself. they have holes with slots for grenades. dic.academic.ru/pictures/ntes/071-2.jpg in the figure they are indicated by numbers 4 and 5. you insert the grenades into the satellites with the number 5. They are fixed with pieces of wood, because they can turn. PS picture of the differential from the rear axle, but the principle is the same
it turns out that it is inserted into the satellites but not completely, the metal boot on the drive does not fit into the smelting box
In theory, there is a groove on the box into which this boot fits. to find out whether a grenade has landed or not, you pull it to the sides: if it doesn’t sit down, it will jump out immediately.
it holds, but not significantly (although it was possible to remove it only with a pry bar or a few blows of a hammer)
does she enter with effort? or easy? It should go in easily until it hits the ring. there's already blows to kill her
goes in easily, the second one went in easily too, but I felt like it was latched
then it sits down completely, if the click is heard and is reached by the assembly tool.
If nothing changes, then try swapping the internal grenades: stick the one that fits in instead of the one that doesn’t want to - this way you’ll find out what the reason is: either there are slots on the grenade or in the differential.
The pinions are gears inside the differential itself. they have holes with slots for grenades. dic.academic.ru/pictures/ntes/071-2.jpg in the figure they are indicated by numbers 4 and 5. you insert the grenades into the satellites with the number 5. They are fixed with pieces of wood, because they can turn. PS picture of the differential from the rear axle, but the principle is the same
Yes, you’re right about the stick. So it’s all clear) photos from the classics?
When to replace
In order for this part to work long enough, sand, dirt and dust should not get into it. Contamination significantly accelerates wear and reduces the service life of the unit. But to protect against this, a boot is provided, which can become unusable relatively quickly. Therefore, timely replacement of the boot will keep the CV joint in working condition for a long time.
The wear of the CV joint is indicated by a noticeable crunch and extraneous sounds when turning the steering wheel. In this case, it is recommended to replace the unit.
Removing the drive, boot and CV joint
To replace the outer CV joint, follow the following procedure:
- We place the car on the inspection hole and support it with wheel chocks.
- Using a 30mm socket, loosen the hub nut. If the nut does not break off, then you can extend the key with a pipe.
- Raise the car with a jack in the right place and remove the wheel.
- We unscrew the bolts securing the ball joint of the lower arm to the hub.
- We squeeze out the tie rod end with a puller.
- Unscrew the drive shaft nut completely.
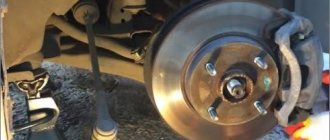
- We pull out the hub by grasping the brake disc and pulling the shock absorber strut towards us.
To change the boot and hinge, you will have to climb into the inspection hole. To remove the CV joint, remove the clamps that hold the boot. Next, we get rid of the old boot, which is easier to do with a knife. Use a rag to remove grease from the hinge. Then you need to knock down the inner race, for which we lightly hit the attachment with a hammer, which must be rested against the end of the hinge. Next, we thoroughly clean the CV joint from dirt, sand, dust and grease.
What is a grenade?
A grenade is the colloquial name for a constant velocity joint, which allows motion to be transmitted from the vehicle's gearbox to the wheels. Pay attention to the design of the car's drive. From the gearbox, consisting of shafts and a differential, there are two rods, at the ends of which there are moving elements (CV joints). They allow movement to be transmitted to wheels that are lower than the differential axis.
It is with the help of movable hinges that it is possible to realize the rotation of the front wheels. Essentially, this is a kind of crosspiece that is installed on the cardan shafts. But the grenade is much stronger and more durable. Why a grenade? Yes, it’s just that this element is very similar to this projectile and nothing more. Consists of three parts - outer and inner cages, balls between them. A special lubricant is pressed inside.
Build process
When assembling the outer CV joint, you must perform the following steps:
- We put a rubber part on the shaft.
- We stuff the CV joint (new or cleaned) onto the shaft until the part is secured with a retaining ring.
- We place fresh lubricant in the hinge and boot.
- We put the boot on the outer race.
- We remove excess air from the boot by pressing it with your hand.
- We secure the boot with clamps.
Then the drive is put in place, the hub is clamped with a nut. It is also necessary to put back the tie rod end, support and wheel. Next, you can lower the jack and tighten the nut securing the drive. To prevent it from unscrewing on its own, the nut should be capped.
Features of repairing the internal CV joint
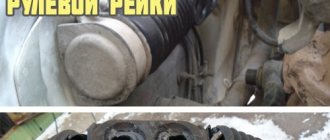
To replace the inner CV joint, it is necessary to completely remove the drive, for which the outer joint is first disconnected without subsequent dismantling. Next, using a pry bar, remove the hinge end from the gearbox. To do this, we insert the flat part of the tool between the outer frame and the box, and then move it like a lever.
Further, the procedure for replacing the unit will be similar to the actions when repairing the external hinge. The inner CV joint must be correctly inserted into the transmission. It is recommended to insert the part into the hub, with the help of which the unit is brought into place by pushing movements. But it is also possible to drive the already assembled shaft with a mallet or a wooden pointer and a hammer. The hinge must be secured with a locking ring.
At the final stage, all removed parts are installed back. At this point, the replacement of CV joints is considered completed.
If you find an error, please select a piece of text and press Ctrl+Enter.
Procedure for replacing outer CV joint
It is much more convenient to work with the drive (half shaft) when it is removed and secured on a workbench in a vice. But you don’t have to perform unnecessary operations to dismantle and drain the oil from the gearbox by removing the outer grenade directly under the car, working from below or in the wing arch.
Without removing the axle shaft
The complexity of the task lies in the fact that when knocking down the outer CV joint, it is important not to transfer unnecessary forces through the shaft to the inner one. It may sort itself out or pop out of the box. Therefore, you need to act carefully, preferably together with an assistant:
- the bolts or nuts of the wheel fastenings are loosened, as well as the nut that tightens the wheel bearing;
- the machine is jacked up from the desired side and secured on a reliable stand;
- the wheel is removed, the hub nut is unscrewed;
- further actions may differ depending on the car model, but in the most common case of MacPherson type suspension, it is necessary to disconnect the steering knuckle from the ball joint with the lever or braces, for which the ball joint pin is uncoupled or its body is unscrewed from the lever;
- the stand is moved to the side, while the shank of the outer CV joint comes out of the splined connection of the hub;
- The clamps and cover are removed from the grenade boot, excess lubricant is removed, which interferes with working with the inner race;
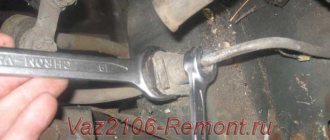
- the most crucial moment is to hold the shaft and apply a sharp blow with a heavy hammer through the spacer to the end of the inner race; if done correctly, the grenade will move along the splines or even separate from the drive;
- The boot, clamps, nut, CV joint assembly and retaining spring ring must be replaced, usually all this is included in the repair kit along with a tube of special lubricant; ordinary multi-purpose lubricant is not suitable here;
- first of all, a new boot is installed on the shaft;
- a new lubricated hinge is put on the shaft and moves with a sharp movement until the locking ring clicks; sometimes you have to apply a light blow to the end of the shank, protecting it from deformation with the old nut;
- The suspension is assembled in the reverse order, the hub nut is tightened according to the repair documentation for the specific machine.
It will be useful to also change the boot of the inner CV joint while the outer one is removed. The resource of the unit fundamentally depends on the condition of the covers.
With axle shaft removed
Removing the drive assembly is useful for greater ease of operation, especially in severe cases of a stuck retaining ring. Usually, this will require draining the oil or part of it from the gearbox, not forgetting to fill it back in, or even better, combine the procedure with an oil change.
The drive in the box is held by a similar retaining spring ring of circular cross-section, which is compressed after a sharp blow to the outer race of the hinge through a spacer.
Sometimes it is possible to press out the drive with a pry bar. Removing the hinges from the shaft is carried out in a vice similar to the procedure already described.
Do not try to pull the axle shaft by the shaft. This will end with self-disassembly of the internal hinge; the thrust ring present there will not withstand it.
Assembling the inner CV joint
Careful disassembly of unfamiliar components and assemblies is the key to trouble-free assembly. In practice, it is not always possible to keep track of all the subtleties and nuances. Fortunately, the constant velocity joint cannot be called an overly complex unit, therefore, after reading our article and watching the accompanying videos, you will know how to assemble the inner CV joint.
In modern cars, only 2 types of designs are used for internal CV joints.
- “Receiver” - used in the vast majority of external grenades, and on some cars as an internal CV joint (for example, Volkswagen Transporter T4). The unit consists of the following parts: a housing with a splined part that fits into the wheel hub, a separator, a race, balls and a retaining ring.
- “Tripod” is a three-pin joint that works in relatively small angles (up to 25º). Nevertheless, this is quite enough to compensate for suspension travel, displacement of the power unit and gearbox in turns, when driving over uneven surfaces, which is why the Tripod is most often used for the manufacture of internal CV joints. Structurally, it consists of a body in which running tracks are machined, a hinge with rollers and a locking ring.
Rzeppa
As an example, let's take the internal velocity joint of the VW Transporter T4. In order to assemble a ball CV joint, you need:
- fix the drive shaft in a vice;
- put a boot with a metal shield on the shaft;
- install a limiting ring;
- the housing with the separator and inner race can be assembled separately. It is necessary to put the separator on the holder and place it inside the housing. Then, turning out the cage and separator, insert one ball at a time. The video shows the assembly process of a CV joint fixed in a vice. Initially, a race, separator and housing are put on the drive shaft. Then, as in the previous case, balls are inserted into the grooves one by one.
Tripod
It is much easier to assemble a tripod-type CV joint. All you need is:
- install the boot on the drive shaft in advance;
- place a hinge with rollers on the slots;
- fix the hinge by installing a retaining ring (there is a groove for it on the drive shaft);
- generously lubricate all rubbing pairs;
- install the housing;
- fix the anthers;
- manually develop the mechanism by making several turns in different directions.
For a visual representation, we suggest watching a video of the assembly of the outer and inner CV joints.
Important points when replacing
Useful tips that will not only help you assemble the inner CV joint correctly, but also extend the life of the joints and angular velocities in general.
- If you notice a torn boot in time and the CV joint has not yet begun to crunch before disassembly, you can get by by washing the unit and replacing the lubricant.
- Litol, grease or graphite grease cannot be used as a lubricant. Only special grease for CV joints is acceptable.
- If you disassembled the old CV joint to wash it and replace the lubricant, mark the location of the race and separator relative to the body. When removing the balls, arrange them so that you can then install them in their original places.
- Gasoline, a small brush and clean rags work well for washing.
- Factory crimp clamps are considered disposable. If you reinstall them, be prepared for the fact that when the wheel is turned out (especially in cold weather), the boot may come off. As a result, installing a new one or washing an old grenade will go down the drain. You can crimp such clamps with thin pliers.
It is most convenient to compress and release retaining rings with special pliers. Without them, assembly and disassembly may require more time and nerves.
Types of CV joints
Based on their location on the drive, hinges are divided into external and internal. The division is not purely geometric; the nature of the operation of these CV joints is very different, which is why they are constructed differently.
If the external one is almost always a six-ball “grenade” of impressive size, then the internal ones are often a three-pin joint of the “tripoid” type with needle bearings.
An example of the operation of an outer CV joint.
How does the internal CV joint work?
But such differences have little effect on the replacement method; the insides of the CV joint will not affect the progress of work. The presence of balls will require greater care; they can easily be lost if handled carelessly.
Replacement of outer and inner CV joints on VAZ 2110, VAZ 2111, VAZ 2112
Welcome! CV joint - Constant Angular Velocity Joint, thanks to it, all the moment that comes from the engine to the box is transmitted to the front wheels, this part is used exclusively in front-wheel drive cars (or all-wheel drive), but if the car is equipped with rear-wheel drive, then instead of this part they install a driveshaft, by the way, it performs the same function as a CV joint, namely, it transmits torque from the gearbox to the wheels. Because of the CV joint, they could not start producing front-wheel drive cars for a long time (in the beginning, all were rear-wheel drive), because it was difficult to implement and simply no one had invented it at that time, and therefore front-wheel drive on cars was not practiced at first.
Note! To replace the outer and inner CV joints, you will need: Firstly, you will need special pliers with which to install the protective covers on the clamps. If you don’t have such pliers and you are not going to buy them, then instead of them you can use thin sliding pliers, and also pliers, thanks to which the retaining rings you can remove it, you will need it, as well as CV joint lubricant (Be sure to stock up, don’t even start work without it, if you don’t find just such a lubricant, then look for something like it, no matter what the name is, the main thing is that it is suitable for lubrication of CV joints), a new boot will be you need (But this is if yours is torn, if your boot is in normal condition, then you don’t need to take a new one) and a new retaining ring of the inner CV joint (It is definitely needed) and thrust rings, too, and be sure to have a new hub nut!
Replacing the inner CV joint
The operation is completely similar to removing the outer hinge, but here you cannot do without removing the axle shaft. There are designs where the drive is bolted to the box flange, for example, as in the Audi A6 C5. In this case, there is no need to drain the oil.
Unlike the outer one, the tripoid inner CV joint is easily disassembled, which provides access to the retaining ring. But it still compresses in the same way, with sharp blows on the inner race when the drive is secured in a vice.
There are differences in the installation of the boot - the internal hinge allows longitudinal movement, so its cover must be secured taking into account the distance recommended by the factory from the end of the shaft. This is necessary for proper operation of the boot when moving the hinge between extreme positions along the length.
How to replace the outer and inner CV joints on a VAZ 2110-VAZ 2112?
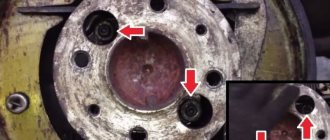
Removal: 1) It doesn’t take that long to change the CV joint, but it’s just a very painstaking job that requires not only removing the CV joint itself, but also the wheels and disconnecting the ball joint, and many other small operations will have to be done, but you will need to start first with draining oil from the box, this is done so that when you get ready to remove the CV joint, the oil does not leak out of the box, but you carefully drain it yourself (For information on how to do this, read the article: “Changing the oil in the box on a VAZ”) , then remove the crankcase protection if it is present on your car (It will just get in the way) and then unscrew the hub nut a little (It is indicated by a red arrow, but only use a screwdriver to open the collars that will not allow it to be unscrewed and also do not forget to remove the plastic cover , which closes this nut from dirt getting into it), and then remove the wheel itself from the car, but just remember which side you are going to change the CV joint, and remove the wheel from the car from that side (For information on how to remove a wheel, read in article: “Correctly replacing a wheel on a car”).
2) When you’re done with the wheel, move to the top of the car and loosen the three nuts that secure the strut to the cup (Indicated by arrows), but don’t unscrew, just loosen two or three turns (If necessary, loosen more), then unscrew completely two bolts that secure the ball joint to the steering knuckle (see small photo) and once the work is done, unscrew the hub nut completely and remove the washer located behind it (Don’t lose it, by the way, it’s very convenient to pry it off with a magnetic screwdriver), and finally Turn the steering wheel all the way to the right or left.
Note! The steering wheel must be turned to the right if you are going to remove the CV joints on the left side (Look as the car is moving), and to the left if you are going to remove and change the CV joints on the right side!
3) Next, remove the brake hose (Be careful not to stretch it too much, otherwise it will break) from the bracket on the rack (see small photo below) and carefully pull out the part of the rack as shown in the large picture, At the same time, also remove the splined part of the outer CV joint (indicated by the red arrow) from the hole in the hub, pulling, as we have already said for this, part of the strut (it is most convenient to pull it by the brake disc, it is indicated by the blue arrow) towards you and lower the outer joint in such a way, so that it lies on the lever and no longer enters the hole in which it was previously located.
4) As soon as the splined part of the outer CV joint is removed from the hub, remove the inner part in exactly the same way, but although it is not even approximately removed in the same way, in general, to remove the inner part from the hole in the gearbox into which it fits, take a mounting blade , a thick chisel or something similar and insert it (the chisel is indicated by a blue arrow for clarity) between the inner CV joint and the box, thereby using the mounting blade or chisel as a lever, ensure that the splined part of the inner joint comes out of the hole in the box, but only be careful not to damage the oil seal, otherwise you will have to replace it with a new one, although if you want, inspect the oil seal just in case; if possible, if it is deformed (if there is a new one nearby), replace it with a new one.
Note! Remove the drive (this is the correct name for a design with two CV joints) through the bottom of the car in the inspection ditch, as shown in the photo below:
Installation: 1. The drive is installed in the reverse order of removal; if necessary, the outer and inner CV joints are removed from it and replaced separately with new ones, but in this article we will not tell you how to do it, because on our website there is already such an article dedicated to the outer and internal CV joint, and it is called: “Repairing the wheel drive and replacing both CV joints on a car,” so if you need to replace them separately or disassemble them, for example, then study that article in detail, but we will return to the topic again and tell you how to do it installing the drive in its place, this is not so difficult to do, to do this you will first need to change the retaining ring (Indicated by the green arrow) of the inner CV joint with a new one, after replacing, apply grease to the spline (Indicated by the red arrow) and on the smooth surface of the shank (Indicated by the red arrow) blue arrow).
2. Now you can insert the shank of the inner CV joint into the box, but just be careful not to damage the oil seal and by the way, when installing the inner CV joint, make sure that the retaining ring with the gap upwards is directed, as soon as the inner CV joint is inserted, make sure that it does not fly out and that the retaining ring holds it, well, do all further work in the reverse order of removal and do not forget to replace the hub nut with a new one, because you cannot re-tighten the old one and do not forget to lock the new one by the way.
Note! We would like to add one more thing, in order to drive the inner CV joint all the way (it just happens that it goes in very hard and not all the way), you will need to hammer it through the outer one, this is done in this way, take a hammer and a wooden plank (You can replace the plank with any other object take one in which you are sure that it will not lead to deformation of the outer CV joint) and through it (in the photo, instead of a wooden plank, another object is taken, as you have already noticed) the outer CV joint is driven inwards, thereby the inner one enters the gearbox all the way, but Just don't overdo it and don't deform the box!
Replacing the outer CV joint
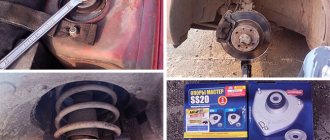
An experienced car owner with practical skills will not encounter any problems when taking on the task of replacing the outer CV joint. The list of tools necessary to carry out the “operation” has already been presented above. In addition to tools and supplies, there are a few other things worth doing. Before removing the wheel, drain a little oil from the gearbox - this will make it easier to work with. You will also need a pry bar - it will serve as a lever when removing the drive shaft.
Let's assume that the problem is on the right. Replacing the right CV joint begins with removing the wheel. We unscrew the hub nut, remove the brake disc, caliper, ball joint and steering tip. We take a pry bar or crowbar and remove the splined drive shaft. Using light blows of a hammer (a support, such as a wooden block, will come in handy), we knock out the outer hinge. Next we perform the following steps:
- It is necessary to remove the hub nut and tear off the wheel bolts. We put stops under the rear wheels.
- We jack up the car, hang it up and then remove the wheel.
- Remove the bolts holding the steering knuckle to the ball joint.
- Turn the steering wheel all the way. Pulling back the steering knuckle, we pull out the outer half of the hub along with the old CV joint. If the grenade does not budge, hit it lightly with a hammer.
- We remove the old boot and clamps and throw them in the trash.
- We remove the CV joint with hammer blows, rotating it along the axle shaft.
- We fix the installed new hinges in the hub together with the boot.
Replacing the left CV joint is carried out in the same way. When returning parts to their place, the above procedures should be done in reverse order. When knocking down a CV joint with a hammer, hit it clearly - some models are equipped with an ABS ring, which does not like strong blows to it. Don't forget to add gearbox oil. When installing the wheels back, be extremely careful to avoid falling apart.