Minimum and maximum coolant volume
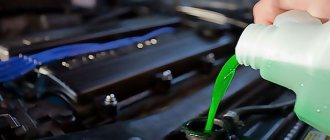
One of the main questions of car owners is: how many liters of antifreeze should I fill? According to the official technical documentation for Russian-made Lada Priora cars, the required volume of antifreeze is 7.84 liters. For full operation of the power unit, you can fill 6 liters each; this option is suitable for the winter period. However, it is best not to deviate from the regulations and fill in the required amount of liquid so that no problems arise.
Each antifreeze is divided into classifications, and it can be distinguished even by color if there is no label, for example. So, in our country, red antifreeze is predominantly poured - the so-called carboxylate. Regardless of the type, it is important to know how many liters of antifreeze to fill and follow this rule.
Article number and cost of antifreeze for Priora
According to factory standards, coolant of different brands cannot be mixed in Lada Priora. The Lada-A40 brand is suitable for Priora, its catalog number is: 88888100005082. The cost of the liquid is approximately 550 RUR. rub. for 5kg. There is also a list of acceptable liquids:
- Antifreeze G-48;
- Macra Cool Stream liquid Standard/Premium;
- 2 types OZh-40 Tosol-TS/OZh-65 Tosol-TS.
OZH-K Tosol-TS;
What types of car malfunctions can occur due to antifreeze?
When the coolant begins to drain, the owner of the Lada Priora should think about why this is happening. Antifreeze leaks often occur due to mechanical damage to the cooling system. In the worst case scenario, the engine overheats and the cylinder head gasket burns out.
The car owner noticed that antifreeze was constantly flowing, reasons:
- Leak between block and cylinder head. In this case, you can tighten the bolts better.
- When the radiator is damaged. You can try to replace it, but there are times when only repairs are required.
- The water pump has become unusable. The situation can be corrected by replacing the pump.
- The pipes are damaged. Initially, you need to tighten the clamps; if the problem does not go away, you can replace the hoses and pipes with new ones.
- The expansion tank of the automobile cooling system is damaged. There is only one option - replace the tank.
- Malfunctions can also be short-term in nature:
- There is scale on the cooling jacket; it can also be seen on the pipes and on the walls of the radiator. Flushing the system will help. Next, fill in new high-quality coolant.
- The existing antifreeze circulates poorly through the system. In certain cases, the pump, and in some cases the entire water pump, needs to be replaced.
- When the car owner first notices a low coolant level, he needs to top it up to the level. If the leak becomes regular, the system needs to be checked for leaks.
Operating temperature of the Lada Priora engine 8 and 16 valves characteristics
A car engine is equipped with a cooling system that contains liquid. The temperature of this liquid is measured by a sensor. This value that it records is the engine operating temperature (ERT). The data recorded by the sensor is displayed on the dashboard. The average operating temperature of a Priora car engine is 95 degrees. This indicator is optimal when the car is moving at a speed of approximately 70-80 km/h and provided that the ambient temperature is not higher than +20 degrees. When the liquid heats up to 100 degrees, the fan turns on, which is designed for additional cooling. With such indicators, it is time to say that the power plant of the machine is functioning without failures. In winter and summer, the RTD may be different. Which RTD is considered optimal for this car? The average is 85-90 degrees.
If the fan does not turn on
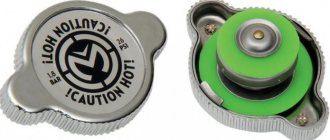
If the RTD has risen to 100 degrees and the indicator needle has entered the red part of the scale, this indicates overheating. Perhaps this phenomenon occurred due to the fact that the fan did not work. If you find that when it overheats, the fan does not start working and the temperature does not drop, you need to check the serviceability of the fan itself. It is necessary to determine whether the switch-on sensor is triggered when the normal RTD is exceeded? First, start the engine and disconnect the wires from the temperature sensor that is installed on the engine. When the wires are disconnected, forced cooling should work. If this does not happen, most likely the fault lies in the electric motor of the device. How to check the operation of the fan, watch the video.
If the fan turns on after disconnecting the wires, it means there is a problem with the fan switch sensor. Perhaps it incorrectly perceives data about the RTD and therefore does not operate at the right time.
This malfunction is quite easy to fix: you just need to replace the sensor. After replacing it, check if the fan turns on. To do this, start the engine. When the RTD reaches normal levels, do not turn off the engine until the temperature exceeds the norm. As soon as this happens, the fan should be activated. If the fan operates at a temperature above 97 degrees, but less than 100 degrees, then the system is functioning properly.
Temperature sensor malfunction
The reason that the liquid in the cooling system, which serves as an air conditioner for the car's power plant, does not heat up or overheats is due to the failure of the temperature sensor.
Often signs of such a malfunction are:
- Stopping the flow of warm air into the car interior, which occurs due to the cessation of fluid flow into the heater.
- Dark, almost black smoke comes out of the exhaust pipe. This indicates engine detonation, which was a result of overheating.
- Engine power drops sharply.
Many drivers quickly stop the car when it overheats and turn off the engine. In fact, an immediate stop of the machine is required only if the tightness of the system is broken and liquid pours out of it. In other situations, the driver must perform the following actions:
- turn on the heating to maximum so that the fluid temperature drops and the engine cools down quickly;
- drive smoothly to the side of the road;
- Let the engine idle for 2-3 minutes with the heating system on.
After this, the engine must be turned off and allowed to cool for 20 minutes. After this, you need to measure the fluid level in the cooling system and add it if necessary. Immediately after the engine is turned off, you cannot open the radiator cap, as you can get burned from contact with the liquid. If the fluid level is normal, then the cause of overheating must be determined by diagnostics. To do this you will have to visit a car service center.
Details about mixing antifreeze in Priora
Remember that antifreeze should never be mixed with antifreeze. In all other cases, a certain scheme applies:
- Type G11 can be mixed with: G11/G12/G12. G must not be mixed with type G12.
- Type G12 can be mixed with: G11/G12. Do not mix with G11/G12/G.
- It is permissible to mix with each other (combine): G13/G12/G12.
Remember that the type of liquid is certainly indicated on the packaging; it is always the letter “G” with a 2-digit number and pluses. The type of coolant is also TL - this is antifreeze.
How to remove an air lock on a Priora
On a car, malfunctions occur in the cooling system, and an air lock may form. To remove air from the system, you need to use its hoses. This is done in one of two ways. In each case, you need to wait until the power plant has completely cooled down, and only then begin to troubleshoot the problem.
It is best to wear thick gloves before work to avoid burns. Warm up the engine a little and be sure to turn off the car. Remove the tube and clamp from the heating when antifreeze flows. Put everything back in its rightful place and tighten the clamp again. Air will escape under the resulting pressure.
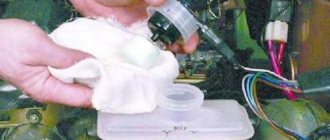
A device such as the throttle assembly clamp needs to be loosened, then the tube must be removed from the heating. Next, open the lid of the special expansion tank of the cooling system located in the engine compartment, cover the neck with a clean rag and blow through it properly. You will see air coming out. You need to tighten the cap when the coolant appears directly.
If, after you have replaced the coolant, you notice that the engine cooling system is not functioning correctly, then it is quite possible that the problem is an air lock.
First way:
- Loosen the clamp and disconnect the pipe from the heating of the throttle assembly.
- We unscrew the lid of the cooling tank, cover it with a clean rag and blow into the neck until antifreeze starts flowing from the removed pipe.
- As quickly as possible, put the pipe in place and tighten the clamp.
Second way:
- We warm up the engine a little so that the pressure in the cooling system increases slightly, and then turn it off.
- Without removing the coolant tank cap, disconnect the pipe from the throttle body heating.
- After antifreeze or antifreeze starts coming out of the tube under pressure, immediately put the coupler in its place and tighten it with a clamp.
Attention! Be careful as the coolant being drained may be very hot at this point.
What to choose: antifreeze or antifreeze
Both antifreeze and antifreeze are coolants. At the same time, antifreeze is the international name denoting coolants for cooling systems of internal combustion engines.
Antifreeze is also an analogue of antifreeze; it was developed back in Soviet times. It is noteworthy that the name TOSOL is not patented. As a result, today antifreeze manufacturers are actively producing products called TOSOL. Such a liquid today has nothing in common with the old Soviet development and is still the same antifreeze. It turns out that this is antifreeze, only domestically produced.
At the same time, TOSOL is traditionally used in domestic cars; it is poured at the factory during the manufacture of new cars. However, if you need to switch from it to antifreeze, no problems arise.
The main thing is to avoid mixing different types of coolants, and also to use products in the cooling system whose properties meet the tolerances of the car manufacturer itself.
Step-by-step instructions for replacing antifreeze in Priora yourself
Replacing the coolant yourself requires some tools and items, check out the list before you get started:
- 13th key;
- Phillips screwdriver;
- Capacity 10 l.;
- Coolant – 8l.
Before the antifreeze is replaced on the LADA Priora, it is, of course, necessary to drain the old antifreeze. First you need to wait until the “engine” and the coolant itself cool down, this is required in order to avoid getting burns.
A procedure such as replacing the coolant is carried out in the following sequence:
- We drive the car into the pit and stop it accordingly.
- Remove the negative terminal from the battery.
- We remove the crankcase protection of the power unit.
- Remove the cap of the expansion tank of the cooling system.
- We substitute the previously prepared container under the “engine”.
- We unscrew the drain plug, a key will help with this.
- The plug should be tightened when all the antifreeze has completely drained out.
- We transfer the container with the drained antifreeze under the radiator and unscrew the cap on it, from here it is also necessary to drain the antifreeze.
- Close the plug after the coolant has drained.
- Disconnect the throttle body heating hose.
- Fill in new antifreeze within the MIN/MAX marks.
- We install the throttle body heating hose in place. Tighten the pipe properly.
- Check the steam outlet pipe for leaks.
So, you have read the instructions on how to replace the coolant on a LADA Priora with 16 valves. If you have a model with 8 valves and air conditioning, then the work will be a little more complicated, since there is no drain plug. The coolant must be drained exclusively from the lower radiator pipe, and upon completion of the entire procedure, install it in place.
Coolant for Lada Priora car
Please tell me a good coolant for the Lada Priora 2007 model year! I would be very grateful! (Valentin)
Hello, Valentin. Your question is relevant for many Prior owners. During the production of these cars, domestic refrigerant “Felix” is filled. If you only need to add antifreeze to the system, we recommend that you do not mix consumables from different manufacturers. Mixing antifreezes of different compositions can have unpleasant consequences, which are discussed in detail here.
Which one to pour?
Silver Lada Priora car Lada Priora cars require only high-quality fluid to be filled. In practice, using, for example, “Luxe” antifreeze does not lead to anything for this model of car. Many domestic motorists trust this consumable material for the cooling systems of their cars. Also high-quality refrigerants are:
- North;
- Sintek;
- Coolant "Siberia";
- Felix (poured during production);
- Lukoil-Extra;
- Liquid Molya;
- Cool Stream;
- Castrol.
The main thing is to remember that modern vehicles, like yours, require the use of exclusively high-quality consumables, including coolant. If you buy an elite liquid at a low price, think about whether it is really high quality? To identify this, you need to know where it is produced.
Before purchasing coolant, check the label. Find out detailed information about the product manufacturer and its composition. If the bottle is transparent, then pay attention to its bottom: there should be no sediment on it. If there is one, then most likely we are talking about a low-quality product. It is advisable to purchase coolant in official stores from trusted suppliers. Otherwise, it won’t be that difficult to get caught in a fake car market these days, so forget about purchasing consumables from vendors on the roadsides.
Video “How to drain the coolant on a Lada Priora car”
You can learn how to properly drain consumables from the video.
Was this article helpful?This article was helpfulPlease share the information with your friends
Why does antifreeze leave the cooling system?
Experts recommend cleaning the system after each replacement. When you change antifreeze to antifreeze, or vice versa, switch from antifreeze to antifreeze, be sure to clean the system. What you may need for this:
- Plastic funnel and hose.
- A packet of regular citric acid.
- Distilled water (15 liters for Priora).
- A brush, sized to fit into the neck of a 5-liter bottle.
Please note that if the coolant is not cloudy, then you can only get by with distilled water. Otherwise, be sure to add citric acid. A good working fluid begins to lose color over time, that is, it becomes discolored, and a contaminated fluid always becomes cloudy.
Cleaning of the LADA Priora cooling system should be carried out after removing the air lock. Let water flow through the system through the open pipe. Using a brush, you can clean the expansion barrel separately. After this procedure, damage to the tank body is clearly visible. After cleaning the system is complete, you can add antifreeze.
If you notice that the liquid in the tank is constantly leaking and is below normal, it means that there is a leak in the system that urgently needs to be fixed. Regardless of how much fluid is lost, it is necessary to conduct a thorough diagnosis of such system parts as:
- expansion tank pipes;
- steam exhaust pipe from the radiator;
- throttle body and thermostat hose;
- all clamps.
Diagnostics of the throttle hose and thermostat Priora
If the connections are ok, check the tank housing, radiator and thermostat, it is possible that the problem lies there. In addition, sometimes antifreeze leaks out of the pump hole. If, after examining all of the above components, the leak problem remains, and the antifreeze also goes away, it is recommended to contact specialists who will conduct a more thorough diagnosis.
Temperature sensor malfunction
The reason that the liquid in the cooling system, which serves as an air conditioner for the car's power plant, does not heat up or overheats is due to the failure of the temperature sensor.
Often signs of such a malfunction are:
- Stopping the flow of warm air into the car interior, which occurs due to the cessation of fluid flow into the heater.
- Dark, almost black smoke comes out of the exhaust pipe. This indicates engine detonation, which was a result of overheating.
- Engine power drops sharply.
Many drivers quickly stop the car when it overheats and turn off the engine. In fact, an immediate stop of the machine is required only if the tightness of the system is broken and liquid pours out of it. In other situations, the driver must perform the following actions:
- turn on the heating to maximum so that the fluid temperature drops and the engine cools down quickly;
- drive smoothly to the side of the road;
- Let the engine idle for 2-3 minutes with the heating system on.
After this, the engine must be turned off and allowed to cool for 20 minutes. After this, you need to measure the fluid level in the cooling system and add it if necessary. Immediately after the engine is turned off, you cannot open the radiator cap, as you can get burned from contact with the liquid. If the fluid level is normal, then the cause of overheating must be determined by diagnostics. To do this you will have to visit a car service center.
Level control and how many liters are needed
To understand how many liters of refrigerant need to be poured into the Priora 16 valves, refer to the car’s operating instructions. The technical manual states that the cooling system capacity is 7.8 liters. Therefore, exactly the same amount of refrigerant is poured into it.
The Prio Dvenar channel published a video in which it showed how the procedure for replacing the coolant in Priora is carried out.
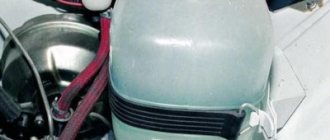
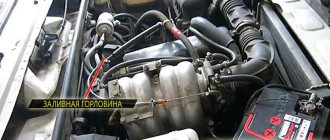
Fluid level diagnostics must be performed on a cold engine. Open the hood and locate the antifreeze expansion tank. You will see two marks on the tank - MIN and MAX, the volume of liquid should be normal between them. If there are no marks on the tank, then it has a horizontal edge that shows the normal level of antifreeze. In order for the system to effectively cool the power unit, it must not be filled with less than the required amount of refrigerant.
List of necessary materials and preparation for work
First of all, you need to purchase supplies and prepare the car.
Materials and tools for replacing fluid:
- antifreeze - 8 liters, you can also purchase coolant concentrate and dilute it with distilled water yourself;
- key “13”;
- crosshead screwdriver.
How to drain antifreeze on a Priora? The following instructions must be followed:
- remove the engine crankcase protection;
- unscrew the expansion tank cap;
- After making sure that the engine has cooled down, place a bucket under the engine and use the “13” key to unscrew the drain plug.
After all the antifreeze has run out of the engine, screw the plug back on. Now you need to drain the liquid from the radiator; to do this, remove the cap on the radiator.
Attention! When the engine is not cooled down, the cooling system is under pressure; it is not advisable to remove the plug, as you can get burned. Substituting a bucket, unscrew the drain plug on the radiator and wait until all the antifreeze comes out.
How to change it correctly?
Next, we will look at how to correctly replace the working fluid of the cooling system in a Lada Priora car with an electronic pedal or with air conditioning. You can change the refrigerant at a service station, but this task is quite simple and anyone can handle it on their own. For the best effect it is necessary, we will talk about this below.
Preparation
Before you begin the process, prepare the following:
- fresh refrigerant in the required volume;
- seal for the drain cover if the old one is worn out;
- set of wrenches;
- clean rags;
- container for collecting used antifreeze.
The Lada Priora Repair and Maintenance channel provided a video that demonstrated the procedure for draining the working fluid from the cooling system.
How to replace antifreeze on a Priora:
- Drive the car into a garage with a pit; you will need a flat surface to perform the work. Wait until the engine cools down; the entire process is carried out cold.
- There should not be high pressure in the cooling system. To reset it, open the hood and unscrew the expansion tank cap. If the engine is hot, coolant may spray out of the hole, so use a rag when opening it.
- Dismantle the plastic protection of the power unit. To remove it you need to unscrew two fasteners on the sides. It is not necessary to dismantle the clamps, but removing them will make the task more convenient.
- If your car is equipped with a transmission with control cables, then it is necessary to dismantle the starter device. To do this, disconnect the negative terminal from the car battery. Press the fastening of the connector with the wiring and disconnect the plug from the output of the traction relay. Remove the protective cap from the nut securing the tip of the wire connected to the positive terminal of the battery. Using a 13mm wrench, unscrew the nut and remove the cable tip from the contact screw on the traction relay. Then use the same tool to unscrew the screws and dismantle the starter device. If the car's transmission is controlled by traction, then there is no need to dismantle the starter.
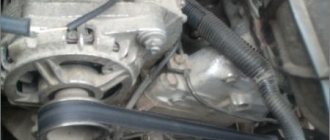
- Find the drain plug; it is located directly on the cylinder block. You need to place an old bucket or basin under it, into which the used refrigerant will be drained. Unscrew the cap and wait until the liquid comes out of the system. Also unscrew the protective valve under the radiator device; some of the substance will also flow out of it. When the draining is complete, you need to tighten both plugs. Don't forget to check the condition of the seal on the drain cap. If it is worn out or there are traces of defects, the ring must be replaced.
- Assess the condition of the refrigerant drained from the refrigeration system. If there are traces of deposits, wear products, or the liquid as a whole is very cloudy and viscous, it is recommended to flush all components. To do this, pour about 7.8 liters of distilled water into the system through the expansion tank. You can add vinegar or citric acid to it to remove dirt. The use of special cleaning agents is allowed. After filling, the engine starts, you can perform a test drive. Then the procedure for draining the refrigerant from the power unit is repeated. If the liquid is still dirty, then the washing is repeated until it comes out clear.
- Assess the condition of all pipes and lines of the cooling system. If there is damage or signs of leaks, the hoses must be replaced.
- The next step is to pour new refrigerant into the system. To prevent an air lock from appearing in the lines and eliminate air entering the system, it is recommended to slightly loosen the clamp of the pipe connected to the throttle assembly. The hose is then disconnected.
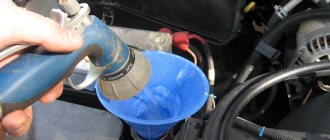
- The cooling system is filled with fresh antifreeze through the filler neck in the expansion tank. New refrigerant is poured in until it comes out of the pipe disconnected from the throttle. When this happens, the line is connected into place and the clamp is securely tightened. Then the refrigerant is added to the system to the required level.
- All previously dismantled components are reassembled in reverse order.
- The engine starts and the journey is carried out. Now you need to once again make sure that the fluid level is correct. Make sure there is no leakage from the drain hole.
Remove the cover on the expansion tank Unscrew the drain valve on the radiator cooling device of the engine Remove the starter from the car by disconnecting all fasteners
Next, we will look at how to correctly replace the working fluid of the cooling system in a Lada Priora car with an electronic pedal or with air conditioning. You can change the refrigerant at a service station, but this task is quite simple and anyone can handle it on their own. For the best effect, it is necessary to flush the cooling system, we will discuss this below.
How to drain antifreeze from priors + video
Antifreeze is replaced in Lada Priora cars every 75,000 km, or after 5 years of operation. It all depends on which limit comes faster. A second replacement is required after 40,000 km, or two years. During maintenance, monitor the color of the coolant. If it changes color to a reddish color, replace the antifreeze, because this indicates a deterioration in the quality of additives and coolant characteristics.
What antifreeze is better to pour into Priora
The car's cooling system requires 7.84 liters of antifreeze, which is worth considering before replacing. For all engines of VAZ cars, including Lada Priora, the use of the following antifreezes is recommended:
- TC-Felix.
- Cool Stream Standard or Premium.
- G-Energy Antefreeze.
- Syntek.
- Antifreeze G-48 and others.
All recommended coolants can be found in the instruction manual for the Lada Priora.
Replacement process
To change antifreeze on a VAZ 2170, prepare the necessary tool - a Phillips screwdriver, the required volume of coolant (buy one 10 liter canister or two 5 liter canisters), a key for “thirteen”, an empty container for draining the old fluid, as well as a clean rag. Before draining antifreeze from the system, place the car on a lift or inspection hole. Then proceed like this:
- Open the expansion tank.
- Remove the mudguard from the engine. If you don’t want to remove the protection, you don’t have to do this. But in such a situation, it is worth taking a number of actions to avoid drips. If nothing is done, then, during the draining process, the liquid will hit the crankcase protection and splash around.
- Place an empty container under the engine in a place where the old antifreeze will approximately drain.
- Open the drain hole on the cylinder block. As soon as the coolant is drained, wipe any marks from the engine surface.
- Place the container under the radiator, then open the drain hole (at the bottom of the radiator).
- Wait until the coolant is completely out of the system.
Remember that the cooling system fluid is extremely toxic. Before draining the antifreeze, prepare a special funnel and use it while draining the coolant from the crankcase and radiator. You can make such a funnel yourself by cutting off the wide part of a plastic bottle.
When removing the plug from the drain hole, be careful. There is a rubber ring installed on it that must be preserved. If there is damage (defects or tears), replace the part. Filling with new antifreeze
The next stage of replacing antifreeze is filling the cooling system of the Lada Priora. Proceed like this:
- Screw the plug into the radiator and cylinder block.
- Loosen the compression of the clamp, then discard the tube to drain the coolant from the throttle heating fitting. This is required so that, during the process of filling the system, foreign air is gradually removed from it. If this work is not done, then there is a high risk of air locks forming, due to which the system itself will not be completely filled.
- Pour coolant into the reservoir until antifreeze runs out of the tube thrown away from the throttle assembly. As soon as this happens, put the hose in place and install the mounting clamp.
- During the filling process, monitor the volume of coolant in the system. As soon as the working composition reaches the MAX mark (marked on the wall of the expansion tank), stop filling.
Consequences of untimely replacement
Over time, the refrigerant loses its original characteristics, as a result of which it will not be able to effectively cool the power unit.
If the antifreeze is not changed on time, this is fraught with serious problems:
- The engine will heat up faster, and regular operation of the machine with an overheated engine can lead to its complete failure.
- The working fluid in the cooling system will freeze and it will be impossible to start the internal combustion engine in the cold season.
- The pressure in the lines may increase. Because of this, the oil seals and seals will be squeezed out, resulting in a refrigerant leak.
Over time, the refrigerant loses its original characteristics, as a result of which it will not be able to effectively cool the power unit.
Timing for coolant replacement
In VAZ Priora cars with a 16-valve engine manufactured in 2011 and other years of production, the frequency of antifreeze changes is 75 thousand kilometers. Then the working fluid begins to lose its properties. In addition, the refrigerant that is poured during production is changed every five years, if during this time the car has not traveled 75 thousand km. But this applies to the initial replacement of the fluid that is filled in from the factory. If you use regular antifreeze, then its service life is shorter and is about 30-40 thousand kilometers.
The need to change the working fluid can be determined by the following “symptoms”:
- the antifreeze has become dirtier, black, and traces of deposits have appeared in it;
- a refrigerant leak has occurred, as a result of which more liquid will need to be added to the system, and if you do not know what kind of antifreeze was added, then it will have to be changed;
- the presence of deposits and dirt in the expansion tank, this indicates that the substance has lost its properties;
- foam formation in the reservoir under the hood;
- the stove began to work worse in the winter season;
- the engine began to boil.