Finally, a free weekend and a free garage! The drives have been lying in the garage for about 3 weeks now, waiting, waiting... and kept driving and clicking... because. the garage was occupied by a broken fit (Fit was sorted out and he left))))) It was the Nivasik’s turn for an actually planned replacement of the drives because After replacing the drive springs, they began to click when driving under load.
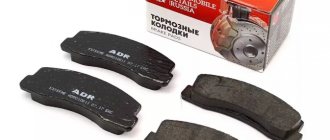
Drives: AR731 TRIALLI and AR730 TRIALLI. I was tormented for a long time about which one to choose, I wanted there to be tripods, it seemed like they wrote that there were tripods, but when the boot blew up to check the lubrication, I was alarmed that there was CV joint grease everywhere, although the CV joint is not suitable for tripods. Pulled it out, stuck in the ring... balls... arrrr... well, there’s nothing else to do anyway, you have to put it in (((
I added lubricants and assembled everything, the anthers seemed to be not bad, with plastic protection.
Then he took off the lower ball joints and moved his fists away.
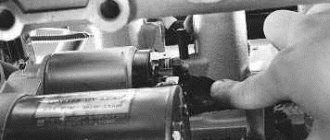
I unscrewed the fastenings of the front gearbox and the drive bolts, they came out without any problems, if you don’t unscrew the gearbox, it’s unlikely that you’ll be able to pull out the right drive. Then I unscrewed the studs, applied some sealant under the gaskets and put them back together. I screwed in long ball bolts instead of studs to make it easier to remove the drive in the future.
The problem arose only when knocking the old drive out of the bearing... well, I didn’t want to go anywhere... I even flattened the teeth on the end while I was knocking it out...
I installed the oil seals 12019142B CORTECO and I don’t really want to play with Balakovo)
I filled the oil with ZIC synthetic 75w-90 and decided to experiment with the Fenom additive, I hope it doesn’t get worse xDDD
There is a bit of oil left, so I’m wondering whether it’s worth pouring it into the box, in theory it shouldn’t eat up the synchronizers, or should I take pure GL-4.
The oil in the front gearbox was black, and there was a magnetic back on the plug. There is a similar situation in the rear axle... apparently the previous owner didn’t really bother with servicing the car (although I realized this a long time ago from the condition of the car, just another fact).
In the transfer case, the oil was clean and transparent, but it did not flow readily, I assume that the mineral water was being filled in.) All that was left was to move the oil only in the box, but it was transparent, I looked when the engine was turned on.
The next plan is to replace the IAC and TPS. because I'm tired of stalling at the entrances to traffic lights. I bought a contactless Kaluzhsky 36.3855, I felt like I was reacting faster, although most likely it was just a self-hypnosis effect xDD
IAC Start Volt VSM 01203 is the cheapest because... I think I'll take the old one apart and clean it. The removed factory sensors are still visible because years of manufacture 2005 are written)))
I drove it for a while, and it seemed like it stopped stalling and began to react more clearly. The play when starting off has become smaller and there are no clicks, it has become even more comfortable to drive the Nivasik.
After the capitalization, the transfer case began to vibrate more strongly, I think when they removed the front universal joint, they did not put it in the old position. The industrial shaft was turning in neutral and there was no vibration from the transfer case. Of course, I would like to take a new CV joint front driveshaft, it seems to be more or less protected from dirt, etc., etc., but I’d better leave the rear one on the crosspieces. But the toad presses... he says he’s coming! xDD
Today, Niva front-wheel drives use 3 main types of internal CV joints: ball, tripoid and Lebro.
Beerfield, or ball CV joints
On Niva and Chevy Niva, the manufacturer installs internal Beerfield CV joints (constant velocity joints), which consist of a drive grenade (housing) and an internal cage of a separator with balls, rotating along the grooves. Hence the most common name for Bearfields - ball CV joints. A drive shaft is installed in the inner race, which connects it to the outer drive.
For a Nivavod that periodically drives off the asphalt, the factory CV joint is one of the most problematic components of the car.
Its design disadvantages are as follows:
- susceptible to loads arising during axial movement due to insufficient longitudinal travel;
- subject to wear at large CV joint angles;
- does not withstand large torsional moments;
- as a result, it “lives” for quite a short time.
All this creates a number of problems for farmers:
a) when, when the separator is destroyed, the balls spill out, the torque stops being transmitted from the gearbox to the wheels and goes to the CV joint grenade, which means the Niva’s front-wheel drive is completely disabled if a differential lock was not installed on your car. In other words, the car simply does not move. In off-road conditions, this is, if not a dead end, then a rather difficult situation.
b) Hence the first conclusion: you need to have spare parts and accessories with you. To install a new separator instead of a damaged stock one, you need to check that the position of the balls in the grooves corresponds to the factory layout. However, separators are not sold separately, and in order to repair the CV joint this way, you still need to get a “donor” somewhere. In addition, it is almost impossible to carry out such repairs in the field; it would be easier to completely replace the grenade.
c) Hence the second conclusion: a nivavod should always have left and right inner CV joints with it
d) Replacing a boot with CV joints is also a very labor-intensive task due to the need to control the position of the balls in the grooves. Therefore, many Niva drivers generally abandon front-wheel drive on a Niva type CV joint and switch to tripoid drives.
Removal and installation of front wheel drives Chevrolet Niva
Tools:
- Driver for 3/4 socket bit
- Extension for socket wrench
- Knob attachment 13 mm
- Knob attachment 17 mm
- Knob attachment 19 mm
- Knob attachment 27 mm
- Large flat screwdriver
- Small hammer
- Mounting blade
- Straight box spanner 13 mm
- Straight box spanner 17 mm
- Rolling jack
- Adjustable support
Parts and consumables:
- Aerosol lubricant type WD-40
- Sealant
- Bearing cover gasket
Note:
We carry out the work on an inspection ditch or overpass.
1. Drain the oil from the front axle gearbox as described here.
2. Disconnect the downpipe from the exhaust manifold and exhaust gas converter as described here.
3. Move the exhaust pipe to the engine (this operation is not required to remove the left drive).
4. We disconnect the driveshaft from the front axle gearbox, as described here.
5. Disconnect the shock absorbers from the front suspension lower control arms as described here.
6. We install an adjustable stop under the front axle gearbox. We move the steering knuckle to the side.
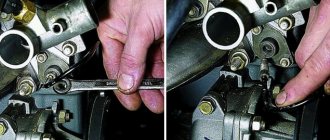
7. Using a “13” socket, unscrew the three nuts securing the bearing cap, the inner hinge housing of the right and left drives to the front axle gear housing.
8. Using a 17mm wrench, unscrew the bolt securing the bearing cap of the inner joint housing to the front suspension cross member bracket.
9. Similarly, unscrew the bolt securing the left drive bearing cover to the cross member bracket.
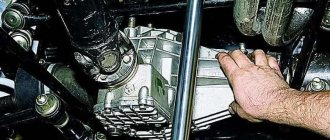
10. Unscrew the four nuts securing the front axle gearbox suspension brackets.
11. We lift the gearbox with an adjustable stop until the eyes of the bearing caps come out of the crossmember brackets.
12. Remove the front wheel hub cap and unscrew the hub nut.
Helpful advice:
The hub nut is tightened to a large torque. Therefore, we recommend using a head with a strong knob.
13. Remove the nut and centering sleeve.
14. Compress the suspension spring by jacking up the lower arm. Unscrew the three nuts and remove the ball joint bolts from the lever.
15. We remove the shank of the outer hinge housing of the right drive from the hub. Move the steering knuckle to the side.
16. Using a mounting spatula, pry the bearing cover of the internal joint housing and slide the cover off the gearbox studs.
17. By rotating the bearing cap relative to the drive, we remove the shank of the internal joint housing from the gearbox.
18. The connection between the cover and the gearbox is sealed with a cardboard gasket.
19. Remove the left drive in the same way.
20. Install the drives and all removed parts in the reverse order of removal, replacing the gaskets with new ones. When tightening the wheel hub nuts, adjust the bearing play as described here.
The article is missing:
- Photo of the instrument
- Photos of parts and consumables
- High-quality photos of repairs
Source: https://mashintop.ru/rukovodstvo_po_remontu.php?id=52;
Chevrolet niva device, operation, maintenance and repair. Publishing house "Behind the Wheel".
Instead of Beerfield - tripoids
Externally, tripoids are practically no different from ball CV joints. They are grenades with three grooves, but there is a significant design difference: instead of a separator with balls, a three-spike is installed here, on the spikes of which three rollers spin on needle bearings.
Tripoids are good because even if they break down in off-road conditions, they allow you to easily get to civilization (that is, the nearest service station).
The main disadvantage of tripoids is their small operating angles compared to CV joints. This is due to their design features. The maximum operating angle of such drives is 22 0, and the optimal one is no more than 4 0.
There is another important point: although if the optimal operating angle is exceeded, the tripoid will, of course, work, but with noticeable vibrations and jerks caused by the fact that the angular velocities of the tripoid parts will no longer coincide. And the larger the angle, the greater the discrepancy in angular velocities
As practice shows, at large angles the drive rod gets caught on the protrusions of the grenade grooves and premature wear of the needle bearing occurs, which manifests itself in significant play in the drives.
Front-wheel drive with Lebro CV joint
There is a third, and as practice shows, the optimal design option for an internal constant velocity joint - a CV joint of the Loebro type. They are included in the Niva front-wheel drive kit from IZH-TECHNO.
What are the features and advantages of this type of CV joint?
Firstly, due to its design, the Lebro CV joint has increased operating angles, which provides greater suspension travel with less vibration (compared to stock CV joints and tripods).
This distinguishes this type of CV joint from Tripod joints, the operating angles of which are significantly limited due to design features. At the same time, Lebro CV joints have a more reliable design compared to birfield ball CV joints.
Secondly, Lebro CV joints are reliable and durable. Niva front-wheel drive CV joints from IZH-TECHNO were tested for strength on a stand, where the wheel was preloaded in such a way as to simulate a load equivalent to the movement of a 2-ton car on asphalt. During the tests, the CV joints performed well: no crunching or breakdowns with a mileage of more than 50 thousand km!
Thirdly, they are easy to install. To replace the grenade, you only need to install the retaining ring of the inner CV joint and tighten the 6 fastening screws. The volume and duration of work is halved! Agree, for off-road conditions, where there are no conveniences for servicing the drives, this is an important factor.
To summarize the above, it should be noted that Lebro CV joints have proven themselves to be the optimal solution for Niva front-wheel drive, meeting the price-quality parameters.
Constant velocity joints (CV joints) of the Chevrolet Niva are an important part of the front-wheel drive. They are a swivel joint that transmits torque from the gearbox to the steered wheels without loss of power. In common parlance, these nodes are called "grenades". This is explained by their external similarity with the ammunition of the same name.
Possible malfunctions, their causes and methods of elimination
| Cause of malfunction | Elimination method |
Noise, knocking from the front axle when the car is moving (especially when turning)
| 1. Wear of parts of the external or internal hinges. 2. Deformation of the wheel drive shafts. | 1. Replace worn or damaged hinges. 2. Straighten or replace the shafts. |
Oil leak
| 1. Damage or rupture of the protective cover of the internal or external hinges. | 1. Replace the grease in the joint and the protective cover. If parts are worn or damaged, replace the hinge assembly. |
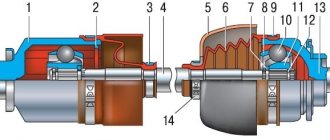
Design and operating principle
To drive the front wheels, two drive shafts (half shafts) are used, on which four CV joints are installed (2 internal and 2 external).
Structurally, they consist of the following parts:
- two cages (external and internal) in which grooves are made;
- bearing balls;
- separator.
The design is enclosed in a rubber corrugated boot, which prevents lubricant leakage and dirt from entering the bearing assembly.
The balls transmit torque between the cages and, moving along the grooves, ensure the operation of the unit when the angle between the axes of rotation changes.
For internal hinges, the bending angle can reach 30 degrees, and for external hinges, 60 degrees.
Note! In addition to driving the front wheels, CV joint gears are used in the intermediate and driveshafts of the Chevrolet Niva.
Replacement drive Niva Chevrolet video
Tools:
- Driver for 3/4 socket bit
- Extension for socket wrench
- Knob attachment 13 mm
- Knob attachment 17 mm
- Knob attachment 19 mm
- Knob attachment 27 mm
- Large flat screwdriver
- Small hammer
- Mounting blade
- Straight box spanner 13 mm
- Straight box spanner 17 mm
- Rolling jack
- Adjustable support
Parts and consumables:
- Aerosol lubricant type WD-40
- Sealant
- Bearing cover gasket
Note:
We carry out the work on an inspection ditch or overpass.
1. Drain the oil from the front axle gearbox as described here.
2. Disconnect the downpipe from the exhaust manifold and exhaust gas converter as described here.
3. Move the exhaust pipe to the engine (this operation is not required to remove the left drive).
4. We disconnect the driveshaft from the front axle gearbox, as described here.
5. Disconnect the shock absorbers from the front suspension lower control arms as described here.
6. We install an adjustable stop under the front axle gearbox. We move the steering knuckle to the side.
7. Using a “13” socket, unscrew the three nuts securing the bearing cap, the inner hinge housing of the right and left drives to the front axle gear housing.
8. Using a 17mm wrench, unscrew the bolt securing the bearing cap of the inner joint housing to the front suspension cross member bracket.
9. Similarly, unscrew the bolt securing the left drive bearing cover to the cross member bracket.
10. Unscrew the four nuts securing the front axle gearbox suspension brackets.
11. We lift the gearbox with an adjustable stop until the eyes of the bearing caps come out of the crossmember brackets.
12. Remove the front wheel hub cap and unscrew the hub nut.
Helpful advice:
The hub nut is tightened to a large torque. Therefore, we recommend using a head with a strong knob.
13. Remove the nut and centering sleeve.
Prices and manufacturers
The cost of CV joints on a Chevrolet Niva depends on the manufacturer and starts from 1,250 rubles.
These parts are produced by several companies:
- LADA is a Russian manufacturer that needs no introduction;
- Trialli is an Italian brand that supplies parts for brakes, drive and other vehicle systems;
- Pekar is a famous Russian plant that has been producing auto parts for almost 100 years;
- DMZ is a Dimitrovgrad mechanical plant that produces spare parts for Russian cars;
- Aurora is a Polish brand that unites spare parts manufacturers from different countries.
Manual for removing and replacing inner and outer CV joints on a Chevrolet Niva with your own hands
Detailed instructions for replacing the inner and outer CV joint boots on a Chevrolet Niva
Is it worth installing a driveshaft on CV joints on a Chevrolet Niva and how to do it yourself?
Replacing CV joints on a Chevrolet Niva video
Removing the internal grenade of a Chevrolet Niva
Replacement of the front left outer and inner CV joint at the Niva
This is Tough! Removing the right drive Chevrolet Niva. Comparison of Chevrolet Niva and NIVA 21214 in Self-repair
How to change CV joint boots on Niva yourself
CV joint disassembly reassembly Cause of crunching
Replacing external and internal CV joints: detailed video!
How to knock out an internal grenade. Do it yourself!
Internal and external CV joint. Replacing the CV joint boot (grenade) in 5 minutes. Video
HOW TO REMOVE A NON-REMOVABLE GRENADE, CV joint. SIMPLE METHOD
Removing the outer CV joint (grenade) in 3 seconds. Super puller for CV joints and axle shafts of VAZ foreign cars
Also see:
- Original number plate of Chevrolet Cruze
- American assembled Chevrolet Cruze
- Chevrolet Cobalt Rear Engine Mount
- How to replace a low beam lamp on a Chevrolet Cruze hatchback
- Chevrolet Niva vs Duster in mud video
- How to replace a Chevrolet Aveo light bulb video
- Tuning Chevrolet Lacetti hatchback 2008
- Trunk lid for Chevrolet Lanos
- How to change a turn signal light on a Chevrolet Epic
- Niva Chevrolet in stone on obi
- Disassembling the front panel of a Chevrolet Captiva
- Chevrolet niva glx 1.8 mt 122 hp 4×4
- Kit for Chevrolet Cruze
- Starline alarm system for Niva Chevrolet
- Standard anti-theft system Chevrolet Cruze
Home » Clips » Replacing CV joints on a Chevrolet Niva video www.chevrolet-perm.ru
Useful video
Watch an interesting video about disassembling a CV joint and identifying possible causes of the crunch:
The topic of the article is the outer CV joint of the Niva. It’s so simple and unpretentious, but informative)) Very often, services and manufacturers began to ask not only for something tuning, but simply for a high-quality standard. And a lot of questions are asked about front-wheel drive. I’ll try to talk separately about the anthers, inner and outer CV joints. What we supply for services, installation features, etc. The usual reminder, the CV joints of the field and the shnivy are the same. CV joint - constant velocity joint, in common parlance an external “grenade”.
External CV joint Niva, history
The main difference that the owner of a Niva or Chevrolet Niva should know. CV joints come in 22 or 24 splines, for cars with and without ABS. Grenades with 22 slots were installed mainly on carburetor fields. With the transition to injection and restyling in 2008, they were no longer produced. Then there are only 24 slots. The 22 slot grenades had two serious advantages. They were smaller in diameter and, as a result, there was more “meat” on the hub. Such a breakdown as a hat breaking off on the hub almost never happened. Second point. Old fields were exported to Europe in fairly large quantities, and there they spit on AvtoTAZ and made their own spare parts. I brought grenades from Loebro, SKF, GKN-Spidan, GLO - all of these are high-class manufacturers in the field of drives and CV joints. Unfortunately, none of these companies makes CV joints for 24-spline fields. There are a lot of bright boxes on the market, but most of them are brands made only for Russia. In the future we will only talk about CV joints with 24 splines.
External CV joint Niva, manufacturer's choice
I experimented a lot on this topic. And if a worthy alternative has been found for internal factory CV joints, there is practically none for external ones. Only factory ball joint. The most important thing, as usual in Russia, is that it was truly a factory part. Contents: CV joint, boot, two “latch” type clamps, retaining ring, nut. The only difference is the presence of a reference disc on the CV joints for cars with an ABS system (anti-lock braking system). When installing, I recommend washing the CV joint from the factory seal and filling it with a better quality lubricant. I’ll immediately explain why I think this must be done. Several times I opened the drive, on new machines, at subzero temperatures. Molybdenum grease was in the form of frozen lumps. In this situation, there is no need to talk about the lubricating properties and the rolling of the machine. As a result, increased wear of expensive parts and increased fuel consumption. The services serving the fields in the north of our homeland completely confirmed my assumptions.
external CV joint, view from the drive side
In general, it remains a mystery to me why cheap lubricant is used in an expensive part? Probably, at the plant this is considered savings, or perhaps it is called the fashionable word “import substitution.” Well, if we don’t have high-quality MODERN WIDE-RANGE temperature lubricants in our country, then why waste money on the end customer’s wallet. A question without an answer. A good inexpensive lubricant for CV joints, MultiMoS2, is included in the price list. Each CV joint requires no more than 100-110 grams. You can safely install the boot that comes with the CV joint. Good quality. Just don’t put plastic protection on top, it does more harm than good. There is a separate article on the site about anthers, which talks about these nuances. (The nuance from the French language is a subtle difference).
A grenade on a car is a constant velocity joint. The knot received this name because it looks like a military knot. It can also be called CV joint. With its help, torque is transmitted from the engine to the wheel in a car at different angles of rotation of the drive wheel.
Niva Chevrolet replacement of outer CV joint
In Niva Chevrolet cars, the grenade is presented in the form of a constant angular velocity hinge. This name of this node comes from its similarity to a military node. It is also called CV joint; it transmits torque in the car, from the engine itself to the wheels, at different steering angles.
This element appeared at the time when front-wheel drive cars began to be produced, and before that, the transmission of torque to the wheels occurred through a conventional cardan. And since the joint was constantly under load, its service life was short, and this problem led to the creation of a special CV joint unit, which could transmit torque to the wheel at different angles when turning.
Types of CV joints
This element helps to transmit torque evenly, while taking into account the fact that the wheel can be at different angles relative to the car. They come in two types:
- External
- Domestic
These parts, like any other, wear out over time, so sooner or later the vehicle owner comes to the conclusion that they need to be replaced. Let's take a closer look at the reasons why replacing the outer CV joint on a Niva Chevrolet is necessary and why it fails.
- A common reason for failure is the longer service life of the part. As a rule, replacement is required after ten thousand kilometers, but replacement may be required earlier
- Driving on a broken road, sharp turns, the steering wheel is turned all the way at speed, at these moments the maximum load occurs on the CV joint
- If dust, dirt, or water gets in due to wear of the rubber boot, this also provokes a breakdown earlier than stated. Therefore, you should periodically check the condition of the protection.
Replacement
To change the outer CV joint, it is necessary to remove the grenade jet; it can only be dismantled together with the axle shaft; when the procedure is completed, the following steps must be taken:
- We clamp the removed unit in a vice
- Removing the old boot
- We knock down the CV joint with a hammer
- We clean all the existing teeth on the axle gear
- We install a new hinge on the axle
- We put the boot on and clamp it with clamps
- Putting everything in place
Quite often, Chevrolet Niva car owners resort to tuning the engine, as a result of which its power increases, thereby increasing the load on the CV joint and cardan shafts several times, and in order to avoid rapid wear of these parts, it is recommended to strengthen the shaft.
Therefore, if you know all the features of these parts, then you will always determine why one or another element failed, and you will be able to replace it at any time yourself.
expertniva.ru
What is a CV joint (grenade)
Internal grenade on Shniva
This part appeared at a time when manufacturers began producing cars with front-wheel drive. Initially, torque was transmitted to the drive wheel using a conventional cardan. At the same time, the service life of the hinge was short, since it was constantly working under load. This problem gave impetus to the invention of a special unit (CV joint), which could transmit torque to the wheels at different angles of rotation.
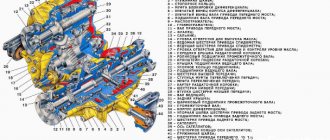
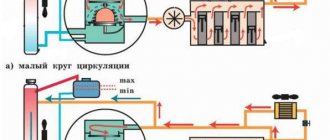
How does Chevrolet Niva all-wheel drive work?
Everyone who is more or less familiar with a car knows what a differential is. This is a mechanical device that distributes the traction force from the engine to two wheels, and in this case the wheels can rotate at different speeds. The total speed of the wheels in an axle with a differential depends on the overall speed of the vehicle and is constant at a constant speed. The need to install a differential in the drive axle of a car is explained very simply: when turning, the inner wheel travels a shorter distance (makes fewer revolutions), and the outer wheel travels more. The absence of a differential would lead to catastrophic wear of the rubber: either one wheel would slip when turning, trying to spin faster, or the other would rub against the asphalt—braking—trying to spin slower. In addition, wheel slipping causes skidding. And finally, the axle load (the force on it) would be extremely high.
There are three such differentials in the Chevrolet Niva transmission
: each axle has its own (interaxle) so that the wheels of the axle can rotate at different speeds, and the third (interaxle) - in the transfer case - distributes the traction force between the axles. It allows the axle wheels to rotate at different total speeds: the sum of the speeds of the front axle wheels may differ from the sum of the speeds of the rear axle wheels. When the car moves in a straight line without slipping, all differentials divide the traction force exactly in half, and the traction forces on all wheels are equal. If the traction of the wheels with the surface is insufficient, slippage occurs, and through the differentials, all the movement created by the engine will go to rotate the slipping wheel, and the traction force on the others will decrease.
Differential lock NIVA Chevrolet
One of the typical misconceptions about the Niva is the purpose of the front (small) transfer case handle. For some reason they think that she “connects the front end.” In fact, the “front”, i.e. the Niva’s front-wheel drive is always on, just like the rear-wheel drive - it has permanent all-wheel drive on all four wheels. And this knob controls the operation of the transfer case differential. In the normal position - on the right - the differential in the transfer case works. Shifting the handle to the left (towards the driver) locks the differential.
When the locking is on, the transfer case outputs to the front and rear drives are connected to each other by a special coupling.
Thus, the speeds of these drives are forced to be equal: the sum of the speeds of the front axle wheels will be equal to the sum of the speeds of the rear axle wheels. The distribution of traction force when the locking is on fundamentally changes its character. Now it is transmitted in the direction of greatest resistance: for example, if you remove the front driveshaft, with the transfer case locked, the Niva will drive in rear wheel drive - all the traction force will be transferred to the rear axle. If one wheel is slipping, say the rear one, you need to turn on the lock. Then a larger share of the traction force will be transferred to the front-wheel drive, and the front wheels can pull the car. But if one of the front wheels is also stuck, the Niva will not be able to get out on its own. It happens with Shniv that the front hub breaks and if it breaks, you can only move off by locking the differential. The differential lock can be turned on and off with the clutch pedal depressed, both while the car is moving and when the car is stationary. With some skill, this can be done without squeezing the clutch when releasing the gas. Advice: It is not recommended to use the lock mode on roads with good grip, as this will lead to accelerated tire wear, increased load on transmission parts and components, and will also increase fuel consumption.
There are similar lockable differentials for axles (self-locking), including those with automatic locking.
Theoretically, a Sheviniva stuck with them will be able to get out if at least one wheel has sufficient traction with the soil. Such devices are quite expensive, usually have a short service life and are used primarily in sports cars. You need to use a lock in the following cases:
✔ when driving in difficult terrain where there is a danger of wheel slipping; ✔ when there is a lack of engine thrust; ✔ when driving on a road covered with snow or ice.
© 2016-2021 24techno-guide.ru
All rights reserved.
Use of site materials is possible only if you install an active direct link to our resource. FEEDBACK
Home
(Main page of the site)
Auto
(Reviews, reviews, test drives of cars)
Engines
(Description and design of various engines)
Techno
(Articles about equipment and mechanics)
Tuning
(Review of tuned cars)
Repair
(Do-it-yourself repairs)
Tractors
(Tractor special equipment)
Osago
(All about car insurance)
Car audio
(Music for the car)
Car LAWS
(Traffic rules, fines and car laws)
Lifehacks
(Tricks of life)
Photo/Video
(No comments)
All articles
(All publications that are on the site)
CV joint on Niva Chevrolet
With its help, torque is transmitted from the engine to the drive wheels. It's mostly front-wheel drive. Due to the CV joint, torque is transmitted uniformly, taking into account the fact that the wheel is at a different angle relative to the car.
On a Chevrolet, a grenade can be:
The topic of the article is the outer CV joint of the Niva. It’s so simple and unpretentious, but informative)) Very often, services and manufacturers began to ask not only for something tuning, but simply for a high-quality standard. And a lot of questions are asked about front-wheel drive. I’ll try to talk separately about the anthers, inner and outer CV joints. What we supply for services, installation features, etc. The usual reminder, the CV joints of the field and the shnivy are the same. CV joint - constant velocity joint, in common parlance an external “grenade”.
External CV joint Niva, history
The main difference that the owner of a Niva or Chevrolet Niva should know. CV joints come in 22 or 24 splines, for cars with and without ABS. Grenades with 22 slots were installed mainly on carburetor fields. With the transition to injection and restyling in 2008, they were no longer produced. Then there are only 24 slots. The 22 slot grenades had two serious advantages. They were smaller in diameter and, as a result, there was more “meat” on the hub. Such a breakdown as a hat breaking off on the hub almost never happened. Second point. Old fields were exported to Europe in fairly large quantities, and there they spit on AvtoTAZ and made their own spare parts. I brought grenades from Loebro, SKF, GKN-Spidan, GLO - all of these are high-class manufacturers in the field of drives and CV joints. Unfortunately, none of these companies makes CV joints for 24-spline fields. There are a lot of bright boxes on the market, but most of them are brands made only for Russia. In the future we will only talk about CV joints with 24 splines.
External CV joint Niva, manufacturer's choice
I experimented a lot on this topic. And if a worthy alternative has been found for internal factory CV joints, there is practically none for external ones. Only factory ball joint. The most important thing, as usual in Russia, is that it was truly a factory part. Contents: CV joint, boot, two “latch” type clamps, retaining ring, nut. The only difference is the presence of a reference disc on the CV joints for cars with an ABS system (anti-lock braking system). When installing, I recommend washing the CV joint from the factory seal and filling it with a better quality lubricant. I’ll immediately explain why I think this must be done. Several times I opened the drive, on new machines, at subzero temperatures. Molybdenum grease was in the form of frozen lumps. In this situation, there is no need to talk about the lubricating properties and the rolling of the machine. As a result, increased wear of expensive parts and increased fuel consumption. The services serving the fields in the north of our homeland completely confirmed my assumptions.
external CV joint, view from the drive side
In general, it remains a mystery to me why cheap lubricant is used in an expensive part? Probably, at the plant this is considered savings, or perhaps it is called the fashionable word “import substitution.” Well, if we don’t have high-quality MODERN WIDE-RANGE temperature lubricants in our country, then why waste money on the end customer’s wallet. A question without an answer. A good inexpensive lubricant for CV joints, MultiMoS2, is included in the price list. Each CV joint requires no more than 100-110 grams. You can safely install the boot that comes with the CV joint. Good quality. Just don’t put plastic protection on top, it does more harm than good. There is a separate article on the site about anthers, which talks about these nuances. (The nuance from the French language is a subtle difference).
Gentlemen, please advise which front-wheel drive tires to take, we sell some vases and have C&Ps.