Tools and materials
To work you will need:
- A set of keys;
- Large flat screwdrivers;
- Massive hammer;
- Jack;
- Wheel locks;
- Mandrel for pressing the drive oil seal.
In addition, of course, you need an axle shaft seal 2101 (or 2123). You may also need an axle bearing. But let’s not rush, if the axle shaft itself has significant runout (more than 0.7 mm) - it also needs to be changed, otherwise it will break both bearings, and the one in the bridge is much more difficult to change. Then it is better to have the axle shaft assembled. Removing the bearing from the axle shaft and then installing a new one is a more complex procedure than replacing the drive seal, but it is better to do the entire described complex once. Defects on the axle shaft can only be done after removal, more on that below.
How to choose a new part and what tools to stock up on?
The original oil seal is difficult to buy separately. Usually the element is sold with anther included. In addition, it is expensive - about 600 rubles. But you can buy a similar cuff that is installed on the compressor of a GAZ-66 car or a KAMAZ fuel injection pump. Dimensions: 28.5x46.5 (Pazovsky, with one side) and 28x45 (KAMAZ, two sides). Components of different sizes are needed for car modifications 1.4 or 1.6 with a number of valves 8 or 16. To check, before installation, try to insert the oil seal into the inner and outer races of the drive. You can pre-lubricate the rubber with oil to make the outer edges fit easier.
As for the tools, you need to prepare:
- a puller for removing the tripoid, which is a device with threads and grips;
- set of screwdrivers and keys;
- pliers, mandrels, hammer;
- a chisel, or better yet, a drift made of soft metal;
- mount;
- heads of different sizes and knobs for twisting the hinge;
- container for draining transmission fluid.
Changing the axle shaft seal 2101
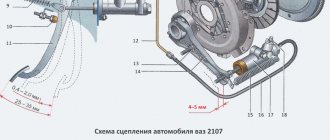
We set the car level. We securely block the wheels. We do not use the handbrake! Otherwise, the brake drum will not be removed. Raise the right wheel and remove it. Next, remove the brake drum; to do this, unscrew its bolts (two), gently tap it on the rim from the inside out through the wooden backing, turning it slightly.
Now you need to jack up the axle shaft from below so that the flange of the right drive is higher - otherwise, when removing the axle shaft, oil will leak out.
When the drum is removed, you can try to remove the drive. There are three ways: a special inertial puller, tapping the flange through a wooden spacer, the “wheel method”. Few people have a puller, and if tapping on the flange fails to dislodge the axle shaft from the support bearing seat, we place the wheel directly on the flange with two bolts on the reverse side. We do not tighten the wheel bolts completely, leaving 2.5-2 cm of thread. Now the wheel needs to be pressed against the flange and pulled strongly towards you, that is, outward relative to the car. Several such impacts from the weight of the wheel will definitely remove the axle shaft.
Having taken out the axle shaft, you need to inspect it for:
- Is there excess play in the bearing?
- Is there any drive runout?
To determine the runout, you need to put it on a smooth surface and roll it around its axis - the runout will be noticeable. We are solving the issue of replacing the drive assembly with the bearing or just the drive bearing. With some experience, the drive bearing can also be replaced independently, but here you need skill or good mandrels, since both removal and subsequent pressing are complicated by the fact that the ends of the axle shaft are long and it is difficult to position it conveniently for impact.
You can only knock on the inner ring of the bearing. Under no circumstances should you place the drive vertically on the bearing and knock, even through the backing on the tail part of the axle shaft (which goes into the rear axle) - it may move and a runout will appear.
Left drive oil seal replacement procedure
The oil seal is located on the outside of the boot, at the location of the bearing on the axle shaft. The cuff is covered with a plastic casing to protect it from dirt. If the plastic interferes when removing the rubber seal, it is broken, then a new protection is installed. But, if you try, you can knock out the oil seal and the elements in contact with it without touching this protective washer.
On the Renault Logan, there is no classic internal grenade on the left side; instead, it is simply a tripod that goes inside the gearbox housing. The left drive of the Logan is significantly shorter than the right.
To get to the rubber seal, you have to dismantle the entire drive shaft, along with the outer hinge. You need to do the following:
- place the container and drain the oil from the transmission by unscrewing the plug;
- unscrew the hub nut;
- pull out the left wheel by lifting the car on a jack;
- separate the hub knuckle from the ball joint using a pry bar;
- disconnect the ABS system sensor, remove the brake caliper;
- remove the end of the axle shaft with the outer grenade from the hub splines;
- crawl under the car, unscrew the fastening bolts of the retaining tee from the other end of the drive shaft;
- remove the shaft from the gearbox.
The oil seal is removed from the drive after removing the boot. To get to the cuff, you need to knock out the retaining ring, pull out the tri-pin (tripod bearing) using a puller, remove the metal outer and inner protective cages and the large needle bearing of the axle shaft.
It is better to knock out the tripod using a soft drift, with light blows, if you cannot find a professional remover.
Installation of the oil seal begins with placing the element on the inner race of the axle shaft, onto which the needle bearing is also placed. All these assembled parts are driven onto the shaft. The order is as follows: first, the oil seal is put on the inner race, then the bearing, then all this is put on the outer race. It is advisable to coat the inside edges of the protective shell with sealant for strength. Naturally, you need to wait for the glue to dry, and only then start putting it on the drive shaft.
After this, a tripoid bearing is placed on the shaft splines and a retaining ring is put on - before this, it is important not to forget to put on the boot. To fix the stopper, you need to rest the tip of a flat-head screwdriver against the edges of the washer and open them a little, rotating the tool clockwise. That's all - all that remains is to secure the boot with a clamp, place the drive on the gearbox housing and tighten the seat ring with three bolts. Next, the other side of the axle shaft is attached to the wheel hub.
The same should be done in case of damage to the right oil seal. Only in this case it is necessary to disassemble the wheel on the passenger side. The right-hand drive Renault Logan is longer and equipped with a special damping damper with a rubber and metal base. The cuff here is located directly on the box; access to it opens after removing the axle shaft with a hinge cup at the end.
We recommend inspecting the boot while working. If there are cracks or breaks, it should definitely be replaced. The tripoid bearings also need to be checked, although they are of high quality on Logan and rarely fail. Replacing the Renault Logan CV joint oil seal will not take much time; it can be done by an experienced Logan driver. However, if you do not have the proper experience, it is better to contact a car service center.
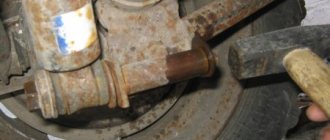
Advice
For those who have not removed the bearings from the seat. In general, all bearings are pressed into place at the factory. In garage conditions, there is no press; in addition, equipment (beds, tables with stops, mandrels) is also needed. Therefore, to remove the bearing by blow, you need a very massive hammer. So that the blow is massive at a low speed of movement of the hammer. Even with a strong blow, the bearing cannot be removed with a light hammer - the blow will be elastic.
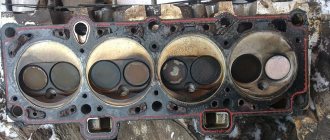
The drive seal is now clearly visible. To remove the oil seal, use a large flat screwdriver point-blank, tapping it diametrically in a circle.
Now be sure to inspect and clean the seat of the right drive oil seal with a rag. If it has holes or corrosion, in addition to cleaning, it is advisable to use a seating lubricant for the new oil seal.
Everything is ready for assembly. We press the axle shaft seal into the seat using a mandrel or head of suitable diameter.
Assembly is carried out in reverse order.
On all “classic” models (VAZ 2101-07), replacing the oil seals of the right and left drives occurs in the same way.
What tools will you need?
In order to replace a VAZ-2107 axle shaft or bearing, you will need a standard set of tools:
- Jack.
- 19 mm wrench for unscrewing wheel bolts.
- Driver and set of socket heads.
- Hammer and chisel.
- Angle grinder, better known as an angle grinder.
- Several flathead and Phillips screwdrivers.
- Pliers.
- Reliable vice mounted on a workbench.
It is imperative to purchase a new bearing and oil seal for the VAZ-2107 axle shaft. Before carrying out work, it is advisable to find a small pipe that can be put on the axle shaft without any problems. With its help, a new bearing is installed.
Changing the axle shaft seal 2123
Replacing the 2123 drive oil seal changes in a similar way, with some differences, since the VAZ 2123 has a slightly different shock absorber mount to the rear axle:
- You will need to unscrew the 4 bolts securing the right rear drive bearing bracket. Then jack up the axle shaft so that its end is slightly higher than the entrance to the rear axle. Then remove the shock absorber mounting bracket from the bearing mounting plate bolts.
- The NIVA has 5 wheel bolts, so to remove the drive using the “wheel method” you will need to screw it onto three bolts, not two.
Otherwise, the procedure for replacing the axle shaft seal 2123 is no different from the process described above for the axle shaft seal 2101, perhaps with the difference that the “NIVA” and “Chevrolet NIVA” are a little higher, which means it will be a little more convenient to work at the bottom.
↑ Replacing the VAZ 2106 axle shaft seal video
ATTENTION!
The electronic catalog of spare parts intended for reference purposes only!
Our company does not sell all spare parts presented in this list. If there is a “Cost” link in the right column, these spare parts are on active sale. Availability in warehouses for details and prices, see the product card. If there is no “Cost” link in the right column, we do not sell such parts and do not accept orders for them.
Rear axle cuff
Probably all motorists know that for long-term service of a vehicle, it needs an eye and an eye. You shouldn’t wait until car parts fail at the most inopportune moment. Experienced drivers carry out preventative maintenance in advance, and their car never fails. One of the most common jobs on the VAZ 2106 is replacing the axle seal. Thanks to its periodic replacement, oil will not leak out of the gearbox. Replacing the axle seal on a VAZ 2106 is a simple procedure and you can handle it yourself.
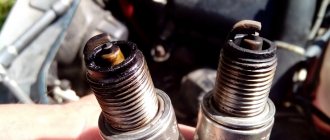
Determining a worn oil seal
If the axle shaft was removed for some other purpose, be sure to check the condition of the drive seal. To do this, in addition to the presence of oil leaks, we check:
- The elastic band should be soft and elastic to the touch;
- The cut sliding along the drive has a sharp edge;
- The notches on the rubber part (they will only be visible when the oil seal is removed) are not worn out.
- If the oil seal is “burnt”, that is, it worked with overheating, its sliding edge will be somewhat stiffer than the peripheral part of the rubber. It should only be replaced immediately, even if there is no leak yet.
Selecting a new drive oil seal to replace
Many manufacturers make good, high-quality parts. Three points are important in the oil seal, which can be checked when purchasing:
- Like all oil seals with a metal fit, the metal cage must be made of good material, soft enough, but at the same time, with a high class of processing, otherwise the oil seal will not fit tightly into its seat;
- The quality of the rubber, including the absence of nicks, casting seams, and other visible defects;
- The quality of the articulation of metal and rubber. The thin edge of the transition between the rubber part and the metal part.
All these parameters are very indirect, but still speak about the manufacturing technology of this important part. It is clear that it is difficult to determine the hardness of rubber and its performance properties by eye, but sometimes indirect parameters allow you to compare two parts and choose the best one. Therefore, it is better to look at it carefully before installing it in your car.
| Attention Bearing Buyers Dear customers, send your questions and requests for the purchase of bearings and components by email or call now: Delivery of bearings throughout the Russian Federation and abroad. Bearing catalog on the website |
Attention Bearing Buyers
Dear customers, send your questions and requests for the purchase of bearings and components by mail or call now: tel: +7 (495) 646 00 12 [email protected] Delivery of bearings in the Russian Federation and abroad. Bearing catalog on the website
themechanic.ru
Symptoms of a faulty Renault Logan drive oil seal
The main symptom of an omentum rupture is difficult to miss. Oil stains suddenly appear under the car and on parts. In this case, you should immediately check the cuff of the internal grenade.
On Renault Logan, the rubber element on the driver's side often fails, since due to the design features of the car, a large load falls on the left drive.
You can also identify a problem with the oil seal by reducing the transmission oil level. True, this symptom only appears if the element fails completely - when there is a hole in it the size of a coin.
Typically, a problem with a leak occurs after a mileage of 100-120 thousand kilometers. The main reason is wear of the material; the rubber becomes dull over time. The contacts of the rubber cuff rust, become nicked, and because of this it breaks. Gasoline can get on the seal, which will quickly corrode the material.
The service life of oil seals depends on timely maintenance and routine inspection. If the technical qualities of the transmission oil deteriorate significantly, the rubber cuff begins to overheat.
On Renault Logan 1.6, 2 liters equipped with automatic transmission, the condition of the cuff becomes critical in winter. In cold weather, you need to warm up the machine more often, but many people forget about this.