Fluids: What and how much to fill in Honda Civic
Introduction
A cheat sheet on fluids for the 6th generation Honda Civic, both restyled and pre-restyled. Basically, all fluids come under the Honda , and probably except for oil (although it’s not bad), all fluids show excellent performance without any complaints.
What is responsible for what, where to pour what fluids into the Honda Civic
Petrol
Gasoline prices in Russia also worry Honda drivers
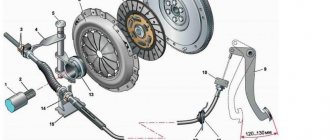
Engine oil
When repairing a Honda engine, a 4 liter can plus 1 liter is used, since all surfaces are cleaned and re-lubricated. A typical change uses approximately 4 liters of oil, including the oil filter. Depending on the engine version and the presence of a VTEC system, variations are usually from 3.3 to 3.7 liters . Let me remind you that the marks on the Min and Max oil dipstick correspond to a difference of 1 liter of oil. Read more about oil in the article. Previously, the synthetic oil was Honda 5W-30 SM , now it has been replaced with a new index 5W-3O SN , and the canister began to look like in the photo.
New packaging of the famous synthetic Honda 5W-30 SN, Previously SM
Power steering fluid, steering rack
Standard fluid replacement for the power steering system (power steering) contains 1.2 liters. It is recommended to take HONDA PSF-II liquid; 2-3 jars . The same amount is needed when rebuilding the steering rack; in general, take 3 cans of HONDA PSF-II and you won’t go wrong. UPD 2021: For the last 2 years I have been pouring myself Gunk liquid - yellow bottle.
PSF Honda, fill it up if you don’t want to have problems with the steering rack.
Brake fluid
Typically, original Honda brake fluid , DOT-4 standard, . You can mix with glycol brake fluids of different standards (not silicone!), for example, in DOT-4 you can add DOT-3 (which is lower than the standard and not particularly recommended) or DOT-5.1 (which is higher and better). DOT-5 cannot be poured into DOT-4 . In general, it is not recommended to mix brake fluids, and you should not save on it. The volume of brake fluid is 1 liter when replacing (2 bottles of 0.5 each). If the expansion tank of the brake system has not been drained, when replacing the front discs, you can only bleed the front ones. The order of bleeding the brakes is as follows: left front, right rear, right front, left rear.
Sequence for pumping brake fluid Honda Civic left hand drive
Clutch fluid
Be that as it may, brake fluid . This is usually DOT-4. The bleeder fitting is located on the clutch cylinder itself.
The best brake fluid option, don't skimp on brakes
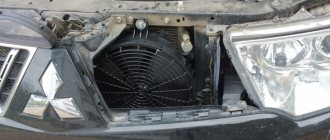
Coolant to the radiator
Coolant, also known as antifreeze, the entire cooling system holds approximately 6 liters of coolant . Standard Honda Coolant Type 2 or Honda Long Life Type 2 . But I personally take Liqui Mole concentrate and dilute it to the desired ratio (distilled water) depending on the season in summer and winter. The color is blue or green , not red!
Coolant concentrate for Honda radiator
Civic automatic transmission oil
Typically, the type of oil in an automatic transmission is written on the gearbox dipstick; the Honda Civic is no exception. The automatic transmission is filled with Honda ATF-Z1 (new ATF-DW1) with a volume of 3 liters. The problem is that simply changing the fluid will not work, since the drain plug is located above the dead bottom point. As a result, replacement occurs in parts. They drained it through the plug, left one quarter, filled it with new oil, drove it for 100 km, and replaced it again. And so on up to 3 times. Naturally, the replacement takes place with a warm automatic transmission. The color is usually red, you can check the color of the oil by moistening a napkin with a drop from the automatic transmission oil dipstick. No Dextron. Although ATF-DW1 differs from ATF-Z1 in that it is synthetic, it does not allow for partial replacement, so you can “mix” 1 to 4 such oils during a partial (three-time) oil change in the automatic transmission without fear of consequences.
ATF-Z1 and new oil ATF-DW1
Manual transmission oil S20S40 Civic
Everything is simpler here: 1.6 - 1.8 liters of Honda MTF for the D Series (that’s 2 bottles maximum), and 2.2 liters for the B Series of Honda engines (3 bottles).
Honda MTF bottle for manual transmission, you need about 3 bottles
Variator oil (CVT)
Honda CVTF, also known as Honda HMMF , requires 5 liters for the M4VA Honda CVT; I have not seen any other CVTs for the 6th generation 1996-2000 Civic.
5 liters of CVTF oil for Honda CVTs
Rear axle oil for 4WD Civic
If you are the happy owner of an all-wheel drive Honda Civic, then the fluid is called Honda DPS-F .
Honda rear axle oil, rarely seen
Random article learn something new
This article is relevant for Honda vehicles manufactured 1992-2000, such as Civic EJ9, Civic EK3, CIVIC EK2, CIVIC EK4 and CIVIC FERIO (partially). The information will be relevant for owners of Honda Integra in DB6, DC1 bodies, with ZC, D15B, D16A engines.
- Autoexotica – May 1
- Jap Days – June 22
- JAP CAR FEST – July 19-21
- Moscow
- Saint Petersburg
- Minsk
- Ufa
EJ9 and EK3 - engineer's notes on Honda Civic 1998. 2010 - 2021. All information is provided for informational purposes only; the author is not responsible for any harm resulting from the use of site materials; by being on the site you confirm your agreement with this. Made by Hondavod for Hondavod. Author: Ilya Serb All images are copyrighted Sitemap Honda Civic, VTEC everyone!
2278-4-28-02
Using the “8” wrench, unscrew the bleeder fitting 1/2–3/4 turn.
In this case, liquid with air bubbles will flow out of the hose, and the brake pedal will move forward.
As soon as the liquid stops flowing out of the hose (the pedal should go all the way), tighten the fitting, and only after that can the assistant release the pedal.
We repeat pumping until the liquid coming out of the hose becomes light-colored. We remove the hose, wipe the bleeder fitting dry and put a protective cap on it.
2278-4-28-01
Remove the protective cap from the brake bleeder fitting.
Use a spanner wrench or an “8” socket to loosen the tightening of the bleeder fitting. We put a hose on the fitting, and immerse its free end in a container partially filled with working fluid.
An assistant should vigorously press the brake pedal all the way 4-5 times and keep it pressed.
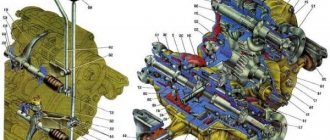
How to modify the AMT clutch with a 1.8 engine on Lada Vesta and Lada XRAY
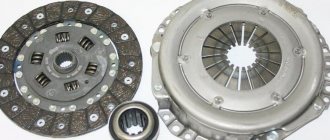
Jerking, jerking, shaking and vibrations when starting to move and when changing gears are one of the problems faced by owners of Lada Vesta and Lada XRAY with AMT and a 1.8-liter engine. If the LADA dealership recognizes such a case as covered by warranty, then the defective Valeo clutch disc is replaced with a new one of the same company (there is no alternative). According to reviews from owners, this solution is not durable. Soon they found a better replacement - a Sachs clutch disc.
Question to AvtoVAZ
via Za Rulem magazine:
You have to modify the design yourself.
Attention! The SACHS clutch disc is designed for installation on Chevrolet Niva cars. You install it on Lada Vesta and Lada XRAY (1.8L, AMT) cars at your own peril and risk
- Driven clutch disc Sachs (article 1878 002 205)
- Washers 8x14x1.5 (6 pcs.)
The Sachs clutch disc is approximately 1.5 mm thicker than the stock Valeo:
Therefore, 6 washers should be placed under the bolts that secure the basket to the flywheel. Otherwise, there may be problems with gear engagement.
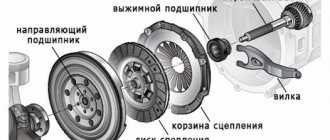
On a Lada XRAY, you can replace the clutch disc without removing the gearbox and subframe, on the left side, by moving the box to the side:
After replacing the clutch disc, we adapt the clutch (some owners did without this, and there were no problems in the operation of the AMT after installing the Sachs clutch disc).
Installation on Lada Vesta (author):
Installation on Lada Vesta (author):
Installation on Lada XRAY (author)
Feedback from social networks:
Have you encountered similar problems? How did you solve vibrations at start-up on a 1.8-liter engine with AMT?
Let us remind you that on 1.6-liter LADA engines with AMT, in such a situation, the clutch kit is replaced under warranty. It uses new friction linings of the driven disk. They make switching and starting movement smoother. The risk of jerking and vibrations is reduced (see information letter No. 5-17 dated January 23, 2017).
2278-4-27-01
When replacing, pump out the old fluid from the reservoir with a rubber bulb.
After pumping out the old brake fluid, pour new brake fluid into the reservoir.
We carry out the replacement with the engine not running, first in one circuit, and then in the other in the following sequence:
- Right rear wheel brake
- Brake mechanism of the left front wheel
- Left rear wheel brake
- Brake mechanism of the right front wheel
We clean the bleeder fitting of the brake mechanism of the right rear wheel from dirt.
Hydraulic Clutch Actuator - Bleeding
If the following malfunctions occur, it is necessary to check the hydraulic clutch drive system for fluid leaks and remove air from the system:
— the appearance of free play of the clutch pedal;
— the clutch pedal is in the middle or depressed position;
- Difficulty shifting gears.
Possible consequences of contamination entering the hydraulic clutch system
The hydraulic clutch drive is very sensitive to contamination. The entry of contaminants into the system can lead to the following consequences:
— inability to change gears;
— damage or complete failure of the hydraulic clutch;
— leaks from the hydraulic clutch drive.
To remove air from the hydraulic clutch drive, use the following equipment:
— installation for removing air from the hydraulic drive system through a brake fluid reservoir type OMA 883 f. "OMA" (Italy);
— a syringe for removing air through a fitting located on the clutch slave cylinder.
Hydraulic Clutch Bleeding Procedures
If parts of the hydraulic clutch are removed
Perform air removal operations using a device for removing air through the brake fluid reservoir or using a new syringe through the air removal fitting located on the clutch slave cylinder (brake fluid according to the current “Codifier of basic and auxiliary materials used in vehicle maintenance and repair” LADA" K 3100.25100.00018).
If the clutch hydraulic parts are not removed
Perform air bleeding operations with a syringe only by injecting brake fluid through the air bleeding fitting on the clutch slave cylinder.
Place the vehicle on a two-post lift, apply the parking brake and turn off the ignition.
Remove the engine crankcase protection (see here)
Bleeding procedure if there are no hydraulic drive parts removed
Bleeding using a hydraulic drive system bleeder
Secure the clutch pedal in the up position using a strap attached to the steering wheel to ensure hydraulic integrity during the bleeding operation.
Connect the installation for removing air from the hydraulic drive system to the brake fluid reservoir (installation for removing air from the hydraulic drive system type OMA 883 f. "OMA", Italy).
Remove plug 1, Figure 8-1, from the air bleeder fitting on clutch slave cylinder 4.
Connect the transparent tube to the air removal fitting, lowering the other end into an empty vessel located above the air removal fitting (transparent process tube, process vessel).
Press the lock 2 and pull out the pipeline 3 one click to open the air bleed hole.
1 — plug of the fitting for removing air; 2 — clamp; 3 - pipeline connecting the main and slave cylinders of the clutch drive; 4 — clutch slave cylinder; 5 - gearbox
Device characteristics
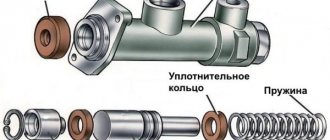
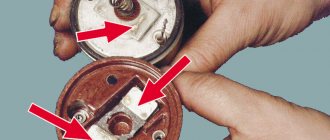
Using the clutch, it is possible to prevent sudden changes in load, which ensures a smooth start of the car from a standstill. The clutch also protects the entire gearbox from the loads of inertial moments that appear as a result of a sharp slowdown in the rotation of the crankshaft with the engine running at the moment when the driver changes gear. On Gazelle cars, a hydraulic clutch system is installed. It has gained wide popularity on many models of modern cars. The design of the hydraulic mechanism is based on the clutch master cylinder. Gazelle “Business” is also equipped with it. The main problem that the cylinder solves is the transmission of impulses from the pedal to the working element of the system. With the help of this unit, the machine starts. The mechanism also makes it possible to switch up and down gears.
Below we will look at the design of the clutch master cylinder. The Gazelle is a commercial vehicle, so at times it requires servicing. What problems happen with the clutch, how to repair, maintain and, if necessary, change this unit? Let's tell you about everything in order.
2278-4-28-03
We pump, as described above, the brake mechanism of the left front wheel.
Similarly, we bleed the brake mechanisms of the other circuit.
When pumping, you need to monitor the fluid level in the tank and add fluid.
We pump the hydraulic drive of the brake system until new fluid (lighter than the old) begins to come out of the bleeding fittings of all working cylinders. After pumping, bring the fluid level in the hydraulic brake reservoir to normal.
Next, we pump the clutch hydraulic drive to replace the fluid in the clutch master cylinder and in the connecting pipes.
The fluid in the working cylinder cannot be completely replaced in-place. Some improvement in its quality is achieved by stirring.
To bleed the clutch hydraulic drive, there is a fitting on the plastic tip of the tube, closed with a rubber cap.
The adapter on which the tip of the tube is placed is not fixed in the clutch housing, therefore, for ease of bleeding, we recommend making a lock washer from a metal washer (1.0–1.2 mm thick, with an outer diameter of 23 mm and a hole with a diameter of 10.5 mm). adapter
Before pumping, check the fluid level in the tank. If necessary, add liquid.