Chevrolet Lacetti manual
Chevrolet Lacetti Removing the outer joint
We carry out the work when replacing a hinge or its cover.
Remove the front wheel drive (see Removing the front wheel drives). We clean the hinge body and cover from dirt and clamp the shaft in a vice with soft metal jaw linings. We cut through the large clamp securing the cover with side cutters... ...or, by inserting the blade of a screwdriver into the clamp lock, we unclench it.
We open the small clamp lock in the same way.
Having removed the clamps from the cover, we slide it along the shaft from the outer hinge. Using a rag, remove the grease from the end of the hinge race. We clamp the splined shank of the outer hinge housing in a vice with soft metal jaw linings.
Using two screwdrivers or special pliers with flat jaws, we open the “tendrils” of the locking ring that secures the joint cage on the drive shaft.
When performing this operation, it is necessary to center the retaining ring with a tool as accurately as possible relative to the hole in the cage, so that when the ring is unclamped, it completely fits into the groove of the cage along its entire circumference (except for the “antennae”) (for clarity, the drive shaft is removed from the cage).
An uncentered ring, when the antennae are unclamped, will not completely fit into the raceway groove and will not release the shaft.
As soon as the retaining ring enters the groove of the cage and at the same time comes out of the groove on the drive shaft, pull the shaft along its axis...
...and remove it from the joint cage.
Remove the dirt cover from the shaft. If the hinge is removed only to replace the cover, then, without disassembling the hinge, remove as much grease as possible from it and wash it in kerosene. We wipe the hinge with a rag and blow it with compressed air. We inspect the balls, separator, cage and internal cavity of the body. Scratches, dents, cracks, and traces of corrosion are not allowed - we replace such a hinge. We clean the shaft of old grease and apply a thin layer of new grease to it. We put the joint cover on the shaft. We install a new retaining ring into the holder and put new lubricant into the cavities of the hinge body and cover, a total of 110–130 g. We put the hinge on the shaft, ensuring that the retaining ring is fixed in the groove of the shaft. We check the mobility of the hinge - it should move without jamming. We pull the cover onto the hinge body so that the belts of the cover under the clamps are located in the corresponding seats of the shaft and the hinge body. We secure the hinge cover with new clamps. To install the original clamps supplied as spare parts, special pliers are required. If they are not available, you can use universal tape clamps for attaching CV joint covers, which are commercially available.
Universal tape clamps for fastening the CV joint cover: clamp for attaching the cover to the hinge body; clamp for securing the cover to the drive shaft
We show the installation of a universal band clamp securing the cover to the hinge body. Having installed the clamp in the groove of the cover...
... use pliers to pull out the tape, squeezing the clamp. In this case, with other pliers it is necessary to rest against the clamp lock or clamp tabs, holding the clamp from turning. Having pulled the clamp tightly, we bend the elongated end of the tape in the opposite direction. Holding the tape in a taut position, we check the tightness of the clamp, trying to slide the clamp by its lock along the groove of the cover. If the clamp moves, it is not tightened sufficiently and the clamp must be tightened again. Pulling the clamp tightly...
...bend the clamp tabs onto the tape. In the same way, we secure the cover with a clamp on the drive shaft. We check the reliability of fastening the hinge cover with clamps. During angular movements of the hinge housing relative to the shaft, the cover should not move from the housing and move along the drive shaft, as well as rotate on them. We bite off the excess end of the clamp tape (behind the tape clamp tabs) with side cutters.
Replacing front struts on a Chevrolet Lachetti
The Camaro story begins with a year. The powerful car quickly conquered the market in this segment.
The car turned out to be not only powerful, but also aesthetically attractive. It’s not for nothing that the Camaro is constantly seen in various films.
If you hear knocking noises in the front-wheel drive while the car is turning, check the condition of the CV joint. If the protective covers are torn or you feel play when rocking the drive shaft with your hands.
Normal, no crunch, 19 thousand. Chevrolet Lacetti Club - North-West.
Remove the front wheel drive, see Removing the front wheel drives. There is no need to unscrew anything else.
We are sending the whole thing for recycling. We remove a little grease to get to the retaining ring. This is what the retaining ring looks like. And there is a groove on the drive shaft.
It is this groove that holds the retaining ring and does not allow the drive shaft to be disconnected from the hinge. That is, in order to remove the drive shaft from the hinge, we need to move the antennae of the retaining ring apart using two screwdrivers or pliers. I think it’s clear. Now we put the new boot on the drive shaft. Inspect the hinge for dirt and water. If there are suspicions, then we wash everything and apply new lubricant.
An uncentered ring, when the antennae are unclamped, will not completely fit into the raceway groove and will not release the shaft. As soon as the retaining ring enters the groove of the cage and at the same time comes out of the groove on the drive shaft, pull the shaft along its axis... ...and remove it from the hinge cage. Remove the dirt cover from the shaft.
If the hinge is removed only to replace the cover, then, without disassembling the hinge, remove as much grease as possible from it and wash it in kerosene. We wipe the hinge with a rag and blow it with compressed air.
We inspect the balls, separator, cage and internal cavity of the body. Scratches, dents, cracks, and traces of corrosion are not allowed - we replace such a hinge.
Some Title Here
We clean the shaft of old grease and apply a thin layer of new grease to it. We put the joint cover on the shaft. We install a new retaining ring into the cage and put new lubricant into the cavities of the hinge body and cover, total - g.
Chevrolet Lacetti Removing and replacing the outer CV joint Chevrolet Lacetti
CHEVROLET LACETTI. Replacing CV joints with bare hands.
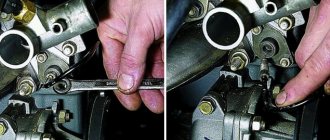
When removing the shank of the inner hinge of the right wheel drive of the Chevrolet Lacetti, use the end of the mounting spatula to pry up the end of the hinge housing and rest the spatula on the head of the bolt securing the differential bearing cover.
An easy way to replace a CV joint on a Lacetti. Will the boot fit from . CV joint, but among the people...
We pull the cover onto the hinge body so that the belts of the cover under the clamps are located in the corresponding seats of the shaft and the hinge body. If everything is normal, then you can simply update the lubricant. For final fixation of the clamps, it is necessary to compress the U-shaped protrusion. At home, you can use suitable pliers. Or, of course, there are special pliers for these purposes.
We cut through the large clamp securing the cover with side cutters or, by inserting the blade of a screwdriver into the clamp lock, unclip it.
To install the original clamps supplied as spare parts, special pliers are required.
If they are not available, you can use universal tape clamps for attaching CV joint covers, which are commercially available. Having installed the clamp in the groove of the cover... ...use pliers to pull out the tape, squeezing the clamp.
In this case, with other pliers it is necessary to rest against the clamp lock or clamp tabs, holding the clamp from turning. Having pulled the clamp tightly, we bend the elongated end of the tape in the opposite direction.
Replacing the boot of the outer CV joint of the Lacetti
Holding the tape in a taut position, we check the tightness of the clamp, trying to slide the clamp by its lock along the groove of the cover. Replacing front struts on a Chevrolet Lachetti
Why is it necessary to replace the CV joint on a Chevrolet Niva and how to determine it?
The wear of a CV joint is determined quite simply. You need to drive a circle, turning the steering wheel to the very end, right or left. When driving this way, this part experiences maximum load, which is exactly what is needed to determine breakage or wear.
So, if it really needs to be replaced, then when turning, a crunching sound will be clearly heard - this will be a signal that the part should be changed. Moreover, it is advisable to always check two hinges at once - first making a circle clockwise, and then counterclockwise. If a crunching sound is heard in both directions, then both joints need to be replaced.
In addition to all of the above, it should be noted that sometimes instead of a crunch you can hear a knock - this also means that there is a problem with the hinges. You can also check for breakage by shaking the shaft by hand and if play is noticed, this will definitely signal a breakage and exit from the explication. By the way, the seriousness of the whole situation when it is necessary to change the hinges is further emphasized by the fact that when replacing it, absolutely all components will have to be changed, there is no other way.
Site navigation
Exactly until the moment when a burst air filter pipe was discovered, there will definitely be a record about it, a little later. The budget was limited, and it was necessary to squeeze the ill-fated pipe into it. The Trialli CV joint was ordered from Avtodok, as well as the Hans Pries drive oil seal and the gearbox O-ring, as it was called in the catalog. First, about the oil seal.
We secure the hinge cover with new clamps. To install the original clamps supplied as spare parts, special pliers are required. If they are not available, you can use universal tape clamps for attaching CV joint covers, which are commercially available.
Universal tape clamps for attaching the CV joint boot: Having installed the clamp in the groove of the boot... ...use pliers to pull out the tape, squeezing the clamp. In this case, with other pliers it is necessary to rest against the clamp lock or clamp tabs, holding the clamp from turning.
Removing and installing front wheel drives
The front wheel drives are removed to be replaced if damaged or to replace the hinges and their covers. In addition, the front wheel drives may need to be removed to gain access to other units.
You will need: “14” (two) and “32” keys, a wrench for the wheel nuts, a mounting blade, a hammer.
1. Loosen the wheel nuts, then lift the front of the vehicle and place it on secure supports. Remove the corresponding wheel.
2. Loosen the front wheel hub nut.
3. Unscrew the hub nut.
4. . and remove the thrust washer located underneath it.
5. Remove the brake hose from the bracket on the shock absorber strut.
6. Remove the wheel speed sensor
7. Disconnect the outer tie rod end from the swing arm (see “Replacing the outer tie rod end”).
8. Unscrew the nut of the coupling bolt of the terminal connection between the steering knuckle and the ball joint, remove the bolt and remove the ball joint pin from the steering knuckle (see “Replacing the front suspension ball joint”).
9. Move the telescopic strut slightly to the side, remove the shank of the outer constant velocity joint from the hub and tie it with wire to the shock absorber.
Helpful advice: If you cannot remove the joint shank by hand, knock it out of the hub with light blows of a hammer through a wooden spacer.
10. With the mounting blade resting on the gearbox housing through a wooden spacer, press the inner drive joint out of the axle gear.
eleven. . and remove the front wheel drive assembly.
Warning: Replace the inner joint shank retaining ring with a new one each time the drive is removed from the vehicle, otherwise the drives may separate from the transmission while driving.
12. The second drive is removed in the same way.
13. To install the drive shaft, insert the splined shank of the inner joint housing into the axle shaft oil seal and rotate the drive shaft slightly so that the splines of the hinge shank and the axle shaft gear coincide.
14. To install the drive, insert the splined shank of the outer joint housing into the wheel hub, install the thrust washer and screw the hub nut until it stops, without fully tightening it.
15. Move the front suspension arm down and with a sharp movement of the shock absorber strut and steering knuckle, press the drive into the axle gear until the drive is secured with a retaining ring.
16. Attach ball joints to the steering knuckles, and steering linkage joints to the steering knuckle arms.
17. Reinstall the brake hoses and wheel speed sensors.
Warning: When installing the sensor, carefully align the hole in the sensor housing with the threaded hole in the knuckle. During installation, do not rotate the sensor around its longitudinal axis.
The increase in resistance to movement of the sensor should only be felt the last 2 mm before it is completely seated in the fist. If the sensor enters the knuckle hole with great resistance from the very beginning of installation, remove the sensor and eliminate the cause of the jamming (dirt, burr on the body, etc.) It is strictly forbidden to press in the rear wheel speed sensor with a hammer.
18. Install the wheels and tighten the wheel nuts until they stop, without fully tightening them.
19. Place the car on the wheels, removing it from the supports.
20. Finally tighten the wheel nuts.
21. Completely tighten the hub nut.
Note: The hub nut is tightened in three stages:
- 1st - tighten to 150 Nm;
- 2nd - loosen by 45°;
- 3rd - re-tighten to 250 Nm.
Replacing a CV joint on a Chevrolet Lacetti
The reason why you have to replace the inner CV joint of a Chevrolet Lacetti is, as a rule, its breakdown. The CV joint or “grenade”, as many motorists call this part, with proper use and timely replacement of the boot, the spare part is durable.
Video
The video will tell you how to replace a CV joint on a car.
Replacing external hinges on a Chevrolet
Experienced car enthusiasts know that CV joint parts do not change individually, but only as an assembly. As a last resort, you can disassemble the “grenade” to replace the internal tripod-type CV joint, since it is the simplest to assemble and is less susceptible to contamination getting inside. When removing the CV joint, it is necessary to carefully inspect it - if there are traces of grease on it, then the boot is torn, therefore, it is necessary to change the hinges.
To replace outer CV joints on a Chevrolet Lacetti, you will need the following tools:
- hammer;
- screwdriver;
- puller for locking rings;
- side cutters.
Replacement process
Before we begin repairing the Chevrolet Lacetti, namely replacing the internal CV joint, let's look at the reasons for its failure. Causes of CV joint failure In order for the CV joint of your car to last for a long time, you need to adhere to only two rules. Firstly, avoid a sharp start with the steering wheel turned too far. Secondly, periodically inspect the CV joint boot for cracks and greasy lubricant stains. If detected, immediately replace the boot:
If the car uses light alloy wheels, then use a jack to hang and remove the wheel from the side of the drive being removed. Using the blade of a flat-head screwdriver, straighten the jammed collar of the hub bearing nut. Install the wheel and secure it with nuts.
Unscrew the hub nut.
Before installing the light alloy wheel, use the handle of a hammer to push it out of the central hole of the disk...
Remove the brake hoses.
Remove the ABS sensor (if equipped).
We lower the car, secure it with the parking brake and place chocks under the rear wheels. Using a 32" socket with a powerful wrench, loosen the tightening of the hub bearing nut.
Remove the tie rod end.
If the disk is steel, remove the cap covering the hub bearing nut and, straightening the jammed belt, unscrew the nut. After loosening the wheel nuts, hang it up and remove it. We securely fix the car on a factory-made stand. Disconnect the ball joint of the front suspension arm from the steering knuckle. Remove the front wheel brake hose coupling bracket to the bracket on the shock absorber strut body and remove the hose coupling from the bracket hole. Unscrew the hub bearing nut and remove the thrust washer.
We move the steering knuckle with the shock absorber strut outward and remove the splined shank of the left wheel drive outer joint housing from the hub hole. We place the drive on the suspension arm.
We take out the outer CV joint.
When the shank of the outer joint housing is tightly seated in the hub hole, knock it out with a hammer through a soft metal drift.
Pull out the inner CV joint.
If you decide not to drain the oil from the gearbox, then place a container under the hole in the gearbox housing into which the shank of the internal drive joint fits. When dismantling the left drive, use the end of the mounting blade to pry the shoulder of the inner hinge housing...
...and, leaning with a spatula on the gearbox housing, overcoming the resistance of the locking ring, we push the shank of the hinge housing outward from the spline hole of the differential side gear.
Supporting the inner joint housing so as not to damage the drive oil seal with its splined shank, remove the left wheel drive.
When removing the shank of the internal hinge of the right drive, use the end of the mounting spatula to pry up the end of the hinge housing and rest the spatula on the head of the differential bearing cover mounting bolt.
We replace necessary or damaged parts.
Remove the right wheel drive. Before installing the drive, replace the inner joint shank retaining ring with a new one. Reuse of retaining rings is not permitted. Carefully insert the shank of the internal joint housing through the hole in the drive oil seal and, turning the shaft, align the splines of the shank with the splines of the side gear. With a sharp movement of the drive towards the gearbox, we send the drive to its place. By pulling the inner joint housing or prying it with a mounting blade, we make sure that the housing shank is fixed in the side gear. We carry out further assembly in reverse order. If the transmission oil was drained from the gearbox before dismantling the drive, then pour new oil into the gearbox, otherwise we check the oil level in the gearbox and bring it to normal by adding exactly the same oil.
Step-by-step replacement of the internal grenade of a Niva Chevrolet
- Unscrew the 3 nuts securing the bearing housing of the drive's inner CV joint.
- Unscrew the bolt securing the front axle bearing cover to the transverse part of the suspension.
- Unscrew the 4 nuts securing the front axle gearbox mounting bracket.
- Unscrew the nut and remove the fastening of the axle bearing cover to the transverse part of the suspension.
- Using a jack or other device, it is necessary to raise the front axle and secure it in this position.
- Unscrew the hub nut.
- Remove the drive nut and centering sleeve.
- By lifting the lower arm, it is necessary to compress the spring to remove the lower ball joint by unscrewing the 3 bolts from the arm.
- Move the axle aside.
- Unscrew the exhaust pipe from the manifold and the catalyst housing, and then move it closer to the engine. Replacing the boot of the inner CV joint with your own, replacing the stud on the hub of a Gilly Emgrand EC7. Replacing the inner CV joint Niva v video! -. If the left drive is being removed, this operation is not required. If it is impossible to get to the main service, vavada mobile functions. Providing the same conditions and chances for the visitor, the service offers fair play and responsibility for the client’s winnings.
- Move the gearbox back and remove the desired drive from it.
- The axle drive is installed in the reverse order.
https://youtube.com/watch?v=37tWMi_J69o
https://youtube.com/watch?v=37tWMi_J69o
https://youtube.com/watch?v=t1mBZ8Eg_g8
I changed it for the first time. I found few videos
, that’s why I’m posting mine. Use it, good
video
instructions, pos.
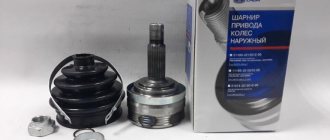
CV joint and oil seals for Chevrolet Lacetti
The design of the drives on the Chevrolet Lacetti consists of two joints with equal angular velocities of rotation, which are connected by shafts. They provide transmission torque from the gearbox gears to the vehicle wheels at speed with variable suspension travel and changing steering linkage angles.
Two hinges - CV joints, external and internal, the main drive units on which controllability, correct operation of the gearbox and traction during acceleration depend. Knocking while driving, beating in the steering wheel when turning is a likely sign of a malfunction of one of the CV joints. You can determine a faulty joint on a suspended wheel, lifting the front of the car on a jack and shaking the shaft - if the CV joint is faulty, then strong play will be noticeable. A sure sign of a worn CV joint is a damaged protective boot with marks and leaks of lubricant.
Malfunctions of the front suspension CV joint lead to emergency situations on the road. A jammed joint leads to the wheels blocking while driving, and at high speed the blocked wheel can simply be torn out along with the hub.
Replacement and repair
If there are problems with the CV joint, it must be repaired. This work is quite difficult, so if you are not confident in your abilities, then it is better to entrust the work to specialists. When carrying out all work, you should do it as carefully as possible and in accordance with the instructions.
Please note the condition of the item. If there is a large hole, then restoring the CV joint is impractical; it is better to replace it as an assembly
The work to put the part in order is carried out as follows:
The CV joint is removed. Be careful. Sometimes you have to knock him down
This should be done as carefully as possible; The dismantled hinge is clamped in a vice. The part is turned all the way, the balls are removed
To do this, knock them out using a screwdriver; The separator is installed vertically, after which it is rotated to the position where the windows intersect with the end; Next, remove the fist with the separator; to do this, rotate the fist until the moment when you can recess the fastening protrusion into one of the windows.
Inspect all hinge elements. There should be no damage to them, no signs of wear or deformation. If there are doubts about the quality of the part, it is better to replace the CV joint. You shouldn't skimp on your safety. Assembly should begin with lubricating the parts. It is important to carry out this work as efficiently as possible; the future service life of the hinge depends on it; The balls are placed in the CV joint in pairs, as they were located before; Grease is again applied on top of them; The last step will be installing the boot. You should also put 50-100 grams of lubricant in it.
The quality of CV joint restoration depends on the correct installation of the balls and the presence of lubricant. It is better to use CV joint-4 as a lubricant, but in extreme cases it will also work. Front-wheel drive cars are loved by motorists all over the world for a reason. Most often, they use MacPherson-type suspension - a very simple and reliable design that will serve faithfully for many years and will not require significant maintenance costs. Depending on the condition of the roads and the aggressiveness of driving, however, some components will have to be changed periodically, for example, ball or bearings on the hubs. And silent blocks and levers fail much less often. This is what most car owners like - the car should be driven and not need to be repaired.
But there are also vulnerabilities in front-wheel drive cars, an example is the constant velocity joint, which is popularly nicknamed the “grenade” because of its visual similarity; you can also find the abbreviation – CV joint. For their production, only high-strength alloys are used, various coatings are applied to the working surfaces, and the original lubricant must ensure the operation of the unit for a very long time. But in practice, it turns out that nothing lasts forever; grenades also break, even on completely new cars that have just left the assembly line. Therefore, if there is a suspicion of a malfunction, an early check of the CV joint is necessary.
The drive system consists of the following joints:
- two internal ones, which are installed directly in the gearbox, drive the axle shaft (one on each side);
- two external ones are located on the hubs and serve to transmit torque to the wheels.
It may seem that they have the same service life. But in reality, everything is not quite like that, the internal ones work longer, while the external ones fail much more often. The reason for this is that the loads that arise when the car moves on the wheel hub are too high, as well as the fact that the outer CV joint rotates at a much larger angle than the inner one. External differences can also be noted - the size of internal grenades is much larger than external ones.
Drive device
A – shaft for the right wheel
B – shaft for the left wheel
- Stop rings.
- Inner CV joint housing.
- Fastening clamp for the protective boot of the inner CV joint.
- Protective cover for the inner CV joint.
- Inner CV joint protection mounting ring.
- Right wheel drive shaft.
- Damper assembly mounting ring.
- Damper mechanism.
- Fastening clamp for the protective boot of the outer CV joint.
- Protective cover for outer CV joint.
- Ring for securing the outer CV joint protection.
- Outer CV joint housing.
- Left wheel drive shaft.
The CV joints are attached to the shafts by means of splines, which are attached to the ends of the shafts. The right shaft is longer with a damper mechanism installed on it. The end of the shaft with the inner joint housing goes to the gearbox gear, the second end of the outer joint goes to the wheel hub. Both CV joints have equal angular speed and a standard collapsible design; they can be swapped (from the left wheel to the right).
The working unit of the internal and external hinges is completely sealed, filled with a special CV joint lubricant and protected by a boot, a cover with mounting clamps at the base of the housings and the shaft. Worn parts of the hinge cannot be repaired - if it breaks, the entire mechanism, complete with protective covers, boots and fastening rings (clamps), is replaced. The base of the outer CV joint housing has a gear, which ensures the operation of the ABS (anti-lock brake system) sensor.
Replacement procedure
If the car owner has the skills to work under the bottom of the car, it is not necessary to completely remove the drive. There is also no need to dismantle the CV joint - the whole operation boils down to removing the hinge mechanisms. First of all, lift the car onto the pit, tighten the handbrake, and select first gear. You need to jack up the front of the Niva and remove the wheel - right or left. For safety reasons, place a wooden support under the threshold of the car.
Now you need to disconnect the hub from the suspension. You need to do the following:
- unscrew the hub nut (it is tightened with great force);
- remove the jack from under the car and install it under the ball joint;
- lift it a little, place a wooden block under the lower arm, remove the jack;
- loosen the nuts of the lower ball joint connecting the part to the steering knuckle and pull out the bolts;
- disassemble the shock absorber mount at the bottom, compress the spring as much as possible so that it does not interfere;
- move the hub mechanism to the side.
Then you will need to crawl under the car and loosen the clamps of the internal grenade case. You can even cut them off, since they will no longer be used. The inner boot must be pulled out from the outer ring, then simply cut off.
If there is a “grenade” of an old year of manufacture on the Niva, then there will be a locking ring around the perimeter of the outer clip, preventing the element from accidentally coming off. The ring needs to be pryed off with a screwdriver and removed.
To separate the inner CV joint from the structure and divide it into 2 parts, you need to pull the hub all the way to the side. Pull the shaft with the outer “grenade” and part of the inner one out from under the car. After:
- remove the elements of the inner race of the hinge: a separator with rollers (in the case of a tripoid version) or just 6 balls (Rzeppa);
- place them in a bath with kerosene, rinse thoroughly;
- put on a new boot;
- assemble the internal mechanisms of the hinge, apply new lubricant;
- install half of the “grenade” in place;
- collect everything as it was originally.
This method takes less time, but is not always feasible. Without certain skills, installing a new protective cover without removing the drive is problematic. Therefore, it is still recommended to dismantle the axle with the internal “grenade” intact. The drive from the outer CV joint will easily disengage after moving the hub with the rotary cam. The second end of the axle is fixed to the gearbox - you need to remove several nuts to remove the bracket. If necessary, the boot of the outer CV joint of the Niva Chevrolet is simultaneously replaced.
Removing the drive and replacing CV joints
To remove the drive on a Chevrolet Lacetti, you will need the following tools: two 14 keys, a 32 end adapter, pliers, a chisel, a large slotted screwdriver, and a hammer. Before work, it is necessary to drain the transmission oil from the gearbox.
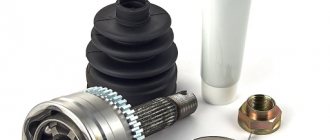
The front part of the car is raised and fixed on a jack. The inner and outer CV joints are supplied complete with mounting clamps, retaining rings, a new protective cover and a tube of special lubricant.
- Remove the wheel from the side of the faulty CV joint.
- The fastening collar on the central nut of the hub must be bent at the edges with a screwdriver.
- Unscrew the hub nut, remove the fastening washer and hang the entire assembly.
- Remove the brake hose coupling together with the bracket.
- The steering knuckle and ball joint must be moved to the side, lowering the front-wheel drive shock absorber strut.
- Hang the drive and carefully knock out the shank of the outer CV joint from the hub hole with a chisel.
- Disconnect the steering linkage and ABS sensor wiring harness.
- Use a screwdriver to remove the large clamp, move the protective boot and remove the outer hinge from the shaft end.
- We dismantle the internal hinge in the same way, by picking up the small mounting clamp with a screwdriver and moving the rubber boot.
- We move the shaft with the inner CV joint to the side.
- The shaft axle drive can be removed along with the hinges.
- Before installing a new grenade (outer and outer CV joints), it is necessary to completely fill the working unit with special CV joint grease.
- When installing a new CV joint, it is also recommended to replace the mounting bolts.
The drive with the new joint should move freely in all angular positions with little force and no play. When installing the shank of the CV shaft axle shaft, make sure that it is positioned correctly relative to the gear in the gearbox. Before installation on a manual transmission, the gear lever is placed in the “neutral” position. During operation, CV joints do not require maintenance, additional lubrication or replacement - they only monitor the condition of the oil seal, protective cover and its fasteners.
Signs and manifestations of malfunction
To carry out timely repairs, you need to pay attention to signs of malfunction. If problems arise with the CV joint, the driver may encounter the following symptoms:
If problems arise with the CV joint, the driver may encounter the following symptoms:
- a characteristic unpleasant, sharp sound appears when turning the steering wheel;
- the sound occurs when reversing;
- slight crunching sound when turning the leading front ears;
- increased crunching and sharp sounds while moving.
The part will need to be completely replaced if shocks occur in the transmission. Slipping also indicates the need for urgent repairs. If the Niva is often used for transportation, how does four-wheel drive work, what maintenance procedure should be found out in advance.
Removing the inner CV joint and replacing the seals
The removed shaft with the front wheel hinges must be clamped in a vice, having previously installed soft metal linings so as not to damage the shanks.
- First, remove the retaining ring, which needs to be pryed off with a screwdriver. The fastening clamps on the protective cover are cut (their reuse is unacceptable), the locks are released and the cover is removed.
- Next, you need to release the second retaining ring in the joint cage, after which the inner CV joint is removed from the shaft.
- If the entire set is changed, then the hinge is installed in the reverse order; when replacing the oil seal and boot, it is necessary to remove the grease, wash the cage with balls and separator with kerosene, blow with air and dry. The old oil seal and boot are removed by prying them out of the seat with a screwdriver. After inspecting the cavity of the hinge body for corrosion, chips, cracks, apply a small amount of lubricant and put the new oil seal in place.
- The new oil seal should fit into the socket with little effort; it is better to use a special tool to press it in. If you don’t have such a tool, you can use a piece of pipe with a diameter of 52-54 mm. To avoid damaging the oil seal surface during pressing, the edges of the pipe must be lined with a cloth or rag. After installing the oil seal, the inner CV joint housing is clogged with CV joint grease.
Varieties
SR as a suspension part began to be used on cars from the mid-20th century. Thanks to the unit, it became possible to simultaneously rotate and control the rotation of the wheels at an angle of up to 70 degrees. In the automotive industry, four technical solutions for components are used:
- cam;
- tripoid;
- ball;
- twin cardan shafts.
All these types are united by the basic design, which is a rigidly connected body and holder. The car's joints are also divided into:
- internal, rotating up to 20 degrees;
- external, more mobile and transmitting without power losses.
The part works according to the following principle.
- There are grooves on the surface of the inner race. Their number is the same as the number of bearings inside it.
- The cage is held in place by bearings that separate the housing and the cam.
- The bearings move along the path of the smaller diameter of the fist and the larger diameter of the housing.
- This creates a rotational impulse that transmits torque to the driven shaft.
If you change the angles connecting the axle shafts, the bearings begin to move inside the grooves. This is how torque is transmitted.
Inner front CV joint for Chevrolet Lacetti
| Brand | Manufacturer country | Original number | vendor code | Model | Price |
| Daewoo | Korea | FENOX CV17003 | 1202968 | Nubira 1999-2003 | 1350 rub. |
| Chevrolet | Korea | Lynx CI3703 | 1780610 | Lacetti 2003-2013 | 2462 rub. |
| G.M. | Korea | Ruville 79009S | 834623 | Nubira 1999-2003 | 3700 rub. |
| Torque | China | VN5805 | 735488 | Nubira 1999-2003 | 1040 rub. |
| TSN | Korea | TSN 3.1.25 | 1098815 | Daewoo | 1260 rub. |
When purchasing an outer CV joint for a Lacetti, you should pay attention to the presence of an ABS sensor drive on the hinge body. Usually the manufacturer indicates this in the description. In models before 2006, ABS was equipped as an additional option, but was not available on cars with a manual transmission. This element of the front suspension also has many analogues.
Caring for front wheel joints
It just so happens that most motorists pay attention to some part of the car after it breaks down. A new CV joint is purchased and replaced, which takes time and considerable money.
In fact, there is no drift to the angular velocity hinges installed in the Niva.
Unlike front-wheel drive VAZ 2110-2114 cars, in the Niva the torque is distributed over 4 wheels. This means that the load on the front wheel drive is half as much as in the same VAZ 2114. And if we theoretically assume that not a drop of abrasive dust and dirt gets inside the hinge mechanisms of the axle shafts, then the service life of the CV joint will be equal to the “life” of the CV joint itself. auto. Of course, this is impossible in real life, and the Niva is designed for off-road driving.
It is quite possible to prolong the life of grenades as much as possible. To do this, you must regularly perform the following activities:
- Conduct a visual inspection of the anthers covering the hinges. When the car is operated on an asphalt road, an inspection should be carried out every 10-15 thousand km. When driving off-road or on embankment and dirt roads, the grenade cases need to be inspected more often, especially after driving in difficult conditions.
- If the slightest damage to the boot is detected, immediately replace it with a new one. This also applies to the clamps that hold the covers in place.
- During replacement, remove old grease from the Niva CV joint along with any dirt that has fallen into it and apply new one. The lubricant used is CV joint-4, its quantity for the outer grenade is 40 cm3, for the inner grenade - 80 cm3.
If you pay attention to these elements, they will easily last 150-200 thousand km
Otherwise, malfunctions may appear within the first hundred thousand km.
Outer front CV joint for Chevrolet Lacetti
| Brand | Manufacturer country | Original number | vendor code | Model | Price |
| AMD | Korea | AMD SH119 | 2011151 | Chevrolet 2003-2013 | 760 rub. |
| Torque | China | VN5431 | 1074010 | Lacetti 2003-2013 | 1170 rub. |
| Daewoo | Korea | DW11 | 1903950 | DW 2003-2013 | 1140 rub. |
| FENOX | China Korea | CV16082 | 2462438 | Lacetti 2003-2013 | 1200 rub. |
| G.M. | Korea | CO1814 | 910527 | Lynx 2003-2013 | 1380 rub. |
Wear of the drive seals leads to depressurization of the housing and destruction of the entire CV joint assembly. The reason for rapid wear is usually operating conditions and strong temperature changes in winter. The rubber (silicone or composite) insert in the oil seal bushing loses its elasticity, cracks and fails due to heavy loads on rough roads. You can detect a deteriorated CV joint seal by visual inspection by removing the protective cover of the joint. The oil seal is replaced together with the boot, cover and clamps.
Among analogues of Lacetti drive oil seals, there are many Chinese counterfeit fakes, so when choosing, you must correctly read all the information about the manufacturer.
Previous posts from the category: NIVA CHEVROLET
It is known that the correct operation of the engine, namely the fuel system, directly depends on the condition of the air filter. The manufacturer recommends replacing the filter element every 30,000 kilometers.
Replacing the front axle oil seal on a Chevrolet
Niva
Replacement
The front axle seal of the Chevrolet Niva is carried out in the event that it has lost its tightness and is leaking transmission oil, the leakage of which threatens the failure of the front differential.
Replacing the bearing and oil seal of the rear axle shaft of a Chevrolet Niva
For trouble-free operation of the car, you need to be sure that it is in good working order. If you have problems replacing the fuel filter, Chevrolet Niva filter video “replacement. Parts such as rear axle shafts and bearings, if they fail, can lead to the wheel stalling right on the road, which is very dangerous, so at the first sign of its malfunction (humming, crackling, howling), it must be replaced.
Replacing antifreeze on a Chevrolet Niva
When replacing coolant on a Chevrolet Niva, it is better to pay attention to the change in color of the coolant; if it has darkened, it means it’s time to change it. To replace, we will need a new 10 liter coolant, a 13 liter wrench and a container for draining the used coolant, but if you are not an environmentalist, you can drain it directly to
Replacing the Lacetti CV joint: instructions, description, video, photo
When installing the shank of the CV shaft axle shaft, make sure that it is positioned correctly relative to the gear in the gearbox.
During operation, the CV joints do not require maintenance, additional lubrication or replacement. Replacing a Chevrolet Lacetti CV joint only monitors the condition of the oil seal, the protective cover and its fasteners. Removing the inner CV joint and replacing the oil seals The removed shaft with the front wheel hinges must be clamped in a vice, having previously installed soft metal linings so as not to damage the shanks.
First, remove the retaining ring, which needs to be pryed off with a screwdriver. The fastening clamps on the protective cover are cut; they cannot be reused; the locks are released and the cover is removed. Next, you need to release the second retaining ring in the joint cage, after which the inner CV joint is removed from the shaft.
Grenade replacement
This unit consists of parts that are constantly in motion. As a result, they may burst or wear out , requiring replacement.
The device can only be repaired if the owner of the car has identified damage to the boot in time, and therefore foreign substances have not yet managed to get inside the mechanism.
But this happens quite rarely, since it is almost impossible to detect damage to the boot in time. It should also be said that the cost of the CV joint is not high, and therefore it can be purchased if necessary.
Video about restoring the Niva Chevrolet CV joint
Troubleshooting
You can determine the malfunction of the grenade yourself . To do this, while the car is moving, turn the steering wheel in any direction until it stops. In this case, the driver will hear a crunching sound in the area of the front wheel. In this case, you need to replace the hinge.
During the repair process, it is important to determine whether it is necessary to change both hinges or one, because such work is recommended to be carried out only in a comprehensive manner.
Video on how to determine if a grenade is faulty
Changing a grenade on a Niva Chevrolet with your own hands
To replace a grenade, you must first remove the old one. In the process, you will have to dismantle the axle shaft along with the CV joint (you can find a disassembly video on the Internet). Then the car owner must perform the following actions:
- Clamp the removed assembly in a vice.
- Remove the old boot.
- Knock the CV joint off the axle using a hammer and a socket.
- Clean all teeth on the axle gear.
- Install the new joint on the axle.
- Place the boot and secure it with clamps.
- Install the axle with CV joint on the car.
Video about replacing a grenade on a Niva Chevrolet using a reverse hammer
Replacing the Lacetti CV joint boot
If the entire Chevrolet Lacetti CV joint is being replaced, then installing the hinge is done in the reverse order; when replacing the oil seal and boot, it is necessary to remove the grease, wash the race with balls and separator with kerosene, blow with air and dry. The old oil seal and boot are removed by prying them out of the seat with a screwdriver.
After inspecting the cavity of the hinge housing for corrosion, chips, cracks, apply a small amount of lubricant and put the new oil seal in place. The new oil seal should fit into the socket with little effort; it is better to use a special tool to press it in.
If you don’t have such a tool, you can use a piece of pipe with a diameter of mm. To avoid damaging the oil seal surface during pressing, the edges of the pipe must be lined with a cloth or rag.
How to remove and replace Cruze CV joint
Use a screwdriver to secure the brake disc through the hole. Use a 32mm socket to loosen the drive mounting nut. Then unscrew the steering end nut with a 18 nut and the ball joint. This is done so that when the drive is pulled out, it will be possible to rotate the stand and it will be more convenient to work with the drive. In order not to drain the oil, there is no need to completely pull it out of the box.
Unscrew the bolt securing the ball joint, the bolt with nut on the ball joint by 15. The ABS sensor does not interfere, so there is no need to touch it. It is necessary to pull the ball out of the trunnion. Then flip it over to the other side and pull out the drive. It is necessary to place a basin at the bottom, since after removing the boot, grease will flow down.
If the boot is in order, you can leave it. If there are no new clamps included with the new boot, then you need to try not to spoil them so that you can return them to their place after installing the CV joint. The second clamp is not removed, but simply loosened in order to pull the boot back and install a puller on the seat.