05/14/2021 21,666 VAZ Chevrolet Niva
Author: Ivan Baranov
In any vehicle, the gearbox is one of the main units that determine the quality of the car's ride. Accordingly, the occurrence of breakdowns in the operation of power units will, one way or another, affect the driving of the car, especially when it comes to the gearbox control lever. Today you will learn how the Niva Chevrolet rocker is changed and adjusted and how to choose a new component for your car.
[Hide]
How to remove and replace?
To replace the Chevrolet Niva rocker you will need:
- Set of heads ½.
- Spanners, open-end or ratchet wrenches for “10”, “13”, “17”, “19”
- Screwdriver Set
The rocker on a Niva Chevrolet SUV is removed in the following order:
- Be sure to disconnect the negative terminal of the battery under the hood.
- Set the gearshift lever to the middle position.
- In the cabin, the lining of the instrument panel console is dismantled. We unscrew all the fastening bolts of the plastic panels, remove the ashtray, the glove box with cup holders, and then lift up the entire lining of the floor tunnel.
- We remove the gearshift lever and transfer case linings using a screwdriver.
- Unscrew the front driveshaft from the drive shaft. We tie the removed part to a convenient place on the body.
- Unscrew and dismantle the intermediate shaft. To do this you will need keys for “13”, “19”.
- To make the work more convenient, use a “13” wrench to remove the two nuts securing the cross member of the rear gearbox suspension to the underbody. It will go down a little, thereby increasing the space for dismantling the required unit.
- We unscrew the nut securing the gear shift drive from the rear drive support using a socket “17” with an extension. Also, together with the nut, it is necessary to remove the expansion sleeve and 2 support washers.
- Using a ring ratchet wrench set to “13”, loosen the tension clamp of the drive rod.
- Using a “13” socket with an extension, unscrew the three fastening nuts securing the gear shift control drive bracket to the rear cover of the box.
- We take out the rocker assembly along with the lever and bracket.
- We remove the speed selection mechanism using a “10” wrench and unscrew the 3 nuts securing the housing.
- We remove the entire mechanism assembly.
Installation of the drive after repair or replacement is carried out in the reverse order.
Advice! You should not independently modify (overcook, shift, lengthen or shorten) the factory design.
And also interesting: Drawing of three Lada Niva Travel - here (live) |
As a replacement for the unit, it is better to purchase a standard rocker, which is equipped at the factory with basic vehicle models. After installation, it is recommended to additionally treat all moving joints with modern grease Mobilgrease XHP™ 220 or conventional Litol-24.
Backstage repair
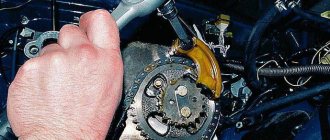
The gearbox linkage is an element of a multi-lever assembly, which is designed to connect the gearbox lever and the rod that fits the power unit. In Niva Chevrolet cars, the rocker is located under the bottom of the vehicle, next to the cardan. This component is susceptible to contamination and the formation of moisture on it, which over time can deteriorate the quality of lubrication of rubbing parts. As a result, parts begin to wear out, which can subsequently lead to various problems.
Chevrolet Niva car - 2013 model
As stated above, the rocker is an integral part of the transmission system in Niva Chevrolet cars. Compared to other components of the transmission system, the rocker, which is also commonly called the gearbox control rod, is a relatively simple mechanism in its structure. However, for correct operation, the condition of the scenes should also be given special attention.
In particular, we are talking about timely repair and adjustment of drive traction. If you want to avoid unexpected unpleasant surprises while driving, then the condition of the scenes should be at the appropriate level.
On most cars, this element is a fairly reliable mechanism that can easily last up to 100 thousand kilometers without replacement. But no one is immune from the breakdown of this unit. How to determine the need for backstage repair? This can be done based on several factors:
- the play of the gear shift lever in your Niva has increased significantly;
- difficulties arose with shifting the gearshift lever (the lever began to “float”);
- Reverse gear does not engage;
- adjustment of the component has become impossible.
An old element of the transmission system that has exhausted its service life
. If the speeds start to turn on very slowly or the speed that should turn on is not turned on, you can try to adjust the mechanism.
Of course, this is only relevant if the condition of the drive can be visually assessed as working. If the connecting elements of the mechanism's hinges operate with a large amount of play, then it would be more advisable to replace the component.
Buy auto parts boot for the handbrake lever Niva Chevrolet for foreign cars - Autopiter
Prices and delivery times depend on the city chosen.
Moscow Cart
The search for “boot for the handbrake lever on a Chevrolet Niva” found 44 positions Lever st/o. VAZ 2123 Chevrolet Niva Avtopribor
Gearbox lever boot for VAZ-2123 “Chevrolet Niva” (external) (manufacturer: Balakovo Rezino Tekhnika)
Gearbox lever boot 2123 (internal) (03441)
Boot RCS V-2123 "Niva Chevrolet"
Handbrake lever boot for UAZ-452 “Loaf”
Gearbox boot for VAZ-2123 Chevrolet Niva (manufacturer: Balakovo Rezino Tekhnika)
Gear selector boot for VAZ-2123 Chevrolet Niva
switch (limit switch) 2123-3710230 of the handbrake lever Niva-Chevrolet (79.3710)
Suspension arm 2123 Chevrolet Niva upper left AvtoVAZ
Pendulum arm 21213, 2123 Chevrolet Niva assembly AvtoVAZ
Boot RCS VAZ 2123 Niva Chevrolet 2123-1602518
Transfer case connection boot for VAZ-2123 Chevrolet Niva (CV joint)
2123-1703200Р Gearbox lever boot 2123 (on the thrust joint) “BRT”
Suspension arm 2123 Chevrolet Niva upper right AvtoVAZ
Suspension arm 2123 Chevrolet Niva lower left AvtoVAZ
Handbrake lever VAZ 2101-07, Niva-2121-13 (in collection) 2103-3508012 VIS
Transfer case lever boot 2121/1111/2110/2170
gear lever boot 2123-1703101 Niva-Chevrolet ***
2123-1703225Р Gearbox lever boot /2123/
Transfer case lever boot for VAZ-2123 Chevrolet Niva (upper)
2123-1703101Р Gearbox lever boot 2123 external “BRT”
Pendulum arm 21213, 2123 Chevrolet Niva assembled on INTER-AUTO bearings
Suspension arm 2123 Chevrolet Niva lower right AvtoVAZ
Lower lever for VAZ-2123 Chevrolet Niva (Chevrolet Niva) AvtoVAZ right
Lower lever for VAZ-2123 Chevrolet Niva (Chevrolet Niva) AvtoVAZ left
Also interesting: Bicycle in winter: how to ride in the snow
How to replace the secondary shaft oil seal
Every car has its own weak technical link. For many models of domestic cars, this is a gearbox; the VAZ Niva is not one of them. The transmission of this car is quite reliable and wear-resistant. But, like any technical unit, it is not insured against breakdowns. The Niva gearbox may fail for one of 3 reasons.
- The device has a manufacturing defect. In this case, the Niva 2121 gearbox is simply replaced with a new one.
- Damage is caused by user factors (poor care). Diagnostics are carried out to identify faults. More often than not, simply adding oil is enough to restore the unit’s functionality, and the Niva gearbox works like a clock again.
- The device is worn out or mechanically damaged. In this case, the feasibility of the repair is assessed and it is carried out or the gearbox on the Niva is replaced.
Boxes of all models are repairable
To ensure a high-quality restoration of the unit’s performance, it is important to correctly determine the type of fault. To do this, just listen to the car. Chevrolet Niva gearbox operation
Chevrolet Niva gearbox operation
Repair of the Niva, Chevrolet Niva gearbox - 2000 rubles. Exchange of the Niva, Chevrolet Niva gearbox with installation - 6000 rubles.
Do-it-yourself gear shift assembly adjustment
To correctly adjust the gear selection mechanism you will need a 13 key
Sequencing:
- We start the engine, engage 1st gear. As soon as the car starts to move, we stop and turn off the engine. In this case, we leave the first gearbox speed in the ON position. We put the car on the handbrake and anti-rollbacks.
- We loosen the coupling bolt of the clamp securing the connecting rod of the gearbox under the body. For ease of work, you can use a lift, overpass, pit or jacks.
- We move the plastic traction lock located in the passenger compartment all the way to the extreme left position.
- Then we fix the loosened bolt of the mounting clamp back.
You can also try one more method to eliminate rattling and play in the gearbox handle: using a “13” wrench, you need to tighten the lever fastening nut until the axial play is eliminated.
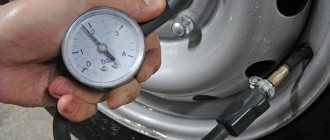
Important! The permissible clearances of the drive unit must correspond to the following values in millimeters: D = 1.5±0.5; E = 1±0.5.
The lever nut must be tightened to a torque of 24.5 Nm (2.5 kgfm).
If, after the adjustment has been made, the same difficulties with gear shifting and vibration remain, this means that this unit is worn beyond the permissible norm and needs to be replaced.
Repairing faults and adjusting the VAZ-2123 steering gear
Bleeding and adjusting the Chevrolet Niva clutch: step-by-step instructions
How to repair a Chevrolet Niva transfer case with your own hands: detailed disassembly instructions
Signs of trouble
Symptoms of malfunction depend on which component is experiencing problems:
- Clutch. In case of breakdowns, jerking occurs when starting to move, slipping under load, or “driving” when trying to stop or change gear. Sometimes the malfunction manifests itself in the form of noise when pressing the clutch pedal or in other conditions.
- Gear box. This unit is more complex, and accordingly, its breakdowns are more varied. They manifest themselves in unclear or difficult gear shifting. Oil leaks, crunching noises and extraneous noises are also possible.
- Cardans and intermediate shaft. Here, malfunctions manifest themselves in the form of knocking during acceleration, squeaking or vibration while driving.
- Main bridge. In the event of a breakdown, the mechanism begins to make noise, knocking noises occur when accelerating and oil leaks.
- Transfer case. Problems make themselves felt in the form of spontaneous shutdown of bridges, noise and knocking. There may also be an oil leak.
- Constant velocity joints. Worn parts begin to crunch and knock while driving. The crunch is especially noticeable when the steering wheel is turned hard.
Repair of the gearshift mechanism of the transmission (slide) Niva Chevrolet - niva chevrolet (VAZ 2123, Chevy)
See also Disassembly and assembly of the gear selection mechanism drive)
| You will need: a 10mm wrench, a screwdriver, a hammer, and a bit. |
2. Remove the clamp from the mechanism rod.
| 1. Remove the gear selection mechanism (see “Disassembling the gearbox”). | |
4. Knock out the rod joint axis.
| 3. Remove the cover of the mechanism rod. | |
| 5. Remove the joint from the gear selector lever. |
8. Remove the protective cover of the mechanism housing and the spring.
| 7. Remove the rod eye bushings. Replace them if necessary. | |
10. ... sealing rings. Replace rings if necessary.
| 9. Remove the locking and... | |
12. Unscrew the three nuts securing the gear selector flange.
| 11. Remove the spherical washer. | |
14. Remove the guide plate washer.
| 13. Remove the flange, seal and two lever gaskets. | |
| 16. ...lever from the guide plate. |
| 17. Assemble the gear selection mechanism in the reverse order of removal. |
Video
Gearbox slide: what it is, signs of wear, how to adjust it yourself
Not all motorists have any idea what the name of this or that part in their car is. In this case, we are talking not only about the mechanisms “hidden” in the engine, but also about the devices with which they interact literally every day. One of these parts is the gearbox linkage.
Please note: The name "slide" is not official for this mechanism, but it is generally accepted. In fact, this part is called the transmission control rod.
1. What is a gearbox rocker 2. Signs of gearbox rocker wear 3. Adjusting the gearbox rocker
What is a gearbox rocker?
Many drivers mistakenly believe that the rocker refers to the gear shift lever, but this is not entirely true. If we are talking about a gearbox rocker, we mean a composite mechanism whose task is to connect the gearshift lever and the rod. That is, the driver cannot see the backstage, much less touch it. This element is located between the lever and the gearbox itself, and it is located under the bottom of the car, near the driveshaft, and in some cases under the gearshift lever itself.
As can be understood from the description, the rocker regularly has to deal with serious loads, so this element must have good strength. Despite this, the slide is susceptible to damage. If it does not contain enough lubricating components, drops of water, dust or other “debris” have entered it, there is a high risk of part failure.
Please note: On some cars, the rocker can last 200-300 or even more than thousands of kilometers without replacement. But, if we take the average result, the gearbox usually fails after 100 thousand kilometers of operation.
Signs of gearbox wear
The driver must pay attention to possible failure of vehicle components, including knowing the characteristic signs of wear on the gearbox linkage in order to take timely action to replace it. Despite the fact that the mechanism is quite reliable, you should be aware of the following “symptoms” of its imminent breakdown:
- Increased play at the gearshift knob. This can be noticeable both when the handle is in neutral and in one of the gears;
- Difficulty shifting gears. For example, one or more gears are difficult to “stick”, or maybe a crunching noise occurs when the lever moves in their direction;
- It feels like changing gears has become more difficult, as if the lever has become much heavier;
- Gears are engaged incorrectly, for example, instead of fifth, third is engaged or vice versa.
Drivers often ignore the appearance of play in the gearbox, believing that this is a normal situation. In fact, if backlash occurs, it is imperative to diagnose the gearbox, and, if necessary, adjust or replace the linkage. The fact is that a slight play is already a fairly serious symptom of a faulty gearbox linkage.
If it “breaks” while the car is moving, this can lead to serious consequences for both the car and the driver, since in such a situation there is a high risk of getting into an accident.
That is why, if you notice problems with gear shifting, be sure to contact a service center for diagnosis and repair of the linkage, if necessary.
Adjusting the gearbox rocker
It is not always necessary to completely or partially replace the scenes. Quite often you can limit yourself to simple adjustments. At the same time, it is possible to adjust the link with your own hands, without contacting a service center. There are two ways to adjust:
- In reverse gear. In order to adjust the rocker for reverse gear, you need to loosen the clamp on it, and then move the gearshift lever to the position that corresponds to the ideal engagement of reverse gear. After this, the clamp is tightened, and the work is considered completed;
- On the first transfer. If it is not possible to engage reverse gear, you can adjust the gearbox rocker in first gear. To do this, engage first gear, and then loosen the rocker clamp. Next, rotate the rocker drive counterclockwise until the gearshift lever stops in the plastic reverse speed lock, and then tighten the clamp.
It is worth noting that the general processes for adjusting the gearbox linkage are described above. It is important to say that the process may differ depending on the car, so before starting work it is recommended that you read the instructions specifically for your car model.
( 353 votes, 4.49 out of 5) Loading...
Source: https://okeydrive.ru/kulisa-kpp-chto-eto-takoe-kak-otregulirovat/
Design and principle of operation
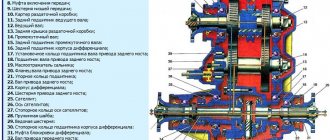
The Chevrolet Niva transmission includes the following components:
- A five-speed manual gearbox allows you to change not only the amount of torque, but also the direction of rotation.
- Split front axle with a gearbox mounted on the power elements of the body.
- Dry single-plate clutch, which, when the pedal is pressed, briefly disconnects the transmission from the engine.
- Solid rear axle, into which the gearbox and differential are integrated. This allows you to increase and distribute torque between the wheels of the same axle.
- The intermediate shaft through which torque is transmitted from the gearbox to the transfer case.
- Transfer case that distributes rotational energy between axles.
- Two cardan shafts transmitting power to the axles (front and rear).
- Constant velocity joints that drive the steering wheels.
It works like this: engine torque is transmitted to the manual transmission through the clutch, then through the intermediate shaft to the transfer case and a pair of drive axles.