Purpose
The Niva SK 5 series has gained the greatest popularity among small farms with small acreage.
The equipment is used in conditions where the use of high-performance machines is impractical. In small areas, the model is indispensable; together with the affordable price, this feature ensures consistently high demand for this series. The main area of application of Niva SK 5 is harvesting grain crops. Some modifications of the combine are used for harvesting legumes, rice, soybeans and corn.
Repair and assembly
Correct and timely maintenance of the steering gear is the key to long-lasting and reliable operation, but there are times when breakdowns do occur. In this case, repairs with complete or partial disassembly simply cannot be avoided. When repairing, it is necessary to pay attention to some features and important points, the use of which will increase the reliability of the mechanism and improve its characteristics.
Steering gear repair
To remove and disassemble the gearbox, it is necessary to hang the front of the car and remove the steering rods. From inside, unscrew the bolt securing the supply shaft from the gearbox shaft. Next, we disconnect the gearbox from the spar by unscrewing the three bolts with spanners. In the engine compartment, remove the hoses and parts that are located in the line of the steering rods.
When the gearbox is unscrewed and removed from the shaft in the cabin, we pull it out of the engine compartment by turning the bipod to the left. Particular attention should be paid to the condition of the gaskets, their location and degree of wear. An unreliable seal can lead to loss of lubrication or contamination of internal cavities. The next step is to unscrew the plug and remove the oil from the steering gear housing, after which you need to unscrew the bipod.
We place the gearbox on a stand made of two boards so as not to damage the shaft splines and unscrew the nut, then remove the bipod. Additionally, you can screw the nut onto the shaft until the ends are mutually aligned. Next, disconnect the steering gear cover by gradually unscrewing the locknut of the adjusting bolt and remove the cover, gradually moving it towards the worm.
In this case, you need to be especially careful with the gaskets if they are in good condition; at the slightest jam or pressing out, the gasket must be replaced. The next step is to remove the bipod shaft, press in the worm shaft and remove the seals. All cavities must be washed and wiped with a rag, checking for dents, chips and any other damage.
It is also necessary to check the crankcase for the presence of metal shavings, which indicates wear of certain parts. It is imperative to check the gaps and play in the mating parts and check the wear of the working surfaces. After carrying out a defective inspection of the steering gear, we replace damaged parts if necessary.
And also interesting: Niva 2121, Niva 2131 and Niva Chevrolet. Let's compare? "
We carry out assembly in the reverse order, making sure to lubricate the parts with oil, and all oil seals with grease (lithol). Install a new cover gasket with an adjusting screw. We mount the bipod, tightening the nut as much as possible. Then we install the steering gear in its regular place, special attention must be paid to the connection of the worm with the intermediate shaft; distortions and misalignments are not allowed here.
It is also necessary to align the direction of the bipod and the steering wheel. The average position of the bipod can be determined by counting the number of shaft revolutions and dividing by two. Next, tighten the gearbox mounting nuts (it is advisable to install new ones), attach the steering rods to the bipod. Fill the gear housing with oil and use the adjusting bolt to select the play in the steering gear.
By adhering to these simple recommendations, you can improve the handling of the VAZ, increase driving safety, and the durability of the steering gearbox and the mechanism as a whole. The use of a worm-type steering gearbox on the VAZ 2121 has been justified for many years, let alone decades. Having the need for periodic adjustment and maintenance, the gearbox ensures trouble-free operation throughout its entire service life.
The Niva SK-5 self-propelled grain harvester is a legendary example of a domestic agricultural machine. The first version of the combine came off the assembly line more than 40 years ago, and the latest version is still in production to this day.
Agricultural machinery of this type is used mainly by small farms with small crop areas, where the use of high-performance machinery is impractical.
In this article we will look at the main technical and operational characteristics of the Niva SK-5 combine harvester.
Steering gearbox Niva
Adjusting the steering gear and the reasons that contribute to the need to adjust the steering column on cars of the Niva family (2121, 2131, 21213, 21214, Chevrolet and other variety of both series and sub-series) is the topic of this story.
These works are not difficult and, if you have direct hands and desire, they can be done with a bang in the garage with your own hands, or with the hands of a local professional
© Uncle Slava
Steering gear design on Niva
But before we start shamanism with a tambourine, a few words about the design of that very steering gearbox. The Shaitan machine, although not cunning in its design delights, still requires ingenuity and understanding from anyone who decides to repair it.
A few dry terms:
The picture was stolen from the Internet (c) who knows?
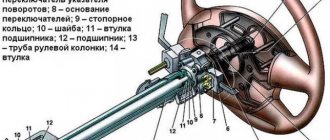
- Carter
- Bipod
- Lower crankcase cover
- Shims
- Worm shaft bearing outer ring
- Ball separator
- Bipod shaft
- Adjustment screw
- Adjustment plate
- Lock washer
- Worm shaft
- Upper crankcase cover
- Sealing gasket
- Bipod shaft bushing
- Worm shaft seal
- Bipod shaft seal.
During the operation of the columns, worm and roller, namely during their combined operation (friction or rolling as is correct), the operating gap in this pair increases, play appears trivially and some strange knocks and sounds appear.
The appearance of play leads to an increase in the free play of the steering wheel and wobble. And this, in turn, is not normal. Is the steering wheel moving? Poor handling, sensitivity and speed of response are lost, which means safe driving can be kept silent.
I didn’t open America to you here.
This play, if not eliminated in time, namely by not adjusting the steering gear, leads to the appearance of chips, microcracks and subsequent mechanical damage to the main pair - the worm and the bipod.
Well, in the end there comes a complete paragraph and failure. And you, yes, exactly you, end up with your hard-earned tugriks, because a new steering gearbox is less than five, and for Chevrolets with and without power steering, up to a whole ten rubles, in local Chinese spare parts stores, will not cost... checked...
No, of course, not everything is so scary because the gearbox can be removed and disassembled. How to do this will be discussed below.
How to disassemble the Niva steering gear
- First of all, the oil should be drained from the gearbox.
- Having disconnected the rods and unscrewed the bolts securing the gearbox to the body spar, remove it from the car.
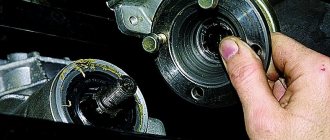
- We remove the bipod. Unscrew the nut securing it. The bipod usually sticks strongly; to remove it, you should hit it sharply with a hammer.
- Then unscrew the bolts securing the upper cover of the gearbox housing and remove it along with the adjusting shims.
- The outer bearing race should now be pushed out of the crankcase. To do this we use a worm shaft.
- Then we remove the shaft along with the separator.
- Remove the oil seals for the worm shaft and bipod shaft.
Adjusting the Niva steering gear
And so, we disassembled and replaced the worn elements, installed the gearbox on the car and now we can start adjusting.
The order of our actions will be as follows:
- Opening the hood and looking at the gearbox, on the top cover of which there is an adjusting screw and a lock nut, these are what we need.
- Loosen the lock nut and use a flat screwdriver to turn the screw. By tightening the screw clockwise, the backlash in the column gears will decrease, but this is provided that the length of the adjusting screw allows us to tighten it.
If the screw is tightened all the way and the play is not removed, then the column must be replaced.
Servicing the Niva steering gear (Chevrolet, 2121, 21213 and 21214)
Like any other component, the steering gear should be maintained by adhering to three simple rules.
Three simple, but at the same time important rules that should always be followed:
- Timely visual inspection.
- Timely control of the oil level in the gearbox.
- Timely adjustment.
Timely visual inspection allows you to quickly identify and identify oil leaks, mechanical defects and other damage to the gearbox housing.
Oil level monitoring – this also includes timely oil changes.
Some craftsmen got the hang of pouring liquid LITOL into the gearbox, having previously melted it on a tile in a vessel.
Good or bad? Everyone decides for themselves. My personal opinion is that this measure takes place in the maintenance of gearboxes whose operational life is approaching sunset. The gaps in the gears can no longer be eliminated by simple adjustment, and the only way out, in order to get rid of the knocking, is to pour liquid lithol into the gearbox housing, thereby leveling the backlash at least a little.
Well, the adjustment allows you to eliminate play in the gearbox gears in a timely manner.
Consistently following the three recommendations above, rest assured that the steering gear in the field will serve you faithfully for more than tens of thousands of kilometers.
Source: https://Remladavaz.ru/rulevoj-reduktor-niva
Steering
Steering
The Niva uses a worm-type steering gear. It provides reliable vehicle control at any speed and in different road conditions. The worm mechanism is equipped with a globoid type worm (variable shaft diameter) connected to an intermediate shaft and roller. A bipod is installed on the outer part of the roller shaft, which, through rods, activates the rotating mechanism. The rotation of the steering wheel ensures the movement of the bipod through a worm gear; it turns the wheels with rods.
The worm steering mechanism has a low level of sensitivity to shocks and impacts transmitted from the wheels on uneven roads. It has the ability to direct a VAZ vehicle to large turning angles and, accordingly, provides excellent maneuverability of the vehicle. The disadvantage of a worm gear is that it is difficult to manufacture. Worm steering has many connections and therefore requires periodic adjustments and adjustments.
Also interesting: Installing fog lights on a Chevrolet Niva
The worm steering mechanism is used on off-road passenger cars with dependent wheel suspension, light trucks and buses. The simplicity of the design has an increased service life and a high degree of maintainability. A slight drawback may seem to be a slightly increased effort on the steering wheel, which occurs for a number of reasons. Having analyzed the design of the steering gear and the loads acting on it, we determine problem areas and ways to solve problems.
The basic steering gearbox is equipped with a worm pair, which during operation causes steering resistance due to friction between the worm and the worm gear. This is the operating principle of a worm gear; therefore, it is not possible to completely get rid of this factor. The solution is to use high-quality lubricant in the gearbox and monitor the condition of the working surfaces.
The steering gearbox has two rolling bearings (worm shaft), two plain bearings on the bipod shaft (also known as the worm wheel shaft). The bearings themselves, in good and lubricated condition, reduce friction of the main parts (and, accordingly, reduce the force on the steering wheel).
In addition, the pendulum arm, which rotates on two plain bearings and ensures the movement of the steering rack, makes its contribution. The use of high-quality lubricant and periodic monitoring of the condition of boots, connections and rods will reduce the possibility of increased force on the steering wheel.
Thirdly, the six steering fingers must provide a high-quality connection, work correctly in the same planes with the system, and ensure the mobility of the steering mechanism.
Assembly
Assemble the steering mechanism on bracket A.74076/R in the reverse order of disassembly.
Press the outer ring of the upper bearing of the worm using mandrel 67.7853.9541, moving the nozzle on the mandrel handle to the opposite side.
After installing the worm in the steering gear housing and securing the bottom cover (Fig. 5-8), check the friction moment of the worm using a dynamometer 02.7812.9501 and head A.95697/5 (Fig. 5-9); it should be in the range of 19.6-49 N cm (2-5 kgf cm). If the torque is less than specified, reduce the thickness of the adjusting shims 2 (Fig. 5-8), and if more, increase it.
Rice. 5-8. Installing the steering gear worm:
1 – bearing cover; 2 – adjusting gasket; 3 – worm.
Rice. 5-9. Monitoring the friction torque of the worm with a dynamometer:
1 – worm; 2 – head A.95697/5; 3 – dynamometer 02.7812.9501; 4 – stand bracket for repairing the steering mechanism; 5 – steering gear housing.
After installing the bipod shaft, check that there is no play in the engagement of the roller with the worm in the positions of the worm shaft turned to the right and left by 30° from the neutral position of the bipod. Eliminate any possible gap in engagement using adjusting screw 2 (Fig. 5-2) and tighten locknut 4.
After adjusting the gap in the engagement of the roller and the worm, use a dynamometer to check the friction moment of the worm shaft, which should be equal to 68.7-88.3 N cm (7-9 kgf cm) when turning the worm shaft 30° both to the left and to the right , from the middle position and should decrease smoothly to 49 N·cm (5 kgf·cm) when turning from an angle of 30° to the stop.
Upon completion of assembly, check the angles of rotation of the bipod from the neutral position, which should be 32°10'±10 both left and right, until the bipod rests on the bolt heads; Fill the steering gear housing with 0.215 liters of transmission oil.
Source
Technical specifications
was founded at the beginning of the 20th century. This company, known not only in its native country, but also near and far abroad, once produced Niva SK-5 combine harvesters. Now its modernized successors are produced there.
Without exaggeration, this outstanding machine began to be produced in 1958 as the SK-3 model. Having previously produced exclusively trailed combine harvesters, the plant took a big step forward by independently developing the first self-propelled harvesting machine. From that moment on, the country had technology of a completely different level, modern and productive.
The year 1962 was marked by the next stage in the development of the car. Production of the improved SK-4 model began, which featured a 25% increase in productivity.
The latest model in the line is SK-5. It began to be produced in 1973. This machine began to be widely used as a base for various highly specialized and other modifications. For example, it served as the basis for the creation of a rice harvester that operates on slopes up to 30°.
Also interesting: Chevrolet Niva wheel sizes - Size tables
Main modifications of the model:
- SK-5A - with increased power (up to 120 hp).
- SK-5AM - power increased to 140 hp. pp., the transmission box is shifted to the left.
- SK-5M-1 - this version is equipped with a hydrostatic transmission.
- SKP-5M-1 - with the option of equipping with a replaceable half-track to work on very wet soils.
- SKK-5 is a steep-slope modification for the ability to work on slopes up to 30°.
How to choose the right device to avoid disappointment? To do this, you need to familiarize yourself with the technical characteristics of the equipment. The combine is presented in the form of a small device with an electric motor and a control panel. It can have 1 or 2 bowls, as well as a set of attachments.
Technical aspects are systematized according to the main criteria:
- power, number of revolutions, productivity;
- bowl volume;
- ease of management and maintenance.
Steering gear: repair, replacement, etc. +
Steering gear: repair, replacement, etc. +
Post by Ctus » June 11, 2010, 11:03
I noticed that all the grease had leaked out of the steering wheel. By external inspection and turning the steering wheel, it was established that the steering itself does not have any play. The possibility of adjustment is still decent, judging by the screw. Change the oil seal or remove it completely and look. Does anyone have experience removing the bipod? Tell. What nuances might there be?
Captain: swing the steering shaft by the bipod along the car, there is probably play in the bushing, the oil seal will not just start leaking. To remove the bipod, there is a special puller, otherwise you just need to remove the gearbox, lay it on its side with the bipod on the anvil and hit it with a sledgehammer on the other side of the bipod with the risk of hitting the body and denting or splitting it. If there is play in the bushing, then mandrels are needed to repress it and a reamer to finish it, that is, it is easier to buy a new gearbox. The fact sheet on Niva4x4 describes the process of replacing the bushing.
Thank you. An acquaintance told me that the oil seal, even if you remove the bipod without removing the steering wheel, cannot be replaced. Is it so?
Captain: The oil seal is outside, there is access. It’s not easy to remove the old one, but it’s possible.
In general, there is an opinion that it is better not to repair the steering but to change it. It is clear that this is after long-term use, i.e. old. I don’t know what to do. Change the oil seal or steering. At the same time, I want to take the Taigovskaya torpedo panel. Not old at all. I don't know what to do next. But no one gave any advice about changing the oil seal or not without removing the steering wheel.
MEW: The problem is the quality of the new gearboxes, everyone who replaced them with new ones from the store spent several years on them and ended up in the trash, a pair was killed, on mine the pair is in good condition, but there is play in the bushing, the spare gearbox is already on the shelf and I take it for rides. And all you have is a leaking oil seal.
Steering gearbox, adjustment, repair and replacement.
Post by Dimon » June 21, 2010, 00:59
This is it? Do I need to remove the vacuum seal to adjust the gap?
Suicide: No, but a cleverly curved screwdriver or just a plate will come in handy.
Still had to take it off
First, I removed a thick layer of dust from the gearbox. Oh miracle, here he is! Then I decided to check the oil level. Naturally, I dropped the drill there, which I used to measure the level. I had to remove the vacuum seal, the top cover of the gearbox and calmly remove the drill. At the same time, see the oil at the bottom and fill it with new one. Never mind, there was nothing to do. Now I know how the vacuum seal is removed.
Replacing the steering gear
Post by Anton » July 16, 2010, 12:17
I'm going to change it today. Are there any pitfalls or features. So at first glance there is nothing supernatural.
wwm: The most difficult thing is to remove 2 tips and unscrew 3 bolts from the spar and one small one on the steering splines. but the alignment may go away and that’s it.
Steering gear
Post by Magellan » Aug 11, 2010, 7:27 pm
The steering column on the Niva 2121 came kaput. I went to the market to buy a new one, but there were no new ones, only a used one - I don’t want to take it. I was offered two options: 1. Bet from a five (sort of). 2. Install a newer Niva, only something else needs to be changed, if I’m not mistaken, the pendulum. What's the best way to do it? And why change what?
Captain: Give it a five and replace the bipod with one taken from your old helmsman. It's not easy to remove it, but it's possible.
Will living in Niva be normal if you get an A? Maybe Nivov's reinforced ones. or the same? And what can you say about the installation from another Niva?
Captain: If you start from 21213, then you’ll also need to rearrange the bipod, but is it easier to buy 2105 and the price might be lower? Another option is the steering and pendulum from 21213, this will definitely be more expensive. There is another option - steering 21213 of a new type (with a short shaft), steering universal joint. and pendulum 21213. This option is the most expensive, but there is the least risk of running into a leftist. IMHO, parts that are no longer installed on the assembly line are not produced by the factory; they are all self-made or refurbished used ones. Therefore - 2105.
Re: Steering gear
Post by simbir » Aug 12, 2010, 01:31 pm
So what kind of steering gear is there in the field: 2105 or 2101, it’s clear that you’ll have to install your own bipod. Niva 21, what donor should I look for?
Captain: from five 2105, already said!
Re: Steering gearbox, adjustment, repair and replacement.
Post by Shashel » Aug 13, 2010 12:07 pm
I recently changed my steering. I set it to 2105. I don’t know what gear ratio, but the steering wheel felt noticeably tighter. I filled in the oil. Made the adjustment. I'm sinning with the worm-roller gear ratio. Actually, an interesting thing with the adjustment. In the position when the wheels are straight, there is a slight play (permissible). 30-40 degrees left and right is still a tolerable effort. Then I twist my whole body. It doesn’t seem weak, but it’s difficult. This was not the case with the old steering wheel.
bambr: On a stationary car? Or on the move?
In move. If you're thinking about wheel alignment, then everything is fine. Tires 205 Kama.
wwm: You need to adjust correctly: - there should be 5-7 degrees of play on the steering wheel (when the wheels are straight) - in the extreme positions of the steering wheel (when you twist the steering wheel all the way) there should be no wedging - you recess the adjusting screw - you remove the gap/play. You unscrew the screw - you increase the gap/play - the presence of GL-5 TM-5 oil is MANDATORY Antokha: Everything seems to correspond, but the steering wheel is either over-tightened or under-tightened. Something went wrong somewhere. Captain: You check and adjust in the middle position! And it is the only one. ALK: unscrewed, tightened, went catazzo. spun it again and went catazzo. then again. and then I liked everything - I put the puck on and locked it. Or is it impossible to use the unit without a washer? Antokha: You can’t. I unscrewed it, tightened it, locked it, drove it. As a rule, two or three repetitions are enough for me. You don’t have to completely unscrew the locknut, just loosen it a little. All operations take 15 minutes.
Re: Steering gearbox, adjustment, repair and replacement.
Post by KRIuK-OFF » 03 Jun 2011, 21:41
Good evening everyone
Need advice! Knock in the steering gearbox when I drive over uneven surfaces. A new toad is choking the budget to spend as much as 2100. A friend of mine offers from a seven for 1000 (total), but I don’t know if it will fit in the field or not, haven’t tinkered with the steering wheel yet. Thanks in advance
Vovchik: The bipods are different, you’ll have to rearrange them. But it is often very difficult to remove it without a puller. Better look carefully for the source of the knocking. The gearbox rarely knocks on rough surfaces
Maybe a pendulum or a ball, or something else?
Re: Steering gearbox, adjustment, repair and replacement.
Post by Kolyan69 » June 12, 2011, 4:38 pm
Hi all. I got a leak in the steering wheel, I don’t understand where it goes. Either along the bipod shaft, or in the cover, I want to fill it with grease instead of oil, I did that on the old one. What do you guys think, since I don’t want to run under the vacuum with adding oil, much less remove it?
rv3dll: through the cover, or rather through its bolts. Apply sealant under the heads and tighten.
Thank you, I can definitely get three bolts from below, I don’t want to remove the vacuum again.
Steering column. Questions.
Post by Italian » 02 Aug 2011, 18:48
Hello everyone!
The steering column arrived, and all its guts were tired of sitting in the dark and asked for fresh air. The real question is - buy a new speaker that is not Niv-like, or buy the guts and shove it into the old case. I heard that it doesn't last long.
collector: I went to the forum with the same question. In general, today I bought a steering worm, bearings and two oil seals for it, I spent 150 UAH. The amount is not significant, so I decided to take a risk. True, there is a bit of work with the replacement. Antokha: My service will not be long and it will be miserable. At least judging by my experience and the experience of my friends from the car service center. It doesn’t depend on the curvature of the arms, it depends on the quality of the spare parts. Collector: Perhaps. Only no one gives a guarantee for the new speaker, just like for these spare parts that I bought
Re: Steering column. Questions.
Post by Roman elektrik » 09 Aug 2011, 07:25
And my column will be held together, what should I do with it? The play is a little large and cannot be removed with a screw. My dad never put oil in it, but then it creaked and I remembered. Is it possible to revive her? is it hard? Or is it easier to install a new one?
Igor: At a minimum, you need to keep an eye on the lubrication, otherwise you won’t get enough speakers. Fill with nigrol and look for a new column or a used one without play.
Re: Steering gearbox, adjustment, repair and replacement.
Post by GOOFY » Nov 14, 2011 11:54 pm
Guys, tell me, I have a Niva 2121 from 1989, the steering gearbox is broken in half, it needs to be changed, I don’t ask anyone, everyone says different things about the shaft, some say that I have a long shaft, some say that they have a short one, which one to buy anyway. (there is no time to remove and look, you need to remove and install a normal one) with a long one it costs significantly less. somewhere around 1800, and with a short one 2700. I was told that on the Niva on 5k and 7k the shaft is long and on the rest of the classics it’s short, but who says the opposite
Nikolay: I had a 2121 from 1993 with a long shaft (the longest there is) Vovchik: How long?!
for all Nivas, except for the “hydraulic booster” ones: - gearbox housing 2121 - shaft 2105 (long) - bipod 2121 for old Nivas and 21213 for new ones romych: I understand correctly that there are gearboxes: 2101 (shortest) 2105 (longest) 21213 " new model" - exactly between them along the length of the shaft? I have 2121, gearbox acc. “long” is actually a new gearbox, but 2101 with a short shaft. It turns out that there is no way to plug my wonderful gearbox into my field? because there are no such long cardan shafts? (I won’t build up the driveshaft - the steering is nothing like that) Vovchik: You can disassemble the gearboxes, take out the shafts with worms and repress them. If you put a long shaft in a cheap gearbox, they are completely identical in terms of fit into the worm.
Re: Steering gear: repair, replacement, etc.
Post by Stranger21 » April 11, 2012, 07:21 pm
People.. I have already disassembled and reassembled the gearbox on the 05 several times. but Senya is going nuts from the fields. I've never seen anything like this before
in short, the middle - everything is OK. and even during maintenance they measured 6 degrees of play! . but now I’m twisting it in the right direction. and I wander back and forth - the backlash is wild. the second and most awesome thing is that the output shaft of the gearbox sits on the bipod and moves up and down. 5-9 millimeters by eye. At the same time, it's knocking wildly! .
how so? . If you tighten the top bolt until it stops, it will simply bite in the middle. I don’t get this kind of joke. this has never happened on 05 in 30 years (((
Captain: Complete nonsense, study the equipment! The backlash is measured and adjusted in the middle position of the mechanism, and increases as it deviates from the average. This is an objective reality, that’s how it’s intended.
Question about the steering gear!
Post by MIXXXA69 » Aug 15, 2012, 10:08 pm
Niva 21214, 2006. The steering gear needs to be replaced (it makes an unpleasant clicking sound). I came to the store and said: “Wrap it up!” And in response to me; “Which one do you want, with a long shaft or a short one?” I say model, year. and they answered me: “I don’t know, I don’t want to know.”
Knowledgeable people, please tell me! Which gearbox is suitable for VAZ 21214 2006? Otherwise you’ll have to go to the store, where there is no choice of shaft lengths for gearboxes
Vovchik: With a long shaft. And try to find another store
Please explain. Why with a long shaft?
Vovchik: What to justify?
Sorry, but somehow it's not right. Look at spare parts catalogs, repair books, talk to car mechanics. And you yourself will draw an unambiguous conclusion about the reliability/falseness of the judgments of the first responder on this site. Why am I going to justify my experience? Will you take my word for it again?
P.S. But the seller, if he is interested in a buyer, should know that a Niva bipod will never be installed on a gearbox with a short shaft (2101). The bipod is the only detail that distinguishes the Niva gearbox from the “five-wheeler”.
Re: Steering gear: repair, replacement, etc.
Post by Oleg Hunter » Mar 12, 2013, 01:08 pm
— For the full 20 years of owning NIVA, I know its problems = better than my own! . Having once again removed the terribly loose steering gear (RR), I decided to take care of its repair/installation “like an adult!” ..As always, we “gave up” very quickly: a worm + its own ball bearings
=
[/url ..Apply balls in this place, and Make them run on cemented + hardened but NOT-bearing steel AS30KhGM (and most likely = cheap 20X) = UNSmart!! Let's turn to the design of the RR GAZ-69, which I owned for more than a year, and which became for me = a measure/model in many ways. :
[/url] ..As you can see: the worm rests on rollers! bearings pos. 6 + the bipod shaft has, in addition to bushings pos. 14, a second support point in the form of a decent roller bearing pos. 20. An additional support bearing is difficult to install, but a worm on the rollers is necessary! We buy bearings No. 7205 + No. 2007105 (30205 + 32005), as well as BRAZH bronze F33-34mm for bushings. Grooving a worm for seating bearings, if there is a CBN cutter, is NOT a problem. :
. Final look. on a sketch with the original and desired dimensions:
- the upper (to the steering wheel) bearing No. 32005 has dimensions 25x47x15.3, the original/ball bearing - 25x47x15, i.e. You need to sharpen to the body of the worm itself + 0.2-0.3mm. Lower bearing 30205 (outer race) - you need to grind the outside to Ф50mm on a special mandrel, or bore the housing to Ф52mm. The seat for it is sharpened NOT reaching 5mm to the worm..
Added after 1 hour 15 minutes 14 seconds: — The Shervyak, already assembled on roller bearings, is run “cold” in a drill at 160-200/rpm, adding oil — to sample the play and “settle” for as long as possible! ..Adjustment - by pressing the bottom cover - is no different from the original:
. Now = bushings! Even the VAZ ones, rolled up from a bronze sheet, did NOT adhere with their entire surface to the RR body, which is clearly visible in the photo! The new ones - already rolled up from steel/bronze sheets with a “puzzle” lock - do NOT stand up to any criticism. . We sharpen the new F32 (minus) - from a bronze blank, press it in (with a suitable socket head), unfold it to size = 28.7 mm using a sliding adjustable reamer (I got a rare one - “Fritz”). It is advisable to first rotate the reamer counterclockwise/working stroke - smoothing/distributing the sleeve. In the photo on the left/below is a bipod remover, without which you cannot start working with the RR.
. I also draw attention to the beating of the worm relative to the shaft due to the gap in the joint:
After pressing, it is necessary to fuse the shaft (in points) and grind it until the worm fits tightly = concentrically!!
Re: Steering gear: repair, replacement, etc.
Post by DRON_63 » 07 May 2013, 09:18
Brothers, on the previous page the photo shows worms removed from the shafts. According to the catalog, it looks like it’s one piece (I haven’t gone to the market yet)
. Will a re-attached worm live on another shaft? This is what I mean. there is a donor 2101 and a dead man 2121, the resuscitator’s thoughts are as follows: knock the worm off the donor (already knocked it down) and put it on the dead man’s shaft. This is the first question. And the second question: are the worm gear ratios 2101, 2105, 2121 different or not? What I mean is, is it possible to leave the old video and use a donor worm?
Oleg Hunter: — The photos on the previous page are mine, and the worms are VAZ ones.. They are all from the classics/NIV = the same! At the bazaar, the traders will try to sell you on: “pure NiFavskai = strengthened. a worm on a long shaft.”
. Knocking/hammering in any combination = a matter of two minutes and an ordinary 0.5 kg metalsmith's hammer + Ø10mm adapter. Just pay attention: the “mouse” slots have one guide protrusion/groove, it is advisable to combine them. It was also noticed that on old worms/shafts these splines were higher and the grooves were deeper. and the sky used to be bluer.
I already did everything yesterday. Everything is easy and beautiful. I have a little doubt about the reliability of repeated pressing, although I think the groove will hold long. I also noticed that the width of the groove is different on different gearboxes (similar to the VAZ tolerance of 0.5 mm
. So there’s no point in running around the market and looking for the required shaft length. I took mine off and put it in the correct gearbox. Everything is interchangeable. I installed the worm from gearbox 2101, and the roller and shaft from 2121. All that remains is to buy oil seals and install them on the car.
Source
Features of Niva agricultural technology
Niva grain harvesters are the first completely automated devices of their kind, allowing grain to be threshed using the efforts of one machine. They have their own motor unit and a wheeled chassis that allows them to move within the field.
The main working part of the Niva combines is the reaping part - a mechanism that separates a section of the field for mowing and cuts off the spikelets. Threshing is done in a drum, and cleaning is done in a straw walker, the design of which has remained virtually unchanged in later models.Advantages:
- versatility;
- suitability for use in a wide range of agroclimatic conditions;
- structural reliability;
- suitability for repair, thanks to which these machines still plow the fields of our country;
- cheap spare parts and service.
Flaws:
- high consumption of fuels and lubricants;
- inconvenient position of the operator’s cabin, who cannot monitor the reaping auger;
- a machine operator’s workplace that is far from modern ergonomic and hygiene requirements;
- predominantly a belt drive, which quickly fails and requires replacement.
Read news about the new Niva
- Cardan - what is a cardan shaft in a car: functions, device | AvtoTachki
- Purpose, diagram, design of the unequal angular velocity hinge
- Mixture formation in gasoline engines
- Cardan transmission, universal joints. CV joint - purpose, device
- Diagram and location of the fuse box Niva VAZ-21213 and 21214
- Where are the relays located in the field | Niva Repair
- No charging for VAZ 21213 reasons "
- Relays and fuses Lada 4×4 (VAZ 21214, 21314) » Lada.Online - all the most interesting and useful about LADA cars
How to tighten the steering rack on Niva 21213
If there are any malfunctions in the steering (knocks, increased free play of the steering wheel or, conversely, its tight rotation, etc.), inspect the steering parts. Carry out the inspection on an overpass or inspection ditch in the following order.
1. Clean the steering gear parts and steering gear housing from contamination. Set the wheels to a position suitable for driving in a straight line. 2. When turning the steering wheel in both directions, make sure that: – the free play of the steering wheel does not exceed 5° (when measured along the wheel rim, no more than 18–20 mm). When performing this operation, use tool 67.8720.9501; – there are no knocks in the hinges, joints and steering mechanism; – fastening the steering gear housing and the pendulum arm bracket firmly (if necessary, tighten the threaded connections); – there is no free play in the ball joints of the rods and in the bracket of the pendulum arm, and the worm shaft does not move in the axial direction; – the turning force of the steering wheel (when installing the front wheels on a smooth plate does not exceed 196 N (20 kgf), 245* N (25* kgf). 3. Turning the adjusting clutches of the side links, make sure that their clamps are securely tightened. 4. Check the condition ball joints and protective caps (see subsection 5.2.1).
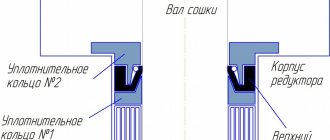
There are two options for installing the bipod shaft roller: on a needle or on a ball bearing. The text gives numerical data for both options, while under the sign * they refer to the first option (the bipod shaft roller is mounted on a needle bearing).
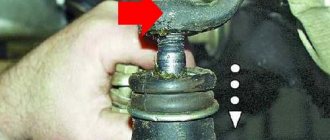
VAZ-21213 (Niva). Checking the steering rod ball joints
1. First of all, check the movement of the rod tips along the axis of the fingers. To do this, using the lever and support, move the tip parallel to the axis of the finger. 2. The axial movement of the tip relative to the finger should be 1–1.5 mm. This movement indicates that the pin insert is not jammed in the rod tip socket and moves along with the pin, compressing the spring. Replace the hinge with a jammed insert. 3. Turning the steering wheel in both directions, check by touch that there is no free play in the steering rod joints. If you feel free play in the ball joint, replace the tie rod ends or tie rod assembly. 4. Check the condition of the protective caps of the steering rod ball joints. 5. If the protective caps are in good condition and ensure cleanliness inside the hinges, then the service life of the latter is almost unlimited. When moisture, dust, etc. gets into the hinge, premature wear of its parts occurs. 6. The cap must be replaced if it has cracks, tears, or if lubricant penetrates out when squeezing it with your fingers.
VAZ-21213 (Niva). Clearances in steering worm bearings
Check and adjustment
1. Set the front wheels to the straight-line motion position and, turning the steering wheel in one direction or the other, check whether the distance between the end of the crankcase 8 (see Fig. Section of the steering mechanism) and mark B marked on the steering gear worm shaft does not change. A change in distance is a sign of clearance in the worm bearings. 2. To adjust the clearance in the worm bearings, turn the steering wheel to the left side 1–1.5 turns, unscrew the bolts securing the bottom cover 19 and drain the oil from the steering gear housing. Remove the bottom cover, remove one of the shims 18 or replace it with a thinner one.
Warning The shims are supplied in spare parts with a thickness of 0.10 and 0.15 mm.
3. After securing the bottom cover, check again to see if there is any axial movement of the worm in the bearings. If there is no movement, fill the steering gear housing with 0.215 liters of transmission oil. 4. Check the steering wheel turning force by placing the front wheels on a smooth metal plate. It should not exceed 196 N (20 kgf), 245* N (25* kgf). There are two options for installing the bipod shaft roller: on a needle or on a ball bearing. The text gives numerical data for both options, while under the sign * they refer to the first option (the bipod shaft roller is mounted on a needle bearing).