Do-it-yourself step-by-step replacement of brake discs on a Lada Granta
If the parts do not correspond to the specified dimensions from the manufacturer, a reasonable question arises - grind or change. Grooving for a ventilated brake disc is possible if the remainder is at least 4 mm. Since if a part is worn out, the manufacturer revokes the warranty, many advise replacing it with a new one.
Many owners of cars with a disc brake system are interested in how often it is necessary to change its consumable parts. On a Lada Granta, replacing brake discs is a key maintenance step.
Replacing caliper guide pins on Grant
With a sufficiently high mileage on a Lada Granta car, a nuisance such as caliper rattling may occur. The reasons why this happens are most likely the following:
- Loosening of the spring clips on the brake pads themselves, which can be cured by simply straightening them out a little
- Deterioration of caliper guide pins due to insufficient amount of lubricant in them
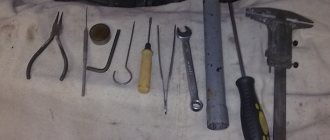
In this post we will consider the second case, as it deserves special attention. In order to replace fingers, you will need a tool such as:
- Flat screwdriver
- 13 and 17 mm wrenches
- Caliper Lubricant
- Brake cleaner
Checking and replacing guide pins and lubricating them
The main reason why guide pins wear out is damage to the boot, which entails “loss” of lubricant and “dry” operation. I think that there is no need to explain once again about the force of friction. In this case, the fingers wear out quite quickly.
As a result, we get play in the caliper bracket on the guides and our unpleasant rattling! Now about fixing this problem. To do this, you will need to buy two fingers for each caliper. When assembled with anthers, their price is no more than 50 rubles, even less.
We lift the car with a jack, or rather its front part. Unscrew and remove the wheel. Next, we need to unlock the caliper bracket mounting bolts to replace them.
We fold the bracket to the side, as shown in the photo below.
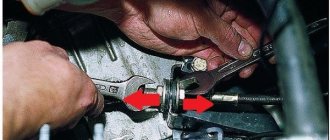
And now you can remove the upper finger by pulling it with the necessary force:
Now take a new finger and apply a thin layer of special lubricant to it.
And we install it in its original place, seating it all the way so that the boot is fixed in special grooves.
We perform the same procedure with the second finger and install all the removed parts in the reverse order. It is worth noting that for lubrication it is necessary to use special compounds that are able to retain all their working properties at high temperatures.
Video on caliper inspection on Grant
To show the entire process of this repair clearly, I will present a video review below.
By the way, in this example we used MC1600 caliper lubricant, which actively began its PR on YouTube several years ago, and now, together with Academician, they are going to make a new motor oil. Well, let's see what they can do!
Procedure for removing old brake discs on Grant
First of all, we tear off the front wheel mounting bolts, and then jack up the car. Then completely remove the wheel from the car. Next we will need a torx t12 socket to unscrew and remove the caliper. Then we hang it in such a way that there is no load on the hose.
Then, using a 7 key, unscrew the two guide pins that secure it to the hub.
After this, we apply penetrating lubricant on the reverse side, since, most likely, the disc is stuck to the hub.
After waiting a few minutes, you can begin to dismantle the disk, using either a special puller or a hammer and a wooden spacer.
After several attempts, most likely you will still be able to cope with this job.
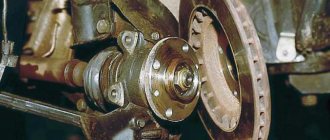
Disc removal and inspection
When carrying out repairs, do not press the brake pedal - this will lead to squeezing the piston out of the caliper. As a result, these mechanisms will have to be changed, and the system will also have to be pumped. After unscrewing the guides, you need to remove the brake disc. This can be done using a special puller or the proven method - a hammer and a wooden spacer.
But usually, when replacing brake discs on Kalina with your own hands, you do not have to resort to either the first or second method. The disc can be easily removed by hand - the metal does not stick to the wheel hub. After dismantling, carefully inspect the working surface of the disk - it should not have cracks or waviness. If thickness allows, you can sharpen the discs - it will be a little cheaper than buying new ones.
READ Replacing the generator bearing for Skoda Octavia Tour
But if you had to pass a disappointing verdict on the elements, you will need to install new ones. It is advisable to purchase ventilated ones - it is easy to distinguish them, since the design consists of two halves. It is better to give preference to the following manufacturers: Ferodo, Textar, TRW, Brembo. True, their cost will be higher than that of domestic AvtoVAZ.
Replacing brake pads on Lada Granta
Selecting brake pads for Lada Granta
Brake pads are a consumable part of the car, in other words, they are changed quite often. The front brake pads bear the brunt of the load when braking, so they wear out three times faster than the rear ones.
Not only the braking efficiency, but also whether they will creak during operation depends on the quality of the brake pads. Do you know which front brake pads are best to choose?
Lada Priora, Granta, Kalina cars are equipped with the same brake pads having catalog numbers: 21100-3501080, 21100-3501089.
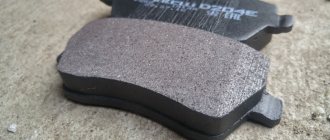
The brake pad consists of a metal plate and a special lining made of friction materials. The quality of this material determines the wear resistance, rigidity and friction coefficient of the brake pad. The higher these important parameters, the better.
Original or non-original
There is an opinion that original brake pads are more effective, and their service life is much longer than non-original ones. In addition, original brake pads are made without the use of asbestos, which is hazardous to the environment. Why do many people choose non-original brake pads? The main reason is the low price for acceptable quality. And in some cases, for a low price you can find non-original brake pads that are not inferior in quality to the original.
Replacing rear brake pads in Lada Granta
Replacement of rear brake pads, disassembly and assembly of the rear brake mechanism of Lada Granta.
If they are worn out, and this usually happens after a mileage of 60,000 km.
1. Securely secure the car so that it does not roll away.
2. Remove the handbrake from the brake and make sure it is in the down position.
3. Raise Grant using a jack.
4. Remove the rear wheel.
5. Using a 7mm spanner, unscrew the two guide pins.
6. Remove the brake drum. If the drum cannot be removed, then turning it, hit the drum with a hammer through a wooden block and remove it. We don't press the brake.
7. Using a screwdriver, remove the spring from the upper block, then remove the spring.
8. Remove the upper spacer bar.
9. Also, using a screwdriver, remove the spring from the lower block, and remove the spring.
10. Using a screwdriver, remove the guide spring. On Grants with ABS, special brake pads are installed with a slot for the wheel rotation sensor.
11. Remove the front block and lower the block.
12. Remove the manual brake pad drive lever from the parking brake cable hole.
13. Straighten the cotter pin and pull it out of the hole in the “manual drive” lever of the parking brake. We also remove the washer from the finger.
14. Take out the lever and finger. We install the manual drive lever on the new block in the reverse order and install the new blocks in the reverse order.
Repair of the front wheel brake mechanism of Lada Granta
The front brake mechanism is disc, ventilated, with a floating caliper and one working cylinder.
The brake disc is cast iron, its minimum permissible wear thickness is 17.8 mm.
The gap between the brake pads and the disc is maintained due to the elasticity of the rubber sealing ring installed in the groove of the working cylinder wall.
The floating front brake caliper includes a caliper and a wheel cylinder held together by two screws.
The cylinder is secured with two bolts to the guide pins installed in the holes of the shoe guide.
The brake pads are pressed by springs to the grooves in the pad guide.
The cylinder contains a piston with a rubber sealing ring of rectangular cross-section. Due to the elasticity of this ring, a constant optimal gap between the brake pads and the disc is maintained.
Let's summarize
As you can see, the process of replacing brake pads is not complicated; it is important to initially understand how to fix it. The work will not take much time - half an hour, and the second or third time you will do it even faster. Pay attention to the sounds when braking: if there is a whistle, grinding or creaking, you feel kickback in the pedal, the system begins to “beat” - it’s time to install new pads. Practice shows that on a Lada Granta, for a driver with a calm driving style, the service life of the kit increases to 50 thousand kilometers, for motorists and reckless drivers it decreases to 30 thousand kilometers.
Do-it-yourself caliper repair - preliminary inspection
The return movement of the piston in this unit is ensured by a cuff. Firstly, it creates a tightness, and, secondly, it acts as a kind of spring. When the piston moves, it undergoes a slight deformation, but then returns to its previous state, slightly pressing it into the body. Determining the malfunction is quite simple - if you hang the wheel, it should rotate freely as soon as you press or release the brake pedal. There should be no signs of overheating on the discs themselves, otherwise you will need to repair the caliper yourself.
When conducting a visual inspection, we must make sure that there is no noticeable difference in the thickness of the outer and inner pads. The piston should move so that when pressed it easily sinks into its body. Its surface should not have noticeable traces of dirt or corrosion particles. You also need to conduct a superficial inspection of the boot and ensure its integrity.
Possible difficulties and solutions
Difficulties in dismantling a worn element may arise at the initial stage - bending of the edges of the plate. It is not always possible to successfully catch the edge and bend the material in the desired direction. If the owner cannot get a grip with pliers, you can use a rigid screwdriver or pliers, placing the working rod in the eye, after which the lever method is used to bend it.
- It is always better to use original spare parts or suitable replacements;
- The rear wheels are securely fixed with wheel chocks;
- Replacement is carried out only comprehensively;
- After completing the procedure, it is necessary to monitor the brake fluid level.
You should not worry if you experience an unpleasant sound after replacement. New elements should get used to the brake discs after several thousand kilometers.
The following video will help every Lada Granta owner learn the step-by-step work of replacing front brake parts with current examples.
What are brake discs?
There are three types of brake discs:
- Solid. The working blade and the part adjacent to the hub are monolithic. There is no cooling.
- Ventilated. There are fins there that form channels for cooling. Due to them, the best cooling is achieved.
- Composite. The central part adjacent to the hub is cast from aluminum or titanium. The structure is prefabricated. The second element is a cast iron ring. In this case, the weight is significantly reduced and thermal stability is improved. Heat transfer to the hub is minimal.
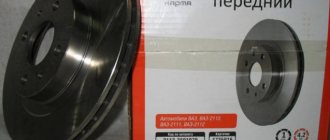
Brake discs on Lada Granta
Brake discs on the Lada Grant are divided into 4 groups by type:
- Smooth - used more often than others. The working surface is completely smooth.
- Perforated - through holes are applied across the entire area of the disk, improving cooling and reducing the weight of the structure.
- With radial notches - special “ditches” are designed that remove waste particles outside the working area.
- Perforated with notches - a combined version of the second and third. A rare species that has the best qualities of both specimens.
Discs are made from cast iron and ceramics.
Cast iron
Cast iron brakes are popular and have been used in almost all budget cars for a long time. Cast iron is durable, heat-intensive and not subject to temperature deformation. Among the disadvantages are weight and long cooling time. But the aesthetics of these discs are not the best - they are susceptible to oxidation, rust quickly, and have to be periodically tinted. It is better to install brake discs made of this metal on the Granta.
Don't underestimate cast iron just because it's not used in expensive cars. It has found wide application in railway equipment - trams, metro trains, diesel locomotives. The brake pads of the Russian ED4M are made of cast iron. The load on this metal is truly monstrous and frequent - on average in Moscow, a train slows down once every 2-3 minutes.
Ceramic
They are used on expensive cars that are designed for sports. They have low noise and vibration levels, are more durable and perform well at high temperatures. They are much lighter in weight than their cast iron counterparts because they do not contain metal.
Minuses:
- price;
- low efficiency when the part is not heated;
- creaks due to design features.
Ceramics are intended for lovers of aggressive driving with frequent braking. For quiet driving around the city, on the highway and on country roads, it is clearly not needed, especially for such a price. In addition to sports cars, ceramics are used in aviation.
Non-ventilated
The non-ventilated disk is the most primitive and widespread. It is a monolithic device with an inseparable rotor and a central part. Most often made from cast iron. Found application in inexpensive and low-power cars. Due to the lack of ventilation, it heats up quickly and cools down slowly. The efficiency is significantly lower than that of a ventilated one. However, you shouldn’t consider it completely bad - most often, just such a brake will suit the average user.
Ventilated
Ventilated is the most common type of front axle disc on modern cars. It has a little less weight, good cooling. The actual device is that it is two disks joined together with a cavity in between. The plates are covered with through holes.
https://youtube.com/watch?v=1ZoVnRZFbGk%3F
Now in Russia, about 70% of all new cars are supplied with ventilated front brakes.
What is the difference between regular and sports
First of all, the difference is in price and purpose.
Requirements for conventional disks are low price, heat capacity, efficiency in normal mode. They are intended for ordinary trips around the city and on the highway at a speed of 60-110 km/h, so there is no point in installing more expensive ones. Conventional ones are made of cast iron. The front axle is ventilated, but the rear axle is not. The weight and how long the part cools down does not matter. It is better to install brake discs of this type on the Granta.
Sports ones are designed for high speeds and constant braking. They should be light, cool quickly, and produce maximum friction between the pad and disc. Such brakes are very expensive, but they also last longer. The main arguments why the average driver should not buy them are the high cost and ineffectiveness when cold. Typically sports brakes are vented ceramic.
Preliminary operations
Before starting the replacement itself, it is necessary to carry out the following work:
- The brake fluid level is monitored. If it exceeds the standard, the excess volume is pumped out, since there is a risk that after installing new pads, the liquid will simply squeeze out.
- The rear wheels of the vehicle are secured with chocks or other anti-rolling devices.
- The bolts securing the wheel rims are loosened.
- A jack is placed under the desired wheel, after which the car is raised and the wheel is dismantled.
- The necessary tools are laid out, as well as a new set of pads.
- Turn the steering wheel in the direction you want to replace it. It will be more convenient to work this way.
Replacing front wheel brake pads
The brake pads of the front wheels must be replaced only as a set - all four pads.
Replacing the pads of only one brake mechanism can lead to the car pulling to the side when braking.
If the fluid level in the brake hydraulic reservoir is at the MAX mark, then before installing new pads, use a syringe or a rubber bulb to pump out some of the liquid from the reservoir so that when the piston is recessed into the working cylinder of the brake mechanism, liquid does not flow out from under the reservoir cap.
Remove the front wheel.
After replacing the pads, press the brake pedal several times to set the gaps between the pads and discs.
Check the level in the tank.
How to replace brake discs on a VAZ 2190?
Note! Before you start work, keep in mind that the discs are changed in pairs and therefore immediately calculate the money (By the way, the brake pads also need to be changed), but this must be done only because each disc is different and if one is left with wear and tear, then If you install a new one, then immediately uneven braking will occur (the car moves away from straight-line motion), and of course, the new brake disc will wear out much faster, because all the force during braking will be applied to it and not to another disc with wear (see. "The principle of operation of a brake caliper")!
1. First, remove the corresponding wheel (see “Proper removal of wheels on a car”) and then remove the brake pads by unscrewing the necessary bolts and folding the caliper bracket (Read the article: “Replacing brake pads”), after this operation, find the brake the hose is screwed to the brake caliper (For clarity, it is indicated by a green arrow), after finding it, move your eyes a little higher (In this case, you will need to look at the brake hose) and look for the place where the hose is attached to the strut using a rubber holder (there will be a slot there) , pull it out (This way the hose will start to dangle), and when everything is finished, unscrew the two hex head bolts and grab the caliper with your hands, completely remove it from the brake disc and hang it on a spring, using a metal wire or something like that (see large photo).
Note! You only need to hang the brake caliper for this purpose, because if you don’t do this, it will hang on the brake hose (And you didn’t disconnect it) which may break; if it breaks, the hose will have to be replaced with a new one, and when suspended, the hose will hang freely and make sure that it does not bend yet, if you decide to disconnect the hose and completely remove the caliper (For example, to replace the brake hose, we will assume that you have found cracks on it that are unacceptable), then after these operations do not forget to bleed the entire brake system on the car or if the hose does not disconnect, or for example, when disconnecting it, you plug it with some kind of plug, and after disconnecting the hose from the brake pipe and plugging it with a plug, you can not bleed all the wheels, but only perform the one on which all the work was done and some other nuance, if you decide not to remove the pads (you don’t want to change them, for example), then you will need to act as follows, when removing the brake caliper, firstly, it may not come off (the pads will be clamped), in this case, take a powerful screwdriver and using it as a lever (Putting it on the brake disc), press the inner brake pad inward (So that they are not in a clamped state) as shown in the photo below and that’s it, you can remove the caliper together with the pads from the brake disc of the car!
2. Now spray WD-40 liquid on the guide pins that secure the brake disc, clean the brake mechanism from dirt using a wire brush and proceed to removal, the brake disc on the right and left sides is attached only to these two guide pins, turn them out (see photo 1) and try to remove the disc with your hands first, if it doesn’t work, then take a hammer and a small wooden board and, using it, knock the brake disc out of its seat and remove it from the car, but only when you hit it, strike in different places so that it is removed evenly, and if you have a rubber hammer, then do the work without a plank at all, and just use a hammer, because it will not cause such serious damage as a metal one.
Do-it-yourself caliper restoration
Most modern cars use disc brakes. The main working body is the caliper, which clamps the disc using pads. In order for this system to operate with high efficiency, regular monitoring of its technical condition is necessary. To do this, you can contact our car service center for professional diagnostics and, if necessary, repair work. In addition to prevention and repair, it is possible to order caliper repair kits for cars from the following manufacturers: VAZ, Opel, Ford, Audi, Renault, Peugeot, Citroen, Mazda, Mitsubishi, Volkswagen, BMW and others. But many car owners prefer to perform these procedures on their own. To repair a brake caliper yourself, there is no need for special conditions. All you need is a set of standard locksmith tools and a device with which you can reliably jack up the car.
Removing fastening elements
So, let's start replacing the brake discs. First you need to loosen the wheel bolts. Then you need to lift the car using a jack. When the wheel nuts are safely unscrewed, you should remove the wheel itself and place it under the front suspension. This is necessary for safety reasons, otherwise you never know what could happen during the work. It is recommended to place a board between the wheel and the suspension.
The two fastening bolts, which are located on the back side, must be unscrewed using a socket or spanner. You first need to feel the second bolt with your hand, because you won’t see it right away. The next step is to unscrew the two guide pins. It’s worth warning right away that you shouldn’t even try to unscrew them using a simple ring wrench No. 7. In this case, it is best to take two keys, and ideally use a long 7-mm socket.
It would be useful to remind you that these pins are screwed into the hub. They simply pass through the brake disc and press it against the hub. They must also be installed when putting on the wheel during its replacement. It will be useful to treat these pins on both sides with WD. It is recommended to shed the fitting diameter of the braking distance on the hub.
Unscrewing the pins is not an easy task. If you have successfully completed this stage, you can consider that half of the work is already done. The level of difficulty in manipulating the pins depends on the mileage of the car. For example, if the indicator does not exceed 20 thousand kilometers, it will not be difficult to unscrew the pins. With a mileage of, for example, 55 thousand kilometers, difficulties may arise with dismantling parts.