If, when starting your “six” from a stop or driving on an uneven road, knocking noises are heard from the rear axle, and the rear of the car moves to the side on potholes, then most likely the rear suspension of the VAZ 2106 requires repair. Most often, the rubber bushings of the reaction rods or transverse rods are to blame for the loss of vehicle stability on the road.
Less commonly, the cause of unstable behavior on the road is faulty shock absorbers and springs. The price of “classic” rear suspension elements is low, and replacing them is not difficult.
Method for checking the technical condition of the rear suspension
To check the serviceability of parts, the car is placed on an inspection hole or overpass. During a visual inspection, mechanical damage (cracking, ruptures, etc.) is unacceptable on rubber products. If the silent blocks of the rear suspension of the Zhiguli are a rubber mass squeezed out of the eyelets of the rods, they also need to be replaced. Be sure to inspect the attachment points of the rod brackets to the body for cracks. Defective areas must be welded.
To determine the condition of the rubber hinges of the longitudinal rods, put the car on the handbrake and rock the body in the longitudinal direction. Play in the connections will indicate worn bushings. The wear of the longitudinal thrust elements is checked by rocking the rear of the vehicle in the transverse direction. Repairing the rear suspension of a VAZ 2106 does not require special knowledge, but some metalworking skills are still needed.
Suspension repair
Having determined that your car's suspension requires repair, depending on the intended work, you need to prepare tools and components, and then follow the step-by-step instructions.
Front suspension
Due to the more complex design of the front shock absorption system, its repair procedure requires more time and labor compared to the rear.
Replacing the upper silent blocks
If damaged, rubber-metal products are replaced with new ones and cannot be repaired or restored. We change the hinges of the upper arms with the following tools:
- silent block remover;
- ball joint remover;
- keys for 13, 22, 24;
- hammer;
- chisel;
- mount;
- lubricant (for example, WD-40).
Repair consists of the following steps:
- Raise the front of the car and remove the wheel.
- Unscrew the bumper bracket.
- Using keys 13, unscrew the ball fastener.
Replacing the lower silent blocks
The hinges of the lower arm are replaced with the same tools used to repair the upper arms. The sequence of actions is as follows:
- We repeat step 1 to replace the upper silent blocks.
- We dismantle the shock absorber.
- We tear off the nuts securing the lever axle.
Replacing shock absorbers
We change the faulty damper using keys 6, 13 and 17 in the following sequence:
- Using a 17 key, unscrew the upper fastener of the shock-absorbing element, while holding the rod itself with a 6 key.
Replacing stabilizer bushings
If only the outer bushings need to be replaced, there is no need to completely remove the stabilizer. It will be enough to unscrew the fastening at the edges. To replace all rubber elements, the part will have to be removed from the car. The following tools will be needed:
- key to 13;
- mount;
- head for 10 and 13;
- collar
The replacement procedure is performed as follows:
- We unscrew the fastening of the stabilizer bracket to the lower element of the suspension and remove it, having previously marked the location of the bracket for correct installation after repair.
Video: replacing transverse stabilizer bushings on a “classic”
Rear suspension
In the rear suspension of the VAZ 2106, torque rod bushings are changed more often, and shock absorbers and springs are changed less often. Let's take a closer look at the process.
Replacing dampers
The rear dampers are changed using the following list of tools:
- keys and head 19;
- hammer;
- knob;
- mount.
The procedure consists of the following step-by-step actions:
- We park the car on the overpass.
- For better unscrewing, apply a lubricant like WD-40 to the fasteners.
- Unscrew the lower bolt of the damper and remove it.
Replacing springs
To replace the elastic elements of the rear suspension, you will need to prepare the following list:
- two jacks;
- keys to 19;
- large screwdriver.
To make repairs more convenient, it is better to place the car on an inspection hole. We carry out the work in this order:
- We tear off the rear wheel fasteners.
Video: replacing the rear suspension springs of a Zhiguli
Replacing rods
To replace the reaction rods or their bushings, the suspension needs to be disassembled. The list of tools required for the job is the same as when replacing springs. The event consists of the following actions:
- We tear off the upper fastener of the rod with a wrench with a 19-mm head, holding the bolt itself on the other side with a wrench.
How a faulty suspension affects the movement of the car
The suspension may have several faults. Each of them influences the car’s behavior on the road in its own way.
- Rocking when braking and when starting - this is caused by faulty shock absorbers. Their job is to dampen spring vibrations. In addition, a non-working shock absorber leads to excessive roll of the car when entering a turn at speed.
- Knocks in the area of the rear suspension of the VAZ 2106 indicate wear of the rubber inserts. If the sound occurs at the moment of starting and braking, then it may be the silent blocks of the longitudinal rods. Knocking on bumps indicates the need to replace the rubber bushings of the shock absorber mounts. The third type of knocking occurs when turning, when the rear of the car skids. This indicates the need to replace the longitudinal thrust bushings. Its function is to hold the rear axle in an exact position relative to the body. But the centrifugal force that occurs at the moment of skidding displaces the body relative to the bridge, which leads to knocking.
Suspension faults
It cannot be said that the VAZ 2106 suspension is unreliable, but taking into account the quality of our roads, it is still necessary to carry out diagnostics and carry out repair work from time to time. The occurrence of a particular malfunction can be judged by characteristic symptoms, based on which it will be easier to determine the damaged part.
Knocks
Knocks may appear at different moments when the vehicle is moving, which indicates the following malfunctions:
- at the beginning of the movement. Indicates damage to the rear axle rods or the brackets to which they are attached. The silent blocks themselves may also wear out. First you need to inspect the attachment points of the rods and their integrity, check the rubber-metal elements. Replace faulty parts;
- while driving. With such a manifestation of a malfunction, the shock absorbers and their bushings may fail or the fasteners may loosen. If there is severe wear, ball joints can also knock;
- when the damping system is compressed. A malfunction can occur when the rebound buffer is damaged and can be eliminated by inspecting and replacing damaged elements.
In addition to the problems listed above, knocking noises can also occur when wheel bolts are not tightened.
Video: reasons for knocking when starting to move
Pulling the car to the side
There can be many reasons when a car deviates from straight-line motion:
- tires are inflated at different pressures. The air needs to be checked and adjusted;
- Incorrect wheel alignment installation. This can occur when one of the levers, their axes is damaged, or the silent blocks are severely worn. It is necessary to inspect the front suspension, check that the angles are set correctly and, if necessary, adjust them;
- axle deformation. The part needs to be replaced;
- loss of elasticity or breakage of one of the springs. A sagging or faulty spring must be replaced;
The car can also pull to the side for other reasons not related to the suspension, for example, when one of the wheels is not fully released. In this case, it is necessary to check the brake mechanism and eliminate the malfunction.
Extraneous sounds when turning
The reasons for the appearance of knocks or creaks when turning the “six” can be as follows:
- The wheel bolts are loose. It is necessary to check and tighten the fastening;
- Excessive axial play of the front wheels. This sign indicates a failure of the wheel bearings or a loosening of the hub nut. Replacement of faulty elements or tightening of fasteners is required;
Front suspension elements of VAZ 2106
- 1 – hub bearings;
- 2 – hub cap;
- 3 – nut;
- 4 – steering knuckle axle;
- 5 – cuff;
- 6 – hub;
- 7 – brake disc;
- 8 – protective cover of the upper ball pin;
- 9 – upper ball pin;
- 10 – bearing (liner) of the upper support;
- 11 – upper lever;
- 12 – compression stroke buffer;
- 13 – spring insulating gasket;
- 14 – shock absorber;
- 15 – shock absorber mounting pad;
- 16 – axis of the upper arm;
- 17 – rubber bushing of the hinge;
- 18 – outer bushing of the hinge;
- 19 – adjusting washers;
- 20 – suspension cross member;
- 21 – stabilizer bar cushion;
- 22 – stabilizer bar;
- 23 – axis of the lower arm;
- 24 – lower arm;
- 25 – clip for fastening the stabilizer bar;
- 26 – spring;
- 27 – rubber bushing of the shock absorber spring;
- 28 – lower spring support cup;
- 29 – steering knuckle;
- 30 – lower ball pin race insert;
- 31 – lower support bearing;
- 32 – lower ball pin.
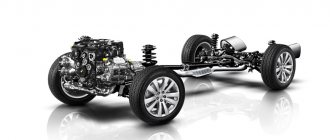
The front suspension is independent, double wishbone, with a coil spring, telescopic hydraulic shock absorber and anti-roll bar.
Checking the condition of rubber parts
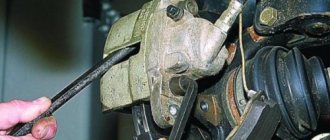
The next stage of diagnosis is checking the condition of the rubber bushings in the rods. To do this, you need to lift the car on a lift. Then a pry bar is inserted into the gap between the mounting bracket and the rod. You need to apply force and see how much the rod moves under the influence of force. Large play will be a sign of worn bushings and silent blocks. This procedure must be done sequentially with all rear suspension arms of the VAZ 2106.
A visual inspection of rubber parts can also tell a lot. Worn bushings often have cracks and are also crushed.
How is the repair carried out?
Do-it-yourself repair of a VAZ 2106 chassis can include a wide range of works, including:
- Adjusting the bearings on the hubs.
- Replacement of grease and bearing seals.
- Replacement of front suspension shock absorbers.
- Replacing springs in pairs.
- Installing new joints on the upper and lower control arms.
- Replacement of arms, both upper and lower.
- Replacing anti-roll bar cushions on a VAZ 2106.
- Installing new upper or lower supports.
After completing all of these or one of the listed works, it is necessary to have the wheel alignment done in a specialized workshop.
Front suspension VAZ-2106: device, features
The front suspension of the VAZ-2106 is of a double wishbone design. Since the car is rear-wheel drive, it works much more efficiently not with the classic McPherson, but with a double wishbone. The MacPherson type suspension has many disadvantages; they outweigh, and significantly, all the advantages of the system. Among the main advantages is that the manufacturing cost is much lower. But double wishbone suspensions have a huge advantage: they perform much better when traveling on rough roads.
Front suspension design
The front suspension of the VAZ-2106, the diagram of which is shown in the figure, is completely independent. The basis of the design is two levers located transversely. The front wheels are fastened using a bolted connection to the hubs. Inside the hub there is a tapered bearing, which is pressed in and secured with a nut. Please note that the nut with reverse thread is installed on the right side. If you are unsure whether you are installing the right nut, look at the edges. One of them should have three dots.
Ball joints
The steering knuckle, to which the tie rod end is attached, is necessary to rotate the wheels. Using steering rods, the wheels are mechanically connected to the gearbox. The steering knuckle is attached at the bottom and top using ball joints. Moreover, their designs are different. The cups of both ball joints are mounted on the suspension arms.
We recommend: How do hanging belts differ in quality?
The hinge pins are installed in the holes of the steering knuckle. The levers are fixed to the body using rubber-metal bushings, which are called silent blocks. It is with their help that the front suspension arms of the VAZ-2106 move relative to the body. The price of the lower one is 700-1000 rubles, the upper one - no more than 800 rubles. Ball joints cost 350-500 rubles. a piece.
Suspension check
It is imperative to diagnose the car’s suspension; to do this, install it on a lift or in an inspection hole. In this position, all suspension elements are much better visible. Very often the front suspension arms of the VAZ-2106 fail.
Despite the fact that their design is very reliable, cracks may appear, which will lead to the destruction of the front suspension. The procedures that need to be carried out on the car are as follows:
- Wheel camber and toe adjustments are carried out every 10,000 km.
- At similar intervals, you need to check the condition of your car tires.
- Every 20,000 km, it is necessary to check the play of the front wheels and, if necessary, tighten the nuts on the wheel bearings.
- Be sure to check the tightness of all threaded connections every 20,000 km.
- Silent blocks, stabilizer pads, ball joints must also be inspected every 10-20 thousand km.
The most vulnerable point of the entire suspension is the ball joints. They are practically eternal, if only they are used under normal conditions. In other words, they should not be under heavy stress. And most importantly, the condition of the anthers must be ideal. Make sure that no dirt gets inside the hinges when operating. It is advisable to replace them at the slightest damage to the anthers.
Checking silent blocks
If the silent blocks on the car are worn out, then it will not be possible to set the normal toe-in and camber angles of the wheels. Therefore, it is necessary to repair the front suspension of the VAZ-2106; the price of a set of silent blocks is about 700 rubles. When the rubber part breaks, the lever moves. If there is even slight damage, it is advisable to immediately install new silent blocks. Moreover, you need to change everything at once, in this case the performance of the suspension will become much better and more efficient. And the levers will move normally relative to the body.
Before starting work, you need to place the car on a level surface and secure the rear wheels with wheel chocks. The side of the car on which the diagnosis is being carried out must be raised using a jack and the wheel removed. It is much better if all this work is carried out on an inspection hole or overpass.
You will need to measure how far the inner and outer washers move. The outer ones should move a maximum of 3-7.5 mm for the lower lever and 1.5-5 mm for the upper one. The displacement of the internal washers should not exceed 2.5 mm on both arms. It is quite possible that the radial displacement of the silent blocks in the levers will be too large. In this case, only installing new elements will help.
Diagnostics of the upper ball joint
To carry out the work you need to use help. Place an assistant in the car, behind the driver's seat, so that he squeezes the brake. Only in this case will you eliminate the possibility that during diagnostics you will be able to feel the wheel bearing being displaced.
Use sharp movements to rock the front wheel. If suddenly there is even the slightest play in the ball joint, you will definitely feel it. When pushing back and forth, the wheel will move freely. It is possible that there will be a creaking or crunching noise coming from the upper ball joint.
Diagnostics of the lower ball joint
On the lower arm of the front suspension of the VAZ-2106 there is a ball joint, which is secured with three bolted connections. It is much easier to check the condition of the lower ball joint than the upper one. To work you need a caliper. But if you don’t have it, then a match, a thin needle, stiff wire and a ruler will do. Pay attention to the bottom of the hinge, there is a small plug in it.
It can be unscrewed using a wrench or pliers. You need to install a caliper in the hole. The distance from the edge of the ball joint housing to the steel pin should not exceed 11.8 mm. And if you take measurements using the same match, then you need to install it in the hole, mark the location of the edge of the edge and take the measurement with a simple ruler. If only the lower ball joints on the car are faulty, the best repair option is to replace these joints all around.
How to check shock absorbers?
If the shock absorbers are damaged, this can be felt when driving. All road surface irregularities are absorbed very poorly, as a result of which the suspension does not work properly. After falling into a hole or hitting a bump, a car begins to sway for a very long time. The shock absorber is attached to the car body and to the lower suspension arm. If it is faulty, the lower arm will not encounter resistance and will begin to move freely. Another sign that the shock absorber has become unusable is the appearance of a leak on its body.
If the seals are damaged, oil comes out. In this case, the operation of the shock absorber strut is disrupted. To assess the condition of the shock absorbers, you need to sharply press on the side of the car body to bring it as close to the ground as possible. Then quickly release. With fully functional shock absorbers, the body will make no more than one upward movement. Otherwise, partial repair or replacement of the front suspension of the VAZ-2106 will be required.
How to replace shock absorbers and springs?
If one shock absorber fails, it must be replaced in pairs. If the shock absorber on the left front side has become unusable, then the right one is changed along with it. Only in this case will the normal operation of the entire suspension be ensured. Similar requirements apply to springs.
If these suspension elements wear unevenly, the car may simply become uncontrollable when cornering. When replacing front shock absorbers, you can use a small hole, but it is better to do everything on a lift or overpass. Sequencing:
- Using a 17 mm wrench, unscrew the nut in the engine compartment that secures the shock absorber rod.
- Remove all rubber cushions attached to the rod.
- Push the shock absorber rod until it fits into the body as far as possible.
- Unscrew the two nuts from the lower arm that secure the shock absorber housing.
- Pull the entire shock absorber down.
We recommend: Elements that are needed for normal headlight installation
If the work takes place on a flat surface, then you can dig a small hole under the lower arm, 15-20 cm is enough. The main thing is that the shock absorber can be removed. Or you can drive your front wheel onto a small hill, for example, several blocks of wood.
How to adjust the front bearings?
Very often the front bearings on the front suspension of a car break. It is advisable to inspect them every 10,000 km. Diagnostics and configuration are as follows:
- Use a jack to hang the wheel.
- Remove the dust cap.
- Unlock the nut on the hub.
- Using a 27 wrench, you need to tighten or unscrew the nut.
Please note that you should not use too much force when tightening. Once you have tightened the hub nut all the way, you need to turn it back 60 degrees and fix it by knocking off the edge of the nut with a hammer. The bearings have a cone shape, so if the permissible tightening torque is exceeded, they are destroyed. But they can easily withstand heavy loads, since the rollers and the holder have a very large contact area.
Description and fastening of the beam
Structurally, the beam is a massive C-shaped structure made of two stamped steel sheets welded together. At the ends of the beam there are four studs to which the suspension arms are attached. The pins are pressed into the recesses. Above the studs are lugs with several holes. Bolts are screwed into these holes, with which the beam is screwed directly to the body of the VAZ 2107.
Basic beam faults
At first glance, the beam seems to be a very reliable element that is difficult to damage. In practice, the situation is different, and owners of “sevens” have to change beams more often than they would like. Here are the main reasons:
- beam deformation. Since the beam is located under the bottom of the car, stones can get into it. The driver can also hit the road with the beam if the front wheels suddenly fall into a particularly deep hole that the driver did not notice in time. Finally, the car may have incorrectly adjusted camber and toe. The result of all this will be the same: deformation of the beam. Moreover, it does not have to be big. Even if the beam bends just a few millimeters, this will inevitably affect the car’s handling, and therefore the driver’s safety;
- beam cracking. Since the beam is a device subject to alternating loads, it is susceptible to fatigue failure. This type of failure begins with the appearance of a crack on the surface of the beam. This defect cannot be seen with the naked eye. With a crack, a beam can work for years, and the driver will not even suspect that there is anything wrong with the beam. But at some point, a fatigue crack begins to propagate deep into the structure, and propagation occurs at the speed of sound. And after such a breakdown, the beam can no longer be used;
Do-it-yourself replacement of VAZ-2106 silent blocks video instructions
Silent blocks are used in the construction of cars of all models. They are rubber inserts between suspension parts; they are used to absorb vibration and, accordingly, to prolong the uninterrupted operation of the machine’s chassis. The silent blocks themselves are subjected to very high loads, which leads to their frequent failure.
In this article we will talk in detail about how to replace silent blocks on a VAZ-2106 car, we will provide step-by-step instructions and useful recommendations, thanks to which you can perform this rather complex procedure with your own hands, without involving car service specialists.
Tools and accessories needed to replace silent blocks
First of all, you will need to prepare all the necessary tools. Without them, it will be quite difficult to get to the silent blocks in a VAZ-2106 car and dismantle failed parts. So, for high-quality and convenient repairs you will need:
- special tools for dismantling ball joints, the upper arm, removing and installing a new hinge made of metal and rubber, as well as for unpressing the far steering tips;
- open-end, ring and miter wrenches for 13, 22 and 24 millimeters;
- jack;
- set of mounts;
- a thin and sharp chisel that will allow you to carefully dismantle the lower silent blocks without removing the lever;
- hammer.
Additionally, you will need to prepare the new suspension components that will be installed on the vehicle. Today it is best to buy polyurethane silent blocks, which differ from ordinary ones in their service life increased several times.
But if your goal is to carry out repairs at minimal cost, then you can get by with traditional rubber parts.
Step-by-step instructions for replacing upper control arm silent blocks
If the entire tool is already ready for use, we begin to replace the rubber-metal hinges, which is performed according to the following scheme:
- jack up the car and remove the wheel from the side on which the work will be done;
- unscrew the nuts holding the silent block and the steering tip;
- Unscrew the fastening nut of the ball joint;
- using a special puller, press out the bipod support pin;
- remove the nut holding the upper arm;
- we take out the lever, carefully clamp it in a vice and change the silent blocks using a special device;
- We install the lever in the reverse order. After this, all that remains is to mount the wheel and remove the jack. The same work is performed on the other side.
It is much easier to replace the silent blocks of the lower arm:
- after removing the nut holding the lever itself, we take a special device and press out the rubber-metal hinge;
- We carry out preparatory work. During this process, it is necessary to remove dirt and carefully lubricate the seat for the new silent block, as well as the lever axis and threads. This, firstly, will greatly facilitate subsequent procedures, and secondly, it will ensure stronger fixation of the part;
- press in a new silent block;
- install the steering ends and insert the cotter pins that secure these parts;
- tighten the nuts of the upper and lower arm.
The procedure for replacing silent blocks must be carried out under load. It is best to first seat your acquaintances or friends in the car, and also place a load weighing 40 or more kilograms in the trunk.
The nuts of the upper and lower arms must be tightened until they stop only after the new silent blocks have been installed. Otherwise, serious problems with the operation of the car suspension may arise.
How to replace springs and shock absorbers?
If the vehicle settles heavily or breaks down, the rear suspension springs of the Zhiguli require replacement. When carrying out the repair procedure, you can simultaneously replace failed shock absorbers. As a rule, before these parts fail, shock absorber fluid leaks out.
There is no point in repairing shock absorbers at home. Practice shows that even parts repaired in special workshops quickly fail. Replacing the rear suspension springs of the “six” is performed in the following order:
- Unscrew the fastening nuts of the lower bolts of the shock absorbers.
- Move the bolts and remove the spacer bushings.
- Move the shock absorbers and remove the spacer and spacer bushings.
- In the same way, the upper mounting points of the shock absorbers are disassembled.
- Shock absorbers are removed.
- To unload the springs, lift the car using a jack.
- Replacement of the Zhiguli rear suspension spring is done using mounting blades, which remove its coils from the supports.
- Installation of new parts is carried out in the reverse order.
Replacing the rear suspension of a Lada requires quite a strong lifting of the rear part of the body, so special attention is required to the flexible brake hose, which is very easy to damage. Accuracy in work will also allow you to avoid troubles associated with the spring “shooting” out of its place.
As you can see, the design of the rear suspension of the VAZ 2106 is not difficult, and any car enthusiast can easily repair it.
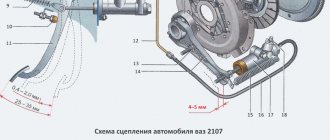
Replace the rear suspension spring on a VAZ 2106 car if it has mechanical damage or significant settlement. Signs of spring settlement: deterioration in ride quality, frequent suspension breakdowns; visible distortion of the rear of the car or a significant difference in the height of the front and rear parts that appeared during operation; strongly pronounced traces of the collision of the spring coils. According to their length under a load of 2950 N (305 kgf), springs are divided into two groups: - group A - length greater than 273 mm; - group B - length equal to or less than 273 mm. The rear suspension springs are marked with paint on the outside of the coils: group A - with yellow paint; group B - green. The upper and lower coils of the spring are the same. To replace the rear suspension springs on a VAZ 2106 car you will need: two 19mm wrenches and a mounting blade. USEFUL ADVICE It is more convenient to replace springs on a lift with an assistant. 1. If you are working on a lift, place a support under the rear axle beam and lower the car, lightly loading the suspension. NOTE If you are working on a viewing hole, you do not need to perform step 1. 2. Disconnect the lower shock absorber hinge from the rear axle (see “Replacing the rear suspension shock absorber”). Move the shock absorber to the side so that it does not interfere with operation.
3. Raise the vehicle to relieve the spring. With the mounting blade resting on the spring support, remove the lower coil of the spring from the support forward along the direction of the VAZ 2106. WARNING
5. Remove the lower spring gasket from the support on the rear axle beam.
6. Remove the upper spring gasket from the support on the body. NOTE
7. Secure new gaskets (for example, with insulating tape) to the new spring so that their screw surfaces coincide with the coils of the spring. NOTE
9. ...the screw surfaces of the lower gasket and the support cup on the rear axle housing coincided. 10. Reinstall the removed parts in the reverse order of removal. NOTES Install rear suspension springs of the same group on the left and right of the VAZ 2106 car. Replace springs in pairs and together with gaskets. Install springs of the same class as the front suspension springs. In exceptional cases, when class A B springs can be installed in the rear suspension . USEFUL ADVICE When removing and installing springs, it is optimal to use any universal spring ties from those available commercially.
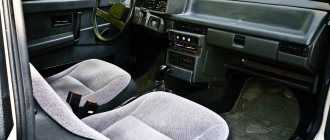
The same type of suspension was installed on VAZ Classic cars. Model 2106 is no exception. Since 1984, this car has had rear dependent and front independent suspension. You can learn more about its structure by reading this article.
Removing the lower arm
When a VAZ 2106 chassis is being repaired, it may be necessary to replace the lower front suspension arm. To work, you will need wrenches 13 and 22. First, remove the front suspension spring, and then, using a wrench, unscrew the two nuts that hold the arm to the cross member. Remove it from the cross member bolts without removing the silent blocks, axle and ball joint. If necessary, replace the ball joint or change the lever. Reinstall it in the reverse order of disassembly.
A selection of videos on repairing the chassis of the VAZ 2106
Replacement of rubber bushings of rear suspension links
The need to replace rubber hinges arises when they are damaged or worn out and require the removal of the longitudinal and transverse rods. The “six” rear suspension links are attached at one end to brackets installed on the floor of the car, and at the other end to brackets installed on the rear axle beam. The “classic” rear suspension diagram will help you better understand the location of its parts.
To carry out repair work you will need 19mm wrenches. Dismantle the parts in this order:
- Remove the top (short) links. To do this, unscrew the nuts and knock out the bolts.
- Remove the long reaction rods. To dismantle them, you need to disconnect the lower hinge of the rear shock absorber and move it to the side. Then you need to unscrew the fastening nuts, remove the spring washers and bolts that secure the rods to the beam.
- To remove the transverse link, you need to unscrew the fastening of this element to the body bracket and rear beam and knock out the bolts.
All rubber joints that are used in the rear suspension links of the VAZ 2106 are similar to each other, although they differ in size. They are pressed into the eyelets of the rods with an interference fit, so to replace them you will need: special mandrels for installation, a brush, a solution of soap in water and a large bench vice. The work should be done like this:
- Remove the metal spacer sleeve from the rubber joint using a vice and a mandrel, and then press the rubber joint itself out of the rod.
- Moisten the inside of the tie rod eye, the inside cavity, and the outside of the rubber joint with soapy water. Also wet the spacer sleeve.
- Using mandrels and a bench vice, first press the hinge into the rear link, and then the spacer sleeve into the rubber hinge itself.
- Similar repairs are carried out for all removed parts. It is important not to confuse the rubber elements intended for short and long rods, so it is better to check the catalog numbers.
When repairing a car, you can do a little tuning of the rear suspension of the “sixth model”. To do this, the metal spacer bushings must be shortened by 2mm. With the help of such a simple improvement, you can increase the life of the articulated joint by 2-3 times, while the stability of the rear axle is significantly increased.
Installation of the rods on the car is carried out in the reverse order.
Modernization of VAZ 2106 suspension
Today, many owners of classic Zhiguli cars are improving their cars and making changes not only to the appearance, interior, power unit, but also to the suspension. VAZ 2106 is a car with a wide field of activity for tuning. The only limitation is the financial capabilities of the owner. Let's look at the main points for modifying the suspension.
Air suspension
One of the options for modernizing the suspension is installing air struts. After implementing such a design, it becomes possible to change the ground clearance and generally increase the level of comfort. The car receives driving characteristics similar to the behavior of imported cars. When installing air suspension, both the front and rear shock absorption systems are subject to conversion. To do this, purchase a kit of necessary items, which includes:
- compressor;
- connecting elements;
- pneumatic struts;
- sensors, etc.
to pneumatic changes in this order:
- Remove the springs from the suspension.
- We cut off the bumper almost completely and make a hole for mounting the air strut in the lower cup and upper cup.
Reinforced springs
They resort to installing reinforced springs on the “six” when it is necessary to make the suspension stiffer, since many are not satisfied with its softness.
Equipping a car with hard spring elements will lead to the fact that when making a sharp turn, there is a possibility that the wheels on the other side will come off, i.e., traction with the road will deteriorate.
Springs from a VAZ 2121 along with a reinforced cushion are often installed on the front of the car. Such elastic elements have a slightly larger coil thickness and rigidity. The rear suspension is mainly equipped with springs from the “four”. In addition to them, dampers from Niva are installed, which will be especially important for those cars that run on gas, since the equipment weighs a lot.
Video: installing air suspension on classic Zhiguli cars
Electromagnetic suspension
Another option for improving a car’s suspension is electromagnetic suspension. The basis of this design is an electric motor. It can operate in damping and elastic element mode. The operation is controlled by a microprocessor. This type of suspension is installed instead of standard shock absorbers. The uniqueness of the design lies in its virtually trouble-free operation. Plus, it has a high level of security. If for some reason the pendant loses power, the system can switch to mechanical mode thanks to the electromagnets. The most popular manufacturers of such suspensions are Delphi, SKF, Bose.
The suspension of the VAZ “six” does not stand out for its complexity. Therefore, the owners of this car can repair it. You can identify and fix problems by reading the step-by-step instructions. When the first signs of problems appear, you should not delay repairs, since other suspension elements will also be subject to increased wear.
Goals of suspension tuning
VAZ-2109 front suspension repair, features
Only ignorant citizens are sure that tuning is carried out only with the aim of increasing the level of aesthetics of the car. In fact, such manipulations are carried out in order to ensure a comfortable, safe ride, excellent maneuverability, increased speed, and a hard landing.
Many have encountered a situation where they felt uncomfortable, simply because the section of the road along which they were driving was not perfectly smooth. Unfortunately, very often such trips end in, at best, abrasions, hematomas, and sometimes bruises.
If the car owner wants to make at least a little changes, for example, tuning the VAZ-2106 suspension, the same section of the road will no longer provoke the same negative emotions, since the “six” will behave differently.
It is for this reason that many are actively thinking about tuning the rear suspension of the VAZ-2106.
Goals of tuning
It is very important to understand that tuning of the VAZ-2106 chassis and suspension must be systematic. It is impossible to replace only some parts, forgetting that they are tightly connected with other components
In particular, if the owner of the “six” decides to replace the springs by installing sports springs instead of the factory standard, but at the same time ignoring the replacement of shock absorbers and silent blocks, it will not be possible to achieve the desired result. In addition, it is absolutely impossible to call such manipulations tuning the rear suspension, since there will definitely be no improvements.
It is for this reason that experienced car owners strongly recommend that those who are thinking about how to improve the suspension of the VAZ-2106 make only system replacements, and carry out all actions in a complex.
During such activities, it is possible to improve the front strut, stabilizer, power unit support, as well as the rear beam bar.
Adjusting the front bearings
This procedure should be carried out as often as possible - approximately every 10 thousand km. mileage On a VAZ-2106 car, the front suspension needs constant monitoring; unfortunately, this is the most vulnerable unit. You hang the wheel, remove the protective cap, after which you will need to loosen the nut on the hub. And only after this you need to use a 27 wrench to unscrew or screw in the nut. It depends on which direction the adjustment is required.
Note: the tightening force should be light. In addition, after tightening, it is necessary to make approximately a sixth to seventh part of a turn in the opposite direction. The fact is that the hub has cone bearings, which are easily destroyed when trying to tighten it with force. But they are able to withstand heavy loads due to the fact that the contact area between the holder and the rollers is rather large.
Sources
- https://avtovx.ru/podveska-stoiki-amortizatory/zadnjaja-podveska-vaz-2106-217/
- https://FB.ru/article/447971/ustroystvo-diagnostika-i-remont-zadney-podveski-vaz-
- https://ovaze.ru/317-elementy-peredney-podveski.html
- https://Driving24.ru/kak-otremontirovat-perednyuyu-podvesku-vaz-2106/
- https://aklaypart.ru/remont/perednyaya-podveska-vaz-2106-ustrojstvo-osobennosti.html
- https://AlanSpb.ru/remont-i-tyuning/zadnyaya-podveska-vaz-2106-ustrojstvo-2.html
- https://bumper.guru/klassicheskie-modeli-vaz/hodovaya-chast/podveska-vaz-2106.html
- https://naruto-grand.ru/ustroystvo-perednyaya-podveska-remont-to-vaz-2106/
- https://adaptsport.ru/remont/remont-perednej-podveski-vaz-2106.html