The heater on a Niva Chevrolet does not heat: cold air is blowing
Use pliers or side cutters to break the upper corner of the plastic radiator flange.
stove Niva Chevrolet
You can pull the radiator out of the casing. I also felt the damper with my hand through the hole for the radiator and realized that with a lever it opens by one percent.
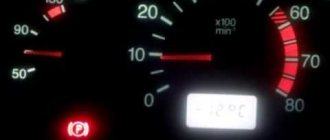
Up. Communities › Chevrolet Niva › Blog › it’s cold for the front passenger. Stanislav on mobile. Special...
New in the process of installation.
In particular, turn on the ignition, and then start the heater, try changing the speed of the warm air supply.
And there is no warm air. The cause of such a heater failure is either a failure of the heater core or a breakdown of the heater itself. The cause of a radiator failure can be determined by the smell of antifreeze in the cabin and by a slow decrease in the level of antifreeze in the expansion tank.
NIVA stove. Modernization from 2108 – pros and cons. The windows are foggy, the stove is not heating well - reasons 1h
Therefore, it is necessary to remove the radiator and replace it. Removing the heater on the Shniva is carried out as follows: The instrument panel for controlling the heating system is dismantled. The ventilation system control handles are removed.
Replacing the radiator of the stove (heater) Niva Chevrolet
The Niva Chevrolet stove consists of a radiator, air pipes and a fan for air circulation. The heater works on the principle of heat transfer from the coolant that comes from the engine. Thanks to constant circulation, the interior is heated.
The average radiator service life is 7-10 years or 100-150 thousand kilometers.
The service life largely depends on driving style, the length of time spent stuck in traffic jams and the quality of the coolant used. If the stove begins to leak, it must be replaced.
It is important to carefully carry out all work on which the service life of the heater depends.
Causes of poor stove performance
The recirculation lever is removed and the panel trim is removed. Behind the cladding, use a screwdriver to unscrew the screws and remove the backlight bulbs for the instrument panel of the heating system.
The terminal block is disconnected and the bolts securing the rods are unscrewed. The heater damper rods and the heater fan switch are disconnected.
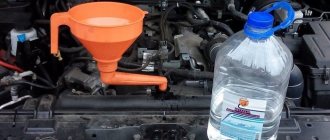
The heater is repaired, if required, and reinstalled in the reverse order. Before you begin removing the radiator, you must purchase a new radiator. Drain the antifreeze from the radiator and remove the air supply filter.
To remove the filter, you need to unscrew the housing screws. Disconnect the power wires for the electric fan and heater. We unscrew the screws securing the fan and the heater itself.
We remove the heating duct, which is designed to warm the feet of passengers sitting in front. Unscrew the 2 self-tapping screws securing the heater and slightly pull the radiator out of the socket.
Use pliers or side cutters to break the upper corner of the plastic radiator flange. When installing a new radiator, first cut off the corner. After installation, seal the hole in place of the cut corner. Turn the fan on to maximum and check for cold air leaks at the entrance of the air duct from the fan to the stove. There is no factory seal and if there are air leaks, cold air will blow into the passenger's feet.
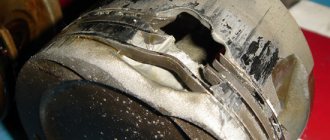
I sealed it with sealant and it became warmer in the car. The old and thin radiator was removed.
New in the process of installation. When removing the old radiator, I was very upset by the amount of coolant with which he filled the heater. I also felt for the damper with my hand through the hole for the radiator and realized that the lever opened it by one percent. I set the damper to the vertical position with my hand, the lever did not react at all.
Four problems with the stove: diagnosing it yourself
The source of heat in a car is the engine (electric cars do not count). Its operating temperature is about 80–90 degrees. Excess heat is removed through the radiator, but with the arrival of cold weather, part of this heat is used to heat the interior.
The process usually looks like this. The heater receives air - external air or, if the recirculation mode is turned on, internal air. It passes through the cabin filter, the air conditioner evaporator (if equipped), and then either through the heater radiator or past it, depending on the driver’s desire. Then, with the help of dampers, the air is directed to certain areas: on the glass, in the face or in the legs.
We figured out the design. Now let’s talk about the main reasons why a seemingly simple system can go on strike.
The Niva Chevrolet stove does not work. How to fix the problem?
In order to determine why the Niva Chevrolet stove does not work, no special skills are required; the reason may be very simple. For example, if only the fourth speed works and the others do not, the reason lies in the malfunction of the resistor responsible for the sequential operation of the electric fan circuit of the heater system. Prevention of operation and replacement of the resistor The Niva Chevrolet stove does not work at the first three speeds because the modes are regulated by this small part; the resistor does not affect the operation of the last speed. Before replacing it with a new one, you need to make sure that the corresponding fuse (F 18, 25 A) is intact. If it burns out, we replace it with a new, serviceable one. If after replacing the fuse it blows again, you need to look for a short circuit or poor contact in the circuit. To replace a faulty resistor with a working one, you must perform the following procedure:
- Remove the negative terminal from the battery;
- Loosen the glove box and push it forward slightly (it is not necessary to remove it completely);
- Unscrew the self-tapping screw securing the resistor and disconnect the terminal block and remove the faulty resistor;
- Reinstall the working part and install the glove compartment in the reverse order of removal.
Healthy! To loosen the glove box, it is more practical to use a ratchet with an H4 bit end. Heater system valve and pipes Worn pipe or faucet failure is a fairly common malfunction on cars that have been in use for more than 5 years. The coolant (antifreeze) circulating in the system is under pressure when the engine is running, so all joints must be sealed. You can determine if a pipe or tap is leaking by feeling the joints on the flanges, as well as by visually inspecting the elements located nearby. For example, if a faucet leaks, there will be oil marks on the carpet underneath. If the tightness of the system is broken and traces of leakage are detected, it is recommended to replace the damaged elements with new ones. During use, rubber loses its elasticity, becomes hard, and subsequently bursts. Important! When choosing a new heater tap, it is recommended to install a ceramic one, since its service life is much longer than that of a metal one. It is not advisable to use cheap Chinese clamps. First of all, when tightening the pipe onto the flange, the threads on them will turn, which will entail depressurization of the system and subsequent leakage of antifreeze. Blower Motor Located under the dashboard on the passenger side, under the glove box on the left. Operates in four-speed sequential mode. Adjustment is carried out by switching the mode with a regulator located on the dashboard. The operation of the electric fan motor is controlled by relay No. 6, which supplies voltage to it. In addition, you need to check the integrity of the fuse, and if the thread breaks, replace it. If the interior fan motor malfunctions, you can remove it by performing the following steps:
- Disconnect the negative terminal from the battery;
- Using a ratchet, unscrew the self-tapping screw securing the glove box and remove it from the niche;
- The electric motor is located in the heater air duct; use a screwdriver to press the lock located on the edge of the housing;
- Turn the motor clockwise and remove it from the air duct.
Important! The heater fan motor is replaced at the same time as the impeller, since it is balanced with it. When removing the housing, clean the air duct and remove any debris clogged in it. Healthy! You can check the functionality of relay No. 6 by turning on the windshield wipers, since it is also responsible for their operation. If the wipers do not work, the faulty part must be replaced. Another common malfunction in the system for this car is the failure of the damper, which is located in the heater housing. The steel cable fastening on the actuator lever becomes loose, and the actuator cannot turn the damper to the desired position. This damage can be eliminated by tightening the cable or completely replacing it with a new one. Cabin filter During operation, it is recommended to keep the cabin filter clean, since when it gets dirty, it cannot pass the required amount of air through itself. Often, for this simple reason, the Niva Chevrolet stove does not work. Due to the lack of air masses in the electrical circuit, the contacts are unsoldered and open due to strong heating. When making repairs yourself, you must use only special solder that is resistant to high temperatures. If soldering is done incorrectly, the wiring insulation may overheat and melt, resulting in a short circuit or fire.
Troubleshooting
Craftsmen have long come up with a simple way to eliminate this unpleasant problem. To do this, you will need an old bank or discount plastic card.
To upgrade, remove the driver's side cover. On the stove, remove the plate from the upper damper, which is responsible for the direction of air movement. Next, cut a new shape from a piece of plastic to guide the air flow. It should turn out to be straight, unlike the factory curved one.
Example of a “new” part
Fix the resulting structure and move the lower damper lever to the foot heating position. In this state, secure it with a self-tapping screw. Reinstall the cover. When working with interior plastic, proceed with caution, as Niva’s is fragile and can crack.
The work done provides excellent heating of the feet. At the same time, it will not interfere in any way with adjusting the direction of heating using usual actions.
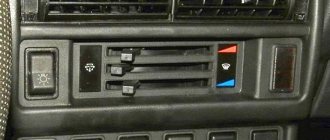
How to troubleshoot the heater switch on a Niva Chevrolet
You have probably already encountered a situation where you take a comfortable position in your favorite car in the morning, turn on the ignition and decide to traditionally direct a stream of warm air onto the windshield in order to remove any remaining ice or traces of night frost from it, but here you receives an unpleasant surprise.
No matter how you try to direct the airflow onto the windshield, nothing works. The heater switches are easy to adjust, turn in different directions, but the result does not change, the flow of warm air continues to blow directly into your face.
Everything indicates that you had to deal with another breakdown of the heating system, as a result of which you are convinced that it is your heater switch on your Chevrolet Niva that is not working. Of course, beginners don’t know what to do in this case. For this reason, we recommend that you obtain useful information from those who have already had practical experience in solving such a problem. To save your own time, we are ready to present you with a ready-made solution so that you do not waste your own time searching for an answer on the Internet.
Comments and reviews
As a result, we get the ability to distribute air to the windshield or to the feet of your choice. You can also relatively smoothly regulate the amount of air supplied in different directions.
Niva Chevrolet heater blows cold air
After such a modification, you may encounter a decrease in air flow. This is due to air redistribution. The result is that in the middle position the cabin is still quite cool.
Identified problems and ways to eliminate them
If controlling the stove on your Chevrolet Niva has suddenly become impossible for you, do not put aside the question of finding the cause. It may happen that you really need to redirect the flow of warm air in a certain direction, and you cannot count on a positive result.
We would like to point out that the problem may be a failure of the switches themselves, as well as a simple break in the cable that allows the valves to turn.
Algorithm for troubleshooting
Do not try to succumb to the “tempting” ideas of some “masters” who suggest doing nothing but changing the position of the damper manually. Indeed, this can be considered as one of the options for solving the problem, but only short-term. If even the slightest amount of time arises, we recommend not to be lazy, but to arm yourself with the necessary information and successfully carry out repair work aimed at restoring the functionality of the switches.
In order to get a positive result, we recommend that you prepare pliers, a screwdriver, high-quality glue, and three pieces of steel wire, the length of which is at least ten centimeters.
Under the driver's steering wheel there is a panel secured with four self-tapping screws. Unscrew them and remove the panel. Under it there will be cables that go to the switch. If you notice a clear break in such a cable, you can rush to the auto store and purchase the appropriate analogue. You can do it differently and use the material that you have prepared in advance.
The cable itself can be safely glued together. You can also disconnect the broken latch, then remove the broken cable. Make a double clamp from the prepared wire and secure it to the plastic part, tightening it with pliers, twisting it into a tight braid. This completes your repair work related to a broken cable.
If you still need to replace the switch itself, then after you remove the panel located under the steering wheel, you will have access to these round switches. All that remains is to simply remove them, then visit a car store and purchase an appropriate replacement. Just do not forget to show the removed regulator to the store salesperson so that he can study the markings and successfully select the right part for you. It will be easy to put the new switch in place, acting in the same way as before, but only in the opposite direction.
Sometimes drivers complain that it is difficult for them to still get to the broken cable, then we suggest you expand the space, and this will make access easier. Of course, in this case you will need to remove the control unit of your stove. There is nothing complicated in these steps, you just have to unscrew a few extra bolts and be extra careful.
Initially, after removing the panel cover, unscrew and carefully remove the plastic frame, then unscrew the two bolts and remove the cup holder. Now unscrew the bolts again and remove the glove box and tape recorder. All that remains is to unscrew two more bolts and carefully pull the climate panel towards you by about five centimeters. Now you will be much more comfortable checking the integrity of cables and fasteners, and if necessary, replacing or repairing them.
So, if you want to personally solve all the problems that may arise during the everyday operation of your favorite vehicle, it is enough for you to familiarize yourself with the recommendations provided, and then carry out all the proposed manipulations in practice. Your beloved “iron horse” will definitely thank you for showing such concern for him; he will be very pleased to please you with his excellent work.
The best prices and conditions for the purchase of new cars
Credit 6.5% / Installments / Trade-in / 98% approvals / Gifts in the Mas Motors showroom
With the onset of cold weather, it is important that the car interior is heated, creating comfortable conditions for the driver and passengers. The article discusses cases when the stove of a Niva Chevrolet car does not work, the main malfunctions, and describes how to repair the unit.
Replacing the heater (radiator)
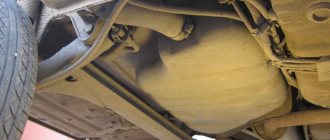
Replacement is carried out if antifreeze begins to leak. The radiator is located behind the glove box, in a niche on the left side of the front passenger's feet.
New replacement product
The procedure includes the following steps:
- First, turn off the on-board network by disconnecting the negative terminal from the battery.
- Then you need to remove the glove compartment and side panel.
- Drain the antifreeze from the block.
- Next, unscrew the air duct blowing on the legs so that it does not interfere with removing the parts.
- Then remove the cabin air filter.
- Having unscrewed the snail, we move the damper body to the side. Then you should disconnect the wires, and take out the volute and motor.
- Next, unscrew the evaporator screws and disconnect the hose. Moving the evaporator to the side and gently pressing it to the floor, remove the device.
- Then disconnect the pipes. If there are new pipes, the old ones can be cut off.
- After unscrewing the two fastening screws, remove the heater radiator from the niche.
- We install a new device. Assembly is carried out in reverse order.
- Add coolant.
After replacing the radiator, you need to check the functionality of the stove.
>Video “How to change the heater on a Chevrolet Niva”
This video shows how to replace a heater core (the author of the video is Auto Fix Info).
Is the stove broken? How to detect a malfunction?
During constant use of the car, antifreeze or antifreeze circulates through the cooling system. Despite heating to high temperatures, the liquid practically does not evaporate, and its level does not decrease.
Control is carried out using the expansion tank marks. If you find a decrease in its volume, then there is a high probability that there is a leak in the cooling system.
There are several ways to determine a breakdown in a stove radiator:
- a decrease in the coolant level in the absence of a leak near the engine pipes - antifreeze or antifreeze enters the cabin through a hole in the radiator;
- the smell of antifreeze or antifreeze in the cabin is felt after the engine warms up and/or the heater fan is turned on;
- Wetting of the floor or the appearance of puddles under the front mats - liquid collects gradually due to constant leakage of the radiator.
E
If the damage is minor, puddles may “hide” under the upholstery. To check for hidden leaks, gently press the fabric with your finger - if it is wet, it means there is antifreeze or antifreeze underneath. Also, coolant can flow onto the street along the joints of the body near the mudguards.
If signs of damage to the heater core are detected, it must be replaced.
Don't delay repairs. Coolant is very harmful and can cause severe allergies and even cancer.
Why doesn't the heater work on a Chevrolet Niva? Fix it yourself
A fairly common breakdown is that the stove on a Chevrolet Niva does not work, which owners of this model often encounter. And what’s most unpleasant is that this breakdown, as a rule, manifests itself in the cold season, when it is, to put it mildly, not entirely comfortable to carry out any repair work. Happy owners of heated garages are in a much better position. Let’s make a reservation right away - this breakdown can be eliminated extremely simply and quite quickly, but in order to ensure the scope of work, you will have to mobilize the existing technical skills - the preparatory activities are characterized by well-known difficulties. The stove in the Niva Chevrolet does not work, as practice has shown, the main cause of the breakdown is the failure of the resistor responsible for the operation of the electric fan that pumps hot air into the cabin. Sometimes malfunctions of the stove are accompanied by a distinct smell of burnt insulation.
Perhaps the failure to operate is temporary: in the first three gears the stove stubbornly refuses to turn on, and in the fourth it suddenly starts working. The fuse may have blown: It should be borne in mind that a similar malfunction can also be caused by the failure of the corresponding fuse responsible for the operation of this resistor. Therefore, before attempting to get to the resistor (this will be discussed below), it makes sense to first check the functionality of the fuse. If the problem is there, then you won’t have to do anything other than simply replacing the old fuse with a new one - the repair will end almost before it even begins.
Niva Chevrolet Strengthening the wind in your feet
It often happens that with the onset of cold weather, owners of the popular Chevrolet Niva SUV model are faced with a problem when the heater in the cabin does not work. Quite an unpleasant phenomenon that requires immediate resolution. It is the question of solving this problem that we will deal with in this material.
Car heater system
Replacing the resistor
Having made sure that the fuse is working, we take steps to fix the problem: now it’s clear - it’s all about the resistor. Replacing it with a new one is not that difficult, it’s just that the location of this part creates some difficulties - getting to it is quite problematic. To solve the problem, just loosen the glove compartment and pull it out a little (there is no need to remove it completely). Let us warn you right away: free space is limited, so a small Phillips-head screwdriver is best. Having reached the resistor, turn it off (pull out the terminal), and then unscrew the fastening screw. We install a new one in place of the failed resistor and perform the above steps in reverse order. At this point the repair can be considered complete. Naturally, before starting assembly, we check the stove for functionality. A few words about the resistor itself. Purchasing this part should not be a problem - it is not in short supply. The cost is also not amazing (about 200 rubles). Any resistor model for the 2110 line is suitable. The resistor, being a mandatory component of the stove, is a speed controller connected in series to the electric fan circuit. The injection of air heated by the stove into the cabin depends on it.
We hope that the above simple tips will help car enthusiasts solve the issue on their own, without resorting to the services of a car service (it’s no secret that garage mechanics can easily diagnose a complete breakdown of the stove, forcing a gullible client to pay a tidy sum for its replacement). We hope that after reading the article, you will easily cope with a non-working stove on a Chevrolet Niva without resorting to outside help. The only requirement is accuracy and thoroughness, i.e. avoiding annoying errors during the work process, such as accidental wire breaks and the like. It is better to spend a little more time, but do the work at a high quality level.
How does the Niva Chevrolet heater fan work?
Like any automobile electric motor, the heater fan on the Chevrolet Niva is a DC commutator motor with the ability to stepwise adjust the speed. A motor with catalog number 2123-8118020 with a removable impeller on bushings is installed on the conveyor; however, there is an alternative to it on floating bearings from the Luzar company with catalog number lFh-01211, and there is a similar bearing motor from the Boutler company.
Stove fan.
The stock engine can peak at 3,000 rpm, while the equivalents rev to a maximum of 2,750 rpm. The maximum current consumption for the Luzarov motor is 25 A, for the native one - about 18 A.
Heater motor luzar lfh-01211 12V/14A.
The difference is significant, since the heater motor circuit is protected by fuse F18 rated 25 A.
Additional resistor
The operation of the electric motor in four modes is ensured by an additional resistor, which often causes various malfunctions. Its catalog number is 2111.8101012 or 2123-8118022-01.
Additional resistor 2123-8118022-01.
At the first speed, the engine should consume no more than 5.1A, at the second and third 9 and 14 A, respectively. At the maximum, fourth rotation speed, the voltage is supplied bypassing the resistor. Actually, all possible culprits for the malfunction of the air supply to the cabin are indicated; it’s time to name the symptoms of the malfunction.
Heating system for a Niva Chevrolet car
The automotive heating system of a Chevrolet Niva SUV consists of the main structural elements and components that are responsible not only for heating the interior, but also for cooling it in the summer. The heating system consists of the following elements:
- Heater radiator;
- Control block;
- Heater pipes;
- Coolant pump;
- Compressor;
- Evaporator.
These are the main elements, but there are also small ones such as a resistor and fuse, which are also responsible for the functioning of the stove as a whole. So, we will not consider how the heating system works, but will only analyze the main points that may be the causes of stove malfunctions. The car's heating system is shown in the photo below.
Causes of malfunction
Often, a breakdown of the stove in the interior of a Chevrolet Niva car is not particularly difficult, so to eliminate it, you should know the main reasons, or, more precisely, the components that fail.
So, the following factors can be the causes of stove malfunction:
- Additional resistor malfunction. This resistor is used to control an electric fan that blows hot air directly into the car interior.
- Malfunction of heater pipes.
- Leak at the connections of the pipe and the heater radiator.
- The stove control unit is faulty.
- Heater malfunction.
Let's look at how to eliminate the main causes of stove failure, how repairs are carried out and what you need to know to carry them out.
Resistor - how to fix it?
Initially, you need to make sure that it is the Niva Chevrolet fan resistor that has failed. This can be found out as follows: if, when the ignition is turned on, none of the first three speed positions work, then the problem lies precisely in this small part. The fourth speed will function in this case, since the resistor does not affect its operation.
Symptoms of a problem
The simplest situation is when the electric motor does not spin at all. In this case, there may be several reasons:
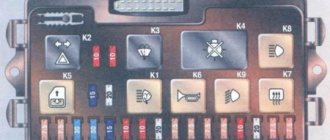
- Failure of fuse No. 18 with a nominal value of 25 A. It protects only the heater motor circuit.
Check fuse F18.
- Break, short circuit, damage to the motor winding.
- Lack of contacts on the motor power supply block, damage to the wiring.
- Damage, freezing or wear of the electric motor brushes.
- There is no voltage at the output contacts of the speed switch, the switch is broken.
In these situations, everything is simple - change the fuse, clean the contacts and check the wiring. In the case of damaged or worn brushes, you will have to completely remove the stove fan.
Connection diagram for the electric motor of the heater fan and the rear window heating element: 1 – ignition switch; 2 – mounting block; 3 – heater motor switch; 4 – additional resistor; 5 – heater electric motor; 6 – rear window heating element; 7 – switch for heated rear window with control lamp; A – to power supplies; K6 – additional relay; K7 – relay for turning on the heated rear window.
Stove fan repair
It is more difficult when the engine turns, but does not develop sufficient speed. This is dangerous because when the rotation of the electric motor shaft is difficult, it consumes much more current, so the fuse may burn out and the winding may fail. Diagnosing a fault in this case requires some experience and the breakdown may not be immediately detected, but a blown fuse will make it clear that there are problems with the motor.
The engine armature may not gain speed due to a dirty, oxidized or worn commutator or worn brushes.
In addition, insufficient motor speed can be caused by an interturn short circuit in the armature winding or wear or clogging of bushings or bearings. It is also possible that the cabin filter is clogged. In the case of bearings or bushings, the engine will make noise during operation, and the noise will increase over time. This can be treated either by replacing the motor, or by lubricating or replacing bushings or bearings.
The cause of increased noise from the stove may be clogged bearings and bushings that need to be lubricated.
The bushings or bearings are lubricated only with a regular spindle and machine oil. Engine oil or grease is not used in this case. A new engine costs about 600 rubles, depending on the manufacturer.
What to do if the Chevrolet Niva stove does not heat well
Chevrolet Niva is a spectacular, powerful SUV with a good rear suspension.
Very well suited for our constantly repaired roads, trips to the country, to the sea and just for travel. The machine is quite easy to use and is inexpensive to repair. It is indispensable if you live outside the city, it justifies itself as a car for the whole family and is very stable. With the arrival of the autumn-winter period, good and high-quality operation of the heater will be relevant. If the stove does not heat well, the Chevrolet Niva will become a very uncomfortable car, and you will have to forget about its advantages. Moreover, if the car was parked in the garage overnight, it is problematic to be in it and feel the cold comparable to that of a basement. Let's consider the main components of this technological unit of the car:
- radiator;
- fan;
- dampers;
- pipes;
- air duct;
- unit for regulating fluid movement.
The stove will work properly if each of its parts works properly and in a coordinated manner.
Main malfunctions and methods for eliminating them in the Chevrolet Niva car stove:
- The ventilating elements of the heater burned out. This will be immediately visible in winter by the formation of characteristic condensation on the windows. They simply need to be replaced with new ones;
- the unit that regulates the temperature breaks, since it can be made of plastic rather than rubber or rubber, which has greater wear resistance. Naturally, the possibility of the cable falling off should also be considered. Depending on the situation, you either carefully return the part to its place and it continues to perform its traction function, or you need to purchase a new one and replace it;
- poor filter performance due to clogging. Accordingly, they need to be cleaned or purged, otherwise air pockets will form in the stove, disrupting its productive operation;
- problems with the cooling system - you should rinse and fill in a new coolant - antifreeze or antifreeze, which is changed annually for prevention;
- The damper that regulates the supply of cold and hot air has broken. It will have to be replaced;
- The thermostat is not working well. It might simply get jammed. Please note that the heater will malfunction when driving fast. It must be replaced immediately, because poor quality work will lead to an increase in temperature throughout the Chevrolet Niva;
- The resistor on the radiator has burned out or the radiator is clogged. There can be many reasons: antifreeze, insects, leaves and other debris. Also, water should not be allowed to get into this part of the stove. The radiator must be cleaned periodically, and in case of a malfunction, a new resistor must be purchased and installed. Cleaning is carried out with compressed air or a vacuum cleaner, an industrial hair dryer;
- The heater control unit, the so-called controller responsible for regulating the interior temperature, may fail. This is already a problem with electronics; to fix it, you need the services of a specialist.
Recommendations for normal and long-term operation of the heating-cooling system in a Chevrolet Niva:
- periodically lubricate the bearings of the stove ventilation device;
- Check the filters and radiator regularly, and if necessary, clean them or purchase new ones. The filter cleans the air from dust and infections coming from the street;
- remove air pockets when the engine is idling and muffled;
- clean the pipes with citric acid or a special product, since poor quality coolant forms sediment and build-up in the pipes.
At a temperature of minus 20 degrees, the Chevrolet heating system should heat the top of the cabin to an average of 10 degrees, and the temperature in the legs is 5-7 degrees higher. Passengers in the rear seats will receive air with a temperature of about 14 degrees. This way, everyone will be in comfortable conditions, and the trip in winter will be quite pleasant.
To avoid problems with the heating and ventilation system, preventive maintenance should be carried out systematically. After all, a car is a complex device that will drive well and function properly only with proper care.
Of course, problems with the stove are not the most critical troubles or breakdowns, but your health, mood and, naturally, performance depend on your comfort and the comfort of your passengers. We value not the quantity, but the quality of the years lived, so let your Chevrolet Niva be a high-quality, elegant and capable car.
If only fourth speed works
In cases where the motor refuses to work at the first, second and third speeds, but turns perfectly at the fourth, the same resistor with three isolated windings is to blame. If you can’t buy it, you can try to restore it yourself. True, only in the case when the thermal fuse has blown, naturally, no one will rewind the windings, the game is not worth the candle.
Fan resistor
You can remove and check the resistor without dismantling the engine. This is done like this:
- Use a Phillips screwdriver with a short blade to unscrew the rightmost screws securing the glove compartment.
Unscrew the rightmost screws securing the glove compartment.
- We gain partial access to the motor, but this is enough to get to the resistor.
Move the glove compartment aside to get to the resistor.
- Remove the terminal block and move the wiring harness to the side.
We remove the contact block.
- Using a Phillips screwdriver, unscrew the screw securing the additional resistor.
Unscrew the screw securing the resistor.
- We remove the resistor from the housing.
Resistor contacts.
We take out the resistor. - We check the integrity of the thermal fuse with a multimeter. If it is faulty, you can try to replace it.
- Installation of a new or restored resistor is carried out in the reverse order.