Replacing ball joints on VAZ 2114-2115
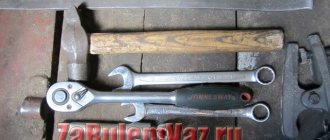
Given the quality of Russian roads and the components supplied to spare parts stores, ball joints on VAZ 2114-2115 cars have to be changed quite often, although there are exceptions, and they last 50-70 thousand kilometers. You can make the replacement yourself, but you should have all the necessary tools at hand, a full list of which is given below:
The first thing we should do is slightly loosen the front wheel mounting bolts, and then jack up the front of the car. Now you can remove the wheel, having first unscrewed all the bolts completely. It is also advisable to play it safe and place stops under the bottom, as well as put the car on the handbrake.
Next, you can unscrew the nut securing the ball joint to the lever, using a regular spanner wrench or a socket with a wrench:
After this, we insert our puller under the rubber (boot) of the support and unscrew the bolt of the puller until the action of the device lever causes the finger to jump out of its seat:
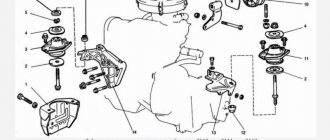
Then you need to unscrew the two bolts securing the VAZ 2114-2115 ball from the top side, as shown in the photo below:
As you can see in the above photo, from the factory it is bolted with TORX profile bolts, but the store comes with a set of supports that come with regular 17mm wrench bolts. Now the support is almost free for removal. To gain access to dismantling, you can place a brick under the brake disc and carefully lower the jack, thereby freeing up space for removal:
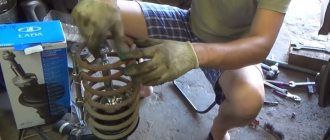
Then we take a new ball, remove the boot and be sure to push lubricant inside, such as lithol:
We put the boot in place and replace the support in the reverse order. There may be difficulties during installation, but with a mount and a lot of effort, you can handle it all. The price of new ball joints for VAZ 2114-2115 varies depending on the manufacturer, around 300-450 rubles per piece.
Source
How to remove a ball joint
To change the ball joint on a VAZ-2114, you need to decide on the choice of replacement method. There is one point in the procedure - pressing the cone lever out of the steering knuckle socket. The choice of technique determines the amount of tools that you need to stock up on. You should focus on the simplest method, suitable for most motorists:
- Place the car on a flat surface.
- Place the wheel on the desired side using a jack.
Raise the front of the car with a jack
- Remove the wheel and unscrew the ball stud nut.
Unscrew the nut on the ball joint pin
- Install the ball joint remover with a fork under the boot, on the reverse side of the lever relative to the nut. The finger should fit into the recess on the puller's foot.
Installing the ball joint remover
- When tightening the puller bolt, tighten the conical connection of the pin in the socket as much as possible.
Tighten the puller bolt
- Sometimes the finger comes out on its own, otherwise there is no need to be zealous with tightening the working thread of the device: the puller itself will break. In a tense position, it is necessary to apply several sharp blows either from below on the puller’s paw to the end of the finger, or from the side on the eye. Usually the finger then pops out with a click.
- You must be careful; a weakened device will fall and cause injury.
- Unscrew the two screws securing the housing and remove the worn part.
Unscrew the ball joint mounting bolts
Important! Do not work under a machine supported by a jack. You need to install a reliable stand under the support point. The car must be on the handbrake, and wheel chocks must be placed on both sides of the rear wheels.
Experienced craftsmen do without a puller. Either a conical impact fork is used, or tension is created on the finger with a pry bar, after which a strong blow is applied to the eye.
Removing the ball joint without a special puller
Without skill, this is unlikely to happen; it’s easier to purchase a puller.
Signs of a bad ball joint
The support on the VAZ-2114 does not work to tear the hinge out of the body, so on a flat road during straight-line movement it will not show its worn or wedged state. But in other conditions the driver will hear:
During visual inspection, you can notice a damaged ball joint cover: this is usually what provokes premature failure. With a sealed cover, the unit lasts a very long time: in a Zhiguli it is lightly loaded. Replacing the cover is possible, but to do this the hinge will still have to be removed.
The final diagnosis is made by rocking the lower arm with a pry bar. Play in the joint will immediately manifest itself by moving the finger and knocking. If you suspect a jam, you can turn the steering wheel and lightly load the assembly with a pry bar. A working finger does not make any sounds. But the exact condition can be determined by disconnecting the joint from the steering knuckle.
Symptoms of a problem
Of course, replacing the ball joint on a VAZ 2114 is required when this element is in a faulty condition. But how can we determine this?
There are several characteristic signs that the support has given up its life, so it needs to be replaced with a new one in the very near future:
But these are rather symptoms that cannot always give a clear answer. In this regard, we recommend using a more thorough method that allows you to really understand the state of the ball joint at the moment:
Ball joint for VAZ 2114: originals, analogues, articles, prices
| vendor code | Price, rub.) | Art. | Price |
| Original | |||
| 2114-2904192 | from 350 | 2114-2904185 | —/— |
| 21114-2904192-00 | —/— | 21114-2904192-00 | —/— |
| 21114-2904185-01 | —/— | 21114-2904192 | —/— |
| Analogs | |||
| AYWIPARTS AW1320063LR | from 350 – 450 | AS METAL 10LD1500 (VAZ 2114) | —/— |
| FORMPART 1604002 | —/— | LYNXauto C1031LR | —/— |
| LEMFÖRDER 15456 02 | —/— | PATRON PS3101 | —/— |
| BIRTH CX0738 | —/— | FENOX BJ10110E7 | —/— |
| BIRTH CX0099 (VAZ 2114) | —/— | DENCKERMANN D110112 | —/— |
| TRW JBJ156 | —/— | SIDEM 19989 | —/— |
| MOOG LABJ0063 | —/— | BIRTH CX0997 | —/— |
Carrying out replacement
Now the crucial moment has come, it is necessary to remove the old ball joint of the VAZ 2114 and install a new one in its place. First, using a 19mm wrench, unscrew the nut that secures the ball joint pin to the front wheel hub. After this, you need to install the puller so that the small ball on its bolt is clearly in the middle of the hinge pin.
Carefully screw in this bolt until the pin comes off the wheel hub. After this, you need to use a key “17” to unscrew the bolts that secure the joint cage to the suspension arm of the VAZ 2114. That’s all, the dismantling is complete. Now all that remains is to install a new hinge, which it is advisable to pre-lubricate with Litol. To be honest, I also used CV joint type lubricant for this purpose.
I haven’t noticed much of a difference; the ball joints have been working without problems for three years now
Please note that when installing a new joint, you may have to install several blocks of wood under the arm and lower the body so that the ball pin fits into the hole in the hub. But this job can be done with a good pry bar.
The repair is complete, good luck on the roads and fewer breakdowns!
Given the quality of Russian roads and the components supplied to spare parts stores, ball joints on VAZ 2114-2115 cars have to be changed quite often, although there are exceptions, and they last 50-70 thousand kilometers. You can make the replacement yourself, but you should have all the necessary tools at hand, a full list of which is given below:
The first thing we should do is slightly loosen the front wheel mounting bolts, and then jack up the front of the car. Now you can remove the wheel, having first unscrewed all the bolts completely. It is also advisable to play it safe and place stops under the bottom, as well as put the car on the handbrake.
Next, you can unscrew the nut securing the ball joint to the lever, using a regular spanner wrench or a socket with a wrench:
After this, we insert our puller under the rubber (boot) of the support and unscrew the bolt of the puller until the action of the device lever causes the finger to jump out of its seat:
Then you need to unscrew the two bolts securing the VAZ 2114-2115 ball from the top side, as shown in the photo below:
As you can see in the above photo, from the factory it is bolted with TORX profile bolts, but the store comes with a set of supports that come with regular 17mm wrench bolts. Now the support is almost free for removal. To gain access to dismantling, you can place a brick under the brake disc and carefully lower the jack, thereby freeing up space for removal:
Replacement of the VAZ 2115 ball joint, removal and installation.
Loosen the wheel bolts and jack up the car, remove the wheel. We place a stand under the threshold so that the car does not accidentally fall off the jack.
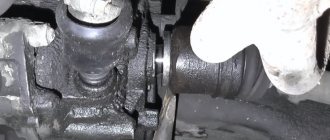
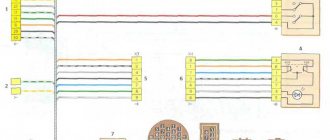
Now we need to unscrew the support pin, which is inserted into the socket of the lower arm, and the two bolts securing the body itself to the steering knuckle, photo 1.
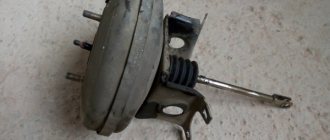
Using a puller, press the conical pin out of the lever, push the lever down and pull out the ball photo 2.
Attention! Usually in garages they remove ball joints without a puller, hitting the lever and causing the finger to pop out, but this is not recommended so as not to damage the lever.
If the finger dangles, we replace the ball joint; if you just removed it to check the condition or change a torn boot, then apply a little grease, put on the boot and put it back in the reverse order. We change the other side in the same way.
You can also read an article that tells you how to replace the ball joint of a VAZ 2107 (classic) yourself.
Let's summarize what we needed when replacing:
At this point, the repair of the VAZ 2115 is completed, now you can safely drive your car on vacation or on your own business. Have a nice trip!
Source
Design features of the VAZ 2114 ball joint
Unlike a number of foreign brands, the ball joint on the VAZ 2114 is mounted independently, without being pressed into the suspension arm. The process of replacing the support is shortened, since there is no need to additionally dismantle the lever with silent blocks.
Considering the method of fixing the ball joint, be extremely careful when overcoming road obstacles and potholes so as not to damage the chamfer of the metal pin. Otherwise, use a grinder to remove damaged threads.
Replacing the ball joint
The ball joint is a very important part of any car, which is included in the design of the car's suspension. It consists of a pin made of metal, on one side with a spherical end, as well as a thread on the other side, and a body, which is filled with a polymer having a spherical socket.
The main purpose of the ball joint is that it provides the mobility of the steering knuckle, which is necessary for turning the car while acting on the steering mechanism. Accordingly, the use of a ball joint in such units is reasonable and justified.
By its design, the ball joint is quite durable and, in general, is not afraid of roads (of course, if it is not some kind of obstacle course), as well as time. The main reason for the breakdown of a ball joint on a car of a brand such as a VAZ, i.e. The main destructive factors of this unit of such a car are dirt and water. In addition, the human factor must be taken into account, i.e. accidental rupture of it with a tool that is used in the process of repairing the front suspension of a car.
The most common causes of failure of VAZ 2114 suspension elements
Before starting repair work, service station technicians recommend carrying out a comprehensive diagnostic of the vehicle in order to study the general condition, identify breakdowns, and correctly calculate the number of spare parts and consumables. A preliminary inspection will help to accurately identify the location of the breakdown and detect the faulty part.
The process of self-diagnosis is not at all complicated; there is no need for special equipment or tools. A standard set of car keys, a crab-shaped puller, is enough. It is extremely difficult to press out a metal tip without a puller.
Step-by-step diagnostic process:
In good condition there should be no third-party sounds, creaks, or grinding sounds. Otherwise, the units must be replaced with new ones.
The manufacturer in the operating instructions indicates a maximum free play of the ball joint pin of 0.8 mm. Without special equipment, it is impossible to check the permissible gap.
In parallel with the diagnosis and replacement of suspension elements, we inspect the steering knuckle, hub, support bearing, and brake caliper. We assess the general condition and decide on the advisability of replacing worn parts.
Since the work is carried out near the shock absorber and spring, we check for the presence of oily streaks and depressurization of the shock absorber cylinder. Finally, we diagnose the support bearing located in the engine compartment.
Advice from experienced motorists
Every car owner becomes more literate, understands more about his own and other cars, and can carry out repairs with his own hands as he gains experience.
Of course, no one forces you to carry out all these related checks and preventative work. But think about who needs this in the first place? Of course you. This is your car, the integrity, serviceability and efficiency of which are your personal interest.
Plus, any independent repair, each small inspection is a coin into your own treasury of personal experience. With it you can perform much more complex procedures than replacing a ball joint.
Don't forget one more important point. Self-repair of many components means saving the family budget. With the money you save, you can take your family somewhere or buy something useful for your home. Or purchase a set of new high-quality tires, wheels, and do some tuning work. Indeed, technically, thanks to your efforts, the car is in excellent condition.
Replacing a ball joint on a VAZ 2114
After completing the comprehensive diagnostics, we proceed to replacing the ball joint:
We carry out preventive maintenance, troubleshooting, and clean the surface from lubricant residues, metal shavings, and corrosion layers. Apply a thin layer of graphite grease to the eyelet.
If there are no comments on the operation and condition of other parts, we begin assembling the structure again. By analogy, we complete the replacement on the opposite side. Subsequent maintenance after 15,000 km, replacement no earlier than after 35 - 40 thousand km. Do-it-yourself replacement of the ball joint is completed. About how much the service costs at a service station, check directly with the specialists.
Removing and replacing the ball joint VAZ 2115
Welcome, friends, to the DIY car repair website. Replacing a VAZ 2115 ball joint does not present any particular difficulties and you can handle this work yourself, without resorting to the help of service station technicians, while saving a little on the cost of work.
Replacing the ball joint VAZ 2115
On front-wheel drive cars such as VAZ 2109-2115, the ball has the same shape and mounting design, therefore, the instructions described in the article are suitable for almost any domestic car.
The ball joint is an integral part of the chassis of the machine, which replaced the pivot joints.
Basically, it is a non-dismountable metal structure made of a body and a conical pin, which has a ball shape on one side and a threaded connection on the other.
The ball can withstand quite heavy loads, while keeping the wheels in a vertical position, especially when cornering, that is, it does not allow them to turn out, which is what it is actually intended for.
Although, by its design, a ball joint is considered a durable part, its service life is varied, there can be various factors, such as the ingress of dirt, water and dust through a torn boot, bad roads, or a defective part.
What affects ball wear:
Before starting work, you need to prepare the necessary tools and stands for the threshold of the car, so that later you don’t get distracted and don’t spend hours looking for a tool. So, let's go.
Replacement
If the inspection reveals that your ball joint is faulty and does not meet safety requirements, you will need to replace it.
First you need to make sure you have the right tools. You will need pads, old rags, a jack, a pry bar, but if possible, it would be better to use a special puller, a set of spanners with removable heads, graphite or lithol lubricant, as well as new ball joints. Let's start the repair. It is important that you do not try to violate the given procedure in order to avoid common mistakes and successfully repair your car.
Immediately before starting repairs, I would like to remind you of one golden rule, which is very important to follow when working with any equipment: if you cannot screw something on or put it on or remove it, you should not make superhuman efforts, rashly run for it. with a hammer or crowbar and thoroughly break the part being repaired.
It is better to first take a closer look at the entire assembly, and only then try to find a way out that requires the least amount of brute force.
First you need to drive your car into the inspection pit. Turn off the car, put the handbrake on, and block the wheels with chocks. Now you need to go down into the pit and unscrew the fixing bolt of the support pin, which is located on the hub. It may be difficult to remove the nut. Therefore, based on my experience, I advise you to use silicone lubricant in the form of a spray in such cases. It has a high penetrating ability, so it will be enough to lightly process the interface of the nut and bolt. Using a pry bar, slowly and carefully remove the spare part itself. Remove the two bolts that secure the support to the bracket. Now you have removed the ball joint from your car.
Just remember, don't try to repair it because you'll just waste your time trying to fix a part that can't be repaired. Better to just scrap it.
Let's start installing the new ball joint. First, carefully inspect the bracket and lubricate it if necessary. It is recommended to check the brake pads at the same time, and if they are faulty, then replace them without disassembling the unit again later. Then we simply repeat the entire dismantling in the opposite direction: we put new supports in place of the old ones, screw two bolts into the bracket and one into the hub. Don't forget to check the quality of work by driving the car 50-100 meters.
If after replacing this unit you no longer observe noise or crackling noise, as well as play in the wheel area, then it means that you have identified the problem correctly and the work has been done in the right direction.
Otherwise, if the symptoms do not go away after replacing the ball joint, then great attention should be paid to other parts of the suspension to prevent unnecessary and untimely damage.
Preparation for replacement and tools
To carry out the repair you will need the following tools:
That's all, now you need to prepare the car for repair. To do this, you need to install wheel chocks, loosen the wheel bolts, lift the side being repaired using a jack and install it on a support. Wooden blocks can be used as support, but it is not advisable to use materials such as bricks, cinder blocks, and the like. They are fragile and the car can simply fall during repairs. If necessary, treat all threaded connections with a penetrating lubricant such as WD-40.
Source