Replacing generator brushes for VAZ 2113, 2114, 2115
If on VAZ 2114, 2113, 2115 cars the battery starts to hold the ignition only for a few minutes, the alternator brushes need to be replaced. If repairs are not carried out in a timely manner, you will have to constantly charge the unit and install a new one in the near future. It is easy to check the functionality of the brushes - by the size of the protrusion from the socket. If the result obtained exceeds 5 millimeters, you need to start working. You can act according to the regulations: every 50 thousand kilometers or every season. This repair is not complicated, you can do it yourself.
VAZ replacement of generator brushes.
| generator brushes, + how to remove generator brushes VAZ 2106, generator 2106, |
| Subscribe to my Instagram: There will be something on Instagram that will not be on YouTube.. Hello everyone... |
| Tags: |
| Replacing the brushes of a VAZ 2112 generator without removing the generator |
| Well, there you are... LIKE AND DON'T FORGET TO SUBSCRIBE I)) Brotherly My Instagram... |
| Tags: |
| The generator does not charge. Replacing brushes, classic. |
| Subscribe to the group on VK Instagram |
| Tags: |
| How to remove the brushes from the generator and check the VAZ 2107 VAZ 2106 |
| Removing the brushes. |
| Tags: |
| Replacing the generator on VAZ 2110-2112 and 2114-2115 |
| Video instructions for removing and installing a generator on a VAZ 2110-2115 car with your own hands. Description… |
| Tags: |
| repair of generator VAZ-2114 (08-15)… |
| DIY car repair... 18+... mat... |
| Tags: |
| REPLACEMENT OF GENERATOR BRUSHES. GENERATOR VOLTAGE REGULATOR RELAY. VAZ, LADA. |
| REPLACING THE GENERATOR VOLTAGE REGULATOR RELAY. GENERATOR BRUSHES. Replacing generator brushes... |
| Tags: |
| Replacing generator brushes on a VAZ 2108 |
| very fast and simple. |
| Tags: |
| How to remove a VAZ classic generator. (for beginners.) |
| how to remove a generator from a classic VAZ car. |
| Tags: |
| remove the generator on a classic in 5 minutes |
| how to remove a generator on a classic in 5 minutes. |
| Tags: |
| Replacing generator brushes for VAZ 2108, VAZ 2109, VAZ 21099, VAZ 21010… |
| Continuation of the fight on electrical issues. Let me remind you that the previous time I repaired the oval generator from a local specialist... |
| Tags: |
| Replacing brushes |
| Detailed article on how to check the generator on a car WITHOUT REMOVING! We will use a multimeter, as well as a wire... |
| Tags: |
| How to check the generator on a car. Basic malfunctions. Just something complicated |
| reasons for the lack of battery charging and low voltage in the vehicle's on-board network. VKontatka groups... |
| Tags: |
| Current leakage through the generator. What it looks like and how to treat it. Advice from an auto electrician. |
| OVER 300 USEFUL VIDEOS HERE: ... |
| Tags: |
| Reasons for the battery not charging. |
| Installation of the German LV HUCO - 14.5V in generators VAZ Priora, Kalina, Grant, VAZ 2110, VAZ2109, VAZ 2114,... |
| Tags: |
| Current leakage and poor charging at the same time. We search, find and eliminate the cause. |
| This test does not provide a 100% guarantee of adequate operation of the generator in the car. |
| Tags: |
| How to increase the voltage of a VAZ generator: setting the HUCO pH - 14.5V |
| In this video, Nail Poroshin shows that sometimes “The casket opens much easier than you think” ;-)… |
| Tags: |
| Quick check of the generator outside the car |
| VAZ 2107, there is no charge at idle...it goes cold when changing gears. |
| Tags: |
| But it was the wire! Be careful!!! |
| The procedure for replacing generator brushes on VAZs. |
| Tags: |
| Poor charging of Lada Granta, replacement of alternator brushes |
| We change alternator brushes on a VAZ 2115! Voltage problems! Enjoy watching everyone! I'm on: ... |
| Tags: |
| VAZ 2107 Replacing brushes (NO CHARGING) |
| Replacing brushes and bearings in a VAZ 2107 generator. |
| Tags: |
| Replacing generator brushes VAZ 2101 2107 |
| replacing Niva generator brushes. remove the Niva generator. remove and install Niva generator. |
| Tags: |
| Voltage problems. Replacing brushes on a VAZ 2115. Relay voltage regulator. |
| Repair of generator 1118 Kalina, budget option, replacement of the factory voltage regulator with an external one… |
| Tags: |
| Repair of generator VAZ 2107″ rel=”spf-prefetch |
| Description missing |
| Tags: |
| Replacing generator brushes on a Priora.” rel=”spf-prefetch |
| Description missing |
| Tags: |
| replacing generator brushes VAZ 2121″ rel=”spf-prefetch |
| Description missing |
| Tags: |
| Generator Kalina, Priora, Granta, original repair of voltage regulator.” rel=”spf-prefetch |
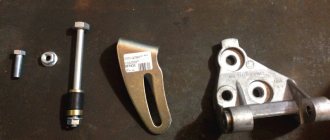
Required spare parts
To work, you will need to purchase new brushes. In the store you can select goods according to article number 2101-3708340, 9402/9412 or EG51A. The markings can also be found in the vehicle's operating instructions. It is better to purchase a kit so that you always have spare parts with you. This will guarantee that if a breakdown occurs you will not have to call a tow truck.
Tools required for repairs
To work you need to prepare the following tool:
- socket head with ratchet 8;
- key to 13;
- a regular flat screwdriver.
The price for replacing generator brushes without removal and with removal on VAZ 2113, 2114 and 2115 as of November 8, 2019 varies from 500 to 600 rubles. Inexpensive, but why pay? Independent work is quite advisable, it is not complicated, does not require special skills, and at the same time you can inspect the condition of the generator and adjacent components.
Main problems
Signs by which you can understand that the VAZ 2115, 2113 or 2114 generator brushes need to be replaced are:
- the battery does not charge or runs out of power quickly;
- warning lights on the dashboard are flashing;
- voltage failures;
- on-board electronics turn off or there is not enough power for its operation;
- the headlights begin to flicker or their light has become dim.
All these signs indicate brush wear. The following message appears on the instrument panel.
Work order
Before starting work, you must read the instructions in full on how to fix the problem. This will allow you to act confidently. You need to understand that the reason for the loss of functionality of the generator may be not only the failure of the brushes, but also the belt or relay regulator. It is possible that the entire generator set is worn out. Therefore, during repairs, you need to check the condition of all elements. First you need to prepare the car for work: remove the terminal from the battery to eliminate problems, and disconnect the plus from the generator.
Now you can start the main work:
- Unscrew the alternator belt mounting bolt.
- Move the unit towards the engine and remove the belt.
- Disconnect the tensioner bar, plug, and terminals.
- We remove the engine.
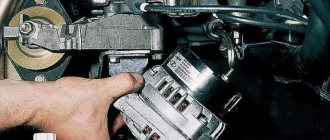
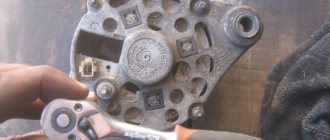
- Now you need to make the brush assembly accessible for work; to do this, you need to open the protective casing. It is secured with three latches.
- After unscrewing the two bolts, disconnect the wires.
- There is a nut on the right that also needs to be unscrewed.
- Now you need to raise the voltage regulator.
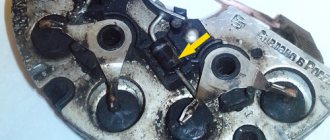
We remove the brushes of the VAZ 2114, 2113 or 2115 generator and check them. It often happens that they are completely over.
Be sure to check the stem at anchor. It is located at the point of contact between the shaft and brushes. If it is large, it needs to be sanded.
- Now you need to thoroughly clean the location of the brush assembly, clean the contacts, and check the reliability of the springs.
- Installation of new parts.
- Reassemble in reverse order.
Compare old and new brush lengths.
Also watch the video of replacing the VAZ 2114 generator brushes without removing the generator:
You can also proceed in the following order:
- We de-energize the battery by disconnecting the negative terminal.
- Disconnect the contacts.
- We unscrew the two fasteners located on the brush holder body.
- We remove the node.
- Inspect the structure for defects.
- Measuring the protruding part of the brushes.
- Installing new components.
- Installation of the unit in reverse order.
This option is relevant if you are absolutely sure that the brushes are the cause of the generator malfunction. After the work has been correctly completed, the following message appears on the dashboard.
Disassembling and checking the generator
So the day came when I finally decided to remove the generator, I have little free time, and I need the car at least once every two days, so what can I do, until I do everything, I won’t install the generator...
What we need to remove the generator: Key/heads, etc. at 8, at 10, at 13 and seemingly at 15
Let's start removing the generator
The first thing you need to do is remove the terminal from the battery, you can even remove both, so as not to accidentally short something))
Well, then we remove the terminals from the generator. One terminal is made according to the “mother” “father” principle - it is simply pulled out of the generator. The second terminal is tightened with a nut, this nut is under a rubber plug. My rubber band burst out laughing, in the photo you can basically see everything.
Then unscrew these bolts in order
And move the generator towards the engine to remove the belt.
Next, you need to remove the protection, if of course there is one, otherwise there is no other way! The protection must be removed completely, it should not hang as in the photo, otherwise you will not remove the generator.
Next, unscrew these 3 bolts
Be careful, after you unscrew the third bolt, the generator will fall, keep this in mind! You can’t drop the generator, or maybe it’s possible, I don’t know))) But it’s better not to do this!
In principle, that’s all, now the generator is in your hands)
There is still not a lot of text about what not to do and how I unscrewed the bolts.
What not to do:
There is a bolt/stud on the bottom of the generator that DOES NOT NEED to be unscrewed! you can only weaken it a little, but this is not necessary) Unfortunately, there is no photo of this, but I circled the place where it stands.
As ALeX-71 said, to remove the generator, it is enough to unscrew this particular bolt, but this is not so, this bolt only tightens the internal bushings, which in turn hold the generator to the generator mount to the engine block, in short, even if you pull out this bolt, the generator you won't take it off either)))
It rests against the body and there is no way to get it out. I tried to push the engine, but no way)
Well, briefly about how I unscrewed the bolts, took the head and knob, inserted it into the bolt and pushed it with my foot))) There’s no other way, it’s just so inconvenient with your hands...
Let's summarize
As can be seen from the above, replacing brushes is not difficult. It is accessible to a motorist who knows how to hold a tool in his hands and has common sense. No special skills required. After replacing the brushes, a message may appear indicating that the battery is low or the generator is faulty. There is no need to immediately panic and look for the reason. This is a fairly common occurrence as new parts are just starting to break in. After a short period of time, you will be able to confidently use the car.
Replacing the generator on a VAZ 2113, VAZ 2114, VAZ 2115
Welcome! A generator is needed to generate current while the car’s engine is running and the stronger the engine runs (the more revolutions), the stronger the generator and produces current, but at the same time into the on-board network of the car (the on-board network includes various types of devices in a car) and it releases a current of a certain strength into the battery (it releases 13.2-14.6± volts), although it can produce much more (Any generator has a voltage regulator installed, so it prevents more current from breaking into the on-board network so as not to burn it, and also if the engine is running in tension, for example, you have engaged 5th gear and are driving 30-40 kilometers, then the current in the generator will be generated less than 13 volts, but the voltage regulator will correct this current and also level it to the desired value, but this is only if the current does not drop too little, if it even drops to 2 volts, for example, then the regulator simply will not be able to compensate for this and the battery will still work), this is why you need a generator, by the way, thanks to it, if you You don’t know yet, the battery is recharged when it produces current and therefore when the engine is running and the music is playing in the car, the battery’s charge is practically not wasted (It also depends on how the music will work, if the car is equipped with good acoustics, then even with the engine running the battery will start working, since the generator simply will not cope with the load).
Note! To carry out the operation of replacing a generator on a car, you will need to take from the tools: A set of wrenches, as well as a wrench with socket heads (They are simply convenient for unscrewing some hard-to-reach nuts, if you don’t have it, you can use other wrenches instead), Well, take a rag so that you can remove moisture from the generator belt if it is present on it (It’s just because of the moisture that the belt makes a very unpleasant whistle, which almost every person has heard in their entire life)!
Summary:
Where is the generator located? If you open the hood and look deep into the left side of the car while standing in front of the car, you will immediately see the generator, it itself is large and for clarity, we have indicated it with an arrow in the photo just below; by the way, the generator has this location on all front-wheel drive cars that are produced in AvtoVAZ, so take this into account for yourself and if you also change it with a friend in his car (If he has front-wheel drive), then immediately point your finger at its location.
When should the generator be replaced? The generator lasts quite a long life, but over time, like any other part, it becomes unusable, it is not necessary to immediately go to the car store and buy a new generator and install it (It’s just not affordable for everyone, since the generator costs quite a lot of money ), or you can sort out the old one so that it starts working again (Read about how to do this in the article entitled: “Repairing a generator on a car”), so let’s talk about malfunctions, if you began to notice that the instruments in your car began to shine brighter then dimmer (Depending on the speed, this could be, for example, you gave gas, the engine spun up and the headlights were bright, but as soon as the speed dropped, the light became dim again, this indicates that the voltage regulator in the generator is faulty ), and also if the battery begins to discharge frequently, then the generator is clearly under repair, or if you have money, you can immediately go to the auto store and change it for a new one.
What problems may arise in the operation of the generator and options for solving them.
- If the brushes or voltage regulator malfunction, you will have to replace the entire assembly due to the fact that it is not collapsible.
- Rotor bearings and their replacement. We have already discussed in detail how to change a bearing on a generator, so let us just remind you that there are two bearings in the generator. One is pressed into the front cover and if it malfunctions, it is most often replaced along with the cover assembly. The second bearing is attached, rolled onto the rotor shaft, it is removed using a special puller and a new one is pressed in its place.
- Additional diodes. If the diode malfunctions, its leads can be unsoldered and then, carefully trying not to break the rectifier unit with blows, pulled out of the holder. Clean the area from epoxy resin, then install the diode and solder it. After the entire procedure, the lead of the diode, which has a color mark, is soldered to the bus, and the diode body is attached to the holder with epoxy resin.
- The generator tension belt needs adjustment. But this must be done competently and carefully, since excessive tension can increase the load on the bearing and lead to its unsuitability in a short period of time.
Many of these problems may seem trivial, but they could mean you need a new generator. You can repair the generator yourself, but to do this you need to have certain skills, so we still recommend leaving this work to knowledgeable craftsmen.
The alternator bearing is an integral part of the alternator and its failure may result in malfunction. In this case, only replacing the generator bearing can help.
On devices from different manufacturers, this process is carried out in different ways, and the bearings of the Bosch generator are most easily replaced. Car enthusiasts often ask the question of how to change a bearing in a generator. So, this is done in the following way:
Remember that even if the bearing on your car looks great, the alternator bearing will still need to be replaced.
Install the generator bearing only using a press, and never use hammers or blows.
It is important that the bearing itself sits completely in place, then install the impeller and pulley on the shaft. The next step is to replace the rear bearing of the generator with the cover, again do not use any blows, only using a press
Next, you just need to perform the opposite actions to those taken during removal, and that’s it, you replaced the generator bearing yourself!
Sources
- https://remontavtovaz.ru/vaz-2110/samostoyatelnaya-zamena-podshipnikov-generatora-vaz-2110.html
- https://nadomkrat.ru/elektrooborudovaniye/kak-pomenyat-podshipnik-generatora-na-vaz-2114
- https://vaz-2114-lada.ru/2012/06/kak-zamenit-podshipnik-generatora/
How to replace the generator on a VAZ 2113-VAZ 2115?
Note! We recommend that you replace the generator with exactly the same one (Similar), it just happens when people buy other generators and problems of this kind arise with them, for example, the generator is not suitable for this car and they cannot fix it (Mounts are in the wrong places), or it takes up there is too much space and cannot fit into the place where the original one stood before, so before removing the generator, take a look at its markings (it’s written right on it) and according to these markings and buy a new generator!
Removal: 1) You need to remove the generator through the bottom since it is convenient and there will be no difficulties in removing it, but for this the crankcase protection will need to be removed, otherwise it will interfere with removal (For information on how to remove the protection, read the article: “Replacing the protection crankcase on the car"), as soon as the protection is removed, be sure to remove the minus terminal from the battery, because if this is not done, then when you touch the wrench with the nut securing the plus terminal of the generator, a short circuit will occur and it will continue until until you remove the wrench from the nut (For information on how to remove the terminal, see the article: “Replacing the battery on a VAZ”).
2) Now move the rubber boot to the side with your hand (This is shown in both photos below) and under it you will find a nut that secures the plus terminals to the generator (The nut is indicated by a blue arrow), you unscrew this nut and then remove both terminals as soon as the terminals will be removed, disconnect the wire block (Indicated by the red arrow) by pulling it with your hand with a little force and thereby disconnecting it.
3) Next, using a wrench or a socket wrench, completely unscrew the adjusting bolt, which for clarity is indicated in the photo below with an arrow. By the way, there is a washer under this bolt, so remove it from the bolt when you take it out.
4) Then unscrew the nut of the upper bolt that the generator itself holds on the bar (Indicated by the red arrow), after which remove the nut from the bolt and remove the bolt itself from the generator, while also removing the tension bar (Indicated by the blue arrow) which is located behind the bolt.
5) Well, finally, unscrew the nut of the lower generator mounting bolt (see photo 1) and immediately behind this nut the spacer bushing will be located, you will also remove it, as soon as it is removed, take something heavy (Hammer for example) and knock the bolt out of the generator, with one hand while holding the generator itself suspended (see photo 2), just if you don’t do this, then when the bolt is removed, the generator will fall to the ground (By the way, you need to hit with a hammer not with the metal part, but the handle is made of wood, there is simply a high probability of damaging the bolt if you knock with the metal part).
Note! As soon as you slightly loosen the nut of the lower bolt, remove the belt from the generator (Indicated by the red arrow), to do this, move the generator closer to the engine with one hand, and with the other hand, remove the belt from the generator roller (Roller indicated by the blue arrow) and let it just hang there, not preventing the generator from being removed at the same time!
Installation: The new generator is installed in its place in the same way as it was removed, just the whole procedure occurs in the reverse order of removal, by the way, after installing the generator, put a belt on its roller and adjust its tension, for more details on how to do this, read the article : “Replacing the alternator belt on a VAZ.”
Additional video: Using the example of a VAZ 2110 car, see how the generator needs to be removed, the whole procedure for removing the generator on front-wheel drive cars is almost the same, but this no longer applies to new cars such as Lada Priora, etc. , because on them the generator is removed a little differently.
How to Remove a VAZ 2115 Generator
It is correct VAZ-2115
generator. Car manufacturers of different brands install generators in different places. For example, to find a generator on a VAZ- 2115 , you will need to open the hood and stand in front of it. By turning your eyes to the left side of the car a little deeper than the surface, you can see the generator itself.
When to replace the generator
The service life of the generator is quite long, as is its price. Therefore, if this item suddenly fails on your car, you should not run to the store and purchase a new one. It's easy enough to take off an old generator and try to find the breakdown. Signs that it's time Note to the generator that the headlights are working unstable. So, for example, if you saw that in an instant the lights began to shine brighter or, conversely, dim, it’s time to look for the place where the generator . A similar action should be taken if your car battery starts to drain too often and for no apparent reason.
How to remove the generator
If you even have a rough idea of how the generator works, you can try to fix it yourself.
Removing the generator on a VAZ 2113-2114-2115 without crap.
Breeding
Gennady in Samara at the top without straining.
VAZ generator replacement
+ Change generator
for
VAZ 2115
. Enjoy watching! VKontakte group Our Twitter.
- In order to remove the generator , you will need to drive the car into a hole or lift it on an elevator. For convenience, you need to remove the engine crankcase. The next step is to remove the terminals from the car battery.
- With the rubber housing aside, you can see the nut that secures the positive terminal to the alternator. Unplug and disconnect the wiring block. This may require some force.
- The adjusting screw is unscrewed using a screwdriver or wrench.
- Open the bolt nut located above. Thanks to it, the generator rests on the crossbar. Both the nut and bolt should be removed by removing the tension bar that holds the bolt.
- Finally, you need to unscrew the bolt nut located at the bottom. Directly behind this nut is a spacer that also needs to be removed.
- Next, use milk to remove the bolt from the generator, but the latter must support the weight.
The note. Once the lower nut on the alternator bolt is slightly loose, it will need to be removed from the alternator belt. To do this, move the generator closer to the engine itself, and with the other hand, remove the belt from the generator roller.
It should remain suspended until the generator is installed or a new one is installed.
Installing a new generator is exactly the same, only in reverse order. Reinstall the generator and place it on the belt pulley, adjust the voltage to the required level.
Important! The best thing is to replace the generator with a similar one. It often happens that when you buy a slightly different generator, it simply does not work to install it on a VAZ-2115. Several reasons have a direct impact on this. For example, the installation may be different or the generator dimensions may not match those installed at the factory. In any case, before purchasing a new generator, it is better to consult with a specialist.
There is a special offer on our website. You can get a free consultation with our corporate lawyer by simply submitting your question in the form below.
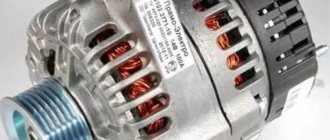
Generator VAZ 2115
A generator of type 94.3701 is installed on cars - alternating current, three-phase, with a built-in rectifier unit and an electronic voltage regulator, right rotation (on the drive side).
The generator rotor 94.3701 is driven by a poly-V belt from the engine crankshaft pulley (on some VAZ-2111 engines - from a damper).
Replacement
In order to remove the generator on the VAZ 2114 - 15, we need:
key for 10 key for 13 key for 15 key 17 x 19 pry bar
If everything is ready, then take step number one - remove the negative terminal from the battery.
Step No. 2 - first we unscrew the protection and boot under the car, on the right side (under the generator), you can do without it, but it will be more convenient to unscrew the lower bolts of the generator.
It is enough to unscrew a few bolts and lower the protection with the boot down.
Step No. 3 - weaken the tension of the generator belt, to do this, unscrew bolt 1 and loosen bolt 2.
Step No. 4 - press the generator to the engine and remove the generator belt
Step No. 5 - since we will be removing the generator completely, we will completely unscrew the belt tensioner bar 3 from the engine block.
Step No. 6 - remove the plug (female) and unscrew terminal 4 from the generator.
Step No. 7 - since the generator is attached to an axle at the bottom, a nut holds it there, this axle (essentially a long bolt) is usually difficult to pull out, it will be easier to unscrew not the axle, but the entire mount of the generator to the engine, there are 15 bolts there.
Step No. 8 - we take out the generator and unscrew the axle (the long bolt on which the generator itself sits), after which we slowly knock out the axle with a wedge (another unnecessary bolt).
That's it, the generator is free, now you can replace it with a new one.
Assembly occurs in reverse order.
You can tighten the generator belt with a pry bar by inserting it between the generator and the engine. Next, adjust the tension using bolt 2.
In this case, the belt tension should not be weak or too strong.
A weak tension will allow the belt to spin, while a strong tension can damage the generator bearing.
Usually the tension is measured by the deflection of the belt; it should not be more than 1-1.5 cm.
Instructions: which battery is better.
What to do if the fuel pump fuse is on, the material is available at the link.
How to remove the mounting block https://vz15-up.ru/lkt/montazhnyj-blok-vaz-2115.html#t3.
How to remove
You will need: keys “8”, “10”, “13”, socket head “17”, wrench.
1. Disconnect the wire from the “–” terminal of the battery.
2. Remove the engine protection.
3. Remove the generator drive belt (see “Replacing and adjusting the tension of the generator drive belt”).
4. Disconnect the block with the wire from terminal “D” of the generator.
5. Remove the protective rubber cover, unscrew the nut and disconnect the wires from the contact bolt (terminal “B+”).
6. Remove the tension bolt.
7. Finally unscrew the nut of the upper mounting of the generator.
8. Remove the tension bar.
9. Finally unscrew the nut of the lower mounting of the generator.
10. Remove the spacer bushing.
11. Holding the generator, remove the bolt securing it and remove the generator down
How to check
To test the generator we need an assistant and a regular tester.
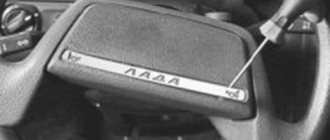
First of all, turn on the ignition key and make sure that all the lights on the dashboard are on (alternator (battery), oil, brakes, handbrake, check engine, etc.). Next, we start the engine and look at the dashboard: A burning or dimly flashing “battery” light indicates a malfunction in the generator circuit. List of possible faults.
Replacement and repair of generator on VAZ 2114 (2115)
Location: engine compartment, to the left of the power unit, at the end.
Preparatory stage:
- a set of keys, heads, cranks;
- a torque wrench to check the tension of the drive belt;
- mounting spatula to remove the belt;
- flat head screwdriver
Step-by-step replacement instructions:
- We fix the vehicle on a level platform.
- Squeeze the parking brake.
- Turn off the ignition.
- Open the hood.
- Disconnect the terminals from the battery.
- Unscrew the fastening of the “+” and “-” terminals from the generator set.
- We turn out the coupling bolt of the support bracket.
- We lower the unit down and remove the drive belt from the groove.
- We unscrew the studs and turn out the coupling bolt.
- To change the GU, we remove it from its regular place.
Do-it-yourself dismantling of the control unit on the VAZ 2114 (VAZ 2115) is completed. We carry out comprehensive preventative maintenance of the equipment, clean the housing and elements from dirt and dust, blow through the windings with a stream of compressed air, and dry the contacts.
We replace worn parts and components with new ones as necessary, if defects are detected. The generator must be completely replaced if cracks are detected in its housing.
We measure the resistance of the excitation winding with a multimeter and check the diode bridge for operability. We also inspect the fuse for integrity and replace it with a new one if damage is detected.
DIY generator installation:
- We fix the GU on the support brackets, put on a pin and a spring washer.
- Place the belt in the groove.
- We screw in the fastening bolts.
- We move the GU body up, tighten the mounting bolts of the bar.
- We tighten the generator fasteners with a torque wrench with a force of 28.0 Nm.
- We check the belt deflection; the range should not exceed 12 mm. tighten as needed.
- We clamp the power cables on the installation.
- We put on the battery terminals.
To reduce the frequency of replacing power units, some car owners install generators from Priora (injector, 8 valves). The equipment is more powerful in terms of technical characteristics, which means it ensures stability in the generation and supply of current to the motor.
A new generator set is 500 - 750 rubles more expensive than a standard one. The holes for fasteners completely coincide with the factory ones on the VAZ 2114 (VAZ 2115).
Recommendations for care and maintenance of PG on VAZ 2114
- strictly adhere to the technical inspection deadlines;
- when purchasing consumables and spare parts, check the correspondence of catalog articles;
- give preference to original parts where the manufacturer guarantees quality;
- in the absence of experience, carry out prevention in certified workshops;
- when purchasing components, require the manager to provide documents for the products he sells;
- Always use the vehicle’s operating manual and consult with car service specialists.
Basic faults
The primary reason for the breakdown of generator brushes is their wear, which makes itself felt by a poor battery charge. You can detect a failed part by the following problems:
- voltage failures;
- the battery discharges quickly or does not charge at all;
- the headlights begin to burn much weaker or blink;
- instrument lights blink;
- There is not enough voltage for the electronics to operate and it turns off (radio tape recorder, for example).
How to remove a generator on a VAZ 2109
In a car, a generator is responsible for producing electrical energy to power a device such as a battery. In the absence of its normal operation, the battery is only discharged, and the car is able to function until it completely exhausts its charge.
Checking the VAZ 2109 generator
In order to prevent an extremely unpleasant situation associated with the failure of the generator at the most inopportune moment, it is advisable to regularly check its serviceability. Let's consider the algorithm for carrying out this procedure. You will need a tester (multimeter or similar device) that operates in voltmeter mode, as well as an assistant. Place the car on any flat surface and raise the handbrake, warm up the engine to operating temperature. You can start checking the generator:
Why change brushes?
If signs of brush breakage are detected, they should be replaced. If repairs are not carried out in a timely manner, there is a possibility that you will soon need to purchase a new generator, and this is a completely different expense. The battery can only hold the ignition without brushes for a few minutes, which means it will have to be constantly charged. And soon it will be replaced.
You can check the condition of the brushes by the size of their protrusion from the seat. If the protrusion size does not reach five millimeters , then they should be replaced immediately to avoid possible problems.
It is recommended to replace it every 50,000 km or every season, which is the key to safe operation of the vehicle. It is better to have a spare set of spare parts so as not to get into an unpleasant situation on the road and then call a tow truck.
For a set of brushes you will need to pay from 150 to 200 rubles, depending on the store. The cost of repairs at a car service center will cost 200-300 rubles, inexpensive, of course, but why pay for something that you can do yourself?
Replacement
The process of replacing old brushes with new ones does not take much time and does not require special knowledge. The only thing you need to prepare are the tools:
- socket wrench 13;
- flat screwdriver (ordinary);
- 8mm socket with ratchet.
Without removing the generator
If you are sure that the problem with the car breakdown is a malfunction of the generator brushes, then you can do without removing it.
- Turn off the negative terminal.
- Disconnect the wires.
- On the brush holder body, unscrew the two bolts holding it in place.
- We extract the structure.
- We check for damage and the size of the protruding part of the brushes (it must be at least 5mm).
- We install new elements and carry out installation in the reverse order.
With the generator removed
Poor charging of the car can be caused not only by the brushes, but also by the alternator belt. To eliminate this point, when replacing brushes, you should remove it to check the condition of the belt.
First, we dismantle the unit.
- We unscrew the bolt securing the generator belt.
Let's move on to the brushes
- Open the protective casing (cover).
Procedure for replacing the generator
If the electrical unit fails and repair is impractical, you must first find a replacement. It is recommended to buy a factory version that will fit the fasteners and terminals. Otherwise, the repair will be accompanied by changing the wires.
Replacement process for VAZ 2109-2115:
- Drive the car onto the overpass.
- Remove engine protection.
- Remove the (−) terminal from the battery.
- Move the protective cover away from the positive one, unscrew the fixing bolt and remove the terminal.
- Remove the wires (secured with a block).
- Remove the upper fastening element.
- Take off the belt.
- Unscrew the bottom bolt.
- Dismantle the device.
- Install a new unit so that the fasteners match.
- Secure with the lower and upper bolts.
- Install the belt (preferably a new one).
- Place the terminal, secure it, and return the protective cover.
- Connect the wire block.
- Adjust tension.
Attention! If you overtighten when adjusting the belt, the bearings will quickly fail. If the tension is weak, there will be no proper grip and the battery will not be able to charge.
To tighten, you need to turn the adjusting screw, which, when moving clockwise, is tightened, and when moved counterclockwise, it is loosened. It's easy to check - you need to gently press the belt so that it bends no more than 15 mm.
Replacement result
After replacement, errors may appear about a low battery charge or a malfunction of the generator; there is no need to immediately try to find the cause of the failure. This phenomenon is not uncommon, since new brushes have just begun to break in. After some time, everything will return to normal, and you can safely continue using the car.
Since front-wheel drive cars of domestic production, such as VAZ 2110, 2115 and 2114, are almost identical in the set of electrical equipment, many repair and maintenance operations will be identical. For example, this can be attributed to repairing a generator, namely replacing brushes.
I think there is no need to explain that the wear of the generator brushes primarily determines the normal charging of the car battery. And if you do not replace them in time, then over time the battery will discharge and you will constantly need to charge it.
Below is the necessary list of tools that you will need to replace the generator brushes yourself:
- Open-end or socket wrench 13
- 8 socket socket with ratchet
- Flat blade screwdriver
Now below we will analyze this procedure in more detail, we will provide the necessary photographs to show the whole process more clearly.
So, the first step is to disconnect the battery terminal and remove the generator from the car, although some perform the replacement without removing the device.
Open the lid, which is a protective casing:
After this, immediately disconnect the brush power wires, as shown in the photo below:
Now all that remains is to unscrew the two bolts that secure the part we need:
And unscrew one nut with a 13mm wrench, which is located on the right:
That's practically all, now we just raise the voltage regulator and we can start replacing it. It is worth noting that before installing new brushes, carefully check the removed ones: if their length is less than 5 mm, then this indicates excessive wear and they should be replaced without hesitation.
The price of a new part for VAZ 2110, 2114, 2115 cars is no more than 150 rubles, so this repair will cost you mere pennies. Agree that this is better than a new generator!
The generator for a front-wheel drive VAZ is quite expensive, costs around 3,000 - 3,500 rubles, of course, compared to foreign cars, VAZ spare parts are much cheaper.
How does the generator work on a VAZ?
Main details:
- Generator VAZ-2110. Design Features
- Brush holder with voltage regulator.
- Stator.
- Rotor.
- Fan with pulley.
- Distance ring.
- Bushings.
- Bearings.
How does the generator work on a VAZ?
With the help of the stator and the generating part, a 3-phase alternating current is generated, which 6 large diodes change to direct current, and the battery is charged.
The generator operates by rotating the crankshaft. The device is located under the hood, on VAZ cars - in the front part. Therefore, it is not difficult to remove the VAZ-2114 and other models generator.