Removing and installing the VAZ 2107 front suspension spring
Place the car on a lift or inspection ditch;
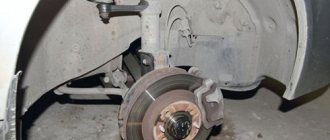
holding the end of the rod by the flats with a wrench A.57070, disconnect the upper end of the shock absorber and remove the front wheels. Having straightened the locking plates, unscrew the bolts securing the caliper to the bracket. Move the caliper to the side and secure it so that it does not hang on the hoses. Remove the shock absorbers with brackets.
Disconnect the ends of the anti-roll bar from the lower control arms.
Using puller 67.7801.9513, press the pins out of the holes in the levers and move the steering rods to the side.
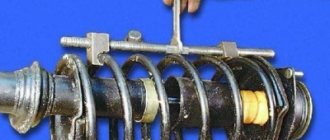
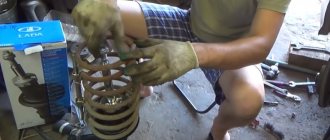
↑ Spring compression with device 67.7828.9504
1 — suspension spring; 2 — screw of the device; 3 - support plate.
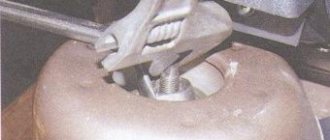
- Insert screw 2 of tool 67.7828.9504 into the hole in the upper support of the suspension spring.
- Then place the support plate 3 on the spring coil 1 and on the screw 2 from below and secure it to the spring with a clamp.
- Screw the nut onto the screw from below so that the nut retainer fits into the socket of plate 3.
- By turning screw 2 with a wrench, compress the suspension spring until the suspension arms are completely unloaded.
- Take out the axis of the upper arm and disconnect it from the body.
- Disconnect the lower control arm axle from the cross member and remove the suspension assembly from the vehicle.
- Remove the spring, smoothly unloading it, remove the device and repeat the operations for the other suspension unit.
- Remove the engine splash guard and stabilizer bar.
NOTE! When removing suspension components, it is necessary to note the number and location of the adjusting washers between the axis of the lower arm and the cross member, as well as the adjusting plates between the cross member and the body side members, so that when installing the units, put these washers and plates in their original place.
↑ Installation of cross member A.70526 to support the engine when removing the front suspension cross member.
Supporting the engine with a cross member A.70526 or a hoist, remove the cross member.
Install suspension components and parts in the reverse order of removal.
Install springs on the front and rear suspensions of the same group (group A is marked with yellow paint, and springs of group B are marked with green). In exceptional cases, it is allowed to install group A springs on the front suspension, and group B springs on the rear suspension.
The front suspension should only have springs with yellow markings on the outer surface of the coils.
↑ Sequence of tightening nuts and axles in rubber-metal joints
To prevent improper distribution of forces in rubber-metal joints, tightening the nuts and lever axles must be done in the following order:
- Place the car on a level surface and place the wheels parallel to the axis of the car;
- load the car with a load of 3136 N (320 kgf);
- under these conditions, use a torque wrench to tighten the nuts securing the axles of the upper and then the lower arms and the nuts securing the axle of the lower arm to the cross member.
Check and adjust the front wheel alignment angles.
How to replace rear springs on a VAZ 2107
Replacement of rear springs on cars of classic models, such as the VAZ 2107, is carried out in two cases: if one of them significantly subsides or in case of mechanical damage. You should definitely remember that both need to be changed at the same time, otherwise the car will lose stability on the road due to tilting to one side. Unlike the front ones, replacing the rear springs does not require special tools and can be done in 1-2 hours without much labor. In particular, to replace the front springs you need a set of special pullers.
Rear springs for the VAZ 2107 are available in two sizes:
- Type A – length exceeds 273 centimeters – red color;
- Type B – length less than or equal to 273 cm – green color.
To work you need to stock up on tools:
- Two keys for 19;
- Two keys for 10.
In addition, you need to purchase two springs and two spare sets of rubber stands. If it is necessary to change the springs, then the stands may be suitable for further use. However, it is better to change them too while the car is disassembled, so that you do not have to do the same work again later.
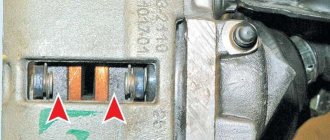
To remove the springs on a VAZ 2107, you need to unscrew all the parts that interfere with the free movement of the bridge in the vertical plane. First, using 10mm wrenches, you need to unscrew the brake fluid pressure regulator rod.
After this, in order to avoid damage to the brake pipes, you need to unscrew the bolt securing the brake pipe tee using a 10mm wrench.
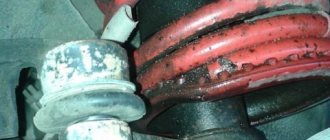
Next, use two 19mm wrenches to unscrew the lower shock absorber mount on the side where replacement is planned.
After this, we jack up the rear of the car on the side where you planned to work, the bridge lowers and the part is released. We take out the part to be replaced along with the upper and lower rubber pads, and install a new one in its place.
You should pay attention to the presence of protrusions on the linings on both sides. On one side the end of the coil rests on the protrusion, on the other we rest:
- into the protrusion on the car body for the upper lining;
- into the protrusion on the bridge platform for the lower lining.
After installing the part in its normal place, remove the car from the jack and screw on the shock absorber. The replacement of one element is completed, you can move to the other side. Having replaced both springs, we assemble the brake system parts in the reverse order. At this point, the work of replacing the rear springs can be considered completed. For VAZ 2107 vehicles with a long service life, before unscrewing the nuts, it is recommended to treat them with a special penetrating lubricant such as WD-40 to make work easier.
Spring Upgrade
Upgrading springs is the process of modifying a spring yourself. As a rule, the essence of upgrading a standard spring is either cutting it (shortening) or lengthening it (through spacers).
Shortened springs
Springs with a shortened length (relative to the standard for the VAZ 2107) are needed in cases where the driver wants:
- lower the height of the car body;
- optimize steering;
- reduce the sagging opening when overtaking;
- remove sideways roll when cornering.
Most manufacturers already have a range of lowering springs. In this case, the understatement varies by height (-30, -50 and -70 mm). Do not forget that at the same time the ground clearance is also reduced, so operating the “Seven” over potholes and bumps will become difficult.
Depending on the owner's preferences, the body can be lowered to different heights
To save money, you can shorten the springs yourself. To do this, you will need a standard pair of springs and an angle grinder (grinder). Usually it is enough to cut 2 turns to get the “low body” effect and ease of handling. Cutting off 3 turns makes the car very low, so it is already dangerous to drive it on uneven sections of the road.
For ease of operation, the spring is clamped in a vice
The modernization of springs should be carried out in clean and bright rooms. It is important to cut the two springs to the same number of turns and carefully measure their length. Even if there is a difference of 1–2 mm in the length of the springs, they cannot be installed in pairs, as this will affect the ride quality.
Video: the formation of springs on a “classic”
Spacers for springs
During operation, the springs wear out - and this is normal. The driver immediately begins to notice that the suspension is losing its rigidity: the car is more difficult to control on uneven roads, increased vibrations and shocks appear.
This problem can be solved by simply replacing the springs or using spacers. By the way, spacers can be used even when installing new springs - they increase their service life and increase the rigidity of operation.
In the auto store you can purchase several types of spacers for VAZ 2107 springs:
- interturn (that is, springs used between the turns);
- products for joints between the spring and the suspension cup;
- products for the joint between the ball joint and the cup;
- spacers for suspension.
Interturn spacers are inexpensive and easy to install. The use of such products will not in any way affect the ground clearance of the car, but will increase the degree of compression of the springs and their stiffness. After installing an interturn spacer on each of the springs, the car will not sag and can continue to be operated without roll when cornering.
Elements are made of high-strength rubber
The process for installing the interturn spacer is as follows:
- Place a jack under the front wheel.
- Expand the spring to maximum using crowbars.
- Soak the spacer in soapy water.
- Install the spacer with a screwdriver on one of the lower coils of the spring and secure it.
- Remove the wheel from the jack and perform the same procedure on the other side of the car.
All other types of spacers are aimed at upgrading the suspension, not the springs, but the essence of their installation and functions is the same.
Video: operating procedure
Replacing the front suspension spring of a VAZ 2107
Today we will talk about replacing the front suspension spring of a VAZ 2107 with your own hands. The article will be accompanied by photographs and a detailed description of all actions.
According to the length under the normalized load, the front suspension springs of the VAZ 2107 are divided into two groups: A - “long”
and
B - “short”
. The front suspension springs of group A are marked with yellow paint, the front suspension springs of group B are marked with green paint.
The vehicle must have springs of the same group installed. The front suspension springs on a VAZ 2107 should be replaced in pairs if at least one of the springs shrinks, deforms or cracks.
To do the work of replacing the front suspension spring on a VAZ 2107 with your own hands, you will need ties to compress the springs.
Warning:
Use only reliable factory-made ties to compress the spring and strictly follow the instructions for their use. The suspension spring has great strength. The spring breaking off the ties can cause serious injury.
How to remove the front suspension springs of a VAZ 2107
1. First of all, you need to prepare the car for repair.
2. Remove the front wheel from the car.
3. Remove the shock absorber from the VAZ 2107.
4. Loosen the two nuts securing the lower front suspension arm to the axle.
5. Disconnect the stabilizer cushion clip and remove the cushion.
6. Press the lower ball joint pin out of the steering knuckle.
7. Install the jack under the lower arm without loading the front suspension of the VAZ 2107, and unscrew the nut securing the pin.
8. Carefully unload the suspension (by lowering the jack) and at the same time, using a mounting blade, move the stabilizer through the upper stud securing its bracket.
9. Remove the jack.
10. Using a mounting blade, pry the spring from below and remove it from the lower arm support cup.
11. Remove the spring and the insulating rubber gasket from the upper support cup.
Installing a front suspension spring on a VAZ 2107
1. Before installing the spring on the VAZ 2107, attach the upper rubber gasket to the spring with insulating tape, ensuring that the end of the screw surface of the gasket coincides with the end of the spring coil. We install two ties on the spring, without catching them on the last turns, and tighten the spring to a height of no more than 280 mm.
2. Install the front suspension spring on the lower arm support cup and orient the spring so that the end of the spring coincides with the screw surface of the lever support cup.
3. Place the jack under the lower arm and lift it, making sure that the rubber gasket is installed on the upper support cup.
4. Raise the lever with a jack and guide the pin of the lower ball joint into the hole in the steering knuckle.
5. Tighten the self-locking pin fastening nut 4-5 turns. We loosen the ties and remove them through the technological hole in the lower arm.
6. Raising the lever, press in the pin of the lower ball joint and tighten the self-locking nut.
7. Install the remaining parts in the reverse order of their removal.
8. Having installed the car on the wheels, we finally tighten the nuts securing the lower suspension arm to its axle and securing the stabilizer pad holder.
9. Similarly, we replace the second spring of the front suspension on the VAZ 2107 with our own hands.
Let us remind you that the previous article was about adjusting the front wheel bearing of a VAZ 2107 with your own hands.
Signs and malfunctions of the front springs of the VAZ 2107
To avoid unpleasant consequences, it is important to identify the problem in time. This is not difficult to do. During operation, you will notice that the car has “squatted” in height and the ground clearance has decreased.
If one of the springs fails, a slight roll may occur. If both springs are damaged, the car will visually “nod off”, that is, the front part will be significantly lower than the rear.
In addition, the malfunction can be identified by inspection - damage will be visible on the spring (cracks, traces of impacts against each other, and so on).
Many car enthusiasts install spacers under the springs and solve the problem this way. It is not right. In most cases, such products are ineffective.
In the best case, you can raise the ground clearance, but if there is a malfunction or defect, then the best solution is to replace the VAZ 2107 front suspension spring.
How to change springs on a VAZ 2107
How to replace rear springs on a VAZ-2107
Over time, the elasticity of the metal decreases, the car sags, and in potholes the wheels begin to reach the wheel arch liners. It's time to replace the rear springs . The procedure is not complicated and a driver with minimal plumbing experience will be able to fix the problem on his own. This article is suitable for owners of all “classic” VAZs from 2101 to 2107 . Sometimes replacing the spring spacers with thicker ones helps. They are available in three versions with different thicknesses. If the springs haven’t burst, then the Zhiguli car is still ok with inflated spacers.
Preliminary inspection
You should start with a visual inspection of the car, preferably in an inspection hole, and compiling a list of parts that need to be replaced along with the springs.
1. Inspect the internal arches and spring seats for cracks in the supporting metal. Welding work may be required.
2. If there are oil stains on the shock absorbers , then they will also have to be changed.
3. Along with the rear springs, it is worth replacing the shock absorber bushings, and at the same time the bushings for the rear links.
4. Inspect the rear brake hose for cracks. A cracked hose should be replaced, followed by bleeding the brake system.
Replace the cracked brake hose with a new one
The list of spare parts for replacing rear springs usually looks like this:
a) rear springs with rubber spacers and metal linings of standard size;
b) bushings for shock absorbers;
We replace shock absorber bushings on a VAZ-2107
c) new torque rods or rubber bushings on them.
When the bushings wear out, it is easier to replace the tie rods as an assembly
Replacing suspension springs on a VAZ-2107
We carefully inspect the suspension springs. Sagging springs, as well as those with cracks and severe corrosion, are replaced.
Check the technical condition of the insulating gaskets and replace them if they are damaged.
Replacing front suspension springs
To remove the front springs, we use a special device consisting of two grips installed between the coils of the spring and a screw tie.
Install the device into the spring and remove it.
Press the lower ball joint out of the steering knuckle (see Replacing ball joints).
We move the hub on the upper ball joint to the side. Use a 22mm wrench to loosen the nuts on the lower arm axle. (See Replacing the rubber-to-metal joints of the lower control arms on a vehicle.)
After making sure that the coils of the spring are tightened securely, push the lower suspension arm down and remove the spring along with the device from the lower arm.
A rubber insulating gasket is installed on the top of the spring
Having compressed the spring three times until the coils touch, check its elastic characteristics at the control points.
Replace the damaged gasket with a new one. The length of a working spring in a free state should be equal to 360 mm. It is allowed to install identical springs on the front suspension only with yellow markings on the outer surface of the coils (group A).
Installation of springs is carried out in the reverse order of removal.
We install the car on the wheels, and then tighten the nuts of the lower control arm axles.
Replacing rear suspension springs
We disconnect the shock absorber from the rear axle beam bracket and...
We compress the spring with two special ties.
Instead of zip ties, you can use two or three strong staples, which are inserted from two opposite sides into a spring compressed by the weight of the car.
When hanging the wheel, they will not allow the spring to fully decompress.
A compressed spring is dangerous, so in addition to ties or staples, you can tie its coils with steel wire.
Using your hands, move the rear axle beam down and remove the spring.
A plastic gasket is placed under the lower part of the spring, and a rubber vibration-isolating gasket is installed on top.
We check the condition of the rubber gaskets and, if necessary, replace them with new ones.
Install the spring in the reverse order of removal.
We replace the second spring in the same way.
We install both springs of the same group (with markings on the outer surface of the coils with paint of the same color).
Class “A” springs (yellow) are installed on VAZ-2107 cars.
It is allowed to install springs of class “B” (green color).
In case of damage (cracks, peeling), replace the compression stroke buffer by moistening it with a soap solution before installation
Logbook VAZ 21074 (2006)
So, we continue to rebuild the suspension. Today we’ll look at how to change the front springs, since the factory ones have already reached 220 thousand and are pretty tired, although the ground clearance is normal. To do this, I purchased similar springs from VAZ JSC with new spacers and a front spring remover.
Before replacing, to compare the effect, we will measure the distance from the floor to the wheel arch of the front wings before and after replacement with new springs, silent blocks and shock absorbers.
As we can see, the car has a skew of 1 cm on the right side, which is not critical.
Out of curiosity, let's measure the thickness of the new spring rod - if you subtract the painting, it is approximately 13 mm.
And the free length is 37.2 cm.
For work we will need:
- Keys and heads for 13, 22
- Central spring puller and ball joint remover (preferably)
- Crowbar or large screwdriver, hammer, wire brush
- WD-shka or other “liquid key”
We hang the car, remove the wheel, remove the shock absorber, loosen the nuts of the silent blocks of the levers, remove the stabilizer bracket and cushion - we will also replace it with a new one.
Now loosen the nut securing the lower ball joint pin to the steering knuckle and tear off the pin. We have already discussed how to do this earlier.
We place the puller plates under the maximum lower and upper coil of the spring and tighten until the lower end moves away from the cup and the tension between the levers is relieved.
It is worth keeping in mind that the puller is weak, the bearing under the lower plate fell apart when replacing the second spring, although it works well without it if you lubricate the washers. Production, it seems, is Kostroma.
Now we fix the upper lever with the hub assembly, remove the ball joint pin from the steering knuckle and lower the lever down, carefully remove the spring with the spacer.
Inspect the spring for damage. As we can see, there are traces of corrosion and interturn wear.
Let's measure the remaining length in the free state - compared to the new spring, there has been a shrinkage of about 1 cm.
Now, using a puller, we tighten the new spring, placing the cups approximately under the second turn from above and below.
We put a new rubber spacer on the spring and fix it with tape or tape so that the end of the rod rests against the recess on the spacer. We carefully place the spring between the levers, orient the lower end of the rod so that it rests against the recess on the metal cup of the lever.
Using a jack, insert the ball joint pin into the steering knuckle and tighten it.
Now we remove the puller and install the new shock absorber back.
Also, we put on a new stabilizer pad and fix it.
We tighten the silent blocks under load and put on the wheel.
Now let's re-measure the distance from the floor to the wing.
As we can see, the front suspension has risen by 3.5 cm, which shows us how much the old springs were already weakened - taking into account the length in the unloaded state, they lost about 2.5 cm in elasticity. Yes, and visually the lower arm has slightly changed its angle.
It remains to check the wheel alignment, since the angles of the levers have changed.
Subscribe! Good luck on the roads!
How to replace rear springs on a VAZ 2101 - 2107
- 183 6 175k
- 76 1 90k
A sure sign of the need to replace the rear springs on a VAZ Classic (2107, 2106, 2105, 2104, 2101) is sagging of the rear part of the body. Moreover, ground clearance is significantly reduced even at minimal loads.
Let us visually analyze the entire process of installing standard springs with medium spacers. You can also experiment a little and install springs with high spacers, but this is allowed if you install simple springs from 2101, their article number 21010-2912712-01, and not reinforced springs from 2102, article number 2102-2912712. What are the best springs to install on VAZ cars is described here.
Springs from 2102 are much higher than standard ones; if they are used in combination with high or medium spacers, they will most likely lift the car very much. Consequently, the travel of standard VAZ shock absorbers is not enough, which means you will also have to change the shock absorbers to longer ones, for example Moskvich ones. Part number: 402-2915006-A. Additionally, it will be necessary to carry out welding work to weld additional rings onto the shock absorber itself. But replacing conventional springs with cargo springs is necessary in cases where you load your Zhiguli every day.
The tools we need to carry out the work:
- two jacks, for example, “trapezoid” and “frog”;
- large screwdriver;
- two keys for 19;
- balloon wrench.
When it's time to replace
There are several signs by which you can determine that it is time to replace the springs. These signs are:
- Detection of damage and defects in the product design. This malfunction can be determined by visual inspection, but first you need to put the VAZ 2107 car on an overpass.
- Their significant subsidence. If the vehicle's ground clearance decreases significantly, this indicates sagging of the devices in question. Springs quickly sag in such cases when the car is used to transport heavy loads every day. Also, those cars that are used as taxis also require frequent replacement of the devices in question.
If you find a problem with the springs on a VAZ 2107, then you should replace them without delay. This will extend the life of other suspension elements and save money. It is recommended to replace devices in pairs, since replacing only one element will cause the body to skew, which will negatively affect driving. In some cases, spacers help when the springs have sagged but are not deformed. Experts believe that you should not get carried away with spacers, since the physical properties of a car with spacers are many times worse. As a result of such modifications, the suspension does not function correctly, which affects many factors: from control to comfort. Therefore, if necessary, it is better to replace the springs, both rear and front. We will learn how this is done on a VAZ 2107 from this material.
Replacing the front springs of a VAZ 2107
Replacing the front suspension elements on the “seven” is carried out according to the following scheme:
- First, you need to install the car on an inspection hole or overpass, and then begin to remove the wheels, having first jacked them up.
- The front shock absorber needs to be removed.
- The nuts that secure the lower arm to the axle are loosened.
- Using a second jack, you need to place it under this lever, thus adding the suspension load. This is done to make it easier to disconnect the stabilizer.
- At this moment, you can use special spring ties (if available) to secure the springs in a compressed state. This will make further removal actions much easier.
The front springs of the VAZ 2107 need to be changed in pairs, just like the rear ones.
Changing the rear springs on a VAZ 2107
Replacing the rear springs of a VAZ 2107 is carried out according to the following principle:
- Install the jack and remove the wheel.
- The pressure regulator rod in the brake system is unscrewed.
- The rear pipe tee bracket is unscrewed.
- The shock absorber fastener at the bottom is unscrewed.
- Jack up the car and thereby release the shock absorber and spring fasteners.
- Now you can remove the spring, which also has a rubber spacer. If the spacers are deformed, they should be replaced.
- Replace the removed springs with new ones, installing all the removed parts in the reverse order of removal. When installing products, it is important to purchase special ties, as shown in the photo below.