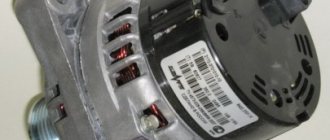
A car generator is a device that converts the mechanical energy of rotation of the engine crankshaft into electricity. The generator powers the vehicle's on-board network and recharges the battery after the engine starts.
During operation, generator breakdowns often occur. To solve problems, the 2110 generator is repaired or replaced. In both cases, the generator must be removed from the car. To do this you will need:
- remove the generator drive;
- unscrew the VAZ 2110 generator mount;
- remove generator 2110;
On the VAZ 2110, the generator can be removed quite simply, so all the work can be done with your own hands in a regular garage. Read more in our article.
Signs of a generator malfunction
The generator on the VAZ 2110 has an average resource of about 80-100 thousand km, after which failures in its operation are possible. There can be many reasons for breakdowns: generator bearings, brushes, windings, etc.
As a result of malfunctions, a weak current is supplied to the on-board network. In this case, it is important to pay attention to the following signs:
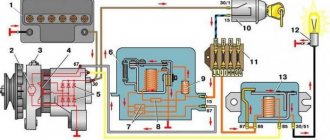
- a battery icon appears on the dashboard (indicating that the battery is not charging);
- when the lights are turned on, the headlights burn dimly or the light pulsates (unstable voltage);
- turning on additional equipment causes the dashboard backlight to dim;
- the load on the on-board network leads to the heater fan working weakly, etc.
These signs indicate that the generator is not capable of powering the on-board network; electricity is taken from the battery. It is also important to understand that when the generator fails or malfunctions, problems arise with charging the battery, as a result of which the battery quickly discharges.
Ultimately, the lack of spark at the spark plugs will cause the engine to stall. In such a situation, it is necessary to remove the generator, since after dismantling the device, you can disassemble the generator, check it, repair it (for example, replace the brushes) or completely replace it with a new or working device.
What types of breakdowns are common?
Most often, the generator for 8 and 16 valve VAZ-2110s fails as a result of moisture and dirt. Another reason is the wear of the components of this assembly, namely the brushes. Most often, the malfunction manifests itself as follows:
- the generator does not produce electricity;
- output current is either too high or low voltage;
- During engine operation, extraneous sounds are heard, most often a squeak or squeal.
The operation of the generator is checked using special stands or a digital voltmeter. If extraneous sounds are heard in the engine compartment area, then first of all you need to check the timing belt tension. Most often this is the reason, but after checking, remove the belt from the pulley and start the engine. The absence of noise is a reason to check the performance of the generator more carefully.
Where is the generator for 2110 located?
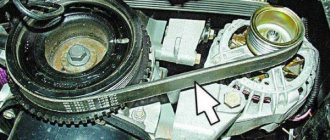
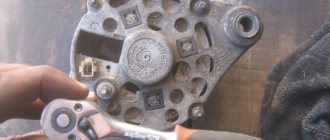
The VAZ 2110 generator is located in the engine compartment on the left side (located closer to the engine cooling radiator).
You can also notice that the engine crankshaft is connected to the generator using a belt. Let us add that the generator on the VAZ 2112 is located by analogy with the “ten”.
In terms of operation, the installation location is not the best, however, the location of the generator is quite convenient for servicing or removing the device. In practice, before dismantling, it is advisable to treat the generator mounting with a penetrating lubricant (such as WD-40).
Stages of work when removing the generator
So:
- first, the first thing you need to do is disconnect the battery and all the terminals that were connected to it;
- then use the steering wheel to turn the wheels to the right;
Replacing a VAZ 2108 generator with a 2110
- sometimes the engine has a crankcase protection; if there is one, it must be removed;
- unscrew all fastening nuts;
- there is a special tension screw on the bracket; it needs to be loosened;
- after which, it’s time to loosen the alternator belt; to do this, you will need to turn the alternator itself slightly to the side;
Replacing the VAZ 2108 generator from the VAZ 2110
- Now removing the belt is not difficult;
- there is a wire coming from terminal “D”, it must be unsoldered;
- wire “B” is secured with a nut, it also needs to be removed by first removing the rubber cap from the nut;
- it's time to unscrew the main tension screw;
- at the top of the generator there is a special fastener that must be temporarily removed in order to be able to remove the tension bar;
- Now you can remove the generator by first unscrewing the lower component of the fastening.
Generator replacement
If it is necessary to remove for repair or replace the 2110 generator, the replacement must be carried out on an inspection pit, lift or overpass. You can also jack up the front of the car and remove the wheel.
As for the tools, you will need to prepare:
- set of wrenches;
- spanners.
Also, always have penetrating lubricant and clean rags on hand. When removing the generator, especially if the 2110 generator is being repaired rather than replaced, try to prevent dirt, moisture, grease, technical fluids, etc. from getting inside the device.
The device is replaced as follows:
- drive the car into a pit or lift it on a lift;
- You need to remove the “negative” terminal from the battery (to unscrew the terminal you need a wrench 10);
- remove the right front wheel from the car;
- unscrew the crankcase protection fasteners (if equipped) and the boot;
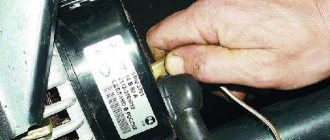
- Next, in the engine compartment of the car, you need to disconnect the wire connector from the terminal (unscrew the nut holding the terminals);
- the main task is to remove the “positive” terminal by moving the rubber cover to the side;
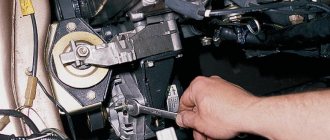
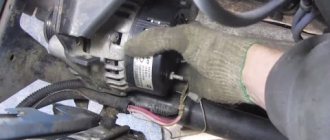
- Having disconnected all contacts, you need to loosen the upper and lower bolts securing the generator using a 13mm wrench;
- Use a 10mm wrench to loosen the adjusting bolt, thereby releasing the tension on the generator belt and remove the belt (then the bolt can be unscrewed completely and then removed);
We also recommend reading the article about how much the generator should produce to charge the battery. In this article, you will learn how to check your car's alternator and how efficiently it can charge the battery. - the generator mounting bolts can now be completely unscrewed with a 13mm wrench (if the bolt cannot be removed from the generator, you can try to carefully knock it out with a hammer),
- normally the top mount and tension bar are removed;
- if difficulties arise, you need to go down under the car and unscrew the bolt nut, pull the bolt out of the hole;
- Next, the generator needs to be lifted, after which the generator can be completely removed from the car;
By removing the generator on the 2110, you can troubleshoot the device, repair it, or completely replace it. Having prepared the generator, installation is carried out in the reverse order of removal.
Replacement process detailed instructions
We will look at options with 8- and 16-valve engines, which are present in the VAZ 2112 and 2110 models. Regardless of the number of valves, the same set of tools will be required for replacement. The list includes standard tools that can be found in almost every driver's garage.
Timing belt for VAZ 2110 16 valves
In addition to the timing belt itself and the roller for the VAZ 2110 or 2112, you will need:
- a special key that regulates the degree of tension of the roller;
- spanner set to “17”;
- key to “15”;
- key to “10”;
- installation, as an alternative - a powerful screwdriver.
Replacement on an 8-valve engine
Replacing the VAZ 2110 8 valve timing belt is as follows:
- First of all, we de-energize the battery - for this you need to get the negative wire;
- We unscrew the bolts that hold the timing belt protective casing, and then remove the casing;
- On the passenger side, it is necessary to remove the engine compartment mudguard along with the protective element and the right wheel;
- Our task is to ensure that the marks on the cover and, accordingly, on the pulley match, as indicated in all the diagrams. To do this, you need to twist the part clockwise;
- We go to the gearbox and remove the plug from it;
- We need to check the alignment of the marks in this hole;
- We block the flywheel - for this you can use a mounting tool or a powerful screwdriver;
- Now you can remove the timing generator pulley;
- We got to the nut that holds the timing belt pulley - it needs to be loosened, but not unscrewed;
- Now we have reached the required element of the VAZ 2110 or 2112 timing belt. Now it can be removed. All parts that it covered must be cleaned with detergent. After removing dirt, the area should be wiped with a clean rag;
- Next, a new timing belt and tensioner roller are installed - follow the direction indicated on the arrow. Sometimes it happens that the manufacturer does not indicate the arrows, in which case, you need to place the element so that the inscription is read from left to right;
- To tension, you need to turn the roller counterclockwise.
- The next step is to test the timing belt and its tension. You need to check the element with a cold engine, and the temperature in the garage or box should be within +15-+30C. We start the engine and inspect the timing belt.
If there are no unnecessary sounds or vibrations, then all the elements can be installed back - these are the wheel, casing and mudguard.
Replacement on a 16-valve engine
Despite the fact that there are more valves, replacing the timing belt is no more difficult than on the version with 8 valves. So, replacing the VAZ 2110 16 valve timing belt is performed as follows:
- As in the case of the VAZ 2110 or 2112, where there are 8 valves, we need to dismantle the belt protection. It is held in place by 6 bolts.
- Next, you need to remove the chip from the crankshaft sensor - unscrew the mount and take out the sensor itself. For clarity, you can study the photo.
- If you dismantle the gas distribution mechanism yourself, then you probably noticed the absence of one tooth. This is done so that the sensor can independently find the dead center. This feature can also be used to lock the crankshaft.
- Blocking can be done when a tube of a suitable size is placed in the hole under the sensor. Now the pulley is blocked, as a result, it can be safely dismantled.
- Next, the work scheme is practically no different from removing the 8-valve timing mechanism with your own hands - loosen the roller fastening and remove the faulty or worn belt.
- There are two ways to install a new element: remove the tension roller and then install the belt along with it, or do it by turning the camshaft.
- When the new element is installed, you can return everything to its original position. You should start by fastening the pulley - tighten the bolt and align the gear - the marks on the oil pump will help with this. If they are missing, then you can make a mark yourself.
- The parts must be combined carefully, since the timing gear should not get knocked out.
- Using a special wrench, we must tighten the belt. Not everyone has such a wrench, but as an alternative you can always take a powerful screwdriver and two nails. It is also worth remembering the nut, which must be tightened tightly.
- We check the tension; the rubber should move away from the gears, but there should be no folds.
- All that remains is to turn the crankshaft 2 times and make sure that the marks remain in the same place - the work is completed
Check the gas distribution mechanism every 10 thousand kilometers, and then you will not have to spend money on expensive repairs.
Recommendations
- Considering that the generator is secured with bolts, it is important to monitor their condition. When removing, experts recommend treating the bolt with copper grease or any other suitable lubricant. In the future, this will make it easier to remove the generator, since the fasteners will be easier to unscrew.
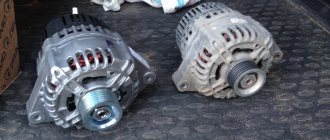
- If the alternator belt has defects (stretched, cracks are visible), it is optimal to replace it with a new belt. In other words, replacing the belt is carried out in parallel with replacing or repairing the generator itself.
- When installing a new belt, it is important to correctly place the alternator belt on the pulley and adjust its tension. The generator belt is tensioned using an adjusting bolt.
When replacing the belt, it is necessary to tighten the alternator belt so as to avoid overtightening or sagging. It should be remembered that incorrect tension can lead to squeaks and whistles of the alternator belt, a reduction in its service life, as well as malfunctions of the device itself.We also recommend reading the article about what to do if the alternator belt whistles or the alternator belt whines. From this article you will learn why the accessory belt makes a whistling sound, as well as what to do if the generator belt starts whistling.
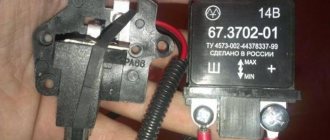
- Lack of battery charge (battery icon on the instrument panel is lit) is not always directly related to the generator. Often the relay regulator may fail, the contacts and terminals of the generator may oxidize, problems may arise with the terminals on the battery, etc. For this reason, before starting work with the generator, it is necessary to carry out diagnostics using a multimeter and clean the terminals, connectors and contacts.