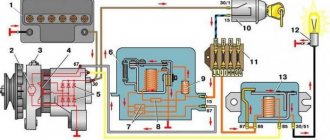
The supply of electricity to all consumers of the VAZ 2101 is carried out using two sources. The battery supplies the car with electricity when the engine is not running, and the VAZ 2101 generator provides power to instruments and devices when the engine is running, as well as charging the battery.
The electrical system of the VAZ 2101 is designed according to a single-wire circuit. This means that only one wire goes to each on-board consumer, coming from the positive contact of the battery. The connection to the negative contact is made through ground, that is, the body of the VAZ 2101 car. The connection diagram for the VAZ 2101 generator is also single-wire.
Repair of VAZ 2101 generator: disassembly, cleaning, replacement of parts
We will consider in detail the process of disassembling, cleaning, replacing failed parts, assembling and installing the VAZ 2101 generator . In the example below, model 37.3701 will be disassembled; model G222 is very similar to it.
Spare parts that are useful for performing the above processes:
- Andycar brand bearings;
- generator capacitor;
- diode bridge;
- nuts for 8 (4 pieces);
- relay-regulator (if it needs to be replaced).
Replacing the unit
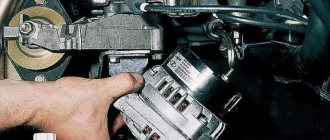
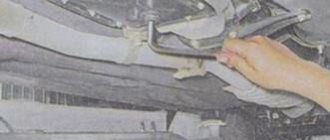
It is not difficult to remove the generator from the classic Zhiguli model. But it is mounted at the bottom of the engine compartment, under the engine, and must be removed from below. This means that you will need an inspection hole or overpass. The preparatory operation consists of placing the car in a pit and removing the engine crankcase protection, if any. It is also necessary to open the hood and remove the negative ground terminal of the battery. Now everything is ready for removal.
The work is performed in the following order. Disconnect the generator of your VAZ 2101 from the vehicle's electrical system. Unscrew the nut securing the positive wires to the generator. Disconnect the brush connector and the diode bridge connector.
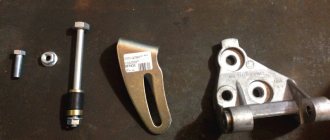
Unscrew the nut securing the unit to the adjustment bar a couple of turns. If possible, use a socket head and an extension with a universal joint. Tilt the generator so that the belt sags on the pulleys of the crankshaft, water pump and VAZ 2101 generator. Remove the belt.
Go down into the pit. Using a 19 mm wrench, unscrew the large fastening nut. The bolt that secures the unit is located at the very bottom of the engine compartment and is exposed to wind and water, snow and dirt, so it often sticks. Knock it out with a hammer. Carefully remove the generator from the VAZ 2101.
If repairs are expected, proceed to it. Replacement is planned - mount the generator on your VAZ 2101 in the reverse order. To connect, connect the plugs and tighten the nut securing the wires.
Required tools:
- a universal puller necessary to remove the bearing (it is possible to use a rod puller, but this is not so convenient);
- metal brush, sandpaper with a cloth base;
- hammer;
- penetrating fluid WD-40;
- standard set with keys and screwdrivers.
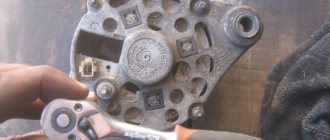
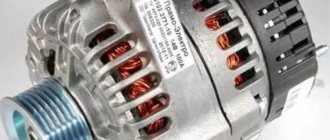
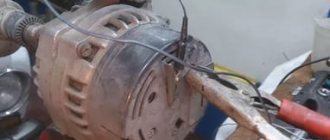
In the photo you can see a VAZ 2101 generator before repair. After repair, changes in it will be obvious.
Repair of VAZ 2101 generator: disassembly, cleaning, replacement of parts
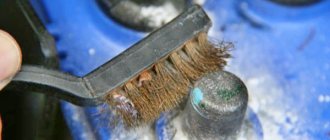
- Clean the generator from accumulated dirt, dust, and oil.
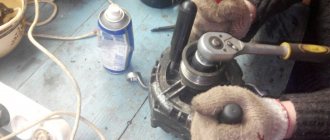
- Position the generator so that the pulley rests on the floor, unscrew the pulley nut, and put a key on it at “19”. Next, hit the key with a hammer several times, holding the pulley from turning.
- Using a “10” wrench, unscrew the 4 bolts of the tie rods connecting the generator into one piece.
- Install the generator so that the shaft is on top, knock out the key with a chisel, hitting it with a hammer.
- Remove the front cover of the generator. If this cannot be done easily, you need to knock it out by weight.
Worth checking out:
- Remove the control relay from the generator.
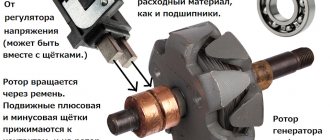
- Use a hammer to knock out the rotor using the hole under the relay.
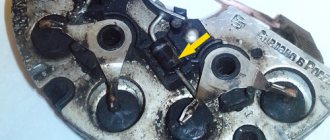
- Using a socket wrench set to “8”, unscrew the 3 nuts that secure the stator of the diode bridge. If the bolts turn, you need to fix them with pliers on the other side.
- Before removing the stator, treat the joints with WD-40 penetrating fluid. Wait a few minutes, then carefully knock it out with a hammer. After removing the stator, remove the diode bridge. Unscrew the condenser and use a universal puller to press out the rear rotor bearing.
- Remove the front cover and tie plates. Damage to the bolts installed there is possible, so it was necessary to prepare 4 “8” nuts in advance.
- Remove the plates and press the bearing through the frame.
Also check out
Now the VAZ 2101 generator is disassembled, all its parts need to be cleaned and washed (for this you should use sandpaper, a knife, or a wire brush).
The photographs show a 1996 model, but since that time the location of pin 61 has changed. On the old diode bridge the contact was placed on a wire, on the new one it is directly soldered into the bridge.
Worth checking out:
Next, the generator assembled in the reverse order. The rotor is reinstalled using hammer blows. At the very end of assembly, it is important to lock the bolts.
Recommendation: if the capacitor seating surface is sanded, the contact will improve and become more stable.
Car owners who have an outdated version of the diode bridge installed may encounter difficulties with the output of pin 61, because it is difficult to fit into the hole on the back cover. One way to solve the problem is to enlarge the hole with a file.
After all the above steps have been completed, the repair of the VAZ 2101 generator can be considered complete. Next, you need to install it on the vehicle and test it in action.
Disassembling and assembling the device
How to disassemble the mechanism with your own hands for further repair?
Detailed instructions for disassembling the generator are presented below:
- First of all, the device is dismantled from the engine compartment; after removal, it should be cleaned of dirt. To do this, you may need a compressor and a rag soaked in kerosene.
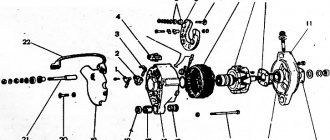
- The pulley itself is removed from the assembly using a special puller. To remove this element, you need to unscrew the nut and, having secured the puller in advance, compress the pulley itself. The key together with the conical washer can be removed.
- Next, the nuts are unscrewed from the coupling screws, there are four in total, after which the back cover can be removed. The rotor element is removed from the installation site.
- After this, the nuts are unscrewed, which secure the tips of the diode components with the contacts of the stator windings. Next, you need to remove the plug from the central contact of the device winding from the blocks and disconnect the stator element from the cover.
- After performing these steps, the screw nut that secures the rectifier unit is unscrewed. The disassembled mechanism must be repaired or replaced. Further assembly steps are carried out in reverse order.
Loading …
Tuning the “classic” series VAZ 2101 – VAZ 2106 – replacement of the standard generator
In general, it would be unfair to accuse the generator of the G-221 model, previously installed on VAZ 2101 - 2106, of low reliability or of the fact that it cannot cope with providing energy to the car in its basic configuration.
At the same time, it should be recognized that the maximum 42A produced by this generator cannot be considered too impressive and already on the VAZ 2106 model, in which the high beam, compared to previous versions, is “heavier” by 100W, the characteristics of the G-221 are at the limit . If we talk about even minimal tuning of classic VAZ cars, such as installing additional electricity consumers in the form of powerful fog lights, a modern sound system, heated mirrors, etc., then you can practically forget about regular battery recharging using the G-221. The optimal solution in this situation is to replace the G-221 generator with its more powerful analogue. Replacement options for G-221
Time does not stand still, and choosing a sufficiently powerful new energy source for the VAZ 2101 - 2106 is not so difficult.
The first simple and affordable way to solve this problem is to install a generator from a VAZ 2105, which is capable of delivering a maximum current reaching 55A. In general, this is not so much, but to provide power for a small amount of additional equipment, such indicators may be quite enough. When installing such a generator, you do not need to perform any modifications to the mounting. Certain changes will only have to be made to the option of connecting the generator to the on-board electrical network. This need is associated with different placement of the regulator relay (on the “five” generator it is combined with the brush assembly, and on the G-221 it is placed separately).
DIY diagnostics
We figured out how to connect the generator and what is the charging circuit for the VAZ 2101, now let’s talk about diagnostics. There are quite a lot of malfunctions of the generator unit on the “penny”. The generator brushes, generator pulley and other structural elements can fail.
To check the generator unit on a VAZ 2101, you can use several options:
- Diagnostics with the engine running. You need to start the car, if the indicator on the dashboard lights up, you should pull out the choke and increase the speed of the power unit to one and a half thousand. in a minute. Then disconnect the negative terminal from the battery for two seconds, and if at this moment the engine stalls, then the mechanism is inoperative and needs to be checked. Do not disconnect the battery for more than a few seconds, as this will cause the diode bridge to become inoperable.
- Another verification option is to use a tester. This option allows you to determine the performance of the brushes, as well as the field windings. To do this, you will need to disconnect all the wiring that goes to the mechanism and diagnose the resistance. Using a tester, measure the resistance between pin 67 and the device body. The unit is serviceable if, during the test, the resistance level was in the region of 4.2-4.7 Ohms at a 20-degree room or air temperature. If the indicator turns out to be different, then most likely the generator brushes need to be replaced.
- The easiest way to check is this: connect a multimeter to the battery terminals and start the car. If the generator is working, then there will be charging, and if not, then there will be no battery voltage (the author of the video is the Pavel Pavek channel).
Do-it-yourself repair of the VAZ 2101 generator: disassembly, cleaning, replacement of parts
This article describes in detail the process of repairing a VAZ 2101 generator with your own hands - disassembling, cleaning, replacing non-working parts, assembly and installation. The generator repair will be carried out on model 37.3701 (it is almost identical to the model G222).
To rebuild a VAZ 2101 generator you will need the following spare parts:
- Andycar bearings;
- Generator capacitor;
- Diode bridge;
- Nuts for 8 (4 pcs);
- Relay regulator (if there is a need to replace it).
I decided not to change my relay regulator, because its condition suits me quite well.
Connection diagram for Generator 2101
This usually happens when the generator is faulty, when electrical appliances are powered from the battery. Most often, the light comes on for the following reasons: Slipping of the V-belt on the generator pulley.
Horn switch. But still it must be considered part of the structure. GENERATOR AND RELAY 702 FOR INDICATION OF GENERATOR OPERATION
Disassembling the stator and rotor Next, remove the rotor assembly with the rear bearing from the front cover.
When the motor is not running, the readings should be within 11.6 V.
The generator brushes, generator pulley and other structural elements can fail. But still it must be considered part of the structure.
Direction of rotation - right on the drive side Maximum output current at 14 V and rotor speed min - 42 A Maximum rotor speed - 13 min Gear ratio engine-generator - .04 The generator rotor is driven by a V-belt from a pulley mounted on the crankshaft motor shaft. Considering the simplicity of the “penny”, to troubleshoot the problem you only need a multimeter and the ability to use it.
VAZ generator
Replacing a VAZ 2101 generator with a VAZ 2109 generator (Excitation connection diagram)
Tools you will need:
- A universal puller for removing the bearing; as an option, you can use a rod puller, but I warn you, this is very inconvenient;
- Also find a good metal brush and a cloth-based sandpaper;
- Hammer;
- WD-40;
- Standard set of wrenches and screwdrivers.
This is what the VAZ 2101 generator looked like before repair, remember it like this, because after the overhaul it will change beyond recognition