Replacing the steering wheel of VAZ 2113, VAZ 2114, VAZ 2115
Welcome! Steering wheel - many people change it to replace it with a new one, more beautiful or more convenient, but sometimes there are also people who change the standard steering wheel to a sports version, it’s up to you to decide whether to do this or not, but in a good frontal collision there will be a greater chance of squeezing in a car that has a factory injury-safe steering wheel, not a sports jelly, in addition, the size of the steering wheel also plays a very important role, so when buying a new steering wheel at a car store, pay attention to the size (the larger it is, the easier it will be for you to turn the steering wheel but if it’s too big, it won’t be comfortable for you), and also look at its thickness (with a steering wheel that’s too thin, your hands can slip off during a sharp turn, and turning such a steering wheel will be less convenient).
Note! In order to change the steering wheel, you will need to stock up on: Screwdrivers, as well as an extension or a wrench, you will need to put on a socket head of size “24”, thanks to this head you will be able to unscrew the central nut securing the steering wheel to which without an extension and You can’t really get to the collar, so you obviously can’t do without them; in addition, take a hammer and a special drift made of soft metal for the same central steering wheel mounting nut!
Summary:
When should you change your steering wheel? At your discretion, but we will give you a couple of tips, if you decide to change the standard steering wheel to a sports one, we do not recommend that you do this, firstly, as was said earlier, sports steering wheels are stiffer compared to standard factory ones, and even technical inspection You may not even be able to get through with such a steering wheel, so think for yourself whether you need it or not, in fact, it is best to install a standard one, which was originally installed from the factory, but the latest cars of the Samara 2 family were equipped with injury-safe steering wheels from the VAZ 2110, think about installing them or change it to the native one from Samara 2.
Note! The steering wheel has a metal part of which it is attached to the shaft with a nut, this metal part can be deformed if you pull the steering wheel hard and try to somehow break it (Don’t think that it is impossible to break it on a car), then most likely this part will be deformed and after this it will become much more difficult and inconvenient for you to turn the steering wheel, in general, when you encounter this, you will immediately understand that in the video at the very end of the article, by the way, the metal part at the steering wheel is also broken!
Dismantling process
There is electronics inside the steering wheel - the signal of a VAZ 2114 car, so first of all you need to disconnect the negative terminal of the battery. By turning the front wheelset to the “straight” position, you can begin dismantling:
- The first step is to unscrew the seven screws on the covers located under the steering wheel. Once the fasteners are removed, the lower casing can be detached. The top section should only be removed when the steering column is pointing down;
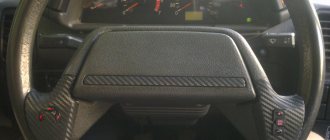
Remove the cover - After this, you need to remove the decorative trim. It has no fastenings, so it can be removed with a flat-head screwdriver. This must be done carefully, as the plastic here is fragile. Under the cover there will be two screws that hold the signal button - this also needs to be removed;
- Next, you should unscrew the steering wheel fastening nut so that it stays on the shaft, that is, you do not need to completely remove it;
Unscrew the 2 bolts located behind the removed cover and remove the cover and remove the plastic component - When the last fastening is removed, the steering wheel can be knocked down with a sharp blow and removed. In this case, a rubber hammer will help, as it will not damage the surface of the steering wheel.
Important! The steering wheel in the VAZ 2114 sits tightly on the spokes, so with a sharp jerk the parts may be damaged. When the hub is removed from the spokes, you can finish the fastening nut.
Installing the steering wheel is done in the reverse order. An important point is the pointer switch ring. When installing, it must be rotated so that the pin can fit into the groove of the ring. If a non-standard product was purchased as a replacement, then the process is the same; the only differences can be in fastening and fixing.
How to replace the steering wheel on a VAZ 2113-VAZ 2115?
Note! Do not forget that the signal of the car is an electrical part, so if you do not remove the negative terminal from the battery, then when you unscrew the central nut of the steering wheel using a metal head, the car will beep and to prevent this from happening, remove the terminal at the beginning, on how to do this, read the article: “Replacing the battery on a car” read point 1, in addition, remove the key from the ignition and turn the steering wheel all the way until it locks! (Also use a marker to place a mark on the steering wheel itself when it is in the locked position, and also install one on the instrument panel so that the marks are opposite each other)
Removal: 1) At the very beginning of the operation, use a screwdriver to pry up the trim that runs along the entire long steering wheel cover and then disconnect it, this trim, as you can see in the photo below, is attached to plastic holders, so it will not be difficult for you to disconnect it, but just be careful not break it, otherwise you will have to buy a new one, although you will most likely have it on the new steering wheel.
2) Now, using a Phillips screwdriver, unscrew the two central screws that secure the steering wheel cover, and when these screws are unscrewed, remove the cover.
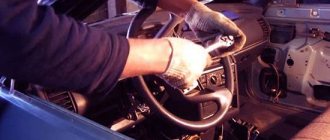
3) Then, using an extension or a wrench with a cap on it, unscrew the same central nut (Indicated by the red arrow) that secures the steering wheel to the shaft, but you don’t need to unscrew this nut all the way, otherwise when you pull the steering wheel off the shaft, this nut will inertia will fly towards you and injure you in the end, so unscrew it only a few turns and then grab the steering wheel with your hands and rocking it, remove it from the shaft on which it sits, and then unscrew the nut all the way and calmly remove it without any effort steering wheel from a car.
Note! In the event that it sits dead, then take a hammer and a drift made of soft metal, in addition, stock up on an assistant (It will just be difficult without him), your actions: Hit the hammer made of soft metal with a hammer, this drift should be directed towards you and is pressed against the end of the steering shaft along it, then you will need to carry out the beating using a drift, and at this time let the assistant pull the steering wheel towards himself trying to pull it off the steering shaft!
Installation: If your new steering wheel is exactly the same as the previous one, you need to install it as follows: first, transfer the mark from the old steering wheel to the new one, then install the new steering wheel in its place so that the mark on the steering wheel and on the instrument panel match , in addition, screw the central nut of the steering wheel fastening by hand, or push it into the head, but so that it does not fall out of the head, insert something between the head and the nut, for example, as shown in the photo below, the strands from the wire can be inserted.
Note! If you choose the option with inserting wire strands, then in this case, too, you will only need to screw the nut, when it is pressed slightly onto the steering shaft, remove the wire strands from the coupling head and then completely tighten the steering wheel fastening nut, if after all done operations, the steering wheel is crooked, then perform all the operations again!
Something else we didn’t tell you is that if you need to change the contact ring of the horn (Usually, when it fails, the car’s signal stops working), then it is attached to only three screws by unscrewing which you can easily remove it, but when you be careful when pulling on it, there’s just a wire terminal connected to it from the bottom, you’ll see it right away, you’ll also need to disconnect it from the slip ring!
Steering rack bulkhead
1. Using side cutters or any other suitable tool, cut off the plastic clamps on the sides of the protective casing.
After this, the casing can be easily removed. We inspect it for damage. The presence of tears or cracks is unacceptable, since water and dust enter the rack and pinion mechanism through them.
2. The side protective caps are also secured with plastic clamps. After cutting the clamp, the caps can be easily pulled off. They are visually inspected for damage.
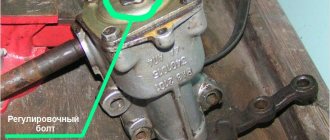
3. It would not be superfluous to check the steering rack for wear in the gear-river pair. To do this, hold the rail with your hand at the place where the rods are attached and try to rotate the mechanism shaft left and right. The presence of play may indicate wear or incorrect adjustment in this unit.
4. For further work you will need a specialized key for VAZ cars. It is usually sold as a dual-use device: on one side there is an octagon for adjusting the rack or unscrewing the adjusting screw, and on the other side for tensioning the timing roller.
If this key is not available, then you can use any suitable octagon.
If the steering rack has not been adjusted or disassembled, it is quite difficult to turn the adjusting screw for the first time. In the factory conditions, after adjustment, this screw is cored.
5. After unscrewing, remove the sealing and retaining rings, the spring and the stop. The stop is one of two points of support for the rack itself in the body. Therefore, the performance of the entire mechanism directly depends on its condition.
The working surface must be smooth, without burrs or other damage. The sealing ring should also not be damaged.
6. To further disassemble the steering rack, it is necessary to remove the steering gear boot. It fits tightly on the body; there are no special fastenings. We also inspect it for cracks or any other damage.
7. Remove the lock washer. Unscrew the bearing nut. To do this you will need a special octagonal key.
- Then remove the O-ring and washer.
- Next, you need to remove the steering shaft. It is not set very tightly, so a little effort is enough.
- The condition of the ball bearing is checked.
- If the bearing is worn, it must be replaced. It fits tightly onto the shaft.
- The old one can be knocked off using a tool or by carefully hitting the outer ring with a hammer.
- Press the new one through a tubular adapter in a vice or on a press.
- It is not recommended to hammer a new bearing, as this will negatively affect its service life.
8. Remove the support needle bearing. To do this, use a screwdriver or an awl to carefully lift it and pull it out of its seat. If it also shows signs of wear, place a new bearing in the groove.
9. Take out the rail itself. After disassembling the steering mechanism and removing the stop, it easily comes out of the housing. Here it needs to be cleaned of any remaining old grease and carefully inspected.
The teeth should not have chips or other damage. There should be no burrs or areas where metal-to-metal friction occurred on the rack shaft itself. If such defects are present, the steering rack needs to be replaced.
There are options for grinding the shaft, but not all car repair shops undertake this. And the economic feasibility of this procedure is questionable.
10. The bushing is dismantled. To remove it, you must first move it from its seat. Using a flat-head screwdriver, hook it onto the edge from one of the edges of the case and apply light pressure until it detaches from the mounting groove.
After this, the bushing can be carefully crumpled in the body and pulled out through the hole for attaching the rods.
The bushing is one of the weakest points in the steering rack design. Plastic material wears out more intensively than metal, and backlashes appear.
11. Replacing the steering rack bushing begins with installing rings on the new bushing. After this, the sleeve is pushed through the side hole into the body until it rests against the locking lip.
Next, use a screwdriver to carefully twist the bushing through the hole for attaching the rods until it is installed in its working position. Most often, the steering rack knocks precisely because of a broken bushing
12. After disassembly, all elements are washed in a solvent or any other liquid composition to wash oily parts.
When using a repair kit, it is better to replace all elements rather than individual parts. Assembly is carried out in reverse order.
AVTOTRUE.RU
- Home
- Video
- How to Remove the Steering Wheel on a VAZ 2115 Video
The VAZ 2114 and VAZ 2115 cars are part of the Lada Samara family. Their control wheels are not distinguished by graceful lines and ease of use, especially in earlier models. There is no need to talk about aesthetic pleasure here. It is clear that the owners of these cars probably feel the desire to replace the steering wheel with a part with the best design. But how to choose a suitable steering wheel, and is it possible to remove and install it at home? Let's try to figure it out together.
Dismantling the control wheel on the VAZ 2114 and 2115 is done in a similar way. But remember that according to the Code of Administrative Offenses, changing to a steering wheel that is different from the unusual one is considered an illegal modification to the control structure and control system of the car. Such tuning falls under Part 2.7 of Article 12.5 of the Code of Administrative Offenses on driving a vehicle in the presence of defects or a criterion when its operation is prohibited. Nowadays, traffic police officers are quite zealous in catching violators of this article, so think carefully before starting the change process.
If you set a goal to remove and finally install a new control wheel, the following tools will be useful to you:
- new steering wheel (make sure the selected part is suitable for your car);
- set of screwdrivers with straight and Phillips slots;
- 24 mm socket head;
- pencil or marker;
- hammer (sometimes);
- a drift made of soft metal (included with the hammer);
- wire strands (sometimes).
Please note that upon completion of all work, you will have to remove traces of a pencil or marker from the steering wheel cover and front panel. To avoid problems with the next cleaning, consider the coating material of these parts of the interior. It makes no sense to use permanent, or as they are also called - indelible, markers, especially if the parts are covered with high-quality natural leather in a light color. The easiest way to remove marker is on an aqua base. However, it is better to use an ordinary pencil: it can be erased with an ordinary eraser.
How to remove the steering wheel in 2 minutes on a VAZ 2114/2115/2110
There is a signal inside the steering wheel that receives power from the battery, so you first need to turn off the power to the car. For this purpose, you simply need to reset the negative terminal. After which you can safely begin the dismantling process.
- Remove the ignition key from the lock.
- Turn the control wheel so that the system that locks the control shaft is activated. Your steering wheel is now locked in a straight position.
- In order to then correctly install the new part while maintaining control accuracy, apply a mark to the control wheel with a pencil. Place a similar mark on the dashboard right next to it.
- Using a straight screwdriver, pry the cover with the Lada inscription on the steering wheel and remove it. This element is attached using ordinary plastic fasteners, so removing it will not be difficult. But due to the narrow plastic, the part simply breaks. If you intend to continue using the old steering wheel, be careful.
- Under the cover you can see two screws. They hold up the steering wheel cover. Unscrew them using a Phillips screwdriver and then remove the cover.
- A large nut is visible in the very center of the structure. It should be unscrewed using a 24 mm socket.
- It's just that the control wheel doesn't hold anything. If you set a goal to remove it, grab the steering wheel with both hands and personally pull each side towards you in turn. There is no need to be diligent. If the part has not been dismantled before, it will be quite difficult to move. Do not try to remove the part in one jump: you may get injured.
- If attempts to remove the control wheel using the method described in point 7 are not successful, use a small hammer and drift. In addition to additional tools, you will need an assistant. One person from the pair must personally pull the steering wheel, and the second person must hit the drift attached to the end of the control shaft with a hammer.
Experts advise not to turn the central nut one hundred percent, because it can protect you from serious injury for which the steering wheel is designed to suddenly break off. Make a few turns while performing step 6, and when the part comes off the control shaft, unscrew it completely by hand.
Using this simple method, there is an option to dismantle the steering wheel on the VAZ 2114 and VAZ 2115.
If you decide to replace the old steering wheel, it means that its appearance did not suit you in some way. This may be due to breakdown or external damage, but even in this case, you should consider the option of installing third-party models. What if you like one there and not just the old helm?
How to remove the steering wheel?
Dismantling the steering wheel on VAZ 2114 and 2115 is carried out using the same method. However, remember that according to the Code of Administrative Offenses, replacing a steering wheel with a steering wheel different from the original is considered illegal modification of the steering structure and vehicle control system. Such tuning falls under Part 2 of Article 12.5 of the Code of Administrative Offenses on driving a vehicle in the presence of malfunctions or conditions under which its operation is prohibited. Recently, traffic police officers have been quite zealous in catching violators of this article, so think carefully before embarking on the replacement process.
The standard VAZ 2114 steering wheel looks unattractive, so someone may want to replace it
Required Tools
To remove and then install a new steering wheel, you will need the following tools:
- new steering wheel (make sure the part you choose fits your car);
- set of screwdrivers with straight and Phillips slots;
- 24 mm socket head;
- pencil or marker;
- hammer (in some cases);
- a soft metal drift (included with the hammer);
- wire cores (in some cases).
Steering wheel removal process
There is a signal inside the steering wheel that receives power from the battery, so the first thing you need to do is turn off the power to the car. To do this, you just need to disconnect the negative terminal. After this, you can safely begin the dismantling process.
- Remove the ignition key from the lock.
- Turn the steering wheel so that the system locking the steering shaft is activated. Your steering wheel is now locked in a straight position.
- In order to subsequently correctly install the new part while maintaining control accuracy, apply a mark to the steering wheel with a pencil. Place a similar mark on the dashboard right next to it.
- Using a straight screwdriver, pry the cover with the Lada inscription on the steering wheel and remove it. This element is attached using ordinary plastic clips, so removing it is not difficult. However, due to the thin plastic, the part breaks easily. If you plan to continue using your old steering wheel, be careful.
- Under the trim you will see two screws. They hold the steering wheel cover. Unscrew them using a Phillips screwdriver and then remove the cover.
- In the central part of the structure you will see a large nut. It should be unscrewed using a 24 mm socket.
- The steering wheel no longer holds anything. To remove it, grab the steering wheel with both hands and pull each side in turn. There's no point in trying. If the part has not been dismantled before, it will be quite difficult to move. Do not try to remove the part with one jerk: you may accidentally injure yourself.
- If attempts to remove the steering wheel using the method described in point 7 are unsuccessful, use a small hammer and drift. In addition to additional tools, you will need an assistant. One person from the pair should pull the steering wheel, and the second should hit the drift attached to the end of the steering shaft with a hammer.
Removing the steering wheel for VAZ 2114 and VAZ 2115
First of all, you need to remove the cover
The screws under the trim should be unscrewed
using a 24mm socket you need to unscrew the central screw
If you cannot remove the steering wheel by hand, use a hammer
Experts recommend not turning off the central nut completely, as it can protect you from serious injury in the event of a sudden break of the steering wheel. Make several turns while performing step 6, and when the part comes off the steering shaft, unscrew it completely by hand.
How to remove the steering wheel on a VAZ 2114 video
The steering column on VAZ 2113, 2114 and 2115 cars is completely identical and the removal or installation procedure will not be any different. Of course, this design already provides for height adjustment of the steering wheel. It is for this reason that many owners of old Samara, VAZ 2109, 2109, 21099 want to install the shaft assembly from the new models.
In order to remove the steering shaft assembly on the VAZ 2114 and 2115, we will need the following tool:
- chisel
- hammer
- 13 mm head
- ratchet and extension
What kind of steering wheel can I install?
There are many options for steering wheels that can be installed on the VAZ-2113, 2114, 2115. The main thing is to choose the right mount for the central shaft.
When choosing a steering wheel, you should pay attention to:
- dimension, shape;
- type of fastening, product material;
- additional features that can be connected.
Sports models
Tuning enthusiasts want to make their car as individual as possible, and therefore they rush to install decorative trims on it, change body kits and bumpers, and attach steering wheels from famous brands of racing cars. The result is a fashionable car that attracts the attention of passers-by. By reducing the diameter of the steering wheel, the maneuverability of the car increases, there is enough space inside the car for a comfortable fit.
Example of a sports steering wheel model
However, installing a sports steering wheel has its disadvantages:
- the design does not include an airbag;
- For fastening, special clamps or adapters are required.
Adapter for mounting a sports steering wheel
Important! If you want to install a sports steering wheel, you can contact the sales points of such parts. Experts will tell you which product should be installed on a specific car.
Steering wheels from other VAZ car models
For models 2113, 2114, 2115, copies from more modern representatives of the domestic ones, Kalina, Grant, are suitable. They are more convenient and have an aesthetically attractive appearance. Installation of such products requires replacing the steering column column. The “steering wheel” from model 2110 fits perfectly.
What you should know when choosing a steering wheel
When changing the steering wheel on VAZ-2114 and 2115 cars, you need to select a similar product with an identical contact group. The diameter of the control element affects the quality of vehicle control. The smaller the size, the more effort required when driving.
Choosing the right steering wheel is not an easy task. In cases with non-original products, the installation process may take some time, taking into account the selection of appropriate components. It all depends on the desires and capabilities of the car owner himself.
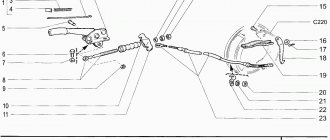
Removing and installing the steering column on VAZ 2114 and 2115
So, first of all you need to do the following:
After all this, we get something like the following picture:
The column is secured with two studs and nuts in the front, and two bolts with breakaway caps in the rear. Of course, round caps are unscrewed using a chisel and hammer:
When the bolt rotates without much effort, you can finally unscrew it by hand.
Before unscrewing the front fastenings, you can immediately unscrew the pinch bolt securing the cardan shank to the steering rack.
Now you can proceed to the front column mountings. Using a 13 mm deep socket and a ratchet handle, unscrew the fastening nuts, as is clearly shown in the photo below.
Now the shaft assembly is attached only with splines to the steering rack. To pull it off, you need to use a chisel to widen the edge a little, and then try to rip the column towards you. To experience fewer problems, you can put the steering wheel on the shaft, tighten it lightly with a nut, and sharply pull it towards you. Usually, in this case, removing the column is much easier.
The result of the work done is shown clearly below.
Installation occurs strictly in reverse order. The price of a new speaker starts from 3,000 rubles.
Hello dear readers of the blog “Autoepoch.ru”. Today I want to tell and show how to remove the steering wheel on a VAZ 2114. Such a need may arise for several reasons, for example, the old steering wheel has worn out, there is a desire to replace the factory steering wheel with a sports version, or it is simply broken, etc.
Replacing the steering rack on a VAZ 2114
Now let's proceed directly to the procedure. If the operation is not carried out on a lift, then you need to hang out the entire front part and use some kind of stands or pedestals. It is imperative that the car is stable.
Next, use a 22mm wrench to unscrew the steering ends, then knock down the bipod with a hammer. If you plan to install the tips in the old places, then under no circumstances should you use all kinds of pullers, because the fork will pull out the finger, and the thread puller will ruin the thread, you will have to either go through it with a hole saw or change the tip.
Now you need to unscrew the four nuts securing the rack to the body. This must be done from under the wheel arch, otherwise you won’t be able to reach it. It is advisable to use a ratchet with a long head of 13. After this, we crawl under the driver’s feet and unscrew the bolt of 13 from the steering shaft. To loosen the clamp, you can insert a sharp chisel and hit it with a hammer several times. At this time, it is advisable to pull the rack from the shaft; this can be done well using a crowbar.
The rack is installed in the reverse order. After replacement, it is imperative to adjust the wheel geometry, otherwise goodbye, tires.
Video: replacing the rack on a VAZ 2114
As you know, the performance of any vehicle depends on the serviceability of each component. If one element is faulty, soon the next one will not function in a chain reaction, and so on until the fault is repaired. If the problem is not resolved in time, it will not only entail additional costs for spare parts, but will also significantly affect traffic safety, on which your life and health depend. Therefore, you should not neglect replacing parts, especially if this VAZ-2114 is no exception: spare parts here fail in the same way as on any other car.
How is this element dismantled and how to adjust it? We will consider the answers to all these questions in our article today.
AVTOTRUE.RU
- Home
- Video
- How to Remove the Steering Wheel on a VAZ 2115 Video
The VAZ 2114 and VAZ 2115 cars are part of the Lada Samara family. Their control wheels are not distinguished by graceful lines and ease of use, especially in earlier models. There is no need to talk about aesthetic pleasure here. It is clear that the owners of these cars probably feel the desire to replace the steering wheel with a part with the best design. But how to choose a suitable steering wheel, and is it possible to remove and install it at home? Let's try to figure it out together.
Dismantling the control wheel on the VAZ 2114 and 2115 is done in a similar way. But remember that according to the Code of Administrative Offenses, changing to a steering wheel that is different from the unusual one is considered an illegal modification to the control structure and control system of the car. Such tuning falls under Part 2.7 of Article 12.5 of the Code of Administrative Offenses on driving a vehicle in the presence of defects or a criterion when its operation is prohibited. Nowadays, traffic police officers are quite zealous in catching violators of this article, so think carefully before starting the change process.
If you set a goal to remove and finally install a new control wheel, the following tools will be useful to you:
- new steering wheel (make sure the selected part is suitable for your car);
- set of screwdrivers with straight and Phillips slots;
- 24 mm socket head;
- pencil or marker;
- hammer (sometimes);
- a drift made of soft metal (included with the hammer);
- wire strands (sometimes).
Please note that upon completion of all work, you will have to remove traces of a pencil or marker from the steering wheel cover and front panel. To avoid problems with the next cleaning, consider the coating material of these parts of the interior. It makes no sense to use permanent, or as they are also called - indelible, markers, especially if the parts are covered with high-quality natural leather in a light color. The easiest way to remove marker is on an aqua base. However, it is better to use an ordinary pencil: it can be erased with an ordinary eraser.
How to remove the steering wheel in 2 minutes on a VAZ 2114/2115/2110
There is a signal inside the steering wheel that receives power from the battery, so you first need to turn off the power to the car. For this purpose, you simply need to reset the negative terminal. After which you can safely begin the dismantling process.
- Remove the ignition key from the lock.
- Turn the control wheel so that the system that locks the control shaft is activated. Your steering wheel is now locked in a straight position.
- In order to then correctly install the new part while maintaining control accuracy, apply a mark to the control wheel with a pencil. Place a similar mark on the dashboard right next to it.
- Using a straight screwdriver, pry the cover with the Lada inscription on the steering wheel and remove it. This element is attached using ordinary plastic fasteners, so removing it will not be difficult. But due to the narrow plastic, the part simply breaks. If you intend to continue using the old steering wheel, be careful.
- Under the cover you can see two screws. They hold up the steering wheel cover. Unscrew them using a Phillips screwdriver and then remove the cover.
- A large nut is visible in the very center of the structure. It should be unscrewed using a 24 mm socket.
- It's just that the control wheel doesn't hold anything. If you set a goal to remove it, grab the steering wheel with both hands and personally pull each side towards you in turn. There is no need to be diligent. If the part has not been dismantled before, it will be quite difficult to move. Do not try to remove the part in one jump: you may get injured.
- If attempts to remove the control wheel using the method described in point 7 are not successful, use a small hammer and drift. In addition to additional tools, you will need an assistant. One person from the pair must personally pull the steering wheel, and the second person must hit the drift attached to the end of the control shaft with a hammer.
How to remove the steering wheel?
Dismantling the steering wheel on VAZ 2114 and 2115 is carried out using the same method. However, remember that according to the Code of Administrative Offenses, replacing a steering wheel with a steering wheel different from the original is considered illegal modification of the steering structure and vehicle control system. Such tuning falls under Part 2 of Article 12.5 of the Code of Administrative Offenses on driving a vehicle in the presence of malfunctions or conditions under which its operation is prohibited. Recently, traffic police officers have been quite zealous in catching violators of this article, so think carefully before embarking on the replacement process.
The standard VAZ 2114 steering wheel looks unattractive, so someone may want to replace it
Required Tools
To remove and then install a new steering wheel, you will need the following tools:
- new steering wheel (make sure the part you choose fits your car);
- set of screwdrivers with straight and Phillips slots;
- 24 mm socket head;
- pencil or marker;
- hammer (in some cases);
- a soft metal drift (included with the hammer);
- wire cores (in some cases).
Please note that after completing all the work, you will have to remove traces of a pencil or marker from the steering wheel cover and front panel. To avoid problems with subsequent cleaning, consider the coating material of these interior elements. You should not use permanent, or as they are also called, indelible markers, especially if the parts are covered with high-quality natural leather of a light shade. The easiest way to remove marker is water-based. But it is better to use a regular pencil: it can be erased with a regular eraser.
Steering wheel removal process
There is a signal inside the steering wheel that receives power from the battery, so the first thing you need to do is turn off the power to the car. To do this, you just need to disconnect the negative terminal. After this, you can safely begin the dismantling process.
- Remove the ignition key from the lock.
- Turn the steering wheel so that the system locking the steering shaft is activated. Your steering wheel is now locked in a straight position.
- In order to subsequently correctly install the new part while maintaining control accuracy, apply a mark to the steering wheel with a pencil. Place a similar mark on the dashboard right next to it.
- Using a straight screwdriver, pry the cover with the Lada inscription on the steering wheel and remove it. This element is attached using ordinary plastic clips, so removing it is not difficult. However, due to the thin plastic, the part breaks easily. If you plan to continue using your old steering wheel, be careful.
- Under the trim you will see two screws. They hold the steering wheel cover. Unscrew them using a Phillips screwdriver and then remove the cover.
- In the central part of the structure you will see a large nut. It should be unscrewed using a 24 mm socket.
- The steering wheel no longer holds anything. To remove it, grab the steering wheel with both hands and pull each side in turn. There's no point in trying. If the part has not been dismantled before, it will be quite difficult to move. Do not try to remove the part with one jerk: you may accidentally injure yourself.
- If attempts to remove the steering wheel using the method described in point 7 are unsuccessful, use a small hammer and drift. In addition to additional tools, you will need an assistant. One person from the pair should pull the steering wheel, and the second should hit the drift attached to the end of the steering shaft with a hammer.
Removing the steering wheel for VAZ 2114 and VAZ 2115
First of all, you need to remove the trim; the screws under the trim should be unscrewed using a 24mm socket; you need to unscrew the central screw; if it is not possible to remove the steering wheel by hand, use a hammer
Experts recommend not turning off the central nut completely, as it can protect you from serious injury in the event of a sudden break of the steering wheel. Make several turns while performing step 6, and when the part comes off the steering shaft, unscrew it completely by hand.
Reasons for failure
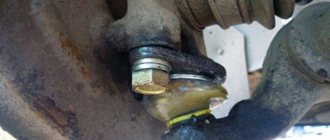
Any tie rod end is negatively affected by dirt and dust. This element consists of a hinge; even a small crack in the boot will cause a lot of inconvenience - moisture, dust, and various small particles get inside through it. They are capable of destroying the element very quickly. There should be lubrication inside, it facilitates control and reduces friction. If dust gets inside, it will act as an abrasive.
The wear of tie rod ends is affected by the quality of the road surface. These elements are part of the front suspension design and are closely related to it. Therefore, all the unevenness of the road affects the wear inside the joint. The most common failure is vertical play. This significantly increases the steering wheel's beating and free play. Only a complete replacement of the steering ends of the VAZ 2114 will help.
Tuning the interior of a VAZ 2115 with your own hands, internal tuning of a VAZ 2114, tips for improving the interior of a VAZ 2113, VAZ 2115, VAZ 2114. Tuning is an improvement in factory characteristics. Despite the fact that Lada Samara 2 cars are successful, these cars still have shortcomings, so car owners very often resort to tuning vases with their own hands. In our sections you can get acquainted with some improvements on your own. All materials are divided into categories and contain detailed instructions for modifying the main components of the VAZ 2115 car: engine tuning, body tuning, interior tuning, gearbox tuning, suspension and brake tuning, and you will also find sections on VAZ tuning with photos. Welcome to the VAZ 2113 tuning and modification sections.
The safest is the steering wheel installed on the car by the manufacturer. It was developed specifically for this car model, passed the necessary tests and complies with current standards. Samaras of recent years of production are equipped with steering wheels from the “ten” - comfortable, “gripable”, and recognized as safe. Owners of older cars can replace their old steering wheels with these without any problems. If you want more (or less - in price or size), there are a great variety of “steering wheels” on sale, especially in markets, both from famous world manufacturers and from handicraft workshops near and far abroad. But it should be remembered that installing a non-certified product is fraught with changes in rotational force, and this affects controllability, especially in critical situations. There may be problems with technical inspection, and sometimes the safety of the driver is at risk in the event of an accident! Therefore, the best option for this tuning, in our opinion, is to install a factory VAZ 2115 steering wheel with a braid (finish) made of materials that provide better hand contact with its surface, for example, covered with leather. This “steering wheel” looks great and fits better in the hands thanks to the increased thickness of the rim. ATTENTION Replacing the steering wheel according to UNECE Regulation P-12 actually means making a change to the design of the vehicle.
We install a leather-trimmed steering wheel on a car with a VAZ-2114 instrument panel. Before removing the steering wheel, disconnect the negative cable terminal from the battery terminal. Having removed the key from the ignition switch, turn the steering wheel until the device that locks the steering shaft is activated. We apply marks on the steering wheel and instrument panel of the VAZ 2114.
Use a screwdriver to pry up the cover of the signal switch and remove it.
Using a Phillips screwdriver, unscrew the two screws and remove the cover.
Using a 24mm socket, unscrew the steering wheel mounting nut by several threads. While rocking, we tighten the steering wheel along the shaft splines.
If you cannot move the steering wheel with your hands, an assistant pulls the steering wheel towards you, and strikes the end of the steering shaft with a hammer through a soft metal drift (in the event of a sudden break of the steering wheel, the nut will protect your face from injury).
Unscrew the nut and remove the steering wheel. Having aligned the two wheels, we transfer the mark from the removed steering wheel to the new one. Install the steering wheel in the reverse order.
To prevent the steering wheel fastening nut from falling out of the head when installed on the shaft, insert a wire or several wire strands of a suitable diameter between the nut and the head. Having tightened the nut, remove the head and take out the wire. Tighten the nut. If the steering wheel spokes are positioned asymmetrically when the VAZ 2113 is moving directly on a horizontal, level platform, stop the car in this position, remove the steering wheel and install it correctly, after which we check the accuracy of the installation again while driving.
Symptoms of failure
It is necessary to check the condition of the steering, suspension, and brake systems as often as possible. The design of the car has a lot of rubber boots that protect the components from foreign objects and dirt. To carry out diagnostics you need to perform several steps:
- Park the car on a level surface.
- Turn on the ignition (so that the steering wheel lock does not operate).
- Turn the steering wheel to the left.
- Check the condition of the boot on the right side. There should be no damage to it. If necessary, thoroughly clean the surface from dirt.
- Turn the steering wheel to the right and inspect the left side.
If there are even the slightest cracks, the boot must be replaced. If the rubber is completely torn, it is better to install a new steering end on the VAZ 2114. Malfunctions of this unit can significantly affect the condition of the car and ease of control. To check the play, you need to install a mounting blade between the tip and the steering knuckle. If there is vertical play, you need to replace the VAZ 2114 steering tips.
Steering ends: signs of malfunction
Steering ends are replaced when the following symptoms are observed: when driving over uneven surfaces, when accelerating or braking, a knock is felt, the steering wheel begins to vibrate and shake, play is noticed in the steering rod, and kickback is observed in the gas pedal. You can fully check the serviceability of the tips by checking the integrity of the anthers, etc.
Since these parts affect wheel alignment, they must be replaced on time so that the rubber does not start to wear unevenly.
The steering tips are changed on both sides at once (if one breaks, then after a while the other will break too).
When performing repair work to replace VAZ 2114 tips, the following tools are used:
- The key is “19”, the key is “24”, the key is “27”.
- Calipers.
- Press-out puller or mounting tool.
- Hammer.
- Brake fluid or chemical WD-40.
All work related to replacing tips on a VAZ 2114 can be performed either on a lift, or, as in this case, using a jack.
Replacement
Replacing tie rod ends involves performing the following actions:
The machine is fixed in a stationary state (using wheel chocks and a hand brake); The car is raised to a height, the wheel is removed from the side where the replacement will be made; The steering wheel is turned as far as possible in the opposite direction to the wheel (left or right, depending on where the repair is being made); Next you need to remove the cotter pin, using a key set to “19”, unscrew the nut securing the tip; Using a special tool, you should press the finger out of the lever. If you don’t have a tool, you can use a hammer or a pry bar; Angles are also measured using a caliper to speed up the installation of wheels; Fixing the position of the coupling with a key set to “24”, you need to unscrew the lock nut with a key set at 27 (clockwise rotation). It is often twisted tightly (perhaps rusted or stuck). To make the nut start to unscrew, you should spray brake fluid or WD-40 on it.
You can also use a hammer - gently tap it on the nut; The steering tip must be unscrewed with a universal key, moving counterclockwise;
- Then a new steering tip is installed on the VAZ 2114, the parts are pre-coated with engine oil;
- Installation is carried out in reverse order.
Such manipulations help eliminate knocking and creaking, as well as improve vehicle control. If after replacement the car's handling is unsatisfactory, and vice versa, it has only worsened, you need to adjust the wheel alignment. Sometimes experts advise performing a comprehensive replacement: replacing the tie rod ends and tie rods, since they have approximately the same service life.
To prevent such malfunctions from occurring, tie rod ends should be replaced at least once a year.
If you find an error, please select a piece of text and press Ctrl+Enter.
source
What do you need to remember?
Before starting repairs, be sure to treat all threaded connections with penetrating lubricant such as WD-40. If there is none, you can generously lubricate it with brake fluid in advance. Since there is a conical hole on the steering knuckle, it is necessary to use only a puller during disassembly. The nuts used to adjust the length of the rod must also be treated with lubricant.
If you do not do this, unscrewing the nuts will be problematic. As an option, completely dismantle the draft and heat it with a gas burner. Be sure to measure the distance from the center of the hinge to the edge of the adjusting nut on each side. You also need to measure the distance from the edge of the rod to this nut in order to place the new tip as accurately as possible. In the future, this will allow you to achieve the most accurate wheel alignment. But this does not mean at all that adjustments are not necessary - camber and toe will definitely have to be done.
Preparatory work
- Park the car on a level surface.
- Place wheel chocks under the rear wheels.
- Loosen the front wheel bolts.
- Raise the side to be repaired on a jack and place a reliable support under it.
- Remove the wheel completely.
Note. There is no need to disassemble the suspension before removing the steering end on the VAZ 2114. But be sure to install the car on reliable supports, otherwise it will fall. You need to place the removed wheel under the engine.
Replacing tips
Replacement is performed in this order:
- Unscrew the nuts that secure the ends to the rods.
- Remove the pin from your finger.
- Use a key set to “19” to unscrew the nut on the tip.
- Place the puller on the pin and slowly turn the bolt.
- As soon as the tip pin comes out of the steering knuckle, disassembly is complete.
- Install the new tip and screw it until the total length of the rod is the same as on the old element.
Be sure to make wheel alignment and camber adjustments. You can roughly adjust. And in this case, rubber wear will occur much faster. At a service station, such a procedure costs no more than 800 rubles and takes about an hour. A prerequisite is that all threaded connections must be new, otherwise the technician will not be able to unscrew the bolts and nuts. It is also advisable to replace struts, silent blocks, ball joints, and other suspension components.
After installing the new tips, the entire assembly must be assembled. For this:
- Install the tip pin into the steering knuckle.
- Refit the nut (be sure to use a new one). It should be twisted by hand.
- Tighten the nut with a wrench to “19”.
- Make sure the hole in the pin lines up with the slot, then install the pin.
- Bend the pin antennae to the sides using pliers.
- Install the wheel and tighten the bolts.
- Lower the side being repaired and tighten the wheel bolts completely.
In a similar way, on a VAZ 2114 the steering tip on the other side is replaced. After assembly, be sure to check that all nuts are securely tightened.
Please note that it is not advisable to knock the tip out of the steering knuckle with a hammer or sledgehammer. This can damage not only the tip itself, but also the strut, support bearing, and ball. And as a result, you replace one node, but break three.
How to replace the steering rack on a VAZ 2115: step-by-step instructions with photos and videos.
VAZ 2114 (Lada 2114) is a restyling of the VAZ 21 99, produced in 1994-2 4 years and was the ancestor of the second generation Lada (Samara).
The performance of a car, like any mechanism, depends on the proper functioning of each part. When one fails, it pulls others along with it – the principle of a “chain reaction”. One such mechanism is the steering rack. Its malfunction is not allowed, since defective steering is deadly. It is not allowed to operate a machine with such a malfunction. When you hear knocking and crunching noises when turning the steering wheel, you should replace the steering rack; sometimes you can get by by tightening the bolts or replacing the seals. But if after this the problem remains, then you still need to replace the steering rack. Sometimes after tightening the bolts, the rotation of the steering wheel gets a little worse, and often the steering wheel jams completely.
Replacing the steering rack on a VAZ 2114 is not so difficult, but if you have no repair skills at all, then it is better to contact a service center. You can carry out the replacement yourself, but it is more convenient to take an assistant to help.
Necessary tools for replacing the steering rack on a VAZ 2114
1. hexagon at “17”;
2. steering rod puller;
3. tube – length 6, hole diameter 3;
6. set of wrenches (open-end and spanner);
7. chisel (tooth width 5-7 millimeters);
8. and the steering rack itself.
The process of removing and installing the steering rack on a VAZ 2114
photo report on the work process
1. Apply the handbrake, block the steering wheel, put stops under the rear wheels, and disconnect the AB terminal.
2. We tear off the bolts of the wheels of the car standing on the ground.
3. Jack up the car and remove the wheels.
4. Remove the wheels themselves and lubricate the unscrewed nuts with WD-4
5. Unscrew the cardan locking bolt in the cabin.
6. Next, to make work easier and open access to the rail, unscrew the absorber under the hood.
7. Unsplint the tip nut and carefully knock it out from the stand. Remember that you cannot hit the thread.
8. If there is no special rod puller, then we use a pry bar or a hammer.
9. Next, carefully unscrew the steering rack mounting nuts.
10 . On the right side we take out the rail.
11. Then we knock it out from the spitz, usually it comes out without much difficulty.
12. Now the rail has been removed - unscrew its tips and count the number of turns.
13. Open the side plugs in the new steering rack and fill the holes with lithol.
14. Carefully screw the ends
Be sure to pay attention not to mix them up, since the left one is different from the right one
15. In order to put the new rail in place, you will need the help of a partner. We install the steering rack in place and attach the fasteners. A helper is needed to help you get exactly into the pins of the steering cardan. You can use a chisel to loosen the clamp. The pins will fit in much easier this way.
Manufacturers and prices
There are several manufacturers on the automotive parts market that have proven themselves well. This:
- AvtoVAZ is the official supplier for conveyors, the cost of the set is 650-700 rubles.
- "Track" has about the same cost.
- FINWHALE - cost - 850-950 rubles.
- LEMFORDER – price – no more than 900 rubles per pair.
- “VIS” – 700-750 rubles per set.
These are the steering tips you can find on the VAZ-2114. The price depends on the manufacturer, the quality is almost the same for all. If you operate the car correctly and carefully, then they will serve faithfully for a guaranteed period.