Greetings to everyone who came here. Actually, I would like to tell/ask about the breakdown of the EUR. To begin with: it began to behave inappropriately, then it constantly strengthened (the steering wheel was too soft at speed), then one fine day it completely switched off at a speed of 80-100 km/h, which, frankly speaking, caused quite a few troubles (I never would have thought that it is so difficult to rotate it without an amplifier on the grant). Common sense dictated that it was necessary to urgently look for the problem and this could not continue. But the problem was that I have little idea what EUR is and what it is eaten with. The first thing that came to mind was to remove the casing and check the EUR itself and the contacts going to it, learning at the same time that you can do its self-diagnosis. Well, it looks like the self-diagnosis item has broken down because there is a Korean with GM nameplates on which there is no information at all. Contacts? Well, I disconnected it, inserted it again - there are no oxides or anything else (which in general is not surprising), the power fuse is quite alive. To be honest, I didn’t know what else you could check with your paws. Then diagnostics was carried out using a normal scanner, which gave the following information:
This was better, but still doesn't answer my questions. 1) A DCM error is kind of like a Torque Sensor error. But not a word about him was found on the Internet. It seems to me that when trying to replace it, there will be problems in the form of the fact that it is not in the official catalog (there is generally only an assembled EUR), and therefore it is not a fact that it is generally sold separately. 2) Failure in the speed sensor circuit - this is already closer and warmer, it seems that all you need to do is replace this very sensor, but the circuit will also have to be changed/checked. 3) Also, when viewing the readings, the force reading was out of line. It was negative, namely -120.ХХХ (where X is a variable), when rotating on a stationary machine, the info changes, but still remains a negative value. Something like this, the further procedure of action is not very clear to me to be honest. It seems that erasing the errors helped, but since I drove for a long time with a power steering booster (actually a couple of days, but I got used to it quickly, as if you were driving with a power steering system) and it’s difficult to draw accurate conclusions about whether the problem has gone away, and it’s still too early. The war is not over. That’s all, it seems, that’s all. At the moment, from my thoughts on the matter - how disgusting and incomprehensible everything is. Go straight to the officials with the face of a naive young man for a guarantee
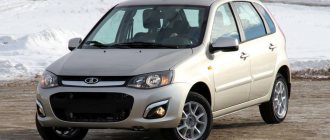
The electric power steering in the Lada Kalina is designed to provide increased comfort while driving. The car itself has only recently appeared on the domestic market, but has managed to gain considerable popularity. The car is quite practical and convenient, which allows it to have a wide army of fans. The cost of the model is low, which ensures favorable positioning in the market compared to competitors in the class. In this article we will talk about malfunctions and ways to eliminate them.
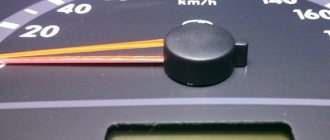
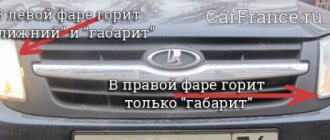
ESD error on the dashboard
If an electric power steering error appears on the instrument panel, this may indicate a breakdown of the system or its incorrect operation.
In this case, the electric amplifier can be fully operational. The error that appears on the dashboard is yellow. This indicates that it is possible to use the machine also, but certain safety precautions will need to be observed. If the device turns off completely, you will have to put more effort into operating the machine. To turn off the EUR, it is enough to remove the fuse responsible for its operation. If you notice that the system is not working correctly, it is better to remove the fuse and solve the problem.
If you notice that the indicator light on the control panel lights up only when the ignition is turned on, and goes out after starting the engine, then there is no need to worry. When the ignition is activated, the system diagnoses all components and mechanisms, so the appearance of an indicator is normal. But if the lamp continues to light even after starting the engine, then this indicates a problem.
Pros and cons of electric booster?
Advantages of EUR:
- Compact mechanism
. The device itself is installed on the steering shaft, thereby taking up no space under the hood. - Easy to maintain
. The electric booster does not require constant monitoring of the fluid level. - Easily customizable.
- Economical
. The electric motor only turns on when the steering wheel is turned.
Disadvantages of EUR:
- During heavy operation, the electric amplifier overheats. For example, on a dirt road after rain.
- Low power. The reason for this was not a powerful electric generator.
Don't forget that power steering of any type can also be dangerous.
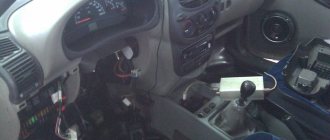
Diagnostics of EMURU without a scanner
In the absence of a scanning device, fault codes for the electric power steering can be read using the “paperclip” method. To do this you will need to perform the following steps:1. Turn off the ignition;2. Close contacts No. 6 and 7 at the 8-pin connector of the control unit (control unit), which is located next to the power connector.3. Turn on the ignition. You will be able to “read” the codes by the flashing diagnostic lamp. Which contacts need to be closed? Look at the control unit connector from the wire side (we remind you that it is 8-pin, black). We consider the first contact to be the one located at the top right and count from right to left: 1. Ignition switch (+12V) – blue.2. Tachometer – red-brown.3. Vehicle speed – grey.4. EMURU control lamp – white and pink.5. K-line – black and yellow.6. L-line – empty contact.7. Mass – brown.8. Empty contact. If you are planning to independently repair the Lada Kalina electric power steering, you need to remember, or better yet, write down the following data somewhere: Light code parameters (temporary): 1. Initial pause – duration 2 seconds; 2. Long signal – 2 sec;3. Short signal – 0.5 sec;4. Pause between signals – 0.5 sec;5. The pause between codes is 2 seconds. Deciphering the light code of faults: 1. “11” - the system is working;2. “12” - there is no engine speed signal;3. “13” - torque sensor;4. “14” - EMUR engine;5. “15” — PPV (steering shaft position) sensor;6. “16”—PRD sensor (engine rotor position);7. “17” - on-board network;8. “18” - control unit;9. “19” is the vehicle speed sensor. That’s all the basic information you need to know on this issue. We hope that you understand - if the electric power steering of the Lada Kalina does not work, there is no need to panic and run to a car repair shop; repairing the device is quite possible even for a non-professional. We are confident that this information will provide you with significant assistance in operating and maintaining your vehicle.
New products follow us step by step. Some technologies are being replaced by others. A person, wanting to make his life easier, begins to introduce them into a car. If earlier in the car there was a well-known “meat grinder”, which was used to open the car windows, now you can hardly see it anywhere; to facilitate this action, electric windows have been installed. The same thing happened with a regular steering wheel. To make steering easier, they first came up with power steering, and then electric power.
Electric power steering, also called electric power steering, is a system that is designed to reduce the effort required to twist the steering wheel. That is, if previously you had to use both hands to twist the steering wheel, now this action can be performed with one finger.
Prices for electric power steering for the Lada Kalina model range from 8,000 rubles
for a used part
up to 25,000 rubles
for a new one.
The electric power steering on the viburnum does not work. Why doesn't the electric power steering work on the Kalina? fixing the problem
Causes of EUR failure
One of the main reasons why it may turn off is a breakdown of the device itself. When the ignition is turned on, the system automatically performs diagnostics, which subsequently fails. As a result, the electric power steering does not work due to its own shutdown, which undoubtedly negatively affects the comfort when driving the car.
Repairing the electric power steering can be quite expensive, so if the Kalina is still under warranty, it makes sense to have your power steering repaired at the dealer. In the event that the system has completely failed, you must first turn off the power. In this case, the engine torque will be received by the steering element (rack), bypassing the amplifier.
Another reason why the electric booster does not work is the failure of the speed sensor, which is responsible for the operation of the system in various driving modes. The power steering operates at full power only when driving at minimum speed. When the vehicle accelerates, the force that the system creates on the rack decreases, and this is what the speed controller is responsible for. Do-it-yourself EUR repair involves replacing the sensor yourself; the cost of such an element today is not high.
If a speed sensor directly connected to the speedometer breaks down, then the unit that controls the power steering receives incorrect data. The system automatically turns off, at this moment a diode indicator appears on the control panel, which informs the driver about a malfunction of the device. To avoid the need to repair the amplifier, it is enough to carry out diagnostics in time with a paper clip. Thanks to diagnostics, the motorist will be able to find out about all the problems that are present in various mechanisms and transport components.
Let's summarize this point - for what reasons does the electric amplifier refuse to work:
- There is no signal from the speed sensor. The problem may be either a regulator failure or a wiring fault.
- Very low voltage level in the car wiring. It is necessary to measure the voltage and solve the problem.
- The permissible engine speed has been exceeded.
- The control unit has failed. Repair will solve the problem, but usually if the unit breaks down, it has to be replaced.
Kalina steering wheel for classics
Car steering is one of the important mechanisms of any vehicle. It includes several components that are responsible for moving the car in the direction specified by the driver. An integral part of the steering mechanism is the steering wheel. Its presence allows you to control the front axle and steer the wheels.
VAZ 2107 steering wheel
The steering wheel is connected to the steering gearbox through an intermediate shaft. The entire steering design is designed to transfer the rotational force of the steering wheel shaft into a similar rotational force of the bipod shaft. When the steering gear lever turns and the steering linkage is applied, the front wheels rotate.
A car steering wheel is a frame with a hub, rim and spokes. On the VAZ 2107, the steering wheel has 4 spokes, and the rim itself is made of special rubber. The steering wheel size on this car is 400 mm. This diameter is quite large by today's standards, but turning the steering wheel is not difficult. There is a pressure element on the steering wheel that allows you to turn on the sound signal.
Is it possible to install from another car?
The steering wheel on the VAZ 2107 differs from the steering wheel of the same “penny” or “six” in its more attractive appearance and comfortable grip. If for some reason the standard steering wheel does not suit you, there are options for replacing it with a part from other cars:
- "Kalina", "Priora", VAZ 2115;
- products from Chinese manufacturers;
- steering wheels from the “sport” category of such well-known brands as Sparco, Momo, etc.
Wheels designed for tuning and sports are universal. They can be installed on different cars using a special adapter that is designed for a specific model.
It is not recommended to install products from unknown Chinese manufacturers on classic rear-wheel drive Zhiguli cars. This is explained by the fact that such cars are not equipped with a rack, but with a steering gear with a worm mechanism. The absence of hydraulic or electric power steering means that sometimes quite a lot of force must be applied to the steering wheel.
When installing a low-quality product, there is a possibility that at some point you will be left with the steering wheel in your hands, which will lead to undesirable consequences.
Therefore, when choosing a steering wheel, attention should be paid not only to aesthetics, convenience and ergonomics. The steering wheel must also meet safety requirements
You can be confident in the quality of parts from the Togliatti Automobile Plant and well-known European brands, since all products of these manufacturers are tested.
The main problems of VAZ EURs
This legendary Russian automobile manufacturer, together with the Aviaagregat enterprise from the city of Makhachkala, has developed an electric power steering for cars of the Lada Kalina and Priora family.
Among the problems are:
Recommendations for installing EUR on the Lada Granta. list of faults and ways to eliminate them
- mechanical breakdowns of the rack;
- steering mechanism jamming;
- most often the gearbox fails, because of this, the power steering for the Lada Priora model began in Kaluga to be manufactured without a gearbox at all;
- Such products developed another problem in the form of spontaneous rotation of the steering wheel when driving at low speeds.
On the other hand, defects in such products most often appeared as a result of the peculiarities of off-road operation of the vehicle. Despite the improvement in quality, AvtoVAZ chose the South Korean company Mando as an alternative supplier of electric power steering. These products have proven themselves to be the highest quality of those installed on Lada models.
According to the driver who was involved in the accident: on a sharp turn to the right, the steering wheel was torn out of his hands due to a failure of the electric amplifier. As a result, the car drove into the oncoming lane. He addressed his claims to the AvtoVAZ plant.
Thus, despite the apparent problems, the electric amplifier is a technological device that greatly facilitates driving. Its design, quality and reliability are improving every year.
Myths about electric amplifier repair. Eur steers himself. EUR repair
List of online stores, addresses of companies providing services
| № | Name | Contacts, address |
| 1. | STO "A1-Motors" | Moscow, st. 1st Dubrovskaya, 13a, building 4, phone https://a1-motors.ru/ |
| 2. | Motel Varshavskiy – Spare parts store: Hyundai, LADA | Moscow (metro Annino), metro Annino, 32 km. MKAD (on the territory of Kashirsky Dvor 3). Telephone, |
| 3. | "Expert-Auto" - Spare parts store: Renault, LADA | Moscow (metro station Tulskaya), Zagorodnoye shosse, 7A, phone: (916) 838-00-62, |
| 4. | “Spare parts on wheels” – Spare parts store: Renault, LADA | Mytishchi, Volkovskoe highway, 13, phone, (968) 409-30-19 |
| 5. | Service station "Car service on Sedova" | m. Elizarovskaya, Sedova street, 11AB, box C |
Reviews of companies
- Vasily: six months ago I installed a servo drive on Grant at the A1-Motors service station. The guys did everything quickly and professionally. My recommendations.
- Ivan: after buying the Lada, I replaced the power steering with an electric steering system. I ordered the work from the service station “Auto Service on Sedova”. New equipment, many repair boxes, work professionally.
- Innokenty: comrades recommended installing an EUR. I bought it at the Motel Varshavsky parts store. Good quality, reasonable prices, bonuses when purchasing.
- Vladlen: I drove the power steering for two years and decided to switch to the electric power steering. They advised to buy from Expert-Auto. Six months have passed since installation, no complaints, my recommendations.
- Vyacheslav: I’m leaving my positive review about the auto parts store “Spare Parts on Wheels”. Professional advice, reasonable prices, friendly staff.
Causes of amplifier failure
A fairly common cause of power steering failure is incorrect operation of the speed sensor. Replacing and eliminating the problem will not cost the car owner much, and you can perform this operation yourself. The higher the vehicle speed, the less the amplifier works, making it easier to control. If the sensor malfunctions, the amplifier reads incorrect information and turns off. This type of failure is easy to detect. The EUR light on the dashboard will simply light up. All you need to do is replace the speed sensor.
Another reason for an amplifier to fail is a malfunction of the amplifier itself. The solution to this problem will not be cheap.
Diagnostics
To check the amplifier in a car, you need to remove the plastic trim on the steering column; to do this, unscrew the bolts securing it from the bottom.
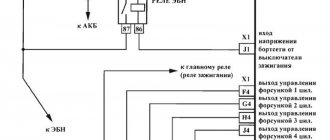
Then you will need to get to the 8-pin plug, its pinout is as follows:
- The blue contact is connected to the ignition switch, this is 12 volt power;
- the red-brown contact is the connection cable to the tachometer;
- the gray contact goes to the car speed controller;
- white and pink wire - amplifier control indicator;
- black-yellow contact is a diagnostic line;
- the next contact is empty, the wire is not connected to it;
- brown contact is ground;
- empty.
More accurate results will be obtained by checking the amplifier using a scanner. But since such equipment can usually only be found at service stations, you can try to check the operation of the system with a paper clip.
Electric power steering for VAZ 2107
To check you need to do the following:
- First the ignition is turned off.
- Then, using a paper clip, you need to close contacts numbered 6 and 7 of this plug, while the plug itself does not need to be removed.
- Next, the ignition must be turned on.
- After completing these steps, the EUR failure indicator located in the dashboard will begin to blink; by the number of blinks, you can determine whether the system is broken (the author of the video is Gosha Vakhromeev).
Diagnostics of EUR (EMUR Electric power steering) VAZ using the “paperclip” method Kalina, Priora
How to understand by the blinking indicator icons where to look for the cause:
- one long signal and one short signal - the electric amplifier is working;
- one long and two short - no engine speed signal;
- one long and three short - the torque controller is out of order or there is no power supply;
- one long and four short blinks—problems in the operation of the electric power steering motor;
- one long and five short - the steering shaft position controller has failed;
- one long and six short - the motor rotor position controller has failed;
- one long and seven short - problems with the electrical network - the voltage is either too high or very low;
- one long and eight short - the control module of the electric amplifier has failed;
- one long and nine short - the speed controller is broken.
Error codes
c1044 - incorrect sequence of the rotor position sensor (RPS)
c1621 - incorrect voltage 5V
c1622 - speed signal circuit failure
c1011 - car engine speed signal circuit, no signal - the signal from the idle sensor (or the standard tachometer through a voltage limiter) is divided by 4 and applied to the tachometer input,
c1022 - error, voltage of the main output of the torque sensor - it is possible that the shaft cover has rubbed the insulation and the middle, green wire shorts to ground
Reasons for shutdown
The main reason lies in the electric power steering. When ignited, the system performs a self-diagnosis and if the mechanism does not pass it, a signal is turned on indicating a malfunction. The color of the signal indicates the degree of danger. The light turns red, the problem needs to be fixed urgently. If the color is yellow, the vehicle can be operated, but safety precautions should be taken. There may be several reasons why the electric power steering on Kalina does not work:
- speed sensor malfunction;
- torque sensor malfunction;
- speed exceeds 60 km/h;
- engine speed is less than 400 per minute;
- failure in the control unit;
- poorly soldered contacts;
- insufficient tension.
Software shutdown
- The electric power steering on Kalina turns off after 60 km/h. Therefore, keep this point in mind; it is set in the system unit and is not a breakdown. The Priora's electric power steering is switched off at a speed of 110 km/h.
- Also, the EUR does not work at low engine speeds. If the value is less than 400 rpm, it is not active.
This is software planned inactivity. It is needed to give information to the steering wheel at high speed and reduce wear of the mechanism.
Electrical booster malfunctions
In the event that it is impossible to immediately check the cause of failure of the electric power steering on Kalina, you need to remove the fuse from the block. This is necessary to prevent sudden activation of the mechanism, which leads to emergency situations.
A direct indicator of a malfunction of the speed sensor in Kalina's electric power steering is a non-working speedometer, as well as a lit-up exclamation mark on the dashboard. It may not work for several reasons. Check the appearance of the sensor; if it is covered with dirt, simply clean it. See if any metal shavings have become magnetized and remove those as well.
If this does not help, then the sensor is probably faulty. Such sensors are now inexpensive and can be found in many auto parts stores. We do the same for the torque sensor. But where is the speed sensor? It is usually located in the gearbox housing, see photo on the left.
Another cause of malfunction of Kalina’s electric power steering is the generator. The control unit requires a voltage of 13.6 V to operate; if you have less, change the voltage regulator (chocolate) on it.
Also, the contacts could simply become disconnected due to poor-quality soldering. You can either disassemble and solder the contacts or send it to service.
If the problem is in the control unit, it is difficult to solve this problem yourself; the service will either solder it or you will have to buy a new one.
Popular on the site
19 Aug
Articles Engine and its components
5 687
Error code P0014 (symptoms, causes and solutions)
The vehicle's variable valve timing system improves engine performance and fuel efficiency. It regulates the opening and closing of the exhaust and intake valves, in turn controlling the air-fuel mixture. This control provides more power, better fuel economy or a balanced approach depending on the engine requirements at any given time.
24 Dec
Repair Electronics and equipment
5 597
Symptoms of a faulty engine control unit (ECU)
The engine control unit (ECU), also called the engine control module or transmission control module, is one of the most important components found on almost all modern vehicles.
09 Jan
Articles Engine and its components Ignition system
5 374
Glow plug relay - how to check its functionality? + Video
Each car has its own glow plug relay circuit. It, like every part, can fail and will have to be replaced. To deal with the rather serious question of how exactly to make a replacement, you need to start with the basics.
17 Dec
Auto News
5 373
2021 Kia Sportage. When will the new body appear in Russia?
On the page are the first details about the new Kia Sportage body of the 2021 model year, possible configurations and prices, release date in Russia, photos, technical specifications and video test drive of the new model.
24 Dec
Repair Engine and its components
4 456
Symptoms of a bad or faulty oil pressure sensor
Without the proper amount of oil, your engine will be severely damaged. Several systems in your vehicle are designed to maintain proper engine oil levels and pressure.
28 Dec
Articles Engine and its components
3 877
Symptoms of a bad or faulty intake manifold gasket
Intake manifold gaskets are one of the most important gaskets on an engine. Gaskets are seals placed between engine components before they are assembled to provide a good seal. They can be made from paper, rubber, metal, or sometimes a combination of the three.
09 Feb
Engine and its components Ignition system
3 704
Nissan Qashqai 2 2.0 – Do-it-yourself replacement of spark plugs (photo report)
Replacing spark plugs on a modified MR20DD Qashqai 2 engine ( J11
) 2.0 l. according to the regulatory deadlines, it should be carried out over a mileage of 30,000 km or once every 24 months. Since this Qashqai, the second generation, was released not so long ago, it has a different, improved engine (a naturally aspirated engine with an aluminum cylinder block with a high compression ratio), unlike its counterparts, it uses more modern, iridium spark plugs.
18 Dec
Electronics and equipment Electrical circuits
2 926
2021 Jeep Grand Cherokee. Release date of the new body in Russia
Development of the fifth-generation 2021 Jeep Grand Cherokee began with the creation of a new platform. The basis was taken from the Giorgio “trolley”, currently used on the Alfa Romeo Stelvio and Giulia.
28 Jan
Automotive software Repair/operation manuals
2 031
VAZ 2109. Replacing crankshaft liners without removing the engine
What to do if the low oil pressure light on gear nine is on? What about the crankshaft bearings - how long have you changed them? What am I talking about? Yes, besides, it is possible that these parts are “khan” and they no longer provide the level of crankshaft lubrication that was before. As a result, increased wear of rubbing surfaces and possible failure of the power unit, as always, at the most inopportune moment.
24 Dec
Fuel System Electronics and Equipment
1 601
Signs of a Bad or Failed Fuel Pump Relay
The fuel pump relay is an electronic component found on almost all vehicles equipped with an internal combustion engine.
Diagnostics
To check the amplifier in a car, you need to remove the plastic trim on the steering column; to do this, unscrew the bolts securing it from the bottom.
Then you will need to get to the 8-pin plug, its pinout is as follows:
- The blue contact is connected to the ignition switch, this is 12 volt power;
- the red-brown contact is the connection cable to the tachometer;
- the gray contact goes to the car speed controller;
- white and pink wire - amplifier control indicator;
- black-yellow contact is a diagnostic line;
- the next contact is empty, the wire is not connected to it;
- brown contact is ground;
- empty.
More accurate results will be obtained by checking the amplifier using a scanner. But since such equipment can usually only be found at service stations, you can try to check the operation of the system with a paper clip.
To check you need to do the following:
- First the ignition is turned off.
- Then, using a paper clip, you need to close contacts numbered 6 and 7 of this plug, while the plug itself does not need to be removed.
- Next, the ignition must be turned on.
- After completing these steps, the EUR failure indicator located in the dashboard will begin to blink; by the number of blinks, you can determine whether the system is broken (the author of the video is Gosha Vakhromeev).
- one long signal and one short signal - the electric amplifier is working;
- one long and two short - no engine speed signal;
- one long and three short - the torque controller is out of order or there is no power supply;
- one long and four short blinks—problems in the operation of the electric power steering motor;
- one long and five short - the steering shaft position controller has failed;
- one long and six short - the motor rotor position controller has failed;
- one long and seven short - problems with the electrical network - the voltage is either too high or very low;
- one long and eight short - the control module of the electric amplifier has failed;
- one long and nine short - the speed controller is broken.
Error codes
c1044 - incorrect sequence of the rotor position sensor (RPS)
c1621 - incorrect voltage 5V
c1622 - speed signal circuit failure
c1011 - car engine speed signal circuit, no signal - the signal from the idle sensor (or the standard tachometer through a voltage limiter) is divided by 4 and applied to the tachometer input,
c1022 - error, voltage of the main output of the torque sensor - it is possible that the shaft cover has rubbed the insulation and the middle, green wire shorts to ground
Possible malfunctions of the EUR on the Lada Grante Liftback (Sedan)
| Malfunction | Diagnosis | Elimination method |
| The diode on the side pillar glows due to a faulty speed sensor. | Checking the serviceability of the speed sensor by dismantling it and ringing it with a multimeter. | Replacement of the sensor with a new one, since the design is not subject to repair (partial, complete). |
| Low voltage in electrical wiring. | Checking the integrity of the insulating layer and contact terminals. | Replacement of damaged cable sections, insulation of connection points. |
| The electric amplifier rotates slowly. | Checking the voltage supply to the input contacts from the relay regulator. | Replacing the relay regulator. |
| During rotation, a characteristic creaking, metallic grinding sound is heard. | Dismantling the EUR, disassembling it into its component elements, checking the condition of the rolling bearings. | Replacement of two rolling bearings with new ones. |
EUR malfunctions and their diagnosis
Despite the simplicity of the design of the unit we are considering, if the need for repair arises, it is difficult to carry out; there are different malfunctions and the methods of elimination are often complex. An important “aggravating” circumstance is the poor location of the mechanism. The manufacturer placed this module directly under the radiator of the LADA Kalina interior heating circuit.
Operation in cold weather has a temperature effect on the electric power steering. Over time, this factor causes malfunctions in the amplifier. This phenomenon is very common for Lada Kalina. If a unit fails, the driver immediately feels it becomes more difficult to control the car at low speeds. The most common factors leading to electrical amplifier malfunctions can be grouped into the following areas:
- the speed sensor “does not respond” and does not send signals to the ECU;
- the on-board network “suffers” from low voltage;
- the maximum speed has exceeded the permissible limit;
- The control module has become unusable.
The identified malfunctions and solutions will be discussed below. When the ignition is turned on, the ECU independently diagnoses the amplifier system for possible failures and malfunctions. If there is no signal from any of the sensors, the on-board controller automatically identifies this sensor as faulty, and the corresponding lamp on the display on the front panel of the cabin immediately lights up. This indicator looks like a steering wheel with an exclamation mark and is highlighted in orange.
The instructions supplied by the factory to the LADA Kalina car require immediate repairs if a malfunction is detected in the electric power steering mechanism, especially when the power is turned off. In such a situation, the driver should drive to the service center at low speed. Practice shows that this development of events does not always take place. An orange symbol on the dashboard may not indicate the need for repair procedures. It indicates the presence of a problem in one of the structural components of the system. Sometimes failures can occur in the supply circuit or one of the sensors has failed. These situations do not in any way affect the functionality of the node, and control control remains active.
If the steering wheel, after the indicated symbol is illuminated, has lost sensitivity, then a malfunction of this kind is considered quite dangerous, since it interferes with the normal functioning of the mechanism as a whole; it is also bad when the amplifier is turned off. Such problems arise quite often and really require urgent intervention. Ignoring this state of affairs may be associated with dire consequences for the LADA Kalina car. In order to quickly respond to a problem that has arisen, we quickly remove the fuse located in the panel block on the left side of the steering wheel. This measure prevents further damage to the electrical amplification system, since it completely deactivates it. You can go to the repair site, but you will need to apply more force to the steering wheel, because the amplifier is no longer functioning.
Repair of EUR LADA Kalina - Review
Steering mechanism malfunctions and their elimination
The steering mechanism of the Lada Granta is quite reliable and rarely causes problems for the owner. However, this does not mean that problems do not occur at all. There are problems. And you need to know how to eliminate them.
| Cause of problems |
Elimination
Large steering wheel play
The fastening nuts on the ball rods have become loose. The cotter pin may be missing. Tighten the fastening and install a cotter pin if necessary.
The clearance in the ball joint rods is too large. Replacement of steering tips for Lada Granta.
The silent blocks of the hinges are worn out. Replace the rods.
There is too much clearance between the rack and nut. Worn elements must be replaced, and after replacement the mechanism must be adjusted.
There is a knocking sound when turning the steering wheel
The tie rod nuts are loose. Tighten the fastening nuts.
There is a large gap between the rack and the nut. Replace worn elements; after replacement, the mechanism should be adjusted.
The steering mount is loose. Tighten the fastening nuts holding the mechanism.
Steering wheel turns too hard
The support bearing of the shock absorber strut is faulty. Replace the support bearing.
The support sleeve is worn, the rack stop is worn. Worn elements need to be replaced.
Tire pressure is too low. Inflate tires to optimal pressure.
Ball joint parts are worn or damaged. Replace elements.
The shock absorber struts or their elements have expired. Repairing the shock absorber strut or replacing it.
The shaft bearings are worn out. The shaft bearings need to be replaced.
The electric power steering is faulty. Replacement of the EUR together with the shaft.
Like the braking system, engine operation and other important components and assemblies, the steering system must be periodically inspected for malfunctions. If there are no signs, protective boots and other smaller structural parts must be inspected. The steering rack of the Lada Granta is a key control mechanism. It is thanks to this that the car is controlled by turning the wheel.
Basic steering rack faults
The main sign of a breakdown is a knocking sound when turning. At first it is almost invisible and appears when hitting potholes. If you ignore the first symptoms, the noise will not go away and will constantly get worse. Then the knock will be transmitted to the steering wheel. If you ignore this symptom, the rack will simply jam, and this risks getting into an accident due to loss of control. The rack knocks due to wear of the hinges, teeth or rubber-metal bushings (damper).
The following symptoms can also be attributed to steering rack malfunctions.
- The steering wheel turns hard (accompanied by a slight whistle).
- The tight rotation stops as the speed increases.
- With straight steering, there is no gain.
- When turning, the steering wheel does not turn the front wheels properly (the car begins to roll left/right while driving).
- Vibration, beating, grinding; the steering wheel begins to rattle.
- The steering wheel does not return to its original position.
- The steering wheel rotates spontaneously.
There are many reasons for steering rack malfunctions. But these are the most common. If at least one of them occurs, the Lada Granta should go for repairs as soon as possible.
DIY steering rack replacement
For novice motorists, this may seem like an overly complicated procedure. But in reality everything is simpler. The algorithm of actions is as follows.
- Disconnect the battery, loosen the bolts of the front wheels, hang the front on jacks and remove the wheels.
- Inside the car, you need to unscrew the bolt that connects the steering gear terminal to the intermediate shaft. In this case, the steering wheel must be in a straight position (the wheels are strictly straight).
- Disconnect the rods from the swing arms.
- Unscrew the steering mechanism mounting nuts through the gaps in the wheel arches.
- Dismantle the clamp and remove the steering mechanism assembly.
- Next, all anthers and their fastenings are removed.
Now you can install a new steering rack (if you did not use a repair kit). The assembly is assembled in the reverse order. The position of the rack should be adjusted so that the marks on the crankcase coincide with the marks on the protective boot. The last operation when replacing a unit is to adjust the front wheel alignment.
In most cases, the cause of rack failure is motorists ignoring to inspect the car for faults. A thorough diagnosis of all components and assemblies is carried out at least once a year.
Removing the electric amplifier
If you decide to repair the electric power steering, then first of all you need to dismantle the steering column switches. Next, you need to disconnect all the connectors with wires from the control panel - if necessary, then to do this you need to unscrew three self-tapping screws. A Phillips screwdriver is used for this. After completing these steps, you can dismantle the lower cross member of the control panel. To do this, press the clips that secure the wire block, then disconnect them from the system control unit
Only after these steps can you disconnect the block from the switches themselves. The bracket itself is fixed with several nuts, they are unscrewed. The entire steering column must be carefully lowered. You need to find the screw that secures the cardan to the assembly shaft
This screw is unscrewed, while you need to hold the nut to prevent it from turning. After dismantling the screw, the terminal clamp must be released, then the intermediate shaft is carefully removed. To prevent installation problems, the location of the shaft, as well as gears, must be marked with a marker. If the marks on the shafts are not aligned, this will lead to problems with the system. When removing the electric amplifier, do not damage the wiring under any circumstances. As for installation, the procedure is carried out in reverse order (the author of the video is Murzik Bely).
Removing the rack: step-by-step instructions
Steering Cardan Lock Bolt
How to remove the steering rack, regardless of the car model? The work is carried out in 4 stages.
- The mounting crosspieces are loosened (to access them, you should look under the brake pedal inside the car). To release it, it is enough to unscrew just 1 nut, since the fastening mechanism is implemented on the principle of a clamp.
- When restoring or repairing the steering wheel, you need to return to the area under the hood and use the steering wheel to release the clamp clamps.
- After performing simple manipulations, the rail is finally released; simply remove it: grab the base of the body with both hands and begin to gently and slowly loosen it, simultaneously pulling it towards you.
We remove the rack
4.After disconnecting all the clamps and fastenings, you need to pull out the steering rack using the hole in the arched wheel space: turn it first to the left and then to the right (as it turns out) so that the splined shaft gets into the structural recess.
Removing the rack
Craftsmen recommend carrying out work as carefully as possible. Replacing the steering rack should not damage the electrical wiring or fuel hose. You can't do this without an assistant. Installation of a new rail begins only after the old one has been cured.
The process of installing a new mechanism is carried out in reverse order. Using graphite lubricant or ordinary grease, the landing areas of the studs are treated, and they are also cleaned with a brush. To prevent traction in the car from falling, all the plugs in the new rack are opened and they are filled with lithol.
New steering rack
The rack is rotated around its axis, but smoothly, in order to eliminate the possibility of damage to the wiring.
We strongly recommend watching the thematic video about removing the steering rack yourself, presented below.
About qualified electric amplifier replacement
If there is a need to replace the mechanism when the ESD does not work, we recommend contacting experienced technicians. When the car is under warranty, the most rational measure would be to contact the dealer network to resolve the problem.
There are situations that do not allow you to resort to these two methods of eliminating an amplifier malfunction. Then the only solution will be to manually replace the mechanism that has become unusable.
Let us immediately make a reservation that the replacement process if the EUR does not work is characterized by sufficient complexity. To carry it out successfully, you will need experience and the possession of special tools. Unqualified replacement actions can aggravate the scale of the breakdown, which will entail a significant waste of money on more expensive repairs in service conditions.
Before the actual replacement procedure, we recommend that you carefully study the entire list of features and actions if the ESD does not work. Here you will need to delve into the connection diagram of the unit, which will avoid damage to the electrical components of the mechanism.
To remove the amplifier, partial disassembly of the front panel of the Lada Kalina is necessary. After this, the device itself must be disconnected from the entire list of supply wires. Sometimes owners repair the electric power steering, avoiding the need to replace it with a new unit. As a rule, after a complex of restoration work, standard devices work no worse than their new counterparts.
A common malfunction is the occurrence of a knock that clearly comes to the driver from under the panel or the amplifier turns off. This phenomenon may be accompanied by a characteristic squeak that occurs during rotational actions with the LADA Kalina steering wheel. This situation is usually solved by using a special lubricant. If such an action does not bring the expected result, then a more detailed diagnosis of the amplification mechanism will be required.
To install the electric power steering in the seat of the Lada Kalina, you will need to be attentive and patient. All cable connectors must be tightly seated, and the device itself must be firmly secured. Only after this can you proceed to the reassembly of the previously dismantled front panel components.
Do-it-yourself repair of Kalina's electric booster
How to disassemble and repair a rack when jammed?
The repair procedure, like replacing the steering rack, begins with disassembling the unit. To perform a set of actions, we purchase a repair kit.
- To disassemble the rack, unscrew the adjusting nut and then remove the thrust bushing. If at the moment we are experiencing difficulties, then we use a mallet, with which we apply gentle blows to the rack body.
- We dismantle the side plugs along with the boot. First cut off the plastic fasteners.
- We must replace the boot with a new product.
- We also use a mallet to remove the shaft from the rack body.
- Inside the freed crankcase we find a plastic sleeve, which we remove using a screwdriver. We also replace this component with a new analogue (present in the repair kit).
- We clean the internal cavity of the rack housing from old grease. Wash and dry.
- Apply new grease. We lubricate the gear pair with special care.
- We inspect all other components of the rack and pinion mechanism and, if wear is suspected, we replace them. Removing the steering wheel in Lada Kalina works like this.
1. Disconnect the battery.
2. Turn off the airbags. Loosen the clamps and move them to the side.
3. Disconnect the two-wire horn connector.
4. We move on to the steering shaft and in the area where the arrow is present, we outline the location (until removal).
5. Loosen the steering wheel nut, but do not completely unscrew it.
6. We take the steering wheel and, using rocking movements to the sides, move it close to the indicated nut.
7. Now we align the wheels and place the steering wheel in a strictly straight position.
8. We take out the pin, and then insert it into the switch block located directly under the steering wheel. At this moment, the steering wheel rim should be clearly fixed.
9. After removing the wires, we proceed to removing the steering wheel itself.
10. We check the integrity of all elements.
11. Assembly is carried out using the reverse algorithm.
Chip errors
When a situation is observed that the wheels turn on their own, the reason is the electronic filling of the Priora electric power steering control unit. As mentioned above, quality was sacrificed for the sake of economy. Now the situation with this seems to have improved and everything has been finalized, but if suddenly you feel that the steering wheel is starting to move by itself, go for repairs.
If, along with the electric power steering, the speedometer also fails, then you need to look at the speed sensor. It was either simply dirty or broken. The same applies to the torque sensor installed on the amplifier. Clean them well and check their functionality.
Don’t forget to reset errors on the on-board computer; this can be done in several ways.
- Remove the terminal from the battery, wait a few seconds and put it back, the error should go away.
- Using a computer, the corresponding software can be found on the Internet.
How to trim a steering wheel correctly?
It's time to move directly to covering our steering wheel with the purchased braid, or to putting on a cover. As mentioned above, this activity is not as simple as it might seem at first glance. To simplify the whole process, I have prepared special photo instructions.
How to put the cover on the steering wheel?
The cover is pulled over the steering wheel from top to bottom. It is better when two people participate in this process: one fixes the cover at one point, preventing it from slipping and warping, and the second carefully tightens it. Sometimes the cover is put on quite tightly, and it is impossible to do without male strength.
How to cover a steering wheel with braid?
The process of tightening the cover may seem like a small thing to you compared to the complexity of covering the steering wheel with a thread and a needle. There are many methods, each of which depends on the individual characteristics of a particular braid model. I will suggest one method.
First, we put our cover on the steering wheel. In the case itself, holes for threads are already made in advance, because... the leather is quite thick, and it will be very difficult to pierce it on the steering wheel (all the work will “go away” and don’t expect a good effect.). In one place our thread with a knot is pierced, and the process of covering the steering wheel has begun.
This cladding method is the simplest, fastest and does not require special skills.
However, this cross method looks much more attractive. This stitch completely replicates the cross stitch method.
There is also this method.
This article was about how to choose a steering wheel braid. Ride in comfort!
All steering wheel braids are divided by size by manufacturers. This is one of the main characteristics, along with the material from which it is made, as well as the method of attachment directly to the steering wheel.
Handlebar braid size 2110 (handlebar size)
Cars VAZ 2110, VAZ 2111 and VAZ 2112 - the steering wheel size is 38 cm, accordingly you need to purchase a braid of size M (37-38 cm)
steering wheel braid size 2110
Niva steering wheel braid size (steering wheel size)
The Niva's steering wheel is slightly different in size from other cars produced by VAZ. The diameter of the handlebar is 40 cm, which corresponds to size L.
Niva steering wheel braid size
Gazelle steering wheel braid size (handlebar size)
The most popular domestic business vehicle has an even larger steering wheel than passenger cars. And accordingly, a braid size XL is suitable for them
GAZelle steering wheel braid
Logan steering wheel braid size (steering wheel size)
One of the most popular foreign cars has a steering wheel size of 38 cm, and accordingly the appropriate size for it is M.
Logan steering wheel braid size
Braid on grant size (handlebar size)
Like most passenger cars, the VAZ 2190 Granta and modifications are equipped with a steering wheel whose diameter is 38 cm. Accordingly, the size of the suitable braid is M.
Grant braid size
Steering wheel braid sizes Priora (steering wheel size)
Priora, like almost all passenger cars, is equipped with steering wheels with a diameter of 38 cm. By purchasing size M, the car enthusiast makes the right choice.
steering wheel braid priors dimensions
Solaris steering wheel braid size (steering wheel size)
Most foreign passenger cars have a steering wheel with a diameter of 38 centimeters, which corresponds to size M.
Braid on Solaris size
We remove the EUR on the Priora and install a new one
When the EUR on your car either works or doesn’t, and you have identified the reasons why it is clear that repairing the device is useless, you need to replace the amplifier with a new one. You can do this with a little time and effort, but still with your own hands.
Tools required to replace the ESD on a LADA Priora:
- A Phillips screwdriver is the most common.
- Head on "13", the main tool.
- An “8” spanner will also come in handy.
Step-by-step instructions for replacing the EUR on a Priora:
The first step is to disconnect the battery; it will be enough to “throw off” the negative terminal. We remove the plastic covers from the steering column, to do this we unfasten a couple of clamps and unscrew a couple of screws. We unscrew the 4 bolts and loosely but carefully separate the lower part of the plastic closing cover. At this stage, the lock and switch levers, of course, the wipers and turns, are in the way. Slowly, disconnect all the wires and use the “8” key to loosen the clamp securing all of the above devices. They come off the shaft casing easily. Disconnect 2 connectors from the electronic control unit. Remove the plastic cover from the special pin. The lower nuts do not need to be unscrewed, just turn them just a few turns. Next, remove the hinge pinch bolt. Unscrew all remaining fastening nuts. We remove the EUR. We install the new amplifier and assemble everything in the reverse order
It is important not to confuse anything.
How to tighten the electric power steering rack?
The appearance of a knocking sound in the operation of the electric power steering is associated with the need to tighten the steering rack.
How to do it right:
- First you need to disconnect the battery; to do this, disconnect the terminals from it. Unscrew the battery mount; to do this, you need to unscrew two more nuts located at the edges. After this, the battery is removed and put aside.
- Then you need to lift the plastic stand, there are four more screws under it, they can also be unscrewed.
- Having done this, it is necessary to move this stand forward until the platform is disconnected from the air filter housing retainer pad. After this, the trim can be moved back, this will provide freer access to the rail itself.
- At the next stage, you will need to crawl your hand under the rail. Directly below it, as shown in the photo, there is a rubberized cap; it will need to be removed, this will allow the key to access the adjusting nut.
- To perform adjustment work, you will need a special wrench to tighten the rack; without it, the adjustment procedure will not be possible. Using this wrench, you need to crawl under the car rail to install the tool in the required hole.
- When adjusting, be careful not to overtighten the rack. If its tightening is very strong, then when cornering the rack will bite, and this, in turn, may affect the safety of movement. The angle of adjustment is always different, it depends on how much the nut is loose, but usually when performing such work the nut is tightened by approximately 30 degrees. This should be enough to get everything right. After the adjustment is completed, it will be necessary to check that this task was performed correctly. That is, you will need to make sure that the steering wheel turns normally to any position all the way and there is no knocking. If the knock remains, then the adjustment continues.
Installation instructions
This manual is intended for those who have minimal skills in working with tools and vehicle systems. It is made as accessible as possible to everyone. But if you doubt your skills and knowledge, it is better to contact a car service.
Required tools and materials
First of all, you will need the EUR itself. Please note its serial number. The last two digits indicate the type and place of production.
So, 00 is a geared amplifier, produced in Makhachkala and has received complaints from drivers. With the numbers 04 - Korean, installed on Grants and Kalinas, a good amplifier, can be found in stores, but there are few of them on sale. Well, 02 - Kaluga, gearless type, also has good reviews.
To connect, you will need common tools such as screwdrivers, wrenches, and an angle grinder.
Installation process
First, you will need to completely remove elements such as the airbag, steering wheel, switches, ignition switch, and finally the steering column along with the bracket and cardan.
Then do everything as follows:
- Taking the old bracket-plate, knock out the bolts from it. Then cut off about 30 mm from the top (where 2 bolts are welded and there are 3 holes).
- Try the plate on the EUR, if the holes do not match (most likely this will happen), drill them.
- Now you need to attach the gimbal to the amplifier.
- You need to put washers under the bracket at the point of attachment to the amplifier. They can be of different thicknesses and have a direct impact on future steering adjustments.
- Now you can attach the EUR. Insert the cardan onto the rack.