Clutch cable VAZ 2110 and its replacement
Usually the clutch cable breaks when the vehicle is operated in extreme conditions. Most often, a similar problem occurs with “old” cars that are in use all year round. If such a problem occurs, you can try to carry out a process called replacing the VAZ 2110 clutch cable yourself. To perform these actions, it is not necessary to use special knowledge and it is not necessary to have a professional tool. In order for the replacement of the clutch cable in a VAZ 2110 to be successful, basic information will be enough.
Clutch cable, why is it needed?
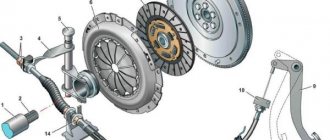
Foreign automakers do not often install this clutch drive on their cars, preferring more reliable hydraulics, which rarely fail. But cars of domestic manufacturers were equipped with conventional cable clutch mechanisms, even despite a lot of shortcomings, which the owners of such vehicles are well aware of.
During operation, the clutch cable must be constantly adjusted, which is due to natural wear and tear of the drive. It can quickly succumb to corrosion, burst at the most inopportune moments, and so on.
Therefore, every motorist driving a car with a manual transmission should be aware of what measures should be taken if the clutch cable fails.
Replacing the VAZ 2110-2112 clutch cable with your own hands, recommendations
In order to replace the clutch cable, you will need the following set of mechanic tools:
- flat and Phillips screwdrivers;
- a set of open-end wrenches and sockets with a ratchet.
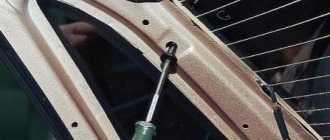
Next, you need to perform a simple algorithm of actions, which involves dismantling the VAZ 2110 windshield wiper and window trim. Of course, it is possible to replace the clutch cable without the above steps, but complete instructions according to standard recommendations will still be more clear.
- 1. First, you need to discard the front facing panel for the wind window frame (jabot), held in place by a set of screws;
- 2. Next, remove the windshield washer tubes, wiper arms (in the case of an old-style frill) and, finally, the casing itself.
Removing windshield washer tubes
- 3. Remove the windshield wiper, having first disconnected the negative terminal of the battery and disconnected the expansion tank, for which:
- the gear motor connector is dismantled;
- unscrew the nuts of the left and right fastening of the trapezoid, as well as the bolt holding the gearmotor to the bracket;
- finally, the wiper base, removed from the studs, can be removed from the air supply box.
Clutch cable is faulty, signs of malfunction
If the clutch cable fails, the movement of the car becomes significantly more difficult, namely:
- The clutch pedal falls.
- When the engine is on, the gears do not engage.
- The free play of the clutch pedal increases.
Shifting gears without clutch
Not every driver of a VAZ 2110 imagines how to not only start, but also drive a car without using the clutch pedal. Of course, this skill is very specific, but it can be vitally important when the clutch cable breaks at the most inopportune moment.
The easiest way is to start the car in first gear, first pressing the gas pedal halfway. After turning the ignition, the car will immediately move off with a very noticeable jerk, so be extremely careful when trying to start it this way. Similarly, we turn on the reverse gear.
Driving for a long time in first gear can cause the engine to overheat. If there is a considerable distance to be covered, it is better to learn how to shift higher gears without using the clutch, for which:
- release the gas pedal and, at the moment of least resistance, switch off the gear, moving the transmission lever to the neutral position;
- then engage the next gear, continuing acceleration.
The proposed algorithm for downshifting in the event of a non-working clutch requiring replacement is somewhat different:
- Having switched to neutral gear, we revise the throttle, thereby increasing the speed of the input shaft;
- and only then switch to a lower gear.
Possible causes of malfunction
A cable break, as a rule, occurs on vehicles that operate constantly and in poor operating conditions. However, this breakdown can occur on any car, even with low mileage.
In addition, wear of the cable occurs as a result of improper driving of the vehicle - with a sharp start at high speeds, and also if the driver’s foot is on the clutch while driving, which causes slipping and, accordingly, its failure in the future.
Important points when replacing the cable
Unscrewing the fastener
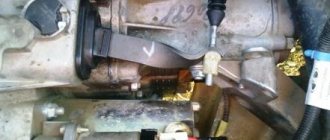
- As practice shows, the procedure for replacing a cable on a “ten” begins in the engine compartment. You are required to hold the fork and at the same time pull the cable that is removed from the fork.
- Then the cable fastener is removed from the bracket, which is located on the gearbox. Having completed this procedure, we go into the interior and dismantle the damaged element, that is, the cable.
- The result of the repair is influenced not only by the quality of the new cable, but also by the correctness of the entire replacement procedure.
- If you are dealing with a “ten” from an experimental industrial batch, then the bracket will be presented as a bolt with a Phillips-head screwdriver. To dismantle such a fastening element, you cannot use a regular screwdriver. A special shortened tool will be required.
- If the cable breaks while driving, you can unscrew the bracket with a handy tool, but through the safety block.
- It is strongly recommended to replace the non-standard bolt with a regular one, which can be unscrewed with a simple wrench.
- Be sure to keep a set of tools in your car, since it is extremely rare for a cable to break at the right moment. There is hardly a right moment for any kind of machine breakdown.
When it is necessary to change, or the first signs for replacing the clutch cable
The clutch cable must be replaced if part of the wire in the tip breaks, the cable itself breaks, or its plastic sheath is damaged. The first signs indicating that the clutch cable should be replaced are the appearance of extraneous sounds when the clutch is engaged, its jerking and slipping.
Replacing and adjusting the clutch cable yourself
Often, some minor malfunctions and car breakdowns take the car owner by surprise.
No one is immune from such unexpected situations on the road, which is why it is so important to have the necessary knowledge that will help you quickly cope with any troubles. Car clutch malfunctions are quite common. Therefore, today we will talk about replacing and adjusting the clutch cable with your own hands.
So, after carrying out the initial diagnostics of the car, you have determined that the clutch cable has failed. It is immediately worth noting that the cable is replaced in two cases - when it has been torn, or when it is moved tightly.
In order to replace and adjust the cable, you should prepare the necessary working materials and tools - a new clutch cable that matches the model of your car, a set of screwdrivers, wrenches and pliers.
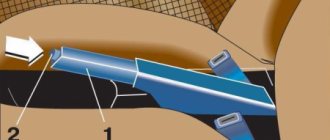
Clutch cable replacement process
- The first thing that needs to be done before dismantling the old cable is to inspect it and take the necessary measurements of the free part of the cable of the lower tip, which is located near the gearbox. We inspect the entire length of the cable from the fastening to the clutch block or gearbox (types of gearbox). Then we find the connection point of the cable and carefully disconnect it from the gearbox or clutch unit, pulling it into the cabin through the engine compartment. If necessary, we remove part of the floor under the pedals for ease of dismantling. At the very end, disconnect it from the clutch pedal. After the cable is disconnected, remove the damper (tip) from the bracket on the gearbox.
- Installing a new clutch cable occurs in the reverse order. We first attach the prepared cable to the clutch pedal. Next, we stretch it back to the gearbox or clutch unit and attach it to the place where it is attached. At the very end, we put the floor under the pedals in place.
After replacing the cable, it is imperative to adjust it. Experts advise adjusting the cable not only when it is replaced, but also every 15-17 thousand kilometers. This is due to the fact that over time, the linings on the clutch disc wear out, which leads to increased looseness of the clutch pedal. Therefore, timely adjustment of the cable is a necessary safety measure when driving a car.
Clutch cable adjustment process
So, the process of adjusting the new cable is carried out as follows.
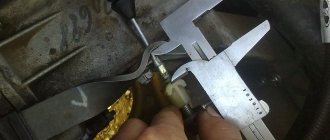
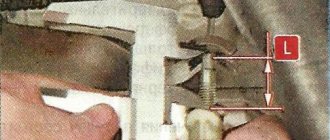
- Using a ruler, measure the length from the clutch release fork to the end of the cable. This distance should be from 82 to 90 mm. But the length from the cable tip to the gearbox bracket should be 56 - 65 mm. However, the indicated values may not always coincide with real indicators. If the length does not correspond to the specified values, it is necessary to adjust the length of the clutch cable using a wrench, tightening the adjusting nut on the tip, slightly loosening the lock nut.
- We check the accuracy of the cable adjustment by pressing the clutch pedal three times for 2 seconds with each press. After this, we measure the distance again. If the measurements do not correspond to the established indicators, we repeat the step of adjusting the cable again. In this case, the fork travel distance should be 27-33 mm or 31-35 mm. After the cable adjustment is completed, secure the nut with a locknut. Check the smooth engagement of reverse gear.
It is important to remember that when adjusting the cable, the clutch pedal must be set at the same level as the brake pedal (brake system).
In order to simplify the process of servicing the clutch cable when replacing it, many car enthusiasts install a ratcheting clutch cable with a self-regulating function, which allows them to independently compensate for the length when the disc linings wear out. This means that in the future there will be no need to adjust the clutch cable in your car.
Carrying out work on replacing and adjusting the clutch cable with your own hands will allow any car enthusiast to economically spend money on vehicle maintenance.
Tools, accessories and consumables
- Lubrication.
- Set of wrenches.
- Screwdriver Set.
- New cable.
Replacing the clutch cable, detailed, step-by-step progress of work
- First of all, we remove the windshield wiper in the car.
- Next, you need to loosen the lock nut, as well as the clutch adjusting nut.
- Then remove the cable lead from the clutch release fork.
- Now you need to move the cover in the lower tip of the cable sheath, after which we unscrew the fastening nut on the tip towards the bracket. In this case, using the second key it is necessary to keep the tip from turning.
- We take out the unscrewed tip.
- Then we remove the bracket from the studs by unscrewing the two bolts on its mount, while remembering that the bracket is mounted with an inclined platform towards the front of the car.
- Unscrew the bolt on the protective cover and remove the holder.
- The end of the cable is attached to the clutch pedal. Using a screwdriver, remove the locking bracket from the finger.
- Remove the cable end from the finger.
- On the cable holder to the pedal bracket, you need to unscrew the bolt and remove the cable itself.
- Remove the clutch pedal bushing from the pin and see what condition it is in. Please note that the sleeve must be cut, which is not a defect. If it is worn out, replace it.
- We put the new cable in place, having first lubricated the cable guide and the clutch pedal pin.
- The edge in the cable seal should be pushed towards the engine compartment, after which we tuck it into the hole in the front panel.
- After installing the cable, adjust the clutch pedal.
How to remove and change the clutch cable
VAZ 2109
- Initially, the work itself takes place under the hood of the car.
- In a VAZ 2109 car, the cable is fixed to the box using a metal bracket. To remove this part from it, it is necessary to reduce the fastening element.
- Then you need to remove the bottom end of the cable from the clutch.
- In order to carry out this work further, you need to go into the car interior. Disconnect the cable from the pedal. To do this, remove the rubber mat and move the carpet aside.
- Then we pull out the stopper bracket using a screwdriver, and then remove the pin; it is connected to the pedal bracket cable.
- In the next method we simply take it out.
- We pass the new part through the hole under the bottom and secure its end to the finger thanks to the bracket.
- Next, we fix the vehicle in the box so that the rubber bushing fits in the bracket.
- Then we put the tip on the fork.
- We install a new cable and check the operation, if necessary, we also adjust the entire process of the mechanism.
VAZ 2110
- At the very beginning, we remove the old vehicle, pull it out of the bracket, it is located in the box.
- It needs to be loosened.
- Then take it out.
- We remove it from the engagement in the fork. We hold it and remove it.
- You need to disconnect the part from the pedal.
- We take out the casing.
- Using a screwdriver, pry up the stopper bracket that supports the cable head on the pedal pin.
- Let's take her out.
- It is necessary that the pedal is raised all the way up.
- Remove the bracket.
- After removing it, you need to unscrew the support plate and then insert it into the car interior.
- At this point the whole process can be considered complete. If you did everything correctly, then you will succeed.
We recommend:
How to check the window lift motor?
VAZ 2114
- First you need to open the hood of the car and disconnect the battery terminal.
- Next, you need to find the clutch cable, then disconnect it. After this, pull the part out of the bracket and remove it from the clutch fork.
- We remove the carpet on the driver's side and remove the carpet in the pedals.
- After you have done this, you will see where the cable is located, it is also attached to the pedal. You just need to turn it off. It is fitted with the eye of one end on a hook.
- When you have disconnected all the parts of the mechanism, we pull it out. To do this, we push it away from us under the hood of the car.
- Finally, the old cable is completely removed, we put a new one in this place. Remember that before installation you need to remove the bushing that is located on the pedal; the cable is attached to it.
Priora
- First you need to remove the boot from the rubber; it covers the hole where the cable comes out. Thus, dust, dirt and moisture do not get into it. Remove the stop from the bracket.
- Now you need to look at the place where the tip of the clutch cable is connected; it is installed on the pedal pin and secured to it using a fixing part. To pull it out, this can be done using pliers or a screwdriver.
- We go under the hood of the car and are there, disconnect the clutch cable from the power fork, to do this, just pull its end.
Kalina
- First you need to remove the clutch cable sheath stop. To do this, under the panel we need to find the nut securing the cable sheath stop to the bracket and unscrew it.
- Next, using a flat-head screwdriver, pry up and remove the spring bracket.
- Then we remove the snoring mechanism part and adjust the tension of the cable.
- Remove the plastic bushing.
- In order to get to the cable, you need to pull out the air filter.
- Next we follow, pull the end of the cable and pull the leash out of the lever.
- Then remove the rubber cover protection from the tip.
- It is necessary to remove the cable from the pedal assembly bracket.
- We take out the cable seal cover from the front panel, then you need to pull out the cable.
We recommend:
How to properly replace alternator brushes on different cars
Granta
- unscrew the nuts that are attached to the cable on the pedal bracket
- remove the stop from the cable sheath studs
- dismantle the stopper bracket, hold the clutch pedal axis
- pull out the axle
- remove the clutch pedal
- disconnect the springs from the bracket
- pull out and remove the cable end stopper
- remove the dense part of the vehicle shell, which is located in the engine compartment
- pull the tip out of the fork groove
- unscrew the cable lead
- remove the braid guide bushing
- remove the clutch cable
Renault Logan
- You need to move the driver's seat as far as possible.
- Then you need to remove the carpet that covers the pedal from the pistons.
- Then you need to remove the hook-shaped part from the top of the clutch pedal. To do this, you need to feel it with your hand and press the pedal towards yourself, thereby moving the cable upward.
- It is necessary to remove the large pipe separately.
- In the end, all that remains is to remove the bracket cable jacket near the clutch fork, then remove it from it.
Adjusting the clutch pedal travel
- We put the car on a level surface with the parking brake and remove the “negative” terminal from the battery.
- We check the travel distance of the clutch drive - you need to place a ruler perpendicular to the floor and pedal. If it is 160 millimeters or more, you need to adjust the clutch travel distance.
- To adjust, open the hood of the car and from below we find the fastening of the metal clutch cable with the pedal.
- There are two nuts at its end. The first of them should be significantly unscrewed, and the second should be tightened to the required free play of the pedal (about 120 and 130 millimeters). When the nut is loosened, the pedal stroke increases, and when tightened, it decreases.
- Next, press the clutch pedal all the way three or four times and release. After this, we check the clutch pedal travel distance again using a ruler.
- If necessary, use the nut to again adjust the travel distance of the drive, and then tighten the locknut back until it stops.
- Now we move the rubber limiting sleeve all the way.
Adjusting the newly installed cable
After the VAZ 2110 clutch cable has been replaced, all that remains is to make its final adjustment, spending about 30 minutes of your personal time. Thus, we ensure comfortable and reliable operation of the VAZ 2110 clutch mechanism.
Clutch pedal adjustment
The degree of tension is adjusted by changing the position of the lower end of the cable fixed in the gearbox bracket. You can navigate by the position of the adjacent pedal. When the adjustment is completed, we check it using a tape measure or ruler.
The pedal travel from its initial position to its stop on the floor should be within 125 mm with an error of 5 mm up or down. If the pedal position does not correspond to the specified recommendations, adjustment should be continued.