How to replace the oil seal on a Chevrolet Niva
Most Chevrolet Niva owners, due to the simplicity of the design, can independently repair their car.
This is especially true for a large number of consumables, including those in the chassis of the car. One of the parts that requires periodic replacement is the Chevrolet Niva front axle oil seal. The need for repairs arises when an oil leak occurs from the axle housing and a knocking noise occurs. The main cause of grease leakage is due to a clogged breather. It is necessary to monitor at what stage the oil leak occurs. If, after intensive movement, while the gearbox is still hot, and after it cools down, it stops, then it is necessary to clean the breather. It may be clogged with dirt, which prevents the heated air from escaping outside. Therefore, it is possible to squeeze out fluid from the gearbox, even if the gaskets are in good condition.
If the breather is working properly, but oil still comes out, then most likely you will need to replace the cover gaskets and o-rings. Typically, the design of the front axle provides for the presence of three rings: an oil seal located on the axis of the drive gear, axle bearings and oil seals for the right and left drive - the axle shaft hinge.
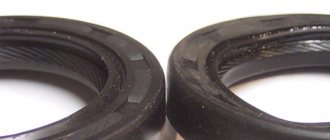
It is important to remember that the left and right oil seals are designed for different directions of rotation, so when purchasing, you should carefully check the package. The direction can be determined by the marked arrow. If installed incorrectly, there may be increased oil leakage outward due to the location of the oil scraper notches.
When is replacement required?
The replacement operation is carried out when oil leaks from the axle housing. A clogged breather causes lubricant to squeeze out.
If grease drips immediately after stopping (while the gearbox is hot), and then the flow stops, the breather must be cleaned. When it is clogged with dirt, the heated air is not released outside during movement. Under pressure, the working fluid of the gearbox will be squeezed out even through serviceable gaskets and seals.
If the breather is in order, but oil still leaks, you will have to replace damaged cover gaskets or O-rings. of them in the front axle, and they are different:
Front axle structure.
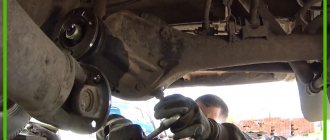
To replace the oil seal, it is not necessary to dismantle the front axle. When replacing oil seals yourself, it is not recommended to use a lift; it is better to carry out the work on an inspection pit or overpass. The rear wheels must be secured with supports. The gearbox and transfer case levers must be adjusted to the neutral position. When using a jack, it is better to hang the front part on special supports.
First, the replacement area is cleaned of drips and traces of technical fluids. After this, the crankcase plug is unscrewed and the oil in the gearbox is drained into a special container. After this, the plug is installed in place.
To carry out the replacement, you need to stock up on the following set of tools:
- set of socket wrenches and hexagons
- hammer and pry bar
- Screwdriver Set
- puller with two or three legs
- pipe sections equal to the diameter of the seals
- Liquid for removing oil residues, such as kerosene
- metal mesh
- rags
Replacing the oil seal on the drive gear drive, main steps
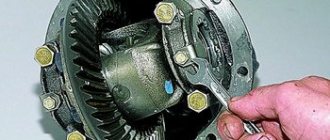
- it is necessary to unscrew the bolts holding the flange, remove the cardan shaft from the gearbox
- disconnect the CV joint housing from the drive.
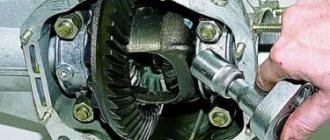
- you need to connect a dynamometer and determine at what moment the rotation begins. To do this, rotate the flange mount until the gears begin to move.
- bolts are screwed into adjacent holes
- Between the bolts there is a pry bar, with the help of which the flange is kept from turning.
- After this, you can remove the flange along with the washer using a universal puller.
- The oil seal from the bridge gear is replaced with a new original spare part. The sealing ring must be lubricated with grease or lithol.
- After this, it is necessary to press the ring using a pipe of a suitable diameter.
- The flange fits onto the spline connection.
- The cardan shaft is installed in place.
Replacing the oil seal sealing the drive gear axis
- We disconnect the driveshaft from the gearbox by unscrewing the bolts securing it to the flange.
- We separate the internal CV joint housings from the drive gears .
- Using a dynamometer, we determine the moment at which the drive gear begins to rotate freely. To do this, turn the flange mounting nut until the gear begins to rotate. We fix the magnitude of the moment.
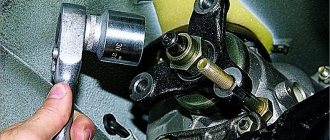
- We tighten the bolts into two adjacent flange holes (for fixation).
- We insert a mounting spade between the bolts, hold the flange from turning and unscrew the fastening nut.
- Remove the washer and flange from the spline joint. If it is impossible to remove it by hand, use a universal puller.
- Remove the oil seal using a flat-head screwdriver.
- We rinse and thoroughly wipe the replacement area.
- Replacement of the front axle drive gear oil seal is carried out only with original Chevrolet spare parts. To facilitate pressing, any grease (litol, grease) is applied to the sealing ring.
- We press the ring using a pipe of a suitable diameter.
- We place the flange on the spline connection and put on the washer.
- Tighten the nut to the torque determined when unscrewing.
- We fasten the cardan shaft.
Replacing the Chevrolet Niva front axle oil seal.
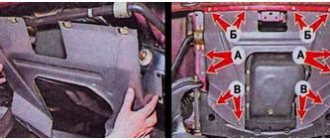
- First you need to remove one or two drives, depending on where replacement is needed.
- After this you need to remove the locking ring
- Using a hammer, knock out the bearing. If you have problems with removal, you can use WD-40 lubricant
- The cover is removed, the old oil seal is knocked out using a pipe.
- The installation site is lubricated and a new O-ring is installed.
- the unit is reassembled.
Advice on how to remove drives without dismantling the Niva front gearbox
- To dismantle the drives, it is necessary to unscrew the fastenings of the gearbox (in this case, some kind of stop is placed under it).
- Then the steering knuckles are released. To do this, simply unscrew the shock absorber mount from the lower arm and the lower ball joint.
- To relieve the load, jack up the lower suspension arm.
- Unscrew the hub nut and remove the centering ring. The nut is too tight, so we use a wrench extension (for example, a metal pipe).
- We move the steering knuckle to the side. The drive can then move freely.
- To ensure free movement of the drive during removal, the gearbox must be moved back slightly.
- We remove the drive, being careful not to damage the anthers. If the boot is torn, it must be replaced.
- The procedure for removing the right and left CV joint drives is similar.
Before dismantling, it is necessary to mechanically remove dirt from the inside of the steering knuckles and from the bottom of the car above the work area. The best option is to wash the bottom with a high-pressure apparatus one day before carrying out work.
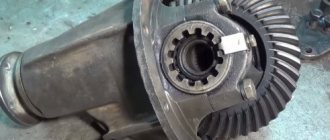
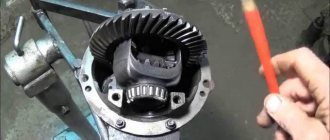
Front axle Niva Chevrolet
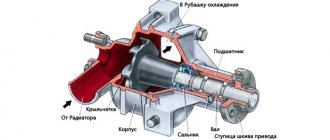
Chevy Niva front axle structure:
1 – mud deflector; 2 – lower cover of the gearbox housing; 3 – drive gear bearings; 4 – differential housing; 5 – drain plug; 6 – filler and control hole plug; 7 – bearing of the internal hinge housing; 8 – oil seal; 9 – housing of the internal wheel drive hinge; 10 – spring washer; 11 – retaining ring; 12 – bearing cover; 13 – adjusting nut; 14 – differential box bearing; 15 – bearing cover; 16 – cover fastening bolt; 17 – support washer; 18 – satellite; 19 – axle gear; 20 – gearbox housing; 21 – breather; 22 – bearing cover of the internal hinge; 23 – satellite axis; 24 – adjusting ring; 25 – drive gear; 26 – bearing spacer; 27 – drive gear oil seal; 28 – flange.
The front axle of the Niva Chevrolet consists of a main gear and a differential installed in one housing. The differential, final drive gears and gearbox bearings of the front and rear axles are the same. The front axle gear housing is cast, covered with covers at the front and bottom. The crankcase covers are sealed with gaskets.
How to replace bearings and seals of the inner CV joint in the front axle of a VAZ-2121
If, when diagnosing the bridge, we find that the radial clearance in the bearings of the internal hinge housing exceeds 0.05 mm, then the bearing must be replaced.
According to the catalog, the right drive oil seal numbers are 21213-2301034; left drive - 21213-2301035.
Inner joint housing bearing numbers - 2107-1701190-01; 2107-1701190-03; 2107-1701190-04; 2107-1701190-05
We carry out the work on a lift or inspection pit
Consider replacing the right wheel bearing.
We remove the front wheel drive (For removal and installation of the front wheel drive, see the article - “Removing and installing the front wheel drive”).
1. Using pliers, remove the retaining ring
2. Remove the spring washer
3. We knock the bearing cap off the shaft, together with the bearing, using a hammer with a plastic striker
4. Remove the inner joint housing bearing
5. Using pliers, remove the installation ring from the groove
6. Remove the bearing cover with oil seal
7. If you need to replace the front axle mounting bracket, remove it
8. Use a suitable socket or piece of pipe to knock out the oil seal.
9. Remove the oil seal from the cover
10. Lubricate the surface of the new oil seal and press it into the cover.
Assembling the units is done in the reverse order.
Changing the oil in the front axle of Niva Chevrolet
The manufacturer recommends changing the oil in the front axle gearbox every 45 thousand mileage; to change it you will need a 17 mm wrench, a 17 mm hexagon, a syringe and a container for old oil. It is best to change the oil in the Niva Chevrolet gearbox after a hot trip
Unscrew the drain plug of the front gearbox housing and drain the oil into a container, then screw the plug back
Unscrew the filler plug and fill in new transmission oil using a syringe to the level of the lower edge of the filler hole and screw in the filler plug. This completes the transmission oil change for Chevy.
Removing the rear axle shaft and replacing the oil seal
An axial clearance of no more than 0.7 mm is allowed.
We hang and remove the rear wheel. Remove the rear brake pads (see here).
We remove the rear shock absorber bracket - at the same time, unscrew the three nuts of the bolts securing the shock absorber bracket and the axle shaft bearing plate to the beam flange
Using a 17mm spanner, unscrew the four nuts on the bolts securing the axle shaft to the beam flange.
Use a slotted screwdriver to bend the locking plates of the axle shaft mounting bolts...
We fix the wheel with the reverse side on the axle shaft by tightening three nuts several turns.
Holding the wheel, we move it with a jerk...
...and remove the axle shaft assembly with the bearing mounting plate, bearing and locking ring.
Note. If you are not going to change the oil seal, be careful not to damage its working edge.
We take out the rubber sealing ring of the beam flange.
We insert two bolts into the holes of the brake shield and the rear axle beam so that the shield does not hang on the brake pipe.
We pry off the oil seal using sliding pliers...
Using a tool head of a suitable size with an extension (or a piece of pipe), we press in a new oil seal.
If the axle shaft is deformed, its splines are worn out, or the bearing is worn out, we replace the axle shaft with a new one complete with bearing and locking ring (it is not recommended to replace the bearing or locking ring yourself).
Install the axle shaft in reverse order. Check the oil level in the rear axle and add if necessary.
(Note: When removing, on cars built before 2009, the lower shock absorber eye is not attached to a removable bracket, but to the rear axle housing, so there is no need to lift the rear axle to unload the shock absorber.)
Replacing the shank oil seal Niva Chevrolet front axle
The oil seal must be replaced with a new one if an oil leak is detected; to replace it you will need a 13, 24 wrench, a screwdriver, a torque wrench and a hammer. Before replacing the front gearbox shank seal on a Niva, turn off the gear and turn off the engine, drain the oil from the front axle crankcase and disconnect the Chevy front propeller shaft from the drive gear flange of the front axle gearbox. Remove the housings of the internal hinges of the front wheel drives from engagement with the gears of the front axle reducer axle shafts. Determine the moment of resistance to rotation of the drive gear flange nut and replace the oil seal. Install the removed components and parts in the reverse order of removal and fill the gearbox with oil.
Replacing the drive gear oil seal of the Chevrolet Niva front axle gearbox
Tools:
- Straight box spanner 13 mm
- Driver for 3/4 socket bit
- Knob attachment 24 mm
- Large flat screwdriver
- Small hammer
- Torque wrench
- Mounting blade
- Flange puller
Parts and consumables:
- Front axle gearbox drive gear oil seal
- Sealant
- Litol-24 lubricant
- Self-locking nut for flange fastening
Notes:
Replace the oil seal with a new one if an oil leak is detected. We carry out the work on an inspection ditch or overpass.
1. We disconnect the driveshaft from the front axle gearbox, as described here. We remove the housings of the internal hinges of the front wheel drives from engagement with the gears of the front axle reducer drives, as described here.
2. Using a dynamometer, we turn the drive gear clockwise by the flange mounting nut and determine the moment of its resistance to rotation (similar to the operations given in the article “Replacing the drive gear oil seal of the Chevrolet Niva rear axle gearbox”).
Note:
For clarity, we show the work with the clips and pads securing the lower cover of the gearbox housing to the anti-roll bar bar removed.
3. Insert bolts into two adjacent holes in the flange and screw nuts onto them.
4. Using a 24mm socket, unscrew the flange nut, holding it from turning with a mounting blade.
5. We remove the washer.
6. Remove the flange from the drive gear shank.
7. If there is difficulty, press it with a puller.
8. Use a screwdriver to pry off the seal.
9. Let's take it out.
10. After applying Litol-24 lubricant to the working surface of the new oil seal, we press it in with a suitable piece of pipe. We install the flange and tighten the flange mounting nut, checking the moment of resistance to rotation of the drive gear (similar to the operations given in the article “Replacing the drive gear oil seal of the Chevrolet Niva rear axle gearbox”).
11. We carry out further assembly in reverse order.
The article is missing:
- Photo of the instrument
- Photos of parts and consumables
- High-quality photos of repairs
Source: Chevrolet niva device, operation, maintenance and repair. Publishing house "Behind the Wheel".
Replacing the bearing and oil seal of the housing of the internal joint of the front axle drive of a Chevy Niva
Before starting work, prepare a hammer, a bit, a circlip remover and sealant. To replace the bearing and oil seal of the inner joint housing, you will need to remove the front wheel drive and then
Remove the bearing retaining ring, using a hammer and a wooden spacer, knock down and remove the housing and bearing from the shaft
Using a hammer and chisel, remove the front wheel inner CV joint oil seal.
Lubricate the working edge of the oil seal with transmission oil, and apply a thin layer of sealant to the outer surface
Then, using a hammer, carefully press the oil seal into the body, install the removed parts in the reverse order of removal, and if necessary, replace the old Niva Chevrolet CV joint bearing with a new one.
Replacing the rear oil seal
A characteristic sign of the need to replace the rear oil seal located on the crankshaft of a Niva Chevrolet car is oil leakage.
But the danger of such a situation is that oil begins to fall on the clutch discs and provoke slipping of this unit, and therefore contribute to the occurrence of an emergency situation on the road. In addition, lubricant leaks into the joint between the engine block and the gearbox. Replacing the rear crankshaft oil seal by analogy with the front part is carried out after checking the crankcase ventilation system. Carrying out repair work requires the use of special tools:
- socket wrench with 10mm head;
- flat screwdriver;
- hammer;
- torque wrench.
Consumables:
- crankshaft rear cover oil seal;
- sealant.
To carry out repair work, the vehicle must be placed in an inspection pit. The steps to replace this part are carried out by dismantling the component products one by one in the following sequence:
- Transmission;
- cardan;
- clutch;
- flywheel.
After completing the above steps, unscrew the two nuts that secure the front cover of the clutch housing and remove it.
A visual inspection examines the condition of the oil seal. In this case, traces of leaking oil are a signal to replace it.
Simultaneously with this check, the condition of the bearing is analyzed.
Using a small flat screwdriver, pry up and remove the faulty gasket from the seat.
The landing nest is thoroughly wiped with a clean rag.
A new copy is lubricated with engine oil.
A new copy is lubricated with engine oil and placed on the holder. During such an operation, it is necessary to control its position. The working edge of the element must be located inside the engine and tucked onto the crankshaft journal.
Using a mandrel that matches the diameter, the new part is completely pressed onto the holder.
Following the above rules will allow you to properly replace both the front and rear crankshaft seals, which, in turn, will prevent engine oil leaks and engine overheating.
Removal and installation of the Chevy Niva front axle gearbox
The Niva Chevrolet front axle gearbox is removed for replacement or repair. However, disassembling, adjusting and assembling the gearbox requires the use of special equipment and requires the skills of the performer . Repairing a Chevrolet gearbox in a garage almost never leads to the desired result. Therefore, if it is necessary to repair the gearbox, use the services of a specialized workshop. In order to remove the gearbox, prepare a 13, 17, 27 wrench, a 12 hexagon, a socket wrench, a chisel, a hammer, a syringe for filling transmission oil and a container for oil.
Remove the front wheels and drain the oil from the front axle gear housing. Disconnect the front driveshaft from the front axle gearbox
Unscrew the nut and remove the bolt securing the left bearing cover of the Niva Chevrolet front axle gearbox to the cross member of the front suspension. Remove the right front wheel drive and unscrew the three nuts securing the left drive inner joint bearing cover to the front axle gearbox
Turn the steering knuckle so that it pulls the drive, disconnect the gearbox from the drive and remove it. Installation of the Niva Chevrolet front axle gearbox and the removed parts is performed in the reverse order of removal, after which fill the gearbox with oil.
Preparation and disassembly
To independently remove a leaking rear axle oil seal on a Niva Chevrolet, you will need the following tools:
- standard set of wrenches;
- slotted screwdriver and wheel wrench;
- jack;
- hammer;
- wooden stand;
- cloth gloves.
Never neglect gloves when repairing a car: they will protect your hands from damage due to accidental impacts. The height of the wooden stand should be enough to support the rear axle with the wheel removed and the shock absorber unscrewed, otherwise oil will leak from it.
Before removing the old seal, you will have to disassemble the rear hub assembly and remove the axle shaft. Disassembly is carried out in the following sequence:
- Place the car on a level surface and secure it with wheel chocks. Make sure the handbrake is turned off.
- Loosen the wheel nuts, jack up the car and remove the wheel.
- Clean the rear axle flange that protrudes beyond the brake drum from rust. Additionally, you can treat this area with WD-40 lubricant.
- Unscrew the 2 bolts securing the drum with a 12 mm wrench, then gently tap with a hammer to move it out of place.
- The drum is removed in 2 ways: by squeezing it out with the same bolts, screwed into other holes, or by knocking it with a hammer through a piece of wood. The methods can be combined, just be careful not to damage the edge of the drum with the blows.
- After dismantling, clean the seat on the axle shaft again to make the drum easier to remove.
The next step is unscrewing and removing the axle shaft. In the VAZ 2131 Niva Chevrolet, 4 bolts securing it are held on the other side by a bracket holding the shock absorber.
After unscrewing the bolts, the shock absorber will no longer hold the rear axle, and the spring will push it down, causing oil to flow.
To avoid this, you need to first adjust the stand by jacking the car higher. The rear axle “stocking” must rest with a slope in the other direction so that the oil does not leak out.
Since in a regular Niva VAZ 21214 and 21213 the shock absorber is attached to the spring cup, and not to the rear hub, there is no need to unscrew it. A stand is also not needed here; a jack is enough to lift it.
The 4 bolts holding the rear axle shaft are unscrewed with a 17 mm wrench
Pay attention to the growers: they should not get lost in the brake mechanism. If you ignore the loss of the groover and install a new one, then the old one will subsequently get between the block and the drum while driving and the wheel will jam
After unscrewing the bolts, with a sharp movement, remove the axle shaft with the bearing from the cage. If this fails, attach the wheel to the studs with 3 nuts and try to pull it. The last option is to use a special inertial puller for removal. There is also a popular method: tie the axle shaft with a rope to an iron garage door and hit it with a hammer to knock it out of the cage. But for this you need to carefully park the car closer to the gate.
Frequent replacement of seals in bridges
Frequent replacement of seals in bridges
Post by DRON_63 » 22 Oct 2011, 12:05
Re: Frequent replacement of seals in bridges
Post by Anton » 22 Oct 2011, 12:11
Re: Frequent replacement of seals in bridges
Post by FAUST » 22 Oct 2011, 13:39
Re: Frequent replacement of seals in bridges
Adver message » 22 Oct 2011, 13:51
Re: Frequent replacement of seals in bridges
Post by DRON_63 » 22 Oct 2011, 14:49
Re: Frequent replacement of seals in bridges
Post by Axen » 22 Oct 2011, 16:18
Re: Frequent replacement of seals in bridges
Posted by bambr » Oct 22, 2011 5:05 pm
Re: Frequent replacement of seals in bridges
Post by DRON_63 » 22 Oct 2011, 17:43
Re: Frequent replacement of seals in bridges
Post by Anton » 03 Nov 2011, 08:26
Re: Frequent replacement of seals in bridges
Post by FAUST » 06 Nov 2011, 02:26
Re: Frequent replacement of seals in bridges
Post by Igor » 07 Nov 2011, 15:29
Re: Frequent replacement of seals in bridges
Post by Myams » Dec 12, 2011, 00:02
Re: Frequent replacement of seals in bridges
Post by Igor » 12 Dec 2011, 01:45
Re: Frequent replacement of seals in bridges
Post by Suicide » 12 Dec 2011, 01:52