Replacing the VAZ 2114, VAZ 2115 clutch with your own hands
We will show you how to replace the clutch on VAZ 2114, VAZ 2115, VAZ 2113 cars with your own hands. We have a new clutch from the company AT 1601131-08
Open the hood, remove the air filter, disconnect and remove the battery. Unscrew the two bolts securing the box:
Short bolt at the front, long at the back. Next we remove the starter:
First we unscrew its terminal, then the fastener (it is held on by three studs). Using a 17-mm open-end wrench, unscrew the clutch cable:
Remove the two front wheels. Unscrew the hub nuts to remove the drive:
From under the wheel arch, unscrew and remove the engine boot. We dismantle the crankcase protection (if you have one). Loosening the crab nut:
Unscrew the crab mounting bolts:
Unscrew the bolt on the stabilizer using the head and wrench at the same time:
Unscrew the two ball joint bolts:
After this, you can remove the lever with the extension so that the box can then easily move to the side. Unscrew the drain plug from the gearbox:
Place a container where the oil will be drained. After the oil has been drained, the plug must be screwed back on. We remove the drive using the following mounting tool:
Remove the plug from the reverse sensor. Unscrew the 3 bolts from the box:
We unscrewed the top bolt from the starter in advance, now we tighten the two lower ones:
After this, the starter can be removed. We disconnect the link (here we have a Kalinovsky cardan):
Disconnect the plug with the wires that goes to the speedometer. Unscrew the side airbag from the body:
Unscrew the rear airbag mount:
Unscrew the last two bolts securing the box to the engine:
We begin to dismantle the gearbox; for these purposes it is best to take an assistant, since the gearbox is very heavy. We move it slightly away from the engine using a mounting tool:
We take it by the body and take it to the side. We insert the input shaft mandrel and unscrew the old basket, it is secured with 6 bolts:
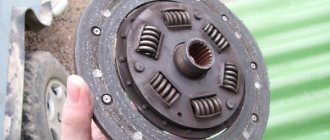
We clean the clutch disc seat from dust and dirt. We place the clutch with the convex part towards the basket:
We insert it through the mandrel onto the input shaft:
Screw it into place. Lubricate the guide bushing, spline part, fork seat and release bearing:
We fix it in its seat:
We connect the box to the engine. Next, we assemble everything in the reverse order, only in order to insert the rear cushion, you will need to first jack the box up, we use a UAZ jack for this.
How to replace the clutch on a VAZ 2115
Sometimes you don’t really want to pay fantastic prices to replace a VAZ 2115 clutch at an official service station when you can do everything yourself. In this article I will try to describe in detail the entire process of removing and installing the clutch and its drive on a VAZ 2115 car.
How to remove the clutch of a VAZ 2115
(click on the picture to enlarge the image of the VAZ 2115 clutch)
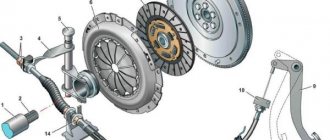
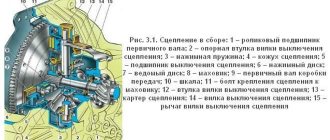
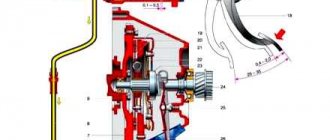
Clutch assembly:
1 – roller bearing of the input shaft; 2 – support sleeve for the clutch release fork; 3 – pressure spring; 4 – clutch casing; 5 – clutch release bearing; 6 – pressure disk; 7 – driven disk; 8 – flywheel; 9 – gearbox input shaft; 10 – scale; 11 – bolt securing the clutch to the flywheel; 12 – clutch release fork bushing; 13 – clutch housing; 14 – clutch release fork; 15 – clutch release fork lever
To remove the clutch cable, unscrew the lower adjusting nut 5 and remove the lower tip 4 of the cable sheath from the bracket socket 2. Then disconnect the guide 7 from the clutch release fork lever 8. Remove the locking bracket 13 from the pedal pin and disconnect the cable 10 from the pedal 1. Remove the cable 10 assembled with the buffer and clip 12 from the front panel of the body.
If it is necessary to remove the clutch pedal, remove the brake pedal release spring and the clutch pedal release spring 9, remove the locking bracket from the brake pedal pin and disconnect the brake pedal from the vacuum booster pushrod fork. Remove the locking bracket 13 from the pedal axle 14 and remove the pedal axle from the hole in the bracket 15, remove the clutch pedal 1 and brake pedal 18 as an assembly with bushings 17 and 16.
To remove the clutch release fork, remove bushing 12 from clutch housing 13, then remove the fork.
To remove the driven disk 7 of the clutch, first remove the gearbox, then unscrew the bolts 11 securing the clutch housing 4 to the flywheel 8 and remove the housing 4 as an assembly with the pressure disk 6; this releases the clutch driven disc.
Do-it-yourself clutch installation on a VAZ 2115
Installation of the clutch and its drive is carried out in the reverse order of removal, taking into account the following:
1. First of all, clean and rinse with white spirit the splines in the hub of the driven disk and on the input shaft of the gearbox, check the condition of the splines;
Attention.
Lubricant is not applied to the splines of the driven disk and the splines of the input shaft of the gearbox, because Coked lubricant during operation can lead to seizing of the driven disk.
Centering the driven disk:
1 – flywheel; 2 – clutch assembly; 3 – mandrel A. 70081
2. Then install the clutch, placing the driven disc with the protruding part of the hub towards the pressure plate and center the disc relative to the flywheel using mandrel A.70081, replacing the splined end of the gearbox input shaft.
Clutch assembly:
1 – roller bearing of the input shaft; 2 – support sleeve for the clutch release fork; 3 – pressure spring; 4 – clutch casing; 5 – clutch release bearing; 6 – pressure disk; 7 – driven disk; 8 – flywheel; 9 – gearbox input shaft; 10 – scale; 11 – bolt securing the clutch to the flywheel; 12 – clutch release fork bushing; 13 – clutch housing; 14 – clutch release fork; 15 – clutch release fork lever
3. Now lubricate bushings 2 (see figure above) and 12 with CV joint-4 grease.
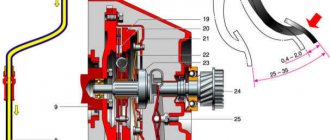
Clutch drive:
1 – clutch pedal; 2 – bracket for fastening the lower end of the cable sheath; 3 – cable sheath; 4 – lower tip of the cable sheath; 5 – nut; 6 – protective cover; 7 – cable lead; 8 – clutch release fork lever; 9 – clutch pedal release spring; 10 – cable; 11 – upper tip of the cable sheath; 12 – clip; 13 – locking brackets; 14 – pedal axis; 15 – bracket for clutch and brake pedals; 16 – spacer sleeve; 17 – clutch pedal bushings; 18 – brake pedal; A - cable guide element; X - clutch pedal travel
4. Lubricate the pedal bushings, fingers on the clutch and brake pedals and cable guide pin 7 with LSC-15 or Litol-24 grease.
5. Place element “A” of driver 7 towards the engine, as shown in the figure above.
Replacing the clutch on a VAZ 2115 with your own hands was successfully completed. Let me remind you that the previous article was about installing the front and rear bumpers on a VAZ 2115.
labavto.com
While driving a car of any brand, specific sounds or even squeaks can be heard, and subsequently the clutch begins to slip. This can only mean one thing: the VAZ 2114 clutch needs to be replaced. If you decide to entrust all replacement work to service station specialists, then, of course, you can be sure of the quality and correctness of the work performed, but for this you will have to pay a lot of money.
The replacement procedure itself is simple and, if you carefully study the instructions, any car enthusiast can do it. When making a replacement for the first time, you can invite a friend who has experience in such work. This will not only significantly speed up the replacement, but will also guarantee that the work was done correctly. Let’s say right away that it is better to carry out replacement work on an overpass or inspection pit, which are provided in almost all garages. If you do not have this opportunity, then you will need to raise the front of the car, for example, using bricks or other devices.
Changing the release bearing on a VAZ 2114
The release bearing of the VAZ 2114 car is the most important clutch element, acting as a thrust mechanism that transmits the pressing force that comes from the clutch to the drive disc hub and the basket spider. Thanks to the release bearing, the disc disengages from the clutch with the basket, and it also ensures that the clutch is turned off and on. If problems arise with the clutch, then it is often necessary to replace the release bearing of the VAZ 2114. The article examines the main symptoms of its malfunctions and provides step-by-step instructions for replacement.
Which bearing to choose?
Currently, the automatic transmission is becoming increasingly popular, but there are still quite a lot of adherents of the manual transmission. The most important component of a manual transmission is the clutch release bearing. Thanks to technological progress, this part has undergone large estates. Instead of mechanical bearings that move the clutch discs due to a mechanical connection, hydraulic bearings have come. In these units, the function of the cable is performed by a hydraulic line; they have a more complex design, but at the same time they are highly reliable.
Thus, there are two types of release bearings on the automotive market:
The photos show examples.
Release bearings for VAZ 2114
Price policy
When choosing replacement parts when repairing a clutch, including the release bearing on a VAZ 2114, you need to make sure of the quality of the product, find out its manufacturer, and familiarize yourself with the certificates confirming the quality. This is of great importance, since inexpensive parts break faster, which will require repeated repairs. Experienced drivers have long come to the conclusion that inexpensive analogues cannot withstand the loads provided for the VAZ 2114 car.
Thus, there is no need to skimp on components. When purchasing new products, you need to pay attention to both price and quality, which must be confirmed by certificates. Quality should come first, as reliable components will ensure safety on the road. The price difference is usually not so high as to risk your life. Below is a table of approximate prices for a release bearing.
| Manufacturer | Price, UAH. | price, rub. |
| F.A.G. | 150,00 | 654,00 |
| UBP (Kursk) | 53,50 | 230,00 |
| AvtoVAZ | 172,00 | 740,00 |
| DK | 111,00 | 480,00 |
| SB TZA, (Khmelnitsky) | 122,00 | 425,00 |
| LSA | 102,00 | 440,00 |
Signs of bearing failure
The release bearing comes into operation only when changing gears, the rest of the time it is at rest. Its malfunction makes it impossible to further move the car. Therefore, at the first sign of failure, the part should be replaced.
This part can deteriorate due to uneven loads on it: when the clutch is depressed, it moves back along with the driven disk. Therefore, manufacturers do not recommend holding the clutch pedal depressed when the gear is engaged, as this will increase wear and accelerate the failure of the part. The product is quite durable, reliable, and rarely fails; most often this happens on the cars of novice car enthusiasts.
Signs of a malfunction are the appearance of a knocking or crackling sound when the driver depresses the clutch pedal. This increases the free play of the pedal. The appearance of sound in the summer clearly indicates a breakdown; in winter it can be caused by a change in the size of the bearing cup when the air temperature drops.
Thanks to the large safety margin, even if a knock occurs, you can drive for a while to make sure that the part is faulty if the sound increases. Other signs are the appearance of a burning smell when the car slips, engine overheating, and increased fuel consumption.
Replacement process
It is more convenient to carry out work on replacing and repairing the clutch on an inspection pit, overpass or lift. The photo shows the clutch diagram:
Car clutch diagram
Tools
To complete the work you will need the following materials and tools:
- flat screwdriver;
- a set of keys;
- lubricant "Shrus-4".
Stages
Replacement consists of the following steps:
- First of all, you need to remove the gearbox.
- Next, the ends of the retainer are retracted from the place where the clutch associated with the bearing engages.
- Then the release bearing is removed from the guide sleeve along with the coupling.
- After squeezing out the four tabs associated with the spring holder, you should remove the holder itself.
- After complete release from the clamps, remove the release bearing from the clutch.
Release from the retainer
Car clutch repair
Replacement does not present any difficulties, you just need to follow the correct disassembly and assembly process without violating the sequence. After carrying out the work, it is necessary to adjust the tension of the handbrake cable and check the functionality of the clutch drive.
Video “How to change a release bearing”
This video shows how to properly remove and replace a throwout bearing.
Which one is better?
When choosing a new clutch kit for a VAZ 2114, you should definitely pay attention to the manufacturer of the kit. This is very important, because by purchasing a cheap kit, you run the risk of encountering this problem again after a certain time. Often inexpensive fakes break quite quickly, unable to withstand the load. As a result, such savings will soon become the reason for repeated repairs. And the important point is that not only your personal safety, but also the safety of the passengers you transport and those around you depends on the quality of the kit you purchase. Since it is impossible to predict when a particular part, unable to withstand the load, will fail. As a result, when purchasing a new clutch kit, you must definitely think about the quality guaranteed by the manufacturer, and only then about its cost. The difference in cost is small, but the possibility of failure at the most undesirable moment is much higher for fakes.
Which clutch is better to install?
There are many clutch kits on the market from different manufacturers. Lada Samara is standardly equipped at the factory with a Vazinterservice (VIS) clutch. The cost of a clutch on the market is around 1,500 rubles - this is the cheapest option.
Experts recommend not saving on the clutch and buying foreign analogues. Clutch kits from Valeo and Kraft Tech are in great demand. The average cost of a Valeo unit is within 3,000 rubles.
Video clutch replacement VAZ 2114, VAZ 2115
Replacement instructions
When replacing the VAZ 2114 clutch, you can resort to a simplified option - without changing the oil and removing the right CV joint. But if it is necessary to replace the fork or release bearing, then you cannot do without draining the lubricant.
Also note that if the gearbox is removed, the car is in a suspended state, which makes access to the space under the hood difficult. To simplify further work, while the vehicle is still on wheels, unscrew or disconnect everything that will subsequently interfere with dismantling the box.
Tools
- keys, heads are better;
- removable key for ball;
- wheel wrench;
Stages
- Disconnect the negative terminal of the battery.
- We dismantle the air purification system and sensor.
- Disconnect the clutch cable. Taking the opportunity, you can replace it if necessary.
Inspection of nearby systems
When replacing the clutch, it would be useful to inspect the condition of other systems and, if necessary, replace or adjust them.
In conclusion, it can be noted that the process of replacing the clutch system is simple. If you do it yourself, then your time will not be wasted, but will later pay off in spades, and the experience gained will be useful for a possible subsequent replacement.
Sorry, there are no surveys available at this time.
Replacing the release bearing on a Priora
The Prior release bearing is an integral element of the clutch system, which is involved in the gear shifting process. The part is involved in the process of pressing the clutch pedal and changing gear, and is responsible for disconnecting the clutch discs.
If we talk about the service life of the bearing, in most cases it is quite long and amounts to at least 100 thousand kilometers of the vehicle. However, during operation in difficult conditions (off-road, constant switching in traffic jams, lack of lubrication), faults are diagnosed even after 15 thousand mileage.
- Diagnostics of the release bearing on a Priora
- Replacing the release bearing of Priora
- Important points
- How to extend the service life
Diagnostics of the release bearing on a Priora
There are no special devices or tools for troubleshooting. The main signs of possible defects or malfunctions:
- extraneous noise when changing gears (knocking, crunching, specific howling, creaking);
- Difficulty when switching.
If any of the listed symptoms appears when switching, pressing the clutch pedal and changing speed, it is recommended to dismantle the box and inspect, and in case of malfunction, replace the Priora release bearing
It is important to note that it is not always necessary to replace the product with a new, similar one. Sometimes the cause of extraneous noise from the gearbox and incorrect operation of the release unit is contamination, insufficient lubrication of the product and (or) the guide bushing along which constant, working rotation of the bearing occurs. Therefore, sometimes it is enough to clean or thoroughly lubricate the bushing and the part itself. Obvious signs indicating a malfunction are:
- significant play of the part;
- physical deformations (cracks, abrasions, chips);
- uneven or difficult rotation.
When diagnosing breakdowns or damage, dismantling and installation of a new part will be required.
Replacing the release bearing of Priora
In order to change the part, you will have to remove the gearbox. You can find detailed instructions for removing the gearbox here (link to page).
After removing the box, you need the following:
- The first step to removing the bearing is to find the antennae of a special spring retainer. Next, remove the two ends of the antennae from the bearing holder. To do this, you need to apply a little force and pull the antennae out of the two holes.
- Now the bearing together with the holder can be easily removed from the guide sleeve.
- In order to inspect or replace the part itself, you will need to remove it directly from the holder. To do this, use a flat-head screwdriver to press out the four metal tabs in several places on the case.
- Now the part can be removed and replaced with a new one.
- When installing a new bearing, pay attention to its visual condition (there should be no defects or cracks). After installation and lubrication, spin the part while checking its operation for any extraneous noise. In addition, no noticeable backlash should be recorded.
- Reinstalling the gearbox.
Now you know how to change the release bearing on a Priora!
Important points
Please note that there are counterfeit auto parts on sale today. Please note that most new, original release valves contain light-colored factory-applied lubricant. In addition to the above, we recommend that you purchase release levers that are made only of metal. In addition to the presence of a metal body, make sure that in the places of fastenings, the so-called lugs (clamps), the metal coating is of a uniform color without signs of hardening at high temperatures. Pay special attention to checking the part for the so-called backlash (should be absent or minimal). Rotate the product, listen to see if there is any noise when it rotates.
In order to choose a Priora clutch release bearing, you need to know what clutch system you have installed (which manufacturer). For example, Valeo also has its own, original bearings that are not interchangeable. And on the contrary, it guarantees full compatibility and correct operation with various clutch systems on Kalina and Priora cars. Plus, there are good reviews about the quality and long service life.
How to change: sequence of actions
- The car is installed on the inspection hole. Wheel chocks are placed under the rear wheels. The front wheels are jacked up and removed.
- The hood opens and both terminals are removed from the battery.
- Using open-end wrenches, the air filter and the sensor next to it are removed.
- Access to the clutch cable is provided. This cable is disconnected with a 10mm open-end wrench.
Clutch cable that needs to be disconnected - Now the starter is removed and the bolts on the upper part of the clutch housing are unscrewed (there are 4 of them).
- The gear shift drive and the support located to the right of the gearbox are unscrewed. After this, use a 10-mm open-end wrench to unscrew the flywheel protective cover.
- Using a spanner, unscrew the fastening bolts of the ball joints. Next, the drive shafts are disconnected from the gearbox and the oil is drained.
The mounting bolts of the ball joints are unscrewed - Removing the box begins with unscrewing the bolts holding the box to the cylinders. The bolts are unscrewed using a socket head 8. A wooden beam tied to a rope is placed under the box, on which it is hung next to the engine. Next, using the same 8mm wrench, unscrew the bolts that secure the pressure plate to the flywheel.
The pressure plate is unscrewed with an 8 key - The clutch pressure and driven discs are removed.
Clutch discs ready for removal - Using a screwdriver, pry up the release spring holding the release bearing, after which the bearing is removed.
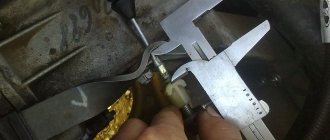
The gearbox input shaft is cleaned of dirt - Access to the gearbox input shaft is provided. It is thoroughly cleaned of residual grease and contaminants. The release bearing and spring are installed in place (replaced with new ones if necessary), then the shaft is centered using a mandrel. Only after this are the clutch driven and pressure plates installed on it. Then all components of the car are reassembled.
Video: how to replace the clutch on the fourteenth VAZ model
How to install
We change the clutch on a VAZ 2115.
First, a new clutch disc is installed. It is necessary to install the clutch basket on the flywheel on top of the disc. The holes for the bolts must match.
Place several bolts into the mounting holes of the box and move it towards the engine. After the input shaft hits the hole on the clutch driven disc, guide the last bolt using a screwdriver.
The clutch basket is tightened only after the input shaft enters the disc through the starter location.
Further assembly of the structure is carried out in the opposite order of disassembly.
Clutch adjustment is performed after complete assembly.
Important points
- When replacing the clutch, it is necessary to pay close attention not only to the condition of the discs, but also to the condition of the release bearing, which was mentioned above. After removing it, you need to turn it several times by hand. If rotation is difficult or a creaking or crackling sound is heard during scrolling, then the bearing needs to be replaced. If this is not done, all the work on replacing the clutch discs will be useless, since they will again become unusable.
- The gearbox shaft and adjacent parts should be cleaned of dirt very carefully; it is best to wash everything with kerosene and wipe dry with a clean rag.
- The above is a method for replacing the clutch with complete removal of the gearbox. But sometimes car enthusiasts do without removal. To do this, the bolts that secure the box to the engine are carefully unscrewed (one at a time). In their place, studs are installed, which are slightly thinner and at least three times longer than the mounting bolts. These pins serve as guides along which the box can be moved slightly to the side. This creates a gap between the engine and the gearbox, through which the clutch discs are removed. This method is less labor-intensive, but it has its drawbacks: it will be impossible to get to the release bearing and it will not be possible to thoroughly clean the gearbox shaft from dirt.
As you can see from this article, replacing a clutch is a very labor-intensive operation. Therefore, it is necessary to follow the proposed instructions exactly. You should also not forget about safety precautions, especially when it comes to removing the gearbox. This is a very heavy unit and you should be extremely careful when handling it.
Clutch release bearing
The clutch release bearing is a mechanical part of the vehicle transmission designed to separate the clutch disc from the pressure plate. Simply put, it engages and disengages the clutch.
The design and principle of operation of the release bearing
Such bearings come in two varieties: roller, which uses a fairly rigid connection between the rods, and hydraulic, which uses the force of the clutch hydraulic system.
Regardless of the make and model of the car, the clutch works on the same principle everywhere. It provides a smooth connection between the car’s engine and its transmission to ensure smooth operation of the car when the gear is engaged and eliminate the possibility of rapid wear of the elements connecting the engine and transmission.
The clutch is a pressure plate that attaches to the housing and presses the driven disc against the flywheel. The disk hub is connected to the input shaft and can move freely along it. Damper springs are located on the hub body, which act as vibration dampers and ensure smooth running.
To create the required pressing force, a spring with petals is used, on which the release bearing acts. It is the connecting link between the drive and the clutch, since a fork with a lever is attached to it, at the end of which a cable or other lever leading to the clutch pedal is attached.
Video - How to check the clutch release on a car
Signs of a faulty release bearing
Torque is transmitted to the release bearing only when the clutch pedal is depressed. He goes back and pulls the clutch disc behind him. This is why the clutch pedal should not be held for too long when the gear is engaged. This leads to the appearance of unstable loads on it, which leads to rapid wear of the part.
A clear sign of wear on the release bearing is the appearance of various sounds when the clutch pedal is pressed in the form of rustling and knocking sounds. However, there is no need to worry if such sounds appear during the cold season. The fact is that this part has a low expansion coefficient at low temperatures. This is due to the high strength of the steel from which the bearing is made. The glass in which the entire assembly is located, on the contrary, has a large expansion coefficient. Therefore, when the engine warms up, the sound disappears.
In addition to this, there are a number of other signs, of which it is worth noting incorrect gear shifting. Some gears simply do not turn on, or they turn on and, at the same time, jerk the car, both at the start and while driving.
Video - Replacing the clutch release bearing VAZ 2109
Operating procedure
1. Drive the car into the pit, put on the handbrake and install the wheel chocks. Then remove the terminals from the battery and put it away so that it does not interfere with the work. Also, disconnect the wire connecting to the clutch housing ground.
2. Unscrew all the bolts that secure the engine protection. Disconnect the protection. This way you will create unobstructed access from below to all nodes.
3. Unscrew the gearbox drive rod (link). To do this, use a 13mm wrench to unscrew the clamp bolt and move it to the side. Then disconnect the drive from the transmission.
4. Disconnect the sensor that turns on the reverse lights and disconnect the clutch cable.
5. Loosen the hub nuts and lift the front wheels. Remove the wheels and unscrew the hub nuts completely. After this, unscrew the ball joints and turn the hubs out so that it becomes possible to dismantle the CV joints. Remove the clamps and boots of the internal grenades and remove them from the gearbox.
Attention! Before removing the CV joints, be sure to drain the oil from the gearbox!
6. Leave some kind of support under the engine so that it does not fall over after removing the box. After this, unscrew all the bolts that secure the gearbox to the engine and unscrew the gearbox mounting bracket. It is recommended that only two people perform this work, since the gearbox is quite heavy. Pull the box out of the engine with extreme caution: the input shaft should not touch the petals.
7. Pull out the ends of the spring clip using a screwdriver and pull out the clutch.
8. Move the petals back and remove the old release bearing.
9. Install the new release bearing in reverse order. To do this, it is installed on the coupling in such a way that the protruding component is directed towards the coupling.
10. Fix the new part using the clutch holder and lubricate the entire shaft with engine oil.
After replacing the bearing, install the gearbox in the reverse order, insert the CV joint into place, secure the ball joints and tighten the hub nut. After this, install the wheels, tighten the wheel bolts and lower the car. After this, tighten them and the hub nuts. Don't forget to pour the oil back into the gearbox; it is best to replace it with new one.
This completes the process of replacing the release bearing. Good luck on the roads!
How to change: sequence of actions
- The car is installed on the inspection hole. Wheel chocks are placed under the rear wheels. The front wheels are jacked up and removed.
- The hood opens and both terminals are removed from the battery.
- Using open-end wrenches, the air filter and the sensor next to it are removed.
- Access to the clutch cable is provided. This cable is disconnected with a 10mm open-end wrench.
Clutch cable that needs to be disconnected
- Now the starter is removed and the bolts on the upper part of the clutch housing are unscrewed (there are 4 of them).
- The gear shift drive and the support located to the right of the gearbox are unscrewed. After this, use a 10-mm open-end wrench to unscrew the flywheel protective cover.
- Using a spanner, unscrew the fastening bolts of the ball joints. Next, the drive shafts are disconnected from the gearbox and the oil is drained.
The fastening bolts of the ball joints are unscrewed.
Removing the box begins with unscrewing the bolts holding the box to the cylinders. The bolts are unscrewed using a socket head 8. A wooden beam tied to a rope is placed under the box, on which it is hung next to the engine. Next, using the same 8mm wrench, unscrew the bolts that secure the pressure plate to the flywheel.
The pressure plate is unscrewed with an 8 keyThe clutch pressure and driven discs are removed.
Clutch discs ready for removalUsing a screwdriver, pry up the release spring holding the release bearing, after which the bearing is removed.
The gearbox input shaft is cleaned of dirt - Access to the gearbox input shaft is provided. It is thoroughly cleaned of residual grease and contaminants. The release bearing and spring are installed in place (replaced with new ones if necessary), then the shaft is centered using a mandrel. Only after this are the clutch driven and pressure plates installed on it. Then all components of the car are reassembled.
Video: how to replace the clutch on the fourteenth VAZ model
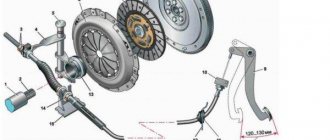
Removing and replacing the clutch block
To remove the basket and disc, you will need to unscrew the bolts in a circle. It is advisable to do this crosswise, this will prevent damage to the basket. The release bearing is located on the input shaft of the box and is fixed with a spring clip. It needs to be removed and a new one installed immediately. It is advisable to apply a little graphite-based lubricant to the new one - this will slightly extend its service life.
Install in the following order:
- Place a guide inside the crankshaft - a small piece of pipe or a piece of the gearbox input shaft.
- Install the clutch disc and basket onto it.
- Tighten the bolts, but do not tighten them.
- Make sure the disc and basket are centered.
- Tighten the bolts in a crisscross pattern.
This completes the replacement of the VAZ-2115 clutch disc; upon completion of the entire procedure, remove the guide sleeve. Now everything is ready to install the box in place. Installing it is much more difficult, since even with a slight deviation in the centers of the holes in the disk and crankshaft, the first one simply will not go in all the way. Everything will have to be disassembled and re-aligned. Therefore, carry out all the work correctly before installing the box.
Important points
As you can see from this article, replacing a clutch is a very labor-intensive operation. Therefore, it is necessary to follow the proposed instructions exactly. You should also not forget about safety precautions, especially when it comes to removing the gearbox. This is a very heavy unit and you should be extremely careful when handling it.
0 0 vote
Article rating
replacing the release bearing of a VAZ 2114
The clutch is an important function of the machine, so you definitely need to know the principle of operation and the release bearing, which is one of the components of the clutch. This part plays the function of a thrust mechanism, by transmitting the pressure force transmitted from the clutch to the drive disc hub and the basket spider. The bearing allows the disk to come out of the coupling with the basket, and also ensures that the clutch is engaged and disengaged. The roller operates due to the rigidity of the linkage. Hydraulic provides force through a hydraulic system. If problems arise with the clutch, the driver will definitely recognize this by the corresponding sounds while driving the car, difficulty appears when changing gears, while overtaking the clutch may completely disappear, slippage may occur, and other unpleasant moments.
Accordingly, if any corresponding sign of malfunction occurs, the driver is obligated to carry out appropriate repairs. To perform this work, it is better to use a pit, a lift or an overpass, for convenience. Before replacing the release bearing and clutch, the gearbox must be disconnected. To remove the release bearing, you need to unfasten the clamps and then remove everything together with the clutch. remove the input shaft from the bearing. After fully releasing the clamps, remove the bearing from the coupling. We carry out the installation procedure for a new bearing model, first checking it for quality.
If the bearing moves perfectly without problems, freely, then it is in good condition. the clutch is lubricated, and the release bearing is installed on the release sleeve, pre-lubricated with engine oil, and then secured with special clamps. The work is done. Finally, secure the gearbox in place. The clutch is an important function of the machine, so you definitely need to know the principle of operation and the release bearing, which is one of the components of the clutch.
This part plays the function of a thrust mechanism, by transmitting the pressure force transmitted from the clutch to the drive disc hub and the basket spider. The bearing allows the disk to come out of the coupling with the basket, and also ensures that the clutch is engaged and disengaged. The roller operates due to the rigidity of the linkage. Hydraulic provides force through a hydraulic system. If problems arise with the clutch, the driver will definitely recognize this by the corresponding sounds while driving the car, difficulty appears when changing gears, while overtaking the clutch may completely disappear, slippage may occur, and other unpleasant moments.
Accordingly, if any corresponding sign of malfunction occurs, the driver is obligated to carry out appropriate repairs. To perform this work, it is better to use a pit, a lift or an overpass, for convenience. Before replacing the release bearing and clutch, the gearbox must be disconnected. To remove the release bearing, you need to unfasten the clamps and then remove everything together with the clutch. remove the input shaft from the bearing. After fully releasing the clamps, remove the bearing from the coupling. We carry out the installation procedure for a new bearing model, first checking it for quality.
Replacing the release bearing of a VAZ 2115
If the bearing moves perfectly without problems, freely, then it is in good condition. the clutch is lubricated, and the release bearing is installed on the release sleeve, pre-lubricated with engine oil, and then secured with special clamps. The work is done. Finally, secure the gearbox in place.