The design of VAZ 2107 cars has a light alarm that indicates that the car is moving in reverse. This is one of the main indicators by which accidents can be prevented. The operation of this light alarm depends on the functionality of the sensor. However, situations often arise when the VAZ 2107 reverse sensor fails, which leads to the need for immediate repairs.
Why don't the reverse lights come on?
There are several reasons why the lamps in the reversing lights may not light:
- The fuse protecting the power supply circuit for the reverse lamps has blown. The breakdown is visible visually; you just need to pull the fuse out of the block.
- The lamps have burned out. To check the functionality of the lamps, they should be removed one by one from the lantern and make sure that there is no break in the spiral using an ohmmeter (multimeter) or a continuity tester.
- Wiring is damaged. You can also check it using a multimeter and a continuity test, but finding a break will be much more difficult.
- Poor contact of wires with the terminals of the reverse sensor. The check should begin with a visual inspection and cleaning of dirt and oxides. Then you can use a multimeter to measure the resistance of the circuit.
- There is a short circuit in the power wires. You can check the absence or presence of a short to ground wire with a continuity tester or a multimeter.
- The reverse sensor of the VAZ 2107 is broken. You can check it with a continuity tester or a multimeter. Visually, the malfunction is expressed in the fact that the reversing lights either do not turn on at all or are constantly on.
DIY replacement instructions
Now let's take a closer look at how the replacement is performed.
Let's consider the procedure using the example of a VAZ 2110 car:
- First, the car is driven into a pit. The area around the installed device must be cleared of dirt, since after removing the device, all dust and debris will get into the transmission. And this, in turn, can lead to its failure.
- Next, the crankcase protection is removed; to do this, you will need to unscrew several bolts.
- Now you will need a small container to collect the oil from the gearbox. When dismantling the DZH, part of the lubricating fluid will come out of the seat, which will subsequently need to be refilled.
- Disconnect the power connector from the controller and unscrew it from the installation location.
- Then clean the socket so that the new device can be installed in the seat without any problems. Install the new controller, do not forget the O-ring.
- Next, you will need to fill the transmission with the required amount of lubricating fluid, that is, what you drained needs to be poured back. But if the lubricant that you collected when removing the DZH contains traces of wear products, for example, metal shavings or sediment, then you need to think about replacing the fluid. Or, at a minimum, you need to fill the box not with collected oil, but with new one.
- Then all you have to do is reassemble all the elements in the reverse order and check the functionality of the installed DZH.
Repair methods
To repair the reverse signal, you can proceed in two ways. They differ in the way the sensor is accessed.
- Drive the car onto a lift or pit.
- Do the work by climbing under the car.
If you have already encountered a similar problem, then you will probably agree that replacing the DZH is best done using a pit or overpass. This makes access to the sensor as comfortable as possible, plus you minimize the risk of being splashed with oil from the gearbox.
Replacing the DZH is not the cleanest job
Of course, there is another cleanest way - sending the car to a car repair shop. But then you will have to pay not only for the sensor, but also for the services of the specialists. And this is another 2-3 times the cost of the sensor. The choice is yours anyway.
Self-replacement
It’s not difficult to get to and replace a failed DZH on your own. Follow the instructions, do not break the sequence of operations, and then the process will not take you much time and effort.
- Place the car on a pit or overpass. Be sure to apply the handbrake and place the transmission in first gear. This will help prevent your car from accidentally rolling away.
- Remove the protection from the contacts of your sensor, disconnect the contacts.
- Prepare a container into which the oil will be drained when unscrewing the DZH.
- When the container is ready, remove the sensor. In some cases, it may not be unscrewed by hand. In such a situation, use a 22 mm socket.
- Very rarely even the key cannot help, since the sensor becomes stuck to its location. Here you will have to arm yourself with a hammer and chisel and try to remove it as carefully as possible.
- Take out the failed device and insert a new one in its place.
- If oil gets on the gearbox housing, remove it with dry rags. There is no need for extra dirt. Plus, it can lead to a decrease in the efficiency of the device.
- Return all contacts to their places, put the protection back on.
- If a decent amount of lubricating fluid has spilled out of the box, be sure to top it up. Just use fresh ones. By the way, this is one of the reasons to completely change the oil in the gearbox if it has been there for more than the first season.
- The decision to change the oil will simplify the task when removing the sensor. If the liquid is drained in advance, it will not flow in different directions when the sensor is unscrewed. The work will be cleaner, plus you will kill two birds with one stone - replace the sensor and gearbox oil.
Removal and replacement
After completing the work, do not forget to check whether the reverse traffic warning system is now working. For this:
- Turn the ignition key, but do not start the engine;
- Engage reverse gear on your gearbox;
- See if the white lights turn on. If yes, everything went great.
Where is it located and how to check it
To begin replacing the reverse sensor on a VAZ 2110, you must first determine its location.
Device location
But really, where is he? There is nothing difficult in finding this element.
- You will need a trestle or pit. One way or another, you should end up under the car.
- Now look towards the rear wheels of the car and raise your eyes to the gearbox. To the left of it is your desired sensor.
- Can it be confused with other devices? Hardly. Only for this element is provision for wiring from the gearbox. Therefore, you definitely won’t find other similar devices nearby.
Let's start checking. We need to make sure that the sensor has failed, and that replacing it will actually produce results.
To check, do the following:
- Disconnect the terminal from the meter;
- Connect a multimeter to the connectors and turn it on in resistance measurement mode;
- Put the gearbox in reverse mode;
- Start the engine;
- Look at what the device produces;
- If the device shows a resistance of 0 Ohm, plus a beep sounds, then everything is fine, the sensor is working;
- It's bad if the meter shows infinity. This indicates that the sensor has served its purpose and needs urgent replacement.
We recommend: Motor oils: technical characteristics, advantages and disadvantages
Location
First you need to understand where exactly the device is located.
You can go two ways:
- Fly under the bottom and look up at the suspension. The desired object on the VAZ 2114 is located on the gearbox. There are only two sensors - speed and reverse.
- If you don’t want to crawl under the car or can’t, try getting to the device through the engine compartment by opening the lid. Although the first option is objectively more convenient.
Device location
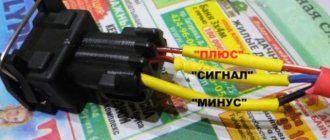
Principle of operation
Connection
This regulator works more than simply:
- You shift the gear stick to reverse;
- Simultaneously with turning on the reverse speed, the shift fork is pressed against the sensor;
- A wire short to ground is created;
- The light turns on, indicating that the car is starting to move in reverse.
ABOUT THE SIGNS OF DZH MALFUNCTION AND ITS SEARCH
It is safe to say that there can be only one sign when the VAZ 2114 reverse sensor does not work, this is the absence of lighting when driving the car in reverse. But there are quite a few culprits for this. It could be:
- Fuse F16 (15A) has blown;
- Oxidation of contacts in flashlights;
- Poor contact of the connector with the fuse block;
- Broken wires;
- The sensor output terminals have oxidized;
- The light bulb has burned out.
Often the culprit of such problems is the light bulb socket, where oxidation of the contacts occurs due to poor sealing of the lamp.
TROUBLESHOOTING
The location of the reverse sensor on the VAZ 2114 (2115, 21113) has already been clarified, let's talk about how to determine the true cause of the malfunction. To do this, it is advisable to have a measuring device such as a tester or multimeter, a light bulb with two wires, but in some cases you can do without them.
The check procedure could be as follows:
- Open the hood of the car, and then the fuse box cover;
- Check fuse F16 and replace it with a new one if necessary. If after this the lighting does not light up, continue the search;
Find and check fuse F 16
- The device checks the presence of electrical voltage at the fuse legs when the ignition is turned on. It should be equal to 12 volts. If it is absent, poor contact between the connector and the fuse box may be to blame. If there is tension, then move on;
- The search moves down under the car. You need to turn on the ignition and reverse gear. But before that you need to remove the engine protection. After this, check the supply voltage to the DZH connector;
- Connect the device or control light with one wire with ground, and the other end with an orange wire. The “movement” of the instrument needle or the glow of a light bulb indicates the presence of supply voltage;
- The next step is to short-circuit the conductors of the DZH connector to each other. If lighting appears, then we can safely say that the VAZ 2114 reverse sensor has failed. If it is absent, the search continues. The troubleshooting algorithm for VAZ 2109, VAZ 2113, VAZ 2115 is the same.
The diagnosis has been made, and now they are starting to treat it.
Functionality check
Before blaming the sensor for the malfunction of the reverse signals, make sure that the device has actually lost its functionality. To do this, run the diagnostics:
- Turn the wheels to the left all the way and look at the sensor from the driver’s side - there is a protection on the side of the gearbox, and contacts inside it;
- Remove this protection and inspect the device. There are also two contacts going to the sensor;
- Close the contacts on the frog limit switches (this is the same reverse sensor) and start the engine, engaging reverse gear;
- If everything is fine, the wires and contacts are working properly, then the white headlights will turn on;
- If the headlights do not light, use a tester to check the voltage on the wire (orange) and ground;
- If there is voltage, check the light bulb board and the quality of the contacts.
Causes of the problem and solutions
There are several most common reasons why the DZH fails. But there are countermeasures that can return the sensor to operation.
Article on the topic: Methods for replacing valve stem seals on a VAZ 2109
| Causes of the problem | Actions |
| The contacts on the wiring have oxidized | They just need to be thoroughly cleaned and returned. In this case, the negative terminal of the battery must be disconnected |
| The sensor is loose | As the sensor is used, it may move out of its seat. Screw it in tighter |
| There is no contact with the wiring in the gearbox | Check the condition of contacts and wires. Clean or replace damaged parts |
| There is no contact between the plug and the fuse box | Also check the condition of the contacts, clean them, change the wiring |
| Fuse blown | Here the situation can only be corrected by replacing the fuse |
In some situations, the sensor is working properly, the contacts are intact and the wiring is undamaged. In this case, the light bulbs themselves burned out. They are easy enough to replace.
Reverse lights do not light up
If you find that the light on the seven does not light up when reversing, then you need to immediately identify the problem and fix it. Most likely the reason will be:
- Fuse blown. If any electrical appliance or circuit malfunctions, the first step is to check the serviceability of the fuses. From the name you can guess that the essence of a fuse is to protect an electrical circuit from high current and short circuit. If the fuse is blown, it needs to be replaced and the lights will work properly.
- Bulbs burn out. One of the reasons is the burnout of the lamps, but this factor is easy to exclude, since if the lamps burn out, not both of them burn out at once.
- The integrity of the wiring is compromised - mechanical stress often contributes to damage to the wires. Rarely is the cause of their damage due to a short circuit. To determine if the wiring is working properly, you will need to use a multimeter by ringing each wire or measuring the voltage on the lights.
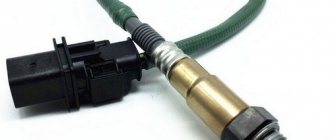
- Sensor malfunction - it is also called the reverse switch, since it is responsible for turning on and off the light alarm. Moreover, it may either break, in which case it will need to be replaced, or the terminals may oxidize, compromising the quality of the contact connection.
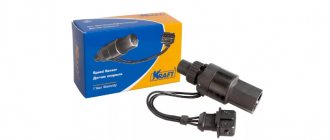
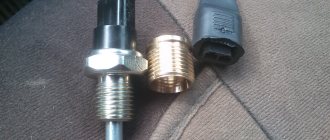
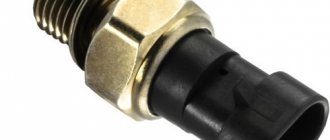
This is what the sensor on the gearbox looks like:
The sensors on 4- and 5-speed gearboxes of 7s are different. You need to pay attention when purchasing.
Malfunction of the reverse sensor is quite common, so you first need to check the integrity of the fuse, then make sure there is voltage on the lights, and only then proceed to replace the switch in question. Moreover, its malfunction can be manifested not only by the lack of lighting of the lights, but also by constant burning. If the 3X lights are constantly on, then it is necessary to replace the sensor.
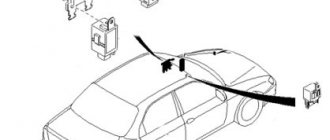
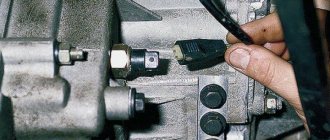
How to find the reverse sensor VAZ 2107
The element in question, which is responsible for turning the rear lights on and off on the VAZ 2107, is located in the main mechanism - this is the gearbox. To find the location of the switch, you need to crawl under the car and look at the box. The element is attached to the bottom of the gearbox on the right side.
It is impossible to confuse it with another sensor if you know where the box is and what it looks like. There is only one sensor installed on the box, not only on carburetor, but also on injection modifications.
This small part cannot be repaired, so if it is found to be faulty, it will need to be replaced. To make sure that the cause is in the device in question, you should remove the lead wires from the sensor terminal, and then move the gear shift lever to the reverse position. Set the multimeter regulator to the continuity position and touch the two contacts with the probes. If the device emits a sound signal when the reverse gear is engaged and, on the contrary, is silent when the lever is moved to the neutral position, it means that the element is working and you need to look for the cause in other components. Knowing where the frog is located on the VAZ 2107, it will not be difficult to check it further.
Location under the bottom of the car
Required parts and tools for replacement
The device in question is not the most important part on the car, however, if it malfunctions, an accident may occur. It's not worth the risk, especially if you know that your reverse lights won't turn on. To change the reverse sensor on the seven, you will need to put in very little effort.
Replacing this element lasts no more than 30 minutes, but after the work done, you will put your vehicle in order. To make a replacement, you will need a new sensor, as well as some tools, or rather a “22” wrench, which will be used to unscrew the part, as well as silicone liquid lubricant for processing the contacts. A long socket head on “22”, if available, will help to simplify the replacement of the part.
Changing the sensor
When replacing the 3X sensor, you must first clean the location of this part on the box. This is necessary in order to prevent dirt and dust from entering the mechanism. You need to carry out work to replace the reverse sensor on the seven from the inspection hole, following the following sequence:
- Disconnect the contacts from the part (there are two of them). In this case, it is not at all necessary to disconnect the terminals from the battery, since the possibility of shorting the wires is excluded (after all, they are protected by plastic clips).
- In the next step, you need to take the key to “22” in your hands, and then unscrew the old and faulty element. The old element must be dismantled together with the metal sealing washer.
- If the element cannot be unscrewed, which happens quite often, then you can use WD-40 solvent, and if the lubricant does not give results, then you need to take a hammer and chisel. If the sensor is unscrewed with a hammer and chisel, then the actions must be performed with extreme caution.
- After unscrewing, you need to clean the element seat.
- Replacing the VAZ 2107 reverse sensor requires the preliminary installation of a metal sealing ring on the threaded connection.
- After this, you can screw the device into the hole, tightening it with a wrench, applying manual force.
- Finally, you need to connect the terminals to the terminals of the device, and then check the serviceability of the light alarm.
The procedure for replacing the IAC on a VAZ 2114 engine
Before replacing the idle speed control of the VAZ 2114, you need to prepare the sensor, the necessary tools and materials:
- As a replacement device, you can buy an IAC marked 2112-1148300-04 “KZTA” or “omega” 2112-114830. When choosing, be sure to check the exit of the needle rod to a distance of no more than 23 mm;
- for work you need a Phillips-head screwdriver, as well as a key “13”;
- Be sure to have rags, WD-40 and carburetor cleaner ready.
Before replacing the device, you must:
- Place the car on a level surface and put the handbrake on.
- Raise the hood and lock it in the open position.
- Disconnect the battery; when replacing the IAC, this is not a requirement, but a mandatory condition.
- Remove the cover, which is the protective casing of the engine.
- After loosening the clamp, disconnect the rubber tube from the air filter pipe, otherwise it will interfere with the disconnection of the pipe itself.
- Unscrew the clamp securing the VF pipe, disconnect and move the pipe corrugation to the side.
- Loosen the fastening screw and pull out the cable running from the gas pedal to the throttle valve.
- Using a rag, clean the surface of the throttle body and around it.
- Lubricate the remote control mounting nuts and IAC mounting screws with WD-40 to make them unscrew better .
- Unscrew the two nuts to “13” and remove the entire throttle assembly.
- Disconnect the IAC connector by removing it from the sensor terminals.
- If there is dirt in the places where the IAC is attached and adjacent to the remote control housing, it must be removed by thoroughly wiping everything with a prepared rag.
- Using a Phillips screwdriver, unscrew the two screws that secure the IAC to the remote control.
- Remove the valve from the mounting socket.
- It is advisable to wash the throttle assembly with carburetor cleaner.
- Install the regulator prepared for replacement on the throttle assembly in the same position in which the device was just removed.
The rubber gasket, which should be sold together with the sensor, must be pre-lubricated with engine oil.
- Tighten the two screws and make sure that the IAC is tightly attached to the remote control housing.
- Place the throttle assembly in place and make sure the mounting nuts are tightly tightened.
- Connect the connector to the valve terminals.
- Attach the cable to the throttle valve and connect the VF pipe and the rubber tube, tightening the clamps.
- Install the protective cover on the engine.
- After installation, the IAC must be calibrated. To do this, connect the battery terminals and turn on the ignition for ten seconds. The ECU will calibrate itself. After this, the IAC is ready for operation.
We recommend: The main thing about the main thing - the car battery
Where is the reverse sensor located on the VAZ 2107?
On the “seven”, as on all “classic” VAZ models, the reverse sensor is located on the gearbox. It is attached to the bottom and right of the gearbox, when viewed in the direction of travel of the car.
It is impossible to confuse it with something else - this is the only part on the gearbox to which it happens that the wires going to the sensor are broken. In this case, it is easy to distinguish by a pair of protruding contacts.
What is needed for replacement
To change the part, you only need two things: a 22mm wrench and a new reverse sensor with a metal washer-spacer. It is advisable to use a socket wrench with a long wrench. But, if you don’t find one, you can get by with a cap or even a carob.
Replacing the sensor
And now it’s time to consider the process of replacing the reverse sensor on various VAZ cars - from 2106 to 2115. Here are the instructions.
VAZ 2107
Let's start with the VAZ 2107 car. On VAZ Classic models everything is done exactly the same.
Advice! Before replacing the sensor on any car, clean the gearbox housing from dirt to make it easier to find the sensor and to prevent dirt from getting into the oil.
So:
- First, we look for the sensor - it is located on the right side of the gearbox, if you look at the car as it moves. It is very difficult to make a mistake - this is the only part in the gearbox where two wires fit.
- If the wires are broken, then look for protruding contacts.
- If the wires are still on the sensor, then disconnect them.
- Next, you will need a 22 key. They need to unscrew the sensor. For convenience, it is better to take a longer wrench, since over time the sensor will stick to the crankcase.
- If you cannot unscrew the reverse sensor using a wrench (head), then you need to do this using a hammer and chisel.
Note! The gearbox housing is very fragile. Therefore, be extremely careful not to damage it with hammer blows.
- Then clean the seat from dirt using a knife.
- Remove the metal washer along with the dirt and replace it with a new one.
- Insert the sensor and tighten it using the same wrench until it stops.
- Next you need to put the wires back on. If necessary, crimp the contacts with pliers.
- And now, the replacement of the reverse sensor on the VAZ 2107 is completed!
Some people have a question about oil - whether it will leak or not. In this case it will not leak.
VAZ 2109
Let us remind you that this point applies to the Samara family as a whole, and not just to the VAZ 2109 car:
- Remove the protection from the car engine, if any.
- The location of the sensor on a VAZ 2108 and similar cars is slightly different than on a Classic, since the car has front-wheel drive.
- As the vehicle moves, the sensor is located on the left side.
- If the Classic had to be driven into a viewing hole, then cars with front-wheel drive can simply be lifted under the left front wheel using a jack.
- Again, the electrical wiring leads to the sensor.
- Remove the wires.
- To remove the sensor you will need an extended 22mm socket and a wrench.
- Using the head, remove the sensor.
Remember! Replacing a reverse sensor on a front-wheel drive vehicle is characterized by small oil leaks from the gearbox housing.
- Prepare a container and, as soon as you unscrew the sensor, place it so that the oil does not spill on the floor.
- Insert the new sensor as quickly as possible.
- Screw it in by hand first and then tighten it using the same socket and ratchet.
- Connect the electrical wiring wires.
- Add the required amount of oil.
All is ready!
VAZ 2110
Cars of the VAZ 2110 family are equipped with engines from the VAZ 2108. Therefore, there is no point in writing the same information a second time. The answer is: VAZ 2110 replacement of the reverse sensor - see the information above.
VAZ 2114
Replacing the reverse sensor on a VAZ 2114 or cars of the Samara-2 family. Instructions:
- The essence of the process is the same.
- Raise the car using a jack.
- If necessary, remove the engine protection, but this may not even be necessary.
- Find the sensor; on new Samara-2 models it has a slightly different location, but finding it will also not be difficult.
- Disconnect the electrical wiring connector from the sensor.
- Using a 22mm wrench (it’s more convenient to use a head, but you can also use a wrench) unscrew the sensor.
- Before removing the sensor from the connector, place an oil container.
Note. It is best to replace the sensor on a cold car, as less oil will leak out. Although this is not important.
- Take out the old sensor and insert the new one along with a new ring.
- Screw the sensor using a wrench or socket.
- Wipe the gearbox housing from oil traces.
- Connect the wires.
- Top up the level to the required level.
- Reinstall the engine protection (if necessary).
So, the sensors have been changed. Now you can start checking their functionality.
Description of DZH
Purpose
Let's start with the purpose. DZH is a device designed to activate white lamps, indicating that the car is in reverse gear. The device is used to turn on the reversing lights, which allows other road users to know the driver's intentions and the maneuvers he is about to perform.
When it's dark outside, white headlights will also help warn drivers behind you that your car is in their path. This, in turn, helps prevent possible incidents and emergency situations on the road. Where this device is located - the location may vary slightly, but as a rule, the controller is located on the gearbox.
Design and principle of operation
The DZH itself consists of a housing, contacts for connection, a rod, a moving ball, and a return spring.
As for the operating principle, it is as follows:
- The driver shifts the transmission lever to the reverse gear position.
- In this case, the gear shift fork is pressed against the controller.
- Next, the device shorts the cable to ground.
- After this, the light source installed in the rear lights is activated, which warns other drivers that the car has started to reverse.
Symptoms of a problem
What signs of malfunction may indicate a breakdown of the DZH:
- One of the problems that happens most often is oxidation of contacts on the terminals or wiring. This problem is relevant for many car owners. To solve this problem, it is necessary to thoroughly clean the contacts and then install them in place. When performing this work, the battery should be disconnected. If the contacts are inoperative due to the fact that they are burned out, then they will have to be changed in any case. But before making a replacement, it is necessary to find out why the burnout occurred; most likely, the essence of the problem lies in voltage surges in the on-board network.
- The device became loose in its seat. During vehicle operation, the controller may slightly move out of its installation location; this problem is usually caused by high vibrations. In this case, you will simply need to more securely fix the device at the installation site.
- Another reason for inoperability is the lack of contact with the on-board network in the gearbox. In this case, it is necessary to diagnose the condition of the contacts, as well as electrical circuits. If necessary, failed components must either be cleaned or replaced.
- The next problem is that there is no contact between the connection connector and the safety mounting block. In this case, you also need to diagnose the condition of the contacts, as well as clean and change the wires, if necessary.
- Failure of the safety device. In this case, the problem can only be solved by replacing the fuse. If this part often fails, then the reason may lie in the same voltage surges. It is necessary to check the electrical circuit more carefully.
- The reverse light may not turn on because the light source itself, that is, the lamp, has burned out. In this case, you will have to dismantle the optics cover in the trunk and replace the failed device.
- And finally, the last reason for inoperability is the breakdown of the DZH. In this case, you will not be able to repair it, since such devices, as a rule, cannot be repaired. The controller will need to be changed (the author of the video is the Do-It-Yourself Auto Repair channel).
Symptoms of malfunctions
Of course, it is very easy to suspect that the reverse sensor is not working - when you engage reverse gear, the lights do not light up.
In such a situation, there are only three options for the development of events:
- The light bulb itself has burned out, so the element itself may be intact.
- The power fuse has stopped working. It’s not uncommon for him to simply burn out.
- The sensor itself does not work. This does not happen so often, but you will have to check its condition.
Is it because of the sensor?
Indeed, how can one determine that it is the one that has failed and not a fuse or light bulb that has blown? Everything is quite simple.
- You will have to remove the fuse and check it for integrity. For a VAZ 2110 car, it is planned to install a fuse number 19, the rated current of which is 7.5A. It is located in the mounting block, and the mounting block is under the dashboard.
- Check the condition of the lamp. If everything is fine with it too, then there is only one option left - the reverse sensor has broken.