Removal and repair of VAZ-21213, VAZ-21214 axle shafts
We hang the rear of the car on tripods, remove the rear wheel and brake drum.
Use a jack to lift the disassembled edge of the rear axle beam so that after removing the axle shaft, oil does not spill out
We remove the brake pads from the side of the axle shaft being removed (see the article - “Replacing the brake pads”).
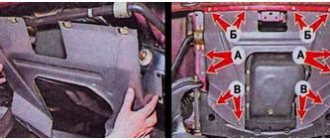
Using a 17 wrench, unscrew the four nuts securing the axle shaft to the beam flange.
Use a screwdriver to bend the locking plates of the axle shaft bolts
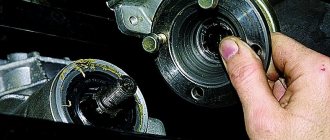
We attach an impact puller to the axle shaft flange and knock the axle shaft out of the beam
If there is no puller, then fix the wheel with the reverse side on the axle shaft, tighten three nuts several turns
Holding the wheel, jerk the axle shaft
We take out the rubber sealing ring of the beam flange
We insert two bolts into the holes of the brake shield and the rear axle beam so that the shield does not hang on the brake pipe
We pry off the oil seal using sliding pliers
Use a socket of a suitable size with an extension or a piece of pipe to press in a new oil seal.
Install the axle shaft in reverse order. Check the oil level in the rear axle and add if necessary.
Disassembling and assembling the transfer case
Drain the oil from the transfer case and clean it of dirt.
Loosen the drive shaft flange nut (see Replacing transfer case shaft seals).
Similarly, loosen the nuts of the other two flanges. We remove the speedometer drive gear housing (see Removing the speedometer drive gear housing and speed sensor of a VAZ-21214 car (vehicle speedometer drive gear housing)).
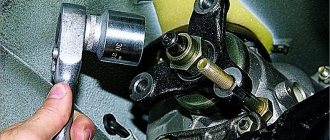
Using a 13mm socket, unscrew the five nuts of the front axle drive housing.
Using a screwdriver to pry the crankcase at the lugs,...
...let's take it off...
...and a gasket.
Using a screwdriver, pry off the lock washer...
... we take out the axis of the differential lock lever of the VAZ 2121 (if there is difficulty, we knock it out with a soft metal drift).
Remove the differential lock lever and the plastic axle bushings.
Remove the differential lock warning lamp switch (see Replacing the differential lock warning lamp switch).
Remove the lever spring from the differential lock fork rod.
Using a 13mm socket, unscrew the four nuts securing the front axle drive housing cover.
Remove the cover and gasket.
We take out the spring and shake out the retaining ball from the crankcase socket.
Using a 10mm spanner, unscrew the locking bolt of the differential lock clutch fork.
Remove the bolt and spring washer.
Use a screwdriver to pry off the protective cover of the differential lock fork rod...
...and take out the rod with the cover.
We take out the plug...
...and the differential lock clutch.
We completely unscrew the previously loosened flange nut and remove the washer.
Remove the flange.
Squeezing with pliers, remove the retaining ring of the front axle drive shaft bearing.
We remove the shaft assembly from the crankcase.
Also interesting: Engine tuning: Niva 4x4 - increasing power using common methods
Remove the oil deflector and thrust ring from the front end of the shaft.
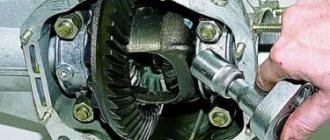
Having hooked the outer ring of the bearing with a three-legged puller,...
...press the bearing.
Using a 13mm socket, unscrew the eight nuts securing the rear cover to the transfer case housing.
Prying it with a screwdriver...
...remove the cover assembly with the rear axle drive shaft...
...and a gasket.
We remove the rear axle drive shaft from the rear cover and disassemble it in the same way as the front crankcase shaft of the VAZ 2131.
Rear axle drive shaft parts and rear cover.
Using a 13mm wrench, unscrew the two nuts securing the gearshift lever bracket to the transfer case housing...
...and remove the gear shift bracket with the lever.
We disconnect the gear shift lever from the bracket in the same way as removing the differential lock lever. Having finally unscrewed the drive shaft flange nut,…
...remove the flange.
Use a 13mm wrench to unscrew the three nuts...
...and remove the front drive shaft bearing cover.
The connection is sealed with a gasket.
Using a 10mm wrench, unscrew the four nuts securing the hatch.
Remove the hatch and gasket.
Remove the lever spring from the gearshift fork rod and slide the rod cover.
Inside the hatch, use a 10mm spanner to unscrew the bolt securing the fork to the rod.
To prevent the ball and spring from popping out,...
...cover the hole with your finger and gradually pull out the rod using pliers.
In this case, the retainer ball falls out through the side hole of the crankcase.
Remove the retainer spring with tweezers.
By pulling the rod further, we remove the gear shift fork...
...and a spacer plastic bushing.
We take out the rod.
The rods of the differential lock fork and gear shift fork of the VAZ 2121 are sealed with rubber rings. We will show their removal using the example of a gear shift fork rod ring.
Prying it with a screwdriver...
...take out the rubber sealing ring.
Unlock the nuts of the rear bearings of the drive and intermediate shafts of the VAZ 2131.
Using a 27mm spanner, unscrew one of the nuts, holding the shafts from turning by holding the other nut with a wrench or socket of the same size.
Remove the nut and washer.
We insert the propeller shaft mounting bolts into the holes of the flange and put the flange on the splines of the drive shaft of the VAZ 2121 transfer case.
We unscrew the second nut, holding the shafts from turning with a mounting blade inserted between the bolts.
Remove the nut and washer. Remove the drive shaft flange.
Remove the thrust ring of the front drive shaft bearing.
Using a 13mm wrench, unscrew the three remaining nuts securing the front cover of the transfer case.
The remaining nuts of this cover were removed when dismantling the front drive shaft bearing cover, the front axle drive housing and the gear shift lever bracket.
Remove the front cover of the VAZ 2131 transfer case with differential.
Remove the gasket from the transfer case housing studs.
Using pliers, remove the mounting ring of the front bearing of the differential housing.
We disconnect the Niva 2121 differential and the front cover of the transfer case.
We remove (or knock out through a soft metal drift) the outer ring of the front bearing of the intermediate shaft from the front cover socket.
Using pliers we open the retaining ring of the front bearing of the differential housing...
...and remove it.
Remove the spring washer.
We install a suitable stop for the puller screw in the hole in the front housing of the Niva 2131 differential...
...and a three-legged puller...
...press the front bearing.
If necessary, we remove the rear bearing Niva 2121 in the same way. We apply marks on the front and rear differential housings so that during assembly we do not upset the balancing of the unit. By holding the differential housing in a vice with soft metal jaw linings,…
Also interesting: Liquids used and filling volumes Niva VAZ 21213, 21214 and 2131
...using a 17-mm spanner, unscrew the six bolts holding the driven gear and the front and rear differential housings together.
Separate the front and rear differential housings.
In this case, the driven gear remains on the front housing.
We knock it off the body through a soft metal drift.
Disconnect the driven gear and the front differential housing.
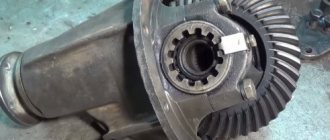
Remove the support washer from the front axle drive gear...
...and take out the gear itself.
Using pliers, open the retaining ring of the satellite axis and remove it.
Remove the spring washer of the Niva 2131 satellite axis.
Hooking the pliers onto another retaining ring, remove the satellite axis.
Remove the support washer and satellite from the rear differential housing.
Having taken out the second satellite and its washer, we remove the rear axle drive gear.
To remove the primary and intermediate shafts...
... using pliers, remove the adjusting ring of the rear bearing of the drive shaft.
Similarly, we dismantle the rear bearing ring of the intermediate shaft.
We remove the drive shaft from the crankcase...
... and the intermediate shaft.
We clamp the splined part of the drive shaft in a vice with soft metal jaw linings...
...and, hooking the paws of the puller onto the gearshift clutch...
...remove the rear bearing, bushing, low gear and clutch.
Remove the clutch hub and high gear from the shaft.
Use a puller to compress the front drive shaft bearing.
Using a screwdriver, remove the rollers from the front bearing of the intermediate shaft...
...and remove the separator.
We clamp the Niva 2121 intermediate shaft in a vice with soft metal jaw linings.
Using two mounting blades, we press the inner ring of the front bearing...
...and remove it.
We remove the rear bearing of the intermediate shaft in the same way as the front bearing of the drive shaft. We assemble the Niva 2131 transfer case in the reverse order. When assembling the center differential, we align the marks on its housings. We install the spring washer on the satellite axis from the side of the blind hole at the end of the axle. ...
...inner ring of the front bearing of the intermediate shaft,...
…front axle drive shaft bearing (the pipe rests on the inner ring)…
...and differential bearings.
In the same way, we press on the rear axle drive shaft bearing, the rear intermediate shaft bearing, the front and rear drive shaft bearings. We install the drive and intermediate shafts into the transfer case housing at the same time. We lubricate all sealing gaskets with a thin layer of silicone sealant.
Useful tips
Stud fastening unit:
1 - crankcase; 2 - bushing; 3 - the remaining part of the boss; 4 — hairpin
Repair of transfer case housing stud fastening
In the Niva 2121 transfer case, the right (long) boss sometimes bursts, into which a special pin is pressed, securing the box to the bracket. For repairs, you can machine a bushing from duralumin, as shown in the figure, file down all the ribs on the remaining part of the boss and file its outer diameter to fit the bush tightly. Having installed the fastening pin into the hole, you need to press the bushing all the way and weld it around the perimeter to the box body.
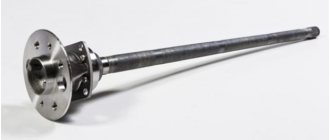
Checking the technical condition and repairing the axle shaft
After dismantling the axle shaft, you need to check its condition and the condition of the parts included in the axle shaft kit. You need to make sure that:
— the ball bearing is not worn out or damaged; if the axial clearance in it exceeds 0.7 mm, replace the bearing;
— the locking ring and bearing have not been displaced relative to the original fit; if the inner ring of the bearing rotates relative to the seat of the axle shaft, replace the locking ring;
— the bearing mounting plate and the oil deflector are not damaged;
— the axle shaft is not deformed and the seating surfaces are not damaged; The runout of the axle shaft, measured at the centers on the journal under the oil seal, should not exceed 0.08 mm.
Before installing into the centers, thoroughly clean the centering holes on the axle shaft from dirt and rust.
If wear or damage to parts installed on the axle shaft is detected, replace them with new ones, following the rules below and using special tools. Eliminate slight bending of the axle shaft by straightening.
After straightening the axle shaft, the runout of the flange hub, measured at the centers, should not exceed 0.05 mm.
If the runout of the flange end is more than specified, but not more than 0.08 mm, then it is allowed to groove it to eliminate the end runout. Reducing the thickness of the flange due to its groove is allowed by no more than 0.2 mm.
Removing the locking ring
Removing and installing the axle bearing lock ring must only be done using a hydraulic press.
First, bend outward the holders of the bolts securing the plate with the oil deflector and the brake shield, and remove the bolts.
Use the half rings of tool 67.7823.9529 to surround the bearing and install the half shaft vertically so that the half rings rest on the thrust ring.
Place the axle shaft under the press (Fig. 13) and apply gradually increasing force to the splined end of the axle shaft until the bearing lock ring is removed.
Do not reuse the axle bearing lock ring, but replace it with a new one.
Check whether the seating surface of the axle shaft has any marks or damage; if necessary, replace the axle shaft with a new one.
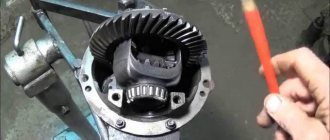
Disassembling the rear axle gearbox
Before removing, clean the gearbox from dirt. We install the dismantled gearbox on a workbench.
Using a 10" wrench, unscrew the bolt securing the locking plate of the adjusting nut of the right bearing of the differential box...
...and remove the plate.
Similarly, remove the locking plate of the left bearing adjusting nut.
Using a center punch we mark the location of the differential box bearing caps on the gearbox housing.
Using a 17mm spanner, unscrew the two bolts securing the right bearing cover of the differential box...
...and remove the bolts.
Remove the right bearing cover.
Remove the adjusting nut...
...and remove the outer race of the differential box bearing.
Similarly, remove the cover, remove the adjusting nut and remove the outer ring of the left bearing of the differential box.
If we do not change the differential box bearings, then we mark their outer rings so as not to mix them up during assembly.
Remove the differential box assembly with the main drive driven gear, inner rings, cages and bearing rollers.
From the gearbox housing we remove the drive gear assembly with the adjusting ring, inner ring, separator and rear bearing rollers and spacer sleeve.
Remove the spacer sleeve.
By striking with a hammer through a drift on the inner ring of the rear gearbox bearing,...
...remove the inner ring with the separator and rollers.
Remove the drive gear adjusting ring.
We remove the oil seal from the gearbox housing socket (see here).
...and the front bearing inner ring with cage and rollers.
Use a drift to knock out the outer ring of the front bearing of the drive gear...
Turning the crankcase over, similarly knock out the outer ring of the rear bearing of the drive gear.
To disassemble the differential…
. Use a puller to compress the inner ring of the differential box bearing.
If there is no puller, insert a chisel between the end of the inner bearing ring and the differential box.
By striking the chisel, we move the inner ring of the bearing.
Insert two powerful screwdrivers (or mounting blades) into the resulting gap and press together...
...inner ring of the bearing with cage and rollers.
Similarly, we press the inner ring of the other bearing.
Clamping the differential box in a vice with soft metal jaws,...
...using a 17mm spanner, unscrew the eight bolts securing the driven gear to the differential box.
Using a hammer with a plastic striker, we knock the driven gear off the differential box...
...and remove the gear.
We take out the satellite axis.
By turning the satellites, we remove them from the differential box.
We take out the semi-axial gears.
. and their support washers.
Before assembly, we wash the gearbox parts in kerosene and inspect them. We check the condition of the main gear gear teeth. Damage to at least one tooth (chipping, scuffing of the working surface) is unacceptable. Using fine-grained sandpaper, we eliminate minor damage to the pinion axle, axle gear journals and their mounting holes in the differential box. In case of serious damage to parts, we replace them with new ones. If even minor damage to the surfaces of the axle gear support washers is detected, we replace the washers with new ones (with a selection of washers thickness). The bearings of the drive gear and differential box must be wear-free, with smooth working surfaces. Poor bearing condition causes noise and gear teeth sticking.
We press the inner rings of the differential box bearings with cages and rollers onto the box using a suitable piece of pipe. We fix the driven gear on the differential box.
When assembling the differential, lubricate the axle gears with support washers and satellites with transmission oil and install them in the differential box. We rotate the satellites and axle gears so as to align the axis of rotation of the satellites with the axis of the holes in the differential box, and insert the axis of the satellites. The axial clearance of each axle gear should not exceed 0.1 mm. If the gap is increased, we replace the axle gear support washers with new ones of greater thickness. The moment of resistance to rotation of the differential gears should not exceed 14.7 N.m (1.5 kgf.m) - the gears are turned by hand.
Axle shaft assembly
Place the axle shaft vertically, resting its flange on wheel 7 (Fig. 14) of tool 67.7823.9530.
Install the axle bearing oil deflector and the bearing mounting plate with a gasket on the axle shaft, pre-connected with two screws; Install the axle ball bearing.
Insert the new locking ring into special holder 3, place it in the oven and heat the ring to approximately 300° C so that at the time of pressing onto the axle shaft its temperature is 220 - 240° C.
Press the locking ring onto the axle shaft using mandrel 1 on a press with a force of no more than 58.8 kN (6000 kgf) so that the inner ring of the bearing is clamped between the locking ring and the shoulder of the axle shaft.
After pressing, make sure that the ring does not move under an axial load of 19.6 kN (2000 kgf).
For this purpose, install the axle shaft assembly on a special device (Fig. 15), and clamp the locking ring in a special vice.
Place the indicator leg 1 with a division value of 0.01 mm to the axle shaft flange.
After setting the indicator arrow to “0”, apply the indicated axial load, using a torque wrench to create a tightening torque of 78.5 - 83.3 Nm (8 - 8.5 kgf m) on the device screw.
The screw rests through the ball against the end of the axle shaft. In this case, even the smallest gap should not appear between the lock ring and the inner ring of the bearing.
After removing the load and unscrewing the screw of the device, the indicator arrow should return to the zero position; this proves that no movement has occurred between the lock ring and the axle shaft.
If the indicator needle does not return to the zero position, it means that the locking ring has moved and the axle shaft assembly must be replaced with a new one.
After checking the press-fit of the locking ring, install the bolts securing the plate and oil deflector 6 (Fig. 14) and fix them by bending them inward, the bolt holders.
Measuring the axial free play of the axle shaft on a car
Loosen the rear wheel nuts.
Place chocks under the front wheels and remove the rear axle.
Release the parking brake and move the gearshift lever to neutral.
Remove the wheels and brake drums by screwing fixture 02.7834.9504 to the axle shaft (Fig. 16), pass the indicator leg extension 1 through one of the holes in the axle shaft until it touches the brake shield or the oil deflector and secure the indicator.
Take measurements with an indicator, applying a force of about 49 N (5 kgf) to the axle flange in both directions along the axis of the rear axle.
Removal and repair of VAZ-21213, VAZ-21214 axle shafts
We hang the rear of the car on tripods, remove the rear wheel and brake drum. Use a jack to lift the disassembled edge of the rear axle beam so that after removing the axle shaft, oil does not spill out
We remove the brake pads from the side of the axle shaft being removed (see the article - “Replacing the brake pads”).
Using a 17 wrench, unscrew the four nuts securing the axle shaft to the beam flange.
Use a screwdriver to bend the locking plates of the axle shaft bolts
We attach an impact puller to the axle shaft flange and knock the axle shaft out of the beam
If there is no puller, then fix the wheel with the reverse side on the axle shaft, tighten three nuts several turns
Holding the wheel, jerk the axle shaft
We take out the rubber sealing ring of the beam flange
We insert two bolts into the holes of the brake shield and the rear axle beam so that the shield does not hang on the brake pipe
We pry off the oil seal using sliding pliers
Use a socket of a suitable size with an extension or a piece of pipe to press in a new oil seal.
Install the axle shaft in reverse order. Check the oil level in the rear axle and add if necessary.
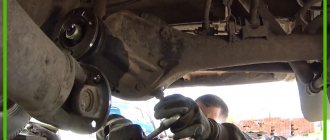
How the front axle is attached to the Niva 2121
Place the car on a lift or inspection ditch and hang the front of the car.
Remove the anti-roll bar, suspension cross member braces and engine crankcase skid plate. Disconnect the shock absorbers from the lower suspension arms and the front driveshaft from the front axle drive gear flange.
Having compressed the suspension spring, disconnect the ball joint from the lower arm and remove the spring, smoothly unloading it. Disconnect the steering linkages from the steering arms.
Remove the cap and unscrew the wheel bearing nut. Perform the same operations on the other end of the pendant.
Loosen the clamp connecting the exhaust pipe to the muffler pipe, disconnect the suspension of the pipes and mufflers at the rear of the car and on the gearbox. Using wrench 02.7812.9500, unscrew the nuts securing the front muffler pipe to the exhaust manifold and remove the pipe downwards.
Unscrew the nuts securing the front engine mount to the front suspension cross member brackets.
While supporting the front axle, unscrew the bolt securing the right bracket 22 (Fig. 3-84) to the engine and the two nuts securing the front axle on the left side.
Raising the engine 25-30 mm, remove the front axle assembly with the front wheel drive.
Installation of the front axle on the vehicle is carried out in the reverse order of removal. When installing the axle, tighten the fastening nuts and bolts to the torques specified in the appendix. Through the oil filler hole, pour TAD-17i transmission oil into the front axle housing; the oil level should reach the lower edge of the hole.
Hello! Nivovods constantly argue about the advisability of decoupling the front axle gearbox from the engine . Opinions are opposite – from “must do” to “under no circumstances.” The arguments of opponents of the operation are simple: “The factory design is the most reliable.”
Proponents of the modification believe that decoupling the bridge reduces vibrations (and therefore extends the life of the gearbox) and makes it possible to painlessly lift the suspension for the axle shafts. In addition, on the later model the axle mount is independent. I will not convince you of the benefits of this decision, or its negative consequences. I'll tell you how to do this job correctly.
The technology has been proven. On this model, the FRM (front axle gearbox) has an independent suspension as standard. To save time, you can purchase ready-made tying kits.
Many car enthusiasts make brackets and fastenings with their own hands, providing colleagues with drawings of their own design.
Rear axle bearing and oil seal
Reg.: 04/30/2010 Threads / Messages: 3 / 1803 From: Moscow, TiNAO Age: 30 Car: MMC Pajero Sport 05
Reg.: 06.27.2007 Messages: 1765 From: Moscow Age: 50 Car: 21213, 1999
Name: Alexey Reg.: 03/05/2005 Threads / Messages: 42 / 3713 From: Moscow, Northern Administrative Okrug Age: 38 Car: Shniva 2021 50 tkm
Wash the semi-axial bearing as a preventative measure (you need to remove one of the cheeks) and fill it with new grease. At least lithol. Anybody will be better than it was.
There is no need to buy any additional rings, etc.
But I also decided to change the bearings on the axle shafts and the seals. I bought 2121 for the Niva. I brought it to the garage and started putting the oil seal on the axle shaft, but it reached halfway and that’s it. Next comes the thickening of the axle shaft. The store said that the axle shafts on the VAZ 2101 and 2121 are the same. It turns out I have a VAZ 21213 rear axle? I think the bearing will fit. The numbers match 62208r
Added after 8 minutes 26 seconds:
Name: Nikolay Reg.: 11/12/2008 Threads / Messages: 2 / 909 From: Ruza.Moscow region. Age: 48 Car: VAZ21214. 2001, MP 7.0
I'll write down how I removed the axle shaft. Maybe it will be useful to someone. We begin removing the axle shaft as in the manual, and end by screwing the wheel on with the reverse side. It was not possible to “pull” the axle shaft with manual effort. My weight is too low. Next, I proceeded as follows: 1. Attach a chain (about 2.5 m long) to the holes of the disk (symmetrically). It turned out to be a loop that I was going to hit (emphasis on the “U”) with a sledgehammer. 2. I placed a log at the end of the loop, on which I placed a chain, and placed a heavy piece of iron (a counterweight from a washing machine) into the resulting loop so that the loop would not fall off the log. 3. I was about to take a sledgehammer, but the log fell, and when I picked it up and lightly hit the loop with a piece of iron to tighten the chain, a miracle happened: the AXLE MOVED. No problem further.
Added after 1 minute 24 seconds:
When and why an axle bearing fails on a Niva Chevrolet
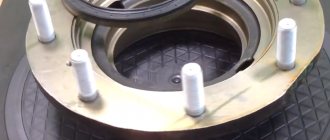
Chevrolet Niva traces its history back to the regular Niva or VAZ 2121, which entered the assembly line more than 40 years ago. In turn, this VAZ SUV was developed on the components and assemblies of the VAZ 2106 and has many design solutions in common with it - both successful and dubious. The weak point was the ball bearings of the rear axle shaft.
The bearing is located inside the rear axle stocking closer to the hub and is pressed tightly onto the axle shaft . The second end of the axle shaft fits freely into the differential of the rear gearbox and is not fixed there by anything. On the wheel side, the axle shaft is secured with a plate with 4 bolts. Therefore, when driving off-road or installing wheels of larger diameter, both axial and radial forces act on the bearing itself. This load is enough to quickly finish off a relatively weak single row bearing. If this problem is not so acute on Lada cars, then on a more massive car, breakdowns are much more common.
Main reasons for failure:
Important! The axial play of the axle shaft allowed by the factory should not exceed 0.7 mm. Radial play is not allowed and is the basis for replacing the bearing.
Replacing a bearing on a removed shaft
The design of the locking ring does not allow you to simply remove it. It is installed with thermal tension, so reuse and disassembly without breaking its integrity is impossible :
Advice! The factory does not always put lubricant in the bearing, so before pressing, check the presence of lubricant or add a new one (Litol, another grease).
Car owners with minimal auto repair skills can replace the rear axle bearing on a Chevrolet Niva. These operations do not require special tools; replacement can be done on a suitable level area near the garage. This way you will not only save on service costs, but will also be confident in the quality of the work performed. It is recommended to combine bearing replacement with other maintenance work on the rear axle: repair of brakes, suspension, replacement of current seals.
5.7.4 Removing and installing the axle shaft
You screw an M10 nut onto the stud, and put a bushing between the nut and the fixed frame of the rear axle. You insert the protruding end of the stud from the nut side into the hole where the thread of the original bolt used to stick out.
As a result, one end of the stud rested against the body of the original bolt, and the head of the bolt rested against the flange of the axle shaft. There are 4 of them in total; Using a puller, the axle shaft is removed.
If you don’t have a puller at hand, you can use a wheel. To do this, the wheel is put in place, but only 3 nuts are used, which are not fully tightened. There must be space between the wheel and the axle shaft. We press the wheel against the axle and pull it sharply towards us. By repeating the procedure several times, you will be able to remove this bridge part.
If you do not plan to change the oil seal, then you should remove the axle shaft very carefully. So as not to spoil it. The brake mechanism is tied with wire, otherwise it may be damaged; The condition of the sealing ring is checked; To remove the bearing, clamp the axle shaft in a vice; First you need to knock out the retaining ring that holds the bearing in place.
This is done using a chisel. Carefully knock down the ring, trying not to damage the nearby parts; After this, the bearing itself is removed, this is also done with a hammer and chisel. After removing the bearing, you should carefully inspect the axle shaft.
It should not be bent, and there should be no cracks or burrs.
Signs of malfunction and wear of the rear axle bearing of Niva Chevrolet
Place the car on a flat surface, place wheel chocks, and lift the wheel with a jack. Standard set of tools and screwdrivers.
Work process
So:
- It is necessary to disconnect the negative cable terminal from the corresponding terminal of the battery.
- Then you should unscrew all the spark plugs.
Note. When performing the following procedure (after removing the camshaft bearing housing), it is necessary to note the position of the actuator valve arms.
- Along with the camshaft, remove the bearing housing, as well as the springs and valve actuator arms. When dismantling the camshaft, the pistons of the fourth and first cylinders must be installed at TDC (top dead center). This measure will prevent the valve from falling into the valve cylinder after the first one has been dried out. In the top dead center position, the oil seals of the fourth and first cylinders are changed.
- Install a tin rod through the spark plug hole between the valve plate and the piston; its diameter should be about 8 millimeters.
Replacing valve stem seals on a VAZ 21213
- Install the depressurizer pressure bracket on the spring plate, using a nut that is screwed onto the camshaft bearing housing fastener pin, secure the support bracket.
- Afterwards, you need to compress the valve spring using a desiccant, and then remove two crackers from the groove. Unscrew the fastening nut and remove the desiccant device.
- Remove the spring plate.
- Then you will need to remove the inner and outer springs.
- Next, you need to remove the valve inner spring support washer.
- Install the collet of the removable inertial device onto the oil deflector cap. To compress the collet, hit the upper striker against the lower one. Perform a crimp test of the oil deflector cap with the valve guide bushing; to perform this task, use the upper striker to strike the nut of the removable structure.
Valve stem seals
Note. Now let's talk about choosing oil seals. A large number of counterfeit caps are sold on car markets, and most of them are questionable in terms of quality, and replacing valve stem seals is not so easy. The oil seal must be reliable and of high quality; it has a difficult and responsible job.
- Firstly, it must allow oil to pass through so that it lubricates the valve stem, and secondly, it must not allow oil to enter the combustion chamber. Quality and its service life depend on the quality of materials and manufacturing precision. A valve seal made of low-quality rubber will very quickly harden and begin to leak oil, which will result in the release of bluish smoke from the exhaust pipe, and in addition, oil will appear on the spark plugs and subsequently they will have to be changed frequently. It won't do you any good to install valve seals of the wrong size. You need to choose those valve stem seals that have proven themselves to be the best, and most importantly, you need to make sure that the product you purchased is not a counterfeit.
- If the installation sleeve is included in the set of new oil seals, then it must be placed on the valve stem. This measure will make it possible to prevent damage to the working edge of the cap during installation.
- It is necessary to apply engine oil to the inner surface of the valve stem seal, and then move it down into the valve guide until it stops along the installation sleeve.
- Using the specialized mandrel included in the puller kit, press the oil scraper cap onto the valve guide.
- Reinstall the removed valve parts in reverse order.
- Pull out the tin rod and give a couple of light blows to the end face of the valve stem with a hammer. This is done so that the crackers sit in place.
Replacing the oil seals of the valve timing mechanism VAZ 21213
- Replace the oil seals in the remaining valves of the fourth and first cylinders in a similar way.
- Replace the oil seals of the third and second cylinders as you previously did on the fourth and first cylinders.
- After replacing the valve stem seals of the third and second cylinders, turn the engine crankshaft one and a half turns (540 degrees). This is required in order to set the piston of the fourth cylinder to the top dead center of the compression stroke.
- Install the camshaft assembly with the bearing housing on the engine cylinder head. And then you need to tighten the fastening nuts evenly.
- Untie the wire from the sprocket-pulley with the chain, install the sprocket on the camshaft (at this time there should be a timing chain on this sprocket). Then you need to tighten the fastening threaded element and lock it, for this you need to bend the petals of the lock washer of this bolt.
- Check if the marks match.
- Then you need to charge the tensioner of the timing mechanism of the drive chain, then put it in place, and then discharge it again.
- It is necessary to adjust the clearance in the valve drive.
- Perform further assembly in reverse order.
Also interesting: What you need to know about the VAZ 21214 engine before buying a Niva | Weak engine
Also, if something is not clear to you or you want to study the process in more detail, then on the Internet there are a huge number of photos and videos of replacing valve stem seals on a VAZ 21213. In them you can study this process in detail. Although, in principle, there is nothing complicated about it no, you just need to start, do it and everything will work out. The main thing is to have all the necessary tools at hand.
Removing the axle shaft
Removing the axle shaft
Post by Magellan » 12 Dec 2009, 03:07
After this, the axle shaft should come out.
Re: Removing the axle shaft
Post by muzolya » Dec 12, 2009, 04:33
Re: Removing the axle shaft
Post by MEW » Dec 12, 2009 12:59 pm
Re: Removing the axle shaft
Post by Himalaev » Dec 12, 2009, 01:17 pm
Re: Removing the axle shaft
Post by Pilot » Dec 12, 2009, 4:18 pm
Re: Removing the axle shaft
Post by ivan1 » Dec 12, 2009, 5:52 pm
Re: Removing the axle shaft
Post by muzolya » Dec 12, 2009, 07:26 pm
Colleague must disagree with you
The machine is old. The last time the axle shaft was removed. Hmmm. For a long time.
But it turned out to be effective. I think it won’t happen once in a while.
Re: Removing the axle shaft
Post by ivan1 » 12 Dec 2009, 20:06
Colleague must disagree with you
The machine is old. The last time the axle shaft was removed. Hmmm. For a long time.
But it turned out to be effective. I think it won’t happen once in a while.
Re: Removing the axle shaft
Post by muzolya » Dec 12, 2009, 8:24 pm
Likewise, the left one came out like clockwork
The car stands on trestles, large, Soviet, strong.
Re: Removing the axle shaft
Post by Pilot » Dec 13, 2009, 00:50
Re: Removing the axle shaft
Post by Vigilant Falcon » Dec 14, 2009, 11:03 pm
Re: Removing the axle shaft
Post by Pilot » Dec 15, 2009, 00:30
Re: Removing the axle shaft
Post by muzolya » Dec 15, 2009, 05:56 pm
Re: Removing the axle shaft
Post by ivan1 » Dec 15, 2009, 10:21 pm
Re: Removing the axle shaft
Post by Serg » 03 Feb 2010, 11:46
hehe, I tried this method - it didn’t help. and put the wheel on the reverse side, and kicked it, and hit it with a sledgehammer, and pulled it through the rope with a sledgehammer - zero weight
The universal tool “sledgehammer” helped, I bent the brake flap and after a couple of blows of the sledgehammer on the flange, the axle shaft very willingly popped out
but before that there was a hellish Kama Sutra for a couple of days on removing the square crap that holds the axle shaft - there was one bolt that just went sour. I had to cut this crap out with a chisel
PS: by the way, I didn’t change the brake flap afterwards, I just bent it back. True, he overdid it a little, he started hooking and hellishly warming up the drum. as a result there is a lot of smoke, a dead drum and pieces of melted silumin from the drum on the shield
I then gnawed it out of there for a loooong time, because the new drum didn’t want to get up.
Re: Removing the axle shaft
Post by longer » Mar 09, 2010, 11:37 am
This is where you need to lift the car and how tall you should be. to fit under the bridge across.
Familiarization with the bridge structure before replacing the axle bearing of Niva Chevrolet (2123, 2121, 2131)
The tool has been selected and the axle shaft can now be removed. This is done in the following sequence: Place the car on a flat surface, install wheel chocks under the front wheels.
We tear off the wheel mount, jack up the car, and install a stand under the rear axle. Remove the wheel and unscrew the brake drum mounting screws. We unscrew the bolts securing the brake drum to the axle shaft. We knock down the brake drum, but not directly with a hammer, but through a wooden spacer, otherwise there is a danger of damaging the brake drum. We knock down the brake drum using a wooden block.
Axle shaft, overview of breakdowns and malfunctions.
Unscrew the four bearing spacer nuts from the back. We unscrew the four nuts of the axle bearing mounting plate bolts.
Signs of malfunction and wear of the rear axle bearing of Niva Chevrolet
For repairs you will need: The differences in the design of the bearing units are only in the locking rings. When replacing, it becomes difficult to remove these washers; in some situations it is simply cut off or knocked down with a hammer.
In any case, when installing a new bearing, it is recommended to also change the retaining ring with the seal. Place the car on a flat surface, place wheel chocks, and lift the wheel with a jack.
When dismantling the axle shaft, you will need to apply quite a bit of force to pull it out, so secure the car securely and install stops.
Dismantling the unit from the axle and removing the bearing. From the faulty side, unscrew and remove the rear wheel. The collapsible design of the Reinforced AVT axle shaft allows without the use of special heating equipment and an angle grinder: The main advantages of the design of the AVT Reinforced axle shaft: The bearing is protected from water!!
For Z, you will need to install differential 4. The price for a pair is about 15 thousand. But then what to do if the bearing falls out?
They write that he is protected there. The original axle shaft costs rubles. They will last about two years, or even more.
Will this reinforced axle shaft last that long? I wrote to them through the website, but no one answered.
The reviews say that this is an indestructible topic. But repair kits are sold for them. This will reduce the risk of the car falling off the jack. It is also recommended to disconnect the battery. This will ensure that you avoid problems with the car's electrical system.
Request a call back
Replacement It is better to carry out the work in a garage with a flat floor. This will allow you to perform all actions with minimal difficulty. Repairs are carried out in the following order: Supports are placed under the body.
This will avoid dangerous situations. If your plans do not include changing the transmission oil, then it makes sense to raise the axle so that the lubricant cannot leak out; The wheel is removed, the nuts are removed in advance; Remove the 2 screws securing the brake drum; Next, with a few soft blows of the hammer, you should pull the drum out of place.
The blows should not be strong. Otherwise, you will simply crack the part; After this, you can safely remove the drum from the machine. But this is not always as simple as it seems.
In some cases it is necessary to knock down the drum.
Removing and replacing the axle shaft seal of the rear axle Niva Chevrolet
Sometimes, it may be necessary to replace the rear axle axle oil seal on a Chevrolet Niva. Such work may be required at any time. Unfortunately, this model has its own problems. Rear axle oil seal leakage is one of these problems. In itself, such a replacement is not difficult. This does not require any special skills. Even a novice driver can cope with such work. Timely replacement will avoid problems with the differential and other axle parts. Therefore, repairs should not be put on the back burner. For greater safety, you should regularly monitor the condition of this element of the car.
Replacing the rear axle axle seal on a Chevrolet Niva
occurs when there is visible transmission fluid leaking from the axle. To do this, after parking, pay attention to the condition of the car’s drums. If there are problems with the seals, small leaks will be noticeable on the wheels. If it is not brake fluid, then most likely the problem is in the oil seal and should be replaced. A transmission fluid leak will cause serious problems with axle components.
Replacing the oil seal
To carry out the work you will need a regular set of tools. The only special tool you will need is a puller for the axle shaft, but if you don’t have one, you can do without it.
Before carrying out work, ensure that the machine is as motionless as possible. To do this, wheel chocks are installed under the front wheels. First gear is engaged. The work is carried out in the following order:
- The wheel fastening becomes loose. The car is raised on a jack. The wheel is completely removed. Supports are placed under the thresholds in case of problems with the jack; ordinary blocks or several wheels folded in a stack will do;
- Before removing the brake drum, make sure the wheel is completely released. In this case, the handbrake lever must be lowered, the wheel rotates freely;
- The decorative cap is removed. To do this, disconnect it by prying up the fasteners with a screwdriver;
- The gap between the flange and the drum is moistened with penetrating lubricant (liquid wrench, WD-40);
- The brake drum is secured with two screws, they must be unscrewed. For this you will need a key “12”;
- Gently tap the drum with a hammer so you can move it relative to the axle shaft;
- In some cases, the drum can be removed quite easily. But sometimes you have to shoot him down. To do this, it is necessary to strike the rim of the drum with a hammer from the back side. Just do this through a block, otherwise you can damage the drum;
- The screws holding the axle shaft and the drum casing are unscrewed;
- The bridge rises slightly;
- The shock absorber bracket should be removed from the axle bearing plate;
- The axle shaft is removed; for this you will need a special puller. If it is not there, then you can do without it. To do this, put the wheel on the axle shaft. Screw on 3 nuts, but so that there is free space between them. We press the wheel against the axle and pull it harder towards us. After several passes, seasoned with strong words, the axle shaft should move. All that remains is to extract it;
- Now you can change the oil seal. Remove it using a screwdriver. Just pry the oil seal in a convenient place and pull it out;
- To install, the new oil seal is pressed back in, and the removed part is used as a mandrel.
We recommend: Removing the radiator grill on Renault Duster: two methods + video
Reassembly is in progress. All dismantled parts are installed in place.
Useful tips
Many drivers combine oil seal replacement and transmission oil change. If you decide to do the same, then it makes sense to find out what type of lubricant is used in your case. It is not recommended to mix different types of oils. This will lead to performance problems. If it is necessary to change the type of lubricant, it is recommended to first flush the system.
When removing the axle shaft, oil will begin to flow out. Therefore, it is better to drain it in advance. If you do not want to change the lubricant, then you need to take measures against its leakage. To do this, simply raise the side of the car from which you are changing the oil seal higher. This way you will avoid lubricant leakage. But, in any case, there is a risk of lubricant leakage. Be sure to add a new portion of oil after all work has been completed.
When reinstalling the brake drum, pay attention to its condition. Often there is a development along the shoulder. It should be removed using a regular file. This simple action will significantly improve braking.
In some cases, oil seal wear can be caused by a bent axle shaft. In this case, knocking noises will be heard when moving, and the oil seal will be worn out on only one side. In many cases, you can even visually determine the damage. Such a defect can only be corrected in a workshop on a special stand. If this is not possible, then you will have to buy a new part.
The rear axle on this model is quite weak. Problems with it arise quite often. That is why, replacing the rear axle axle seal on a Chevrolet Niva is familiar to almost all owners of this car. This work is not difficult. If you have even average repair skills, you will only need half an hour on one side. The most important thing is to do the work carefully. It is especially important to ensure that dirt does not get inside the bridge. Even the smallest particle of sand can cause problems with the operation of this part of the machine.
Preparation and disassembly
To independently remove a leaking rear axle oil seal on a Niva Chevrolet, you will need the following tools:
Never neglect gloves when repairing a car: they will protect your hands from damage due to accidental impacts. The height of the wooden stand should be enough to support the rear axle with the wheel removed and the shock absorber unscrewed, otherwise oil will leak from it.
Before removing the old seal, you will have to disassemble the rear hub assembly and remove the axle shaft. Disassembly is carried out in the following sequence:
The next step is unscrewing and removing the axle shaft. In the VAZ 2131 Niva Chevrolet, 4 bolts securing it are held on the other side by a bracket holding the shock absorber.
After unscrewing the bolts, the shock absorber will no longer hold the rear axle, and the spring will push it down, causing oil to flow.
To avoid this, you need to first adjust the stand by jacking the car higher. The rear axle “stocking” must rest with a slope in the other direction so that the oil does not leak out.
The 4 bolts holding the rear axle shaft are unscrewed with a 17 mm wrench. Pay attention to the growers: they should not get lost in the brake mechanism. If you ignore the loss of the groover and install a new one, then the old one will subsequently get between the block and the drum while driving and the wheel will jam.
Installing a New Seal
After removing the axle shaft, the metal shield where the brake pads are attached will remain hanging on the copper pipe with the fluid, so it should be fixed by inserting the 2 upper bolts back into the holes. Then follow the instructions:
- Remove the thick rubber gasket from the rear axle flange.
- Pull out the old oil seal by prying it with a screwdriver or pliers. Clean the seat and wipe with a rag.
- Lightly lubricate the new seal with transmission oil and insert it into the socket of the Niva rear axle as evenly as possible.
- Using a round pipe adapter, press the oil seal into the socket with light blows of a hammer. You can use an old seal as an additional attachment.
At the end of the procedure, you must thoroughly wipe all parts free of oil - the brake cylinder, pads, drum and metal shield. Before reassembling, it would be a good idea to check the axle bearing for wear and grease. Wear is indicated by difficulty turning, binding, or slight noise. If you discover a malfunction, take the axle shaft to the nearest car service center; you will not be able to replace the bearing without special equipment.
This is interesting: Cheap and clean - 10 best ideas for keeping your car clean
To check the grease inside the bearing, you need to pry the plastic covering the rollers with an awl and remove it. Then add thick Litol-type lubricant inside and put the plastic in place, and then begin assembly.
At the end, it is important to check the oil level in the rear axle gearbox of the Chevrolet Niva. The test is carried out on a fully assembled car, standing on a level area. The filler plug is unscrewed from the gearbox housing, after which the oil level is determined visually or using a thin wooden stick. If there is a shortage, you need to insert a hose of a suitable diameter into the filler neck with a watering can at the end, where the lubricant is poured. It is more convenient to top up with an assistant: you control the level, and the assistant gradually adds oil.
In what situations is it necessary to replace the oil seal?
The sealing element mounted on a Chevrolet axle shaft does not have a service life determined by the mileage. For this reason, replacement is carried out only when certain signs of malfunction of this rubber band are detected. In particular, repairs are definitely necessary when it turns out that transmission oil begins to leak. This is evidenced by characteristic stains found either on the rear axle housing or on the Niva brake housing. Depending on where the leaky axle shaft seal is located, drips will appear on the right or left.
In addition, the seal in question often becomes unusable when the bearing located there is replaced. The elastic usually breaks when this element is pulled out. The problem is that to dismantle the named part it is often necessary to apply a lot of force or use not very delicate methods.
It is important to understand that in a Chevrolet, in the rear axle area, there can also be a leak from the gear shaft that holds the driveshaft. In the latter case, oil drips appear exactly in the middle.
Thus, anyone who intends to replace the bearing located on the Chevrolet Niva axle shaft is recommended to buy a fresh oil seal and, for preventive purposes, install it instead of the old one, regardless of the performance of the latter. The part will cost literally a few rubles, and it is not difficult to find it by article number. So, in the case of the right part of the bridge, take 2110-2301034, for the left - 2110-2301035.
The element dimensions are:
If a Niva model 21214 requires repairs, then the axle shaft sealing ring is the same.
In addition to the oil seal, before replacement it is necessary to purchase a sufficient amount of transmission oil, because some of the lubricant in the gearbox will probably spill. If you don’t know which one is suitable, then buy what is poured at the Volzhsky Automobile Plant - its brand TAD-17I.
axle bearing
The topic of the article is Niva axle bearing. To further understand the issue, I will say that the bearings for Niva, Niva-M and Shniva are the same. The only difference is in the locking rings, but I’ll talk about that below. There is only one problem with this node - it is a fake. If a factory bearing is installed and the installation is carried out correctly, the service life of this unit is very long.
Niva axle bearing, Russian manufacturer
For several years now I have been sending this bearing to services and individuals from a Russian manufacturer. The plant is a gas processing plant, located in the city of Vologda. The only recommendation I give is that before installation, very carefully and gently remove the protective cheeks, wash off the factory grease and fill with something more modern. A sharp toothpick works great if you don't have anything special on hand. It’s a mystery to me why our factories, with the tenacity of maniacs, continue to fill bearings with mineral-based lubricants. Maybe they believe from the old days that a bearing can lie in a warehouse for a long time and use a preservation lubricant? I don't have an answer to this question.
Import manufacturer, FAG (Germany)
The bearing of this standard size is made by the German manufacturer FAG. I circled three symbols on the bearing with red circles. The name of the manufacturer (FAG), at which plant the spare part was produced (Turkey) and the designation of the bearing according to the European classification (62208 2RS). Of course, this bearing is made of higher quality than the domestic one. This is confirmed both purely visually and tactilely when you pick it up, and by the rolling of the car after its installation. The advantage of this bearing is its service life and work with wheels of large diameters and discs of non-standard offset. The disadvantage is its price today. As of November 2018 – 1900 rubles per bearing. However, if you sort through a node based on the “sort through and forget” rule, then this is normal. On cars in which FAG bearings were installed in the hub assemblies and axle shafts, a drop in gasoline consumption of about a liter per hundred kilometers was repeatedly recorded. It is not difficult to calculate the further payback of bearings. Delivery of this item is carried out only upon order, with prepayment. Delivery time 2-3 weeks.
Niva axle bearing - installation
When to change the seal
Replacing the axle seal is not tied to a specific mileage, but is done in connection with the following defects:
A distinction should be made between transmission oil leakage from the axle seal on either side of the rear beam and from the gearbox shank where the driveshaft is secured. In the second case, greasy stains and dirt cover the rear axle gear housing, located in the middle.
If for various reasons you need to replace the axle bearing, then you should also change the oil seal at the same time. This will save you from having to disassemble the unit again due to leakage of the old part. The part costs mere pennies, its catalog number for the Chevrolet Niva is 2110-2301034 (right) and 2110-2301035 (left), and the overall dimensions are as follows:
The catalog number and dimensions of the O-ring of the Niva VAZ 21214 axle shaft are identical. In addition to the oil seal itself, transmission oil will be needed to replenish the lost amount in the gearbox. TAD17I brand oil is considered “native” for all types of VAZ gearboxes.
Rear axle
A diagram of dismantling the unit will also be described below. Specific repairs to the rear axle gearbox of the VAZ 2121 Niva require specifics. It is simply impossible to briefly describe every possible malfunction and its elimination. Therefore, the diagram for removing the rear assembly is:
- Unscrew the axle shaft.
- Bend back the locking plates.
- Move the axle shaft.
- Remove the mounting bolts and remove the assembly.
As you can see, the rear assembly is much easier to remove. All that remains is to secure it on the workbench and disassemble it. However, you still need to remember that the part is very heavy and move it carefully.