Where is the fuel pump located in the field?
So, the subject of observation is a “crocodile” with a 21214-10 engine with a power system with distributed pairwise-parallel fuel injection, controlled by a Bosch MP7.0H ECU – also known as version 41 of the well-known “thirty-one”.
What are the differences in the layout of the fuel supply system from 21214-20 (“short” car with the same engine and ECM)? It is clear that the tubes and wiring harnesses are longer. But in the “thirty-first” the fuel tank is also located differently - it is larger in volume, and its deeper part is located not closer to the nose of the car, but on the contrary - closer to the stern. It is in it, of course, that the submersible electric fuel pump is fixed - absolutely identical to the one used on 21214.
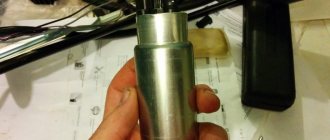
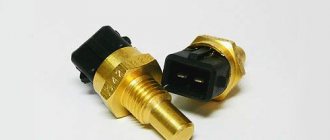
There are two types of pumps - with the marking on the flange “UTES” and an embossed catalog number starting with the numbers 21214, as well as older ones, in which the flange has not a silver-tin, but a bronze tint, external markings, except for an arrow indicating the direction of installation, No. The connectors on the flange are also different - the Utes has an oval, horizontally oriented four-pin white connector, into which a “tail” 10-12 centimeters long with a square four-pole connector (pink, purple, gray and black wires) is inserted. The unnamed product (note that it is at least a third more expensive - most likely, it traces its ancestry back to GM systems) - has a tightly sealed dirty yellow chip on the flange, from which comes the same “tail” 10-12 cm long with a four-pin connector described above. That is, in terms of seats and connections, the EBNs are identical - they differ only in the width of the fuel intake (the “Utes” is wider, and this is better - there is less chance of blocking with stuck-in dirt).
The fuel level sensors and the contacts for turning on the emergency fuel reserve lamp are identical, the floats are the same, they differ only in the color of the plastic.
How to get to the pump on a crocodile with distributed injection?
Fortunately, when designing the rear part of this car, VAZ developers showed more intelligence and imagination than usual. To access the EBN in 2131-41, you do not need to completely remove the plate covering the gas tank - it is in a long Niva of a complex shape, plus it is to it that the rear seat cushion and backrest, and the mating parts (locks) of the rear seat belts are attached.
So - two ways. Either you need to start by dismantling the plastic linings of the entire stern (the trunk sill, the lower edges of the sidewalls, the lining of the rear wheel arches) and removing the carpet that covers the floor of the luggage compartment (the carpet goes onto the back of the rear seat and is secured there with linings on self-tapping screws) - or proceed as usual advice from some book on chisels - armed with a stencil knife, cut off the carpet attached to the back from a piece lying horizontally. This dramatically reduces labor costs when accessing the luggage compartment, and does not change anything for the owner - after all, almost all of us have a trough mat in the trunk, and we carry long items a couple of times a year as promised, and we don’t drag them around the trunk so often .
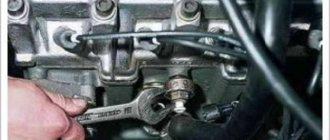
We remove the back of the rear seat: to do this, you need to unscrew two M6 bolts with a “10” head, securing the backrest hinges to the bracket ears on the protective casing of the gas tank. We take out the backrest together with a piece of carpet from the floor of the trunk - or, if you decided and performed the surgical operation described above - separately, and carefully remove the carpet in the trunk from under the lining of the rear wheel arches and turn it towards the stern, opening access to the “ridge” - cross profile stamped on the gas tank casing. Having unscrewed the three bolts to “17”, remove and set aside the RIGHT-WAY reinforcing box-shaped longitudinal floor lining along with the seat belt buckles.
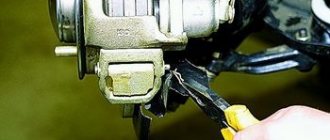
Now we carefully look at the right half of the transverse stiffener along the car. Part of this rib is a hatch mounted on eight M5 screws with a cross head. The screws are screwed into the captive nuts of the gas tank lining. I warn you right away - they will not give in easily, since they are painted from the heart. For example, I was never able to completely unscrew the two lowest (closest to the nose of the car) screws, and the hatch was opened by slightly bending the lower edge of the trim.
After removing the hatch, a wonderful view of the EBN opens up - in 2131, unlike the short car, it does not stand in the recess - the stamping of the tank, but on the tide. Access to the flange is excellent - however, it is a little inconvenient to unscrew and tighten the tubes, the edge of the lining gets in the way - but it is quite possible. Crawling up.
On Utes pumps, it is better to disconnect the connector on the flange body before removing it for inspection or replacement, without touching the four-pin. If you pull the last one, two frail “fathers and mothers” lying between the gas tank and the trim will be disconnected - the adapter from harness 2131 (gray-red and pink wires from the instrument panel) to the EBN chip (purple and pink) - and the lamp and indicator on the panel will die devices. In the case of an “unnamed” product, there is no alternative - you will have to carefully and gently pull the square four-contact connector towards you and just as gently undo it - otherwise the entire tank cover will inevitably be removed.
The pump can be easily removed and installed through the hatch. When replacing or reinstalling, it is vital to use a sealant - otherwise, leakage along the studs and from under the pump gasket is almost completely guaranteed - a working “return” creates a fair amount of excess pressure in the tank.
We carefully monitor how the connecting hoses of the system are laid - even a slight bend can reduce the efficiency of the fuel supply. And not only in the stern, but also in the engine compartment - it was precisely such a case, mistakenly taken for a long time as “glitches” of the control electronics, the route on-board computer State BK-214 or security system locks, that led to the sudden death of a new type starter with a planetary gear for me gearbox (you can’t turn it for a long time, but you had to do it constantly - because due to the lack of pressure in the ramp, the engine began to “catch” only on the fifth or sixth time, and started on the seventh or eighth.).
Consistently eliminating the influence of third-party electronic systems and controls, I came to the conclusion that the problem was still in the insufficient amount of fuel supplied to the engine - the same conclusion was also facilitated by a sharp dip during intensive acceleration after 4500 rpm. according to the tachometer in second and third gears.
The fuel pressure regulator on the ramp turned out to be working, but... working only halfway, since its vacuum hose did not communicate with the cavity of the receiver - the vacuum outlet tube was filled with the same compound that was fixed in the mounting socket. Gvozdik did his job - now it works.
The hypothesis about a faulty EBN disappeared after an adapter hose bent by 90 degrees was found in the engine compartment. Apparently, one of the tubes used in the fuel supply circuit turned out to be longer than necessary (poorly chosen, taking into account the extra half meter of the base) - and the hose had nowhere to go. The problem is easily solved by selecting hoses and tubes 2109 that are identical in seating - they are available for sale at any decent auto parts store.
The advantages of the “treatment” were that the overload of the fuel pump disappeared, the fuel supply was stabilized in transitional modes (starting off, accelerating uphill, maneuvering when parking) and in modes close to the maximum power speed, normal elasticity of the engine was restored.
The downside is that fuel consumption has increased slightly, which is natural. a “carbonation effect” appeared, which did not exist before - because the “return” did not work at all - the pressure was barely enough to operate the injectors, why drain it?