The headlight leveler is an inconspicuous and rarely used device. But sometimes without its work it is impossible to move at night on busy roads.
A typical situation that requires the use of this device: a combination of a heavily loaded trunk and a trip in the dark.
When the trunk is overloaded, the rear part of the car lowers, and the front part “lifts up”. In this case, the “low beam” from a certain distance from the car automatically becomes “high beam”.
At first, the driver is perplexed why all oncoming drivers begin to “blink” and demand to switch the lights. If the driver guesses what happened, then he has to reload bags of potatoes into the cabin and onto the front seat in the dark. If the seats are occupied by passengers, then you have to either turn off the low beams and drive on the lights, or create an emergency situation on the road.
But there is a third way out: use a corrector and adjust the tilt of the light beam, lowering it down.
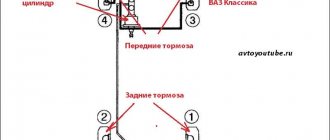
The opposite situation may also occur: if the hydraulic corrector is adjusted to the maximum load, and the machine is empty, then, on the contrary, it is necessary to raise the beam of light upward. In this case, the driver no longer blinds others, but illuminates the road “in front of his nose,” which is also fraught. Figure 1 illustrates these situations. The normal position of the light beam is shown in yellow.
What does a hydraulic corrector consist of and how does it work?
The design of the adjustment device is non-separable and simple; the hydrocorrector of the Lada Granta headlights consists of the following elements:
- the main cylinder located under the dashboard;
- a working cylinder located on each headlamp;
- reflector regulating mechanisms;
- connecting components.
A knob for controlling modes is displayed on the instrument panel, helping the owner change the pressure in the master cylinder. A change in pressure causes the reflector to rotate, and therefore the direction of the light flux.
The peculiarity of the hydrocorrector is its tightness and closedness. If a visual inspection reveals places where fluid is leaking or there are cracks, the connecting tubes require replacement.
The change in pressure in the main cylinder is transmitted to the working elements, causing the pistons to rotate, changing the angle of inclination of the reflector. Electrical correctors operate using on-board electricity and therefore do not depend on the ambient temperature. More reliable devices of this type are more expensive.
Operating principle of the VAZ 2110 hydraulic corrector
The corrector works on a fairly simple principle. The driver, by switching the knob located on the instrument panel, changes the fluid pressure in the main cylinder, which is immediately transmitted through the connecting tubes to the working mechanisms. In the cylinders located in the headlight units, this leads to a change in the length of the rods rigidly connected to the pistons. The rod pushes the lever, which exerts force on the reflector, which as a result takes the corresponding position.
All this happens when the system is closed and sealed. In the event of depressurization, the headlight hydraulic corrector stops functioning.
Manual headlight adjustment
How to properly adjust GF
For various reasons, during prolonged operation, the device settings “move away” from the original factory settings, which requires manual adjustment of the headlight hydraulic corrector during scheduled maintenance. That is, the device is working properly, but it is no longer possible to set the position of the head optics in the correct direction only with the help of a switch. This usually occurs due to the lack of good engagement between the rod and the lever (we are talking about the head cylinder). This situation arises due to the imperfect design of the hydraulic corrector. It is easy to fix - just return the lever to its seat. Another thing is that this is unlikely to prevent the possibility of a reoccurrence of damage, so it is worth thinking about how to strengthen the connection without compromising its mobility. The problem is partially solved by unscrewing the adjusting screw, since it is this that often causes the lever to jump out if it is screwed in completely. But here you need to take into account the fact that the screw is set in such a way that the headlights lower/raise, ensuring the correct angle of illumination set on the stand.
When is replacement needed?
- If you notice that the adjustment does not work, you need to accurately determine the cause of the breakdown. Most often, depressurization and leakage of working fluid occurs in the system. This can be detected by visual inspection. But if there is no leak, the cause of the malfunction may be in other parts. Perhaps the problem is in the rod itself, the movement of which is hampered due to contamination or deformation. To measure the stroke of the rods, you must first remove the cylinders; the stroke length should be 6-7 mm.
- If the rod stroke is normal, then there is a breakdown in other parts of the hydraulic corrector. In the VAZ 2110 model, this device is non-separable; if one of the components malfunctions, a complete replacement will be required. There are kits on sale at different prices. It is better not to save money and purchase a regulator with high-quality cylinders and tubes.
- Some car enthusiasts recommend trying to repair the hydraulic corrector yourself. You will need to use available materials: threaded bolts, washers and clamps. This will save you money on purchasing a new set, but the service life and reliability of such a design leave much to be desired.
Tip: Most often, when the device breaks down, one or both headlights are lifted up and the flow of light is directed higher than usual. You can notice this when you park your car in front of a garage door or in front of a flat wall.
Eliminating headlight shake
Some owners of the domestic VAZ 2110 noticed that the light trembles when driving. This problem appears more often in Kirzhach headlights, but in this part from Bosch this phenomenon occurs quite rarely. Reason: rattling of the reflector itself.
To eliminate light jitter you need to check:
- Is the reflector in place in the latch?
- Is the adjusting bolt rod in place?
- Does the hydraulic corrector rod rest against the seat;
- Is the thread slack (we swap the high and low beam lamps)
- Is the tube in the hydraulic corrector frayed?
Among the most successful ways to troubleshoot the problem:
- Replacing the hydraulic corrector with an electric corrector.
- Increasing the length of the hydraulic corrector rod, which will help tension the spring.
This popular method allows you to get rid of the twitching of the light by placing a cap on the hydraulic corrector rod.
Use as a cap:
- plastic dowel 8mm long,
- brake fitting cap,
- another plastic cap.
The operating procedure is simple:
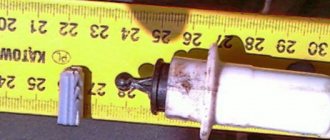
We take out the hydrocorrector from the illuminator. We tightly place the cap on its stem. If you decide to repair the stove on a VAZ 2110 with your own hands, then you should study possible malfunctions of this unit, and
It is important that it does not jump inside.
We insert the hydraulic corrector into the seat.
Hydrocorrector malfunctions
Among the most likely causes of a non-working headlight hydrocorrector is depressurization of the joints of tubes and sealing cuffs. The consequence of loose connections is loss of working fluid and air being sucked into the system. For the working pistons to move properly, the system must be completely filled with liquid. The manufacturer does not suggest repairing the hydraulic corrector, so if the system fails, the assembly is replaced. Nevertheless, the article “Repairing a hydraulic corrector” shows that the system can be troubleshooted and restored.
This is interesting: Prevention and lubrication of the starter - what can be used to lubricate it: types, characteristics of products
Where is the lamp hydraulic corrector located? Each headlight unit has an actuator that acts on a reflector, from which 2 tubes go into the cabin. Through a technological hole in the engine shield, the tubes go to the master cylinder and the switch on the dashboard.
Reasons for failure of the hydraulic regulator
If, when turning the headlight adjustment knob, the light beam does not change direction, this indicates a failure of the hydraulic corrector. There are several reasons for the malfunction:
- One of the working cylinders is jammed. In this case, the corresponding reflector will not rotate.
- The connecting tubes were damaged and the system depressurized.
- Failure of sealing due to damage or wear of seals.
If the system is depressurized, it is impossible to regulate both lamps. Most often, they lower and take a lower position, as a result, the headlights only illuminate the road next to the car. At night, this increases the risk of an emergency. You can try adjusting the hydraulic device rod.
Manufacturers of hydraulic correctors did not provide for the repair of the closed system as a whole and individual elements. Therefore, if the device fails, it is necessary to either install a new hydraulic regulator or replace the hydraulic device with an electric one.
Some car enthusiasts try to repair the regulator, but this does not bring long-term results. For example, they replace the working rod with a self-tapping screw of a suitable diameter with the sharp end removed. This makes it possible to fix the reflectors in a certain position. It will be impossible to make adjustments from the interior.
If, during a visual inspection of the hydraulic regulator, cracks are found in the connecting tubes, the repair will consist of eliminating them. The cause of cracks is temperature changes in the engine compartment of the car. If the crack is close to the main or working cylinder, cut off the cracked end. The tube damaged in the middle is completely replaced by pumping with antifreeze.
Removal and installation of headlight hydraulic corrector Niva 2121, Niva 2131
What to do if the Renault Logan stove does not work. A little about the air conditioning system of the Renault Logan car - watch the video
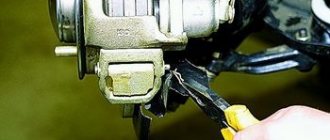
We disconnect the hydraulic corrector from the headlights and instrument panel when removing these components. We completely dismantle it for replacement. To disconnect the working cylinder of the Niva 2131 hydraulic corrector from the headlight...
...press the lock, turn it counterclockwise...
...and remove the hydraulic corrector working cylinder from the headlight.
Having removed the rubber plug from the mudguard (see Removing and disassembling a VAZ 2131 headlight, replacing the lamp),…
...we bring the working cylinder into the engine compartment.
Similarly, we remove and remove the working cylinder of the other headlight. To remove the hydraulic corrector master cylinder in the passenger compartment of a VAZ 2121,…
... by pulling it towards you, we remove the control handle.
Using a 21mm socket, unscrew the nut securing the master cylinder to the instrument panel.
We remove the main cylinder of the hydraulic corrector from under the instrument panel.
Having removed the plug from the front panel, we bring both working cylinders into the passenger compartment through the resulting hole. We install the headlight hydraulic corrector Niva 2121 in the reverse order.
Lighting VAZ 2121, Niva 2131
| Headlight diagram and lighting Niva 2121, Niva 2131 |
| Disassembly and assembly of headlights Niva 2121, Niva 2131 |
Adjusting headlights Niva 2121, Niva 2131 |
| Removal and installation of headlight hydraulic corrector Niva 2121, Niva 2131 |
| Brake and reverse lamps, interior and trunk lighting Niva 2121, Niva 2131 |
| Removal and installation of the front lamp Niva 2121, Niva 2131 |
| Removal and installation of the side direction indicator Niva 2121, Niva 2131 |
| Removal and installation of the rear light Niva 2121, Niva 2131 |
| Replacing the reverse light switch Niva 2121, Niva 2131 |
| Removal and installation of license plate lamps Niva 2121, Niva 2131 |
| Removal and installation of lampshades and interior lighting switches Niva 2121, Niva 2131 |
Direction indicator diagram Niva 2121, Niva 2131 |
| Replacing the turn signal and hazard warning switch relay Niva 2121, Niva 2131 |
| Removing and installing the hazard warning switch Niva 2121, Niva 2131 |
Units and diagrams of electrical equipment VAZ 2121, VAZ 2131
Diagnostics of electrical circuits of the Niva 2121 car. Instructions for repairing electrical equipment: generator, starter. Niva 2131 car diagram.
How to find a breakdown
Repair of the VAZ 2110 headlight hydraulic corrector
Many people, when headlight adjustment fails, immediately blame the hydraulic corrector for everything and rush to replace it as quickly as possible. But don't rush to conclusions. There may be other causes of the malfunction.
- Pay attention to any leaks of working fluid. If they are not there, check the stroke of the rod.
- To check the stroke of the rod, the actuator cylinders are dismantled. The normal value is between 6.5 and 7.5 millimeters.
- It is impossible to repair the hydraulic type corrector provided by the factory for the VAZ 2110, since the design of the device is not dismountable.
- If malfunctions occur, the entire assembly must be replaced, including cylinders and pipes.
Is it possible to repair a hydraulic corrector?
Manufacturers of correctors for the Lada Granta did not provide for the possibility of restoring the device. It is assumed that the driver should make a change. However, it is possible to repair the hydraulic corrector yourself, although it eliminates the problem only for a while. It is impossible to achieve full functionality, however, the lampshades are installed in the working position and secured in it.
This is interesting: The procedure for replacing brushes on an alternator in an Audi A6
The choice between an electric corrector or a hydraulic regulator is based on several parameters:
- cost – hydraulics will cost much less than an electric corrector;
- operating conditions - when the car often finds itself in situations with sudden temperature changes, it is worth paying more, but getting a reliable adjustment system;
- car model - not all cars allow you to connect an electric corrector, however, it is possible to install one on a Lada.
Barbaric repair method
Many drivers do not burden themselves with either repair or replacement of the hydraulic corrector. When the headlights begin to shine downwards, they simply screw in screws from the back of the working cylinder. Adjustment of the position of the rod and the level of tilt of the headlights is carried out by screwing in and unscrewing the screws.
After such a repair, the concept of a headlight range control is no longer applicable to the system, since the possibility of quickly adjusting the angle of the headlight reflector from the passenger compartment disappears. But such repairs have a right to life if the malfunction caught you on the road and there is simply no other way to raise the headlights.
Recovery without removal
- Pull the actuators out of the headlight assembly.
- Remove the tubes from their seats, and then secure the tubes so that the remaining working fluid does not leak out of them. It is better to preheat the landing site, but you can simply cut the tubes at the edge of the landing sites. Check the stroke of the actuator cylinders by moving them by the rod using pliers. The pistons should move without jamming.
- Each actuator has a plug for bleeding the system, which must first be pulled out.
- Turn the switch on the dashboard to position O. Fill the tubes with antifreeze so that a small drop remains on top, then put them on the fittings of the actuators.
- Position the slave cylinder bodies so that the bleeder hole is the highest point.
- Holding the rod in the maximum retracted position, fill the working cylinder with liquid until a small “hill” forms above the bleeder hole.
- Close the plug.
The system should work, but since the seals of the connections at the main cylinder, the regulator at the dashboard and the seals of the working cylinders were not checked, one cannot be sure of the long service life of the hydraulic corrector after such repairs. This restoration method will not work if the system is airy at the master cylinder in the cabin.
Restoration of headlight hydraulic corrector
You need to know where the headlight hydraulic corrector is located and how to remove it, since for a complete troubleshooting you will need to dismantle the working cylinders and the main adjustment mechanism. Take 2 small pieces of tube to connect the working cylinders to the main mechanism after removal, fill the system with water. If the device is operational, set the switch to the maximum headlight raise mode and leave the mechanisms in this position for several hours. If no leaks have appeared during this time, the system can be filled with antifreeze and installed on the car. If the leak does not appear in the pipe connections, it is better to replace the hydraulic corrector with a new one or install an electric corrector instead.
This is interesting: How to adjust headlights with your own hands - a detailed explanation of popular adjustment methods
Only new coolant should be used so that dirt particles do not interfere with the normal movement of the pistons. Remember that the system must be completely filled with working fluid. To restore, you will need a syringe and a blunt needle so as not to damage the cylinder seals. Do-it-yourself repairs, the assembly and disassembly process are perfectly shown in the video.
How to use concealer
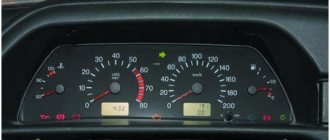
The corrector has knob A on the dashboard of the VAZ 2107 to the right of the steering wheel, next to knob B for adjusting the brightness of the dashboard lighting. If you rotate knob B counterclockwise, the brightness of the light decreases.
As they say, the control knob of the device has an “intuitive interface.” To change the direction of the light flow, with the trunk loaded and the headlights on low beam, you need to align the mark shown on the regulator with one of the marks marked on the unit body so that the beam of light does not blind oncoming drivers.
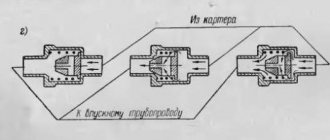
The VAZ 2107 hydraulic corrector has four switching options (in order from large point to small point):
If not
it turns out to adjust
the headlights
on
NIVA
2121,21213,21214 then watch this video to the end.
I - minimum load, the front of the car is slightly lowered: one driver, or there is a passenger in front;
II - driver and four passengers, the body sags evenly downwards;
III - the same as II, with an additional load of up to 75 kg in the trunk:
IV - driver and maximum trunk load: the “nose up” the most.
In order to see how the angle of inclination of the light beam changes during operation of the corrector, it is better to place the car perpendicular to the wall. Let us recall the standard requirements for the location of the low beam.
Replacing the headlight range control on a VAZ 2110
Every car enthusiast can change the headlight hydraulic corrector. The work process takes no more than half an hour. The only tools needed to replace the hydraulic corrector are a wrench with a size 21 head and a straight screwdriver. The rest is done by hand:
- Remove the adjustment knob located on the instrument panel. To do this, you need to pull it with medium force, slightly shaking it.
- Using the existing wrench, unscrew the nut under the handle (it pulls the master cylinder to the panel).
- Click on the rectangular button on the panel. It is located slightly below the hydraulic corrector adjustment. As a result, the door opens. Through the resulting opening from below, we can easily reach the free master cylinder.
- Open the hood. We find headlight units with integrated working cylinders. To remove them, unfasten the clamps. After this, each cylinder is turned counterclockwise and removed.
- Using a prepared screwdriver, unscrew the bolts that secure the tube clamps.
- We push the released elements of the hydraulic corrector into the cabin at the place where the connecting tubes come out. The seal present here is flexible, so it won’t hurt much.
- Installing a new headlight range control is carried out in the reverse order.
Have you noticed how simple it is? So, if the hydraulic corrector in your VAZ 2110 does not want to work, take half an hour and replace it. Agree, the ability to adjust the direction of the light beam at any time without leaving the car is, it seems, a small thing, but a pleasant one.
To electric
A more reliable and attractive electric headlight corrector on the Lada Granta is installed as follows:
- Before installing the headlight electric corrector, it is necessary to dismantle the failed device - first by disconnecting the main cylinder, then by disconnecting the hydraulics and leading the pipes through the passenger compartment.
- The negative terminal is disconnected from the battery.
- Electrical mechanisms are located where the working cylinders were installed. If the O-rings are worn out, they are replaced.
- The negative wire is connected to ground, the positive wire is connected to terminal 20.
- The wiring runs in the space previously occupied by connecting pipes.
The corrector lever is dismantled when installing the element.
Having finished with the wiring, you need to return the terminal to negative. The performance of the new system must be tested.
To hydraulic
If the owner is satisfied with the hydraulics, then replacing the headlight hydraulic corrector on the Grant is done in the same way:
- the old system is dismantled, connecting pipes are removed;
- new elements are installed in the same way in place of failed elements;
- O-rings are checked;
- Full testing is carried out.
There is no need to disconnect the battery when installing hydraulics to replace damaged correctors.
Adjustment process
To increase accuracy, you should additionally prepare the following tools:
- building level;
- thick fabric or cardboard;
- window cleaner;
- gloves;
- wheel chocks;
- clean napkins.
Using a level you can determine the position of the body and significantly improve the quality of adjustment. Before making adjustments, you need to wash the headlight with window cleaner and wipe dry with napkins.
- Place the machine on the site. The distance from the wall should be 5 meters.
- Place the load in the driver's seat or place an assistant in it.
- Rock the body to relax the silent blocks and springs.
- Check the slope of the body with a level.
- Set the electric corrector to the zero position.
- Mark the center of the machine with a vertical line on the wall.
- Draw lines A and B at a distance of 1108 mm.
- Draw a height mark of 60 cm with a horizontal dotted line.
- Move 75 mm down from the main horizontal designation and draw a thick line.
Clear marks on the wall will increase the accuracy of the headlights during the work process.
To adjust the beam, you cannot use the hydraulic corrector: it must be at level 0. All adjustments are made manually, using special screws built into the headlight housing.
You can raise the headlights on a VAZ using a screw located near the radiator grille. To turn the reflector left or right, twist the plastic handle, which is located near the wing.
If the screw is tight, you need to unscrew it all the way, apply a drop of oil and screw it back. When turning the handles, do not apply force: this will break the reflector or disrupt the angle of the rod.
- turn off the VAZ engine;
- to turn on the light;
- cover one headlight with cardboard;
- use the handles to align the headlight beam according to the diagram;
- adjust the second VAZ lamp.