General provisions
Before you begin installing a standard multimedia system, you need to know what is included in the audio preparation of the Lada Vesta. Starting from the Classic version, there is a minimum required for connecting a car radio, i.e. All the necessary harnesses and wires have already been installed in the Lada Vesta in order for the standard acoustics to be connected.
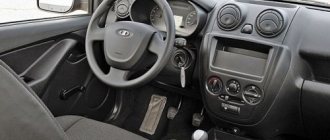
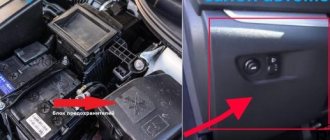
There are no wires for tweeters in the triangle of mirrors. When installing a multimedia system in a Lada Vesta, just pull out the plug. To do this, carefully remove the bar; behind it there are ISO and FAKRA connectors for connecting an antenna, as well as USB and AUX connectors. You can install a standard multimedia system or a 1DIN radio in the resulting hole.
Installing a radio in a Lada Vesta is not very difficult; just connect the appropriate harnesses.
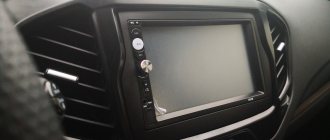
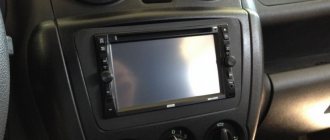
It should be taken into account that without significant modifications it is impossible to mount a 2DIN car radio.
Installing speakers in Lada Vesta has its own subtleties.
To connect standard speakers, non-standard connectors from Nissan or Renault are used. In order to connect other speakers, you will need to purchase adapters ZRS-AG-22 or CT55-17. It is not recommended to cut off the factory pads, because... The car will be automatically removed from warranty.
Recommendations for removing the casing
It is impossible to install a sound system in a Lada Vesta car without removing the door trim. When dismantling the cladding, be extremely careful not to scratch the plastic. Under no circumstances should you use a screwdriver; we only use a plastic card.
To dismantle the plug at the end of the door, pry it off with a card; there are special recesses at the bottom. In the same way, the window lift buttons are dismantled using a card; the fastening antennae are located at the back and on the sides in front of the MUS.
The casing itself is attached, in addition to self-tapping screws, to 4 more “hedgehogs”. They will definitely break if you do not use a special removal tool. The Lada Vesta has hedgehogs from Nissan or Renault, but if you modify the grand ones, which are much stronger and cost several times less, you can save money.
Thus, the trim from the left door is removed. Removing the trim on the right side has its own characteristics. There is no need to remove the power window buttons and look for the secret screw plug. Simply remove the handle cover. To do this, you need to pry the plugs from the bottom; there is a special groove in it, using a plastic card. Then you need to unscrew two 10 mm screws, the next step is to remove the trim, as with the left door.
Selecting speakers
Speaker systems are divided into 3 types.
- Type 1 - Component: consists of three speakers, each of which is responsible for reproducing its own frequency range. HF - high frequencies, LF - low, MF - respectively, medium. All three speakers are in separate housings on the same platform. The system is presented as the best. The disadvantage is the high price.
- Type 2 - Coaxial. Here all the speakers are located in one housing. The most common in terms of price-quality ratio.
- Type 3 - Broadband. One speaker reproducing all frequencies.
Vesta has wideband standard speakers; their sound does not suit all music lovers. If you are not satisfied with the Lada Vesta radio, and you are planning to replace the entire speaker, then you will need to purchase spacers for the Lada Vesta speakers, or cut them out of plywood. When buying speakers, remember that their power should be slightly greater than that coming from the radio. Only in this case the sound will be of high quality. There cannot be an unambiguous recommendation for choosing speakers; everyone has their own hearing. The space under the speakers on the front doors of Lada Vesta is 160 mm. (6 inches), on the rear - 130 mm. (5 inches). When choosing speakers, you should proceed from these dimensions, adding the thickness of the spacer.
Selection of speaker systems
For high-quality sound of the played soundtracks, it is recommended to purchase a 2-component system, which contains separate tweeters and mid-bass midrange/bass speakers. In this way, a high-quality sound stage can be formed.
That is why it is recommended to place them in front. The role of the subwoofer is played by cheaper coaxial speakers, which are installed in the rear of the car. To install tweeters and connect them to the radio, you need to install additional wires.
HF speakers are installed in the triangles of the Lada Vesta mirrors. If you need a budget option, then you should buy coaxial system speakers. You will not get the effect of frequency diversity to obtain a sound stage, but the musical sound of the broadcast programs will be good. No additional system configuration is required.
What is audio preparation in a Lada Vesta car?
Almost all modern cars come from the factory with multimedia systems with a display that are multifunctional and easy to use. You can additionally connect a rear view camera to such MMCs, watch videos, and use the navigation system. In simple configurations, such an option is most often absent, so the standard Lada Vesta radio comes without a display. However, for comfortable listening to music and radio it will be quite enough.
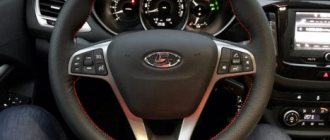
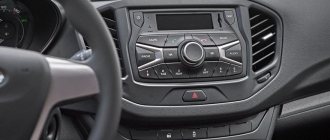
The radio is located in the center of the front panel and fits harmoniously into the overall design of the cabin. Even the radio itself is made using an X-ray design, as evidenced by the X-shaped aluminum-look inserts around the RADIO and AUDIO buttons. I'm glad that the designers worked on even such minor details.
Main functions and capabilities of the Lada Vesta head unit
Firstly, the radio tape recorder 100% fulfills its purpose - it plays music files and radio. Music can be listened to via AUX, SD card or via USB devices that can be connected as a file drive. You can also connect the radio via Bluetooth to your phone and play music on your car speakers.
Secondly, the radio displays the time on a monochrome display.
Thirdly, it has a Hands free function.
As you can see, the radio has all the necessary functions for comfortable listening to sound.
Control elements for the standard Lada Vesta radio
In the usual place for everyone - in the upper left corner of the radio there is a button to turn the radio on and off.
To the right of it there is a microphone for communication when the Hands free function is turned on, as well as a Reset button to reset the device settings. Even further to the right is a monochrome display that serves to display various information – track name, radio station and its frequency, time, etc. In general, here is everything that we are used to seeing and expecting from the radio display.
To the right of the radio there is an SD card slot and a DISP clock display key.
In the bottom row we can see the buttons:
MUTE – mute Green and red handsets – accept and reject calls,
SCAN is a multifunctional key.
A little lower we see the RADIO and AUDIO keys, which perform the functions of switching playback modes - either radio or audio from a storage medium.
In the very center of the radio there is a puck for scrolling through various functions, but most often it is used to increase or decrease the volume.
Below are keys with numbers from 1 to 6. These are used to quickly navigate to saved radio stations. In addition, in audio mode they can be used for other purposes. So, for example, key 1 can scroll through folders on a flash card.
Head unit Lada Vesta price
It happens that the installed radio tape recorder breaks down, so you urgently need to find out the price of this product. The price of a standard Lada Vesta radio is approximately 13-35 thousand rubles. Now you are probably thinking, why is there such a difference in cost? Let me try to explain to you.
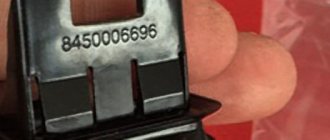
The fact is that this device is produced under the ITELMA brand. You should know this brand by the E-GAZ system, which is installed on AvtoVAZ, as well as by a number of ECUs that are installed on Lada cars. Now let's get back to the essence of our conversation. The original article number for the standard radio is 8450007949.
If you order goods online, you can find this radio under this article number. But the manufacturers will be different. If it is ITELMA, then the price will be 12-14 thousand rubles. And if LADA is already 34-36 thousand. Although there will be the same product inside the box. Such are the things. A small life hack on how to buy an original Lada Vesta head unit at a discount.
Buy a Lada Vesta head unit
You can purchase a standard Lada Vesta radio either from an official dealer or by visiting any car dealership. Or you can use third-party auto stores. We recommend shopping online. To search, you can use article number 8450007949. Shopping on the Internet allows you to save from 10 to 40% of the cost of the product. In terms of money, the savings will be very good.
If you want to save even more, then you can resort to searching for a radio on specialized forums or message boards such as Avito.ru. In this way you can save an impressive amount. In our case, the factory radio is most often sold because it is not needed. Many car owners change it to a more advanced one in order to get better sound quality from the audio system. Let's try to find some good deals.
Replacing the Lada Vesta head unit
If the standard Lada Vesta radio does not suit you for some reason, then you can always replace it. Fortunately, now you can find anything on sale. The simplest option would be to install a multimedia system from more expensive models, and in particular the DVM 2117 iQ Multimedia Center with Navitel software is suitable. It can be ordered from officials at a price of about 35 thousand rubles. Or find it on the same Avito. You can also use article number 99999021174700 and order this system in the online store. In the last two cases, you will be able to save a lot.
Source: https://chevroletcars.ru/info/chto-takoe-audiopodgotovka-v-avtomobile-lada-vesta/
Adviсe
Technically, installing music yourself in Lada Vesta is not difficult. By adhering to a few simple rules, any motorist can handle the work. Consider these rules:
- All work must be done very carefully to avoid damage to the plastic upholstery;
- The car already has audio preparation; you only need to install harnesses to connect the front speakers;
- You cannot cut off standard connectors, but you need to buy and use adapters;
- Before installing audio, it is recommended to soundproof the Lada Vesta doors to obtain improved sound characteristics;
- Install the speakers on the spacers.
Audio preparation is measures carried out by the manufacturer (laying audio cables, installing speakers, etc.) that simplify the process of installing music for the car owner. Depending on the configuration of Vesta, audio preparation may be different.
Speaker installation
In order to install speakers in the front doors of Lada Vesta, no special preparation is required; it is enough to remove the layers of insulating material at the places where the speakers are attached. For installation it is necessary to cut out the gaskets. If you are using acoustics of a suitable diameter, you can cut pads from felt.
Speaker Installation
Installing 16 cm speakers in the front doors has its own peculiarities. The standard fastening involves fastening with 3 self-tapping screws, therefore, to install 16 cm acoustics, you need appropriate spacers for the speakers in the Lada Vesta. The diameter and thickness depend on the size of the speakers in the doors that are supposed to be installed.
No adjustment is required, you need to ensure that the speakers do not come into contact with the car body, the gap should be approximately a centimeter. According to the proven scheme, acoustics are installed in the rear doors.
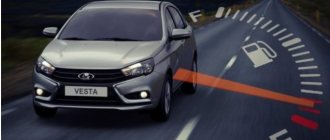
Lada Vesta Classic
What is included in the cheapest version of the car? The equipment table indicates that there is audio preparation and this means:
- There is no radio, there is a blank instead;
- there are no front and rear speakers (their installation locations are sealed with sound insulation);
- there are wires for connecting the radio (behind the plug there are connectors: ISO, FAKRA (antenna), USB and AUX);
- there are wires for connecting speakers in the doors (hidden inside the door and wrapped with sound insulation);
- There are no wires for the tweeters in the mirror triangles.
To install the speakers you will need an adapter and spacers.