and so you are about to install fog lights! but you don’t really understand how, there seems to be a lot of information about this on the net, and there are also a lot of diagrams, but we imagine that PPC you don’t understand the diagrams,
I will try to write a very detailed report that after that Any person was able to connect them right next to the house, and does not pay anyone any money! The most important thing is to remove the battery terminals!
I will describe it according to my Matiz! but this BZ can be connected to anyone! so, let's begin! first what we need!
1) the FOGS themselves!
I didn’t take any photos, so I’ll explain it using other people’s photos and on a piece of paper! I’m not a walker, but it doesn’t matter, the main thing is to make it clear!
and so let's go! According to GOST, it is necessary for the fog lights to be turned on with the current dimensions (but this does not mean that we cannot drive with the dimensions but without the fog lights), that is, if the dimensions are turned off, then the fog light button will click to nothing! but when you turn on the headlights, you can use the foglight button to turn these same foglights on or off!
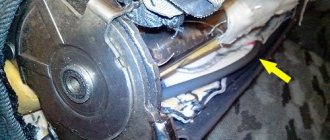
Let's start with the location of the RELAY! you can put it anywhere, even in a common block, I didn’t bother and put it behind the instrument panel above the radio, so I’m writing as I did) we remove the black (who didn’t paint) central panel, and we see this, that’s where I threw the relay
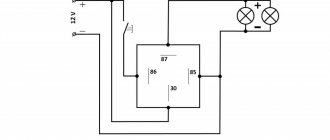
that is, after these actions we already have a 12 volt circuit from the dimensions, then a button that breaks the circuit and then a relay 85 contact)
Then we pull pin 87 through the plug under the pedals and pull it to the AKUM! don’t forget to put a fuse, it is placed between the positive of the Akum and relay 87 contact (put the fuse closer to the Akum) we’ve passed half the way, let’s go further, we throw the 86 contact of the relay on the body, or the minus (most often the black wire) it would be nice to extend it to the Akum too, but this not necessary!
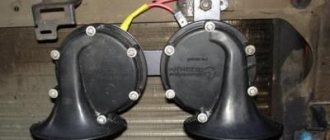
all that's left is the fog lights themselves,
let's start with the front end, the fog lights are installed in their normal place, and there are 2 wires, plus and minus, coming from each headlight! with a minus, as always, throw it on the body, or connect 2 minuses from two headlights and connect them to the minus Akuma (it doesn’t matter! It’s just that if you throw it on the body, you need to pull fewer wires! But connect the pluses from 2 headlights and pull them into the interior through the same plug as the plus on the Akum, ...pulled it out? Now lift it up to our relay so that the wires are not visible (it’s also more beautiful) and connect it to connector 30, well, don’t assemble everything yet, you never know so! so as not to take it apart again! go put the terminals on the battery... I’ll wait here for now) now turn on the dimensions and check if they work! (of course they work) well, try the fog lights, if everything works then you can hide everything and put it back together, check that there is no short circuit anywhere! and insulate all bare wires)
if the fog lights don't work, listen to the relay! it should click, if it doesn’t click, then you have connected the relay connectors incorrectly! (in general, it is advisable to check all the connectors not in the car, but to the side! That is, assemble this entire circuit on the table and then, knowing where to connect, put everything in the car)))
I hope I explained it correctly and clearly! If you forgot anything, ask in the comments, I will answer!
Yes, and I’m very tired of writing all this, so wish me and click LIKE!
Fog lights are designed to generate a flat and wide stream of light directed above the road surface. This direction of the light beam allows minimizing illumination of the volume of fog in thickness and improves visibility from the driver’s seat. Failure to follow the rules and wiring diagram for fog lights when installing them yourself can lead to accidents.
What will you need to install fog lights?
To install fog lights yourself, a minimum set of tools is required. The car owner must have knowledge and skills in working with electrical wiring, since the safe operation of the car as a whole depends on the correct installation.
- color electrical diagram of the car;
- nippers or side cutters;
- wire cleaning knife;
- terminal crimping pliers (terminal block);
- soldering iron
Set of materials required for installation:
- a set of fog lights suitable for installation in standard holes in the bumper or universal ones that are mounted on the surface of the bumper;
- stranded copper wire with a cross-section of 1.5-2 mm² with insulation capable of operating at low temperatures and resistant to gasoline and oil vapors;
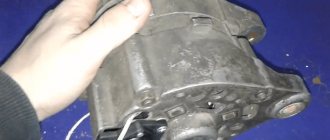
- relay for turning on (standard headlight turn-on relays from front-wheel drive VAZ models are usually used);
- remote housing for installing a blade fuse;
- 30 A blade fuse;
- a control key that matches the interior design (preferably with a backlight);
- connectors and terminals for connecting wires to circuit elements;
- heat shrink tube of suitable diameter;
- electrical tape on a polyethylene or fabric basis;
- plastic ties;
- automotive corrugated hose for laying wires.
Set of fog lights for Ford Focus 3
The working process
We select the desired location and use a drill to drill holes for the bolts on which the foglights will be attached. Place the relay on the right side of the engine compartment. It should be connected to the wire located next to the splash guard. Now connect the relay to the new headlights.
We form a bundle from two wires coming from the left and right fog lights so that the wires do not dangle and interfere. Then we drill three holes in the bumper and secure the flagellum with wire.
We screw the headlight mounts to the bumper, then put it in place. We disassemble the lanterns and insert pre-purchased light bulbs into them.
Now let's hang the back parts of the foglights. First, we thread the connected wires into the left headlight, strip them, and crimp the connectors. Now you can connect a light bulb to them and assemble it completely. We perform the same actions with the right one, but in addition we additionally crimp the parallel power supply and the harness onto the left fog lamp.
Connection diagram
For installation, two connection schemes for fog lights are possible:
When connected in parallel, the positive wire goes to each headlight from the relay contact. Power to the relay is supplied through a fuse link with a rating of 15 A, which is enough for most models of fog lights. It is advisable to place the fuse as close to the battery terminal as possible.
The +12V signal voltage should appear only when the ignition is active. This measure prevents the headlights from working when the engine is off. If desired, you can automatically ignite the headlights after turning on the ignition. To do this, the signal wire is connected to the battery charging indicator lamp installed in the instrument cluster. The button must be on.
Parallel connection
Serial connection reduces current consumption and lamp brightness. A similar scheme is used to use fog lights instead of standard headlights.
Serial connection
Connecting additional headlights via a relay is demonstrated in the video tutorial from the “AUTO ELECTRICAL — Steel Horse” channel.
How to install and connect with your own hands?
Installing fog lights on your own begins with developing a connection diagram. A properly designed circuit avoids unnecessary wires and ensures reliable operation of the electrical circuit. It is recommended to carry out installation work in the garage, although many owners install it outdoors.
Installing PTF in the front bumper and setting it up
There are three installation methods:
- into standard openings;
- on the outer bracket;
- into a blank bumper not intended for installing headlights.
The setup is done using the homemade template presented below. The template is installed perpendicularly at a distance of 5 m from the car headlights. The adjustment is made until the top edge of the light spot coincides. The matching line is located 100 mm below the height of the center of the lamps.
Approximate view of the template for customization
Adjusting your fog lights increases driver visibility and reduces the risk of blinding oncoming drivers.
Installing PTF in a blind bumper
The most difficult and time-consuming option is to install fog lights in a solid bumper (i.e., one that does not have factory holes for this):
- Remove the bumper from the vehicle in accordance with the repair and operating instructions.
- Determine the optimal location for installing headlights in terms of housing shape and compliance with regulations.
- Make a hole for the headlights. The best way is to drill holes around the perimeter and saw through the gaps with a file. The hole must be adjusted to ensure proper fit between the body and the decorative frame. Small fragments of the bumper are carefully cut off with a construction or stationery knife.
- Drill holes for the fog lamp housing, which is secured with suitable bolts.
- Install the headlight into the housing and mount the protective cover. It clings to the plastic of the bumper.
- You can adjust the headlight using a special key included in the kit.
Which ones to choose?
As we have already said, fog lights are not only an important part of the car, but also its decoration. Thus, their choice must be approached responsibly.
First decide on the design and color of the light. You can choose round or square, yellow light or white. A wide range is offered by such companies as Osvar, Wesem, Hella, Catz and Osram.
The pricing policies of these brands are different, but you should assume that the more expensive the headlights, the better they are. Please note that the larger its surface, the brighter it will shine. That is why it is best to choose the largest size models from all those presented in the store.
In addition, we advise you to immediately purchase bulbs for them of the required category (H1, H2, H3, H7 or others) with a power of no more than 55 watts, so as not to blind drivers of oncoming cars and not to overheat the relay.
Video
The wiring diagram for installing fog lights is shown in a video filmed for the “Car Lover” channel.
About parallel and serial connection
According to the new Rules, you need to drive a car during the day in the same way as at night with a light on. Available with low beams, running lights or fog lights. Today we’ll look at how you can connect fog lights to your car. Fog lights will also be useful in fog. To save money, you can connect the fog lights yourself. There is nothing complicated about connecting fog lights, and anyone can handle this task!
When installing a PTF, an electrical circuit for turning on the main light of a car's headlights may be useful.
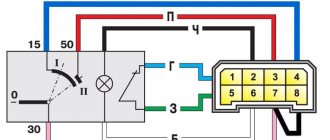
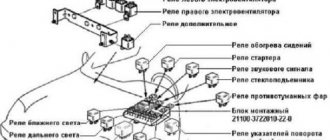
Standard wiring diagram for car headlights.
2. Fuse and relay panel.
3. Steering column switch.
4. Button for three positions in the car interior.
5. Ignition switch.
6. Dashboard.
And so, the fog lights have been purchased, just the ones you need for your car model (motorcycle, etc.). Installed. All that remains is to make the electrical connection of the PTF.
Diagram of parallel connection of fog lights
Next, we will take a closer look at the parallel connection diagram of fog lights. This is the usual PTF switching scheme.
We connect the bulbs at one end to the ground of the car, and twist the other ends and connect them to contact number 87 of our relay.
At 30 of the relay we supply a plus through a fuse of at least 15 Amps , the plus is taken to the fuse panel, preferably closer to the battery.
Now we connect the button for turning on the fog lights with one end to the car body, and the other end to 86 of our relay.
Contact 85 of the relay goes to plus 12V, which appears when the ignition is turned on. This plus can be found on the fuse panel.
Automatic activation of PTF
If you want the fog lights to turn on automatically when the car starts, then connect this wire to the “charging” in the instrument panel. “PTF” button in the passenger compartment must be turned on.
That's it! Now, when you press the power button, the minus is applied to the relay winding - the relay is activated and thereby closes contacts 30 and 87 of the relay and - our light bulbs light up!
Economical (sequential) inclusion of PTF
If you use foglights only for driving during the day with lights on and do not intend to use them in fog. Then two fog lights can be connected to each other in series. Of course, they won’t “pierce” the fog, but during the day you can see that the car is driving with light.
In this way we will “kill” three birds with one stone