Many people ask what does audio training mean on Grant? Audio preparation is, as a rule, a series of works already completed by the manufacturer (laying cables, installing speakers, etc.), which allow the future owner to install music in the Lada Granta without much effort. Interestingly, depending on the configuration of the car, audio preparation may be different.
Audio preparation of Lada Granta liftback and sedan
Many people ask what does audio training mean on Grant? Audio preparation is, as a rule, a series of works already completed by the manufacturer (laying cables, installing speakers, etc.), which allow the future owner to install music in the Lada Granta without much effort. Interestingly, depending on the configuration of the car, audio preparation may be different.
Video - Installing 16 cm Speakers in Lada Granta through spacers
Acoustics in Lada Granta
It's no secret that acoustics in a car are very necessary and perform various functions. Installing it is a bit of a concern for novice motorists: they find it difficult to choose the right speakers, they do not have enough money for high-quality installation, etc. This article was written solely to help everyone in this matter and we will find out how to install acoustics in a Lada Granta with our own hands. The Lada Granta and the acoustics, installed correctly in its interior, taken together, will create a completely different car, which even the owners of some foreign cars will look at with envy.
Acoustics Lada Granta
As a rule, installing acoustics in a car has three main stages of development:
- Car radio installation.
- Installation of front speakers.
- Installation of rear speakers.
Let's look at everything in more detail.
Lada Granta standard
The car in this modification has a minimal set of options. The standard configuration has an option called “Audio preparation (cable, plug for the hole in the roof for the antenna).” This means that the car does not have a radio, but the necessary wires to connect it are there and they are hidden under the panel. But to connect the radio to the speakers you will have to lay the cable yourself.
The connection diagram is as follows:
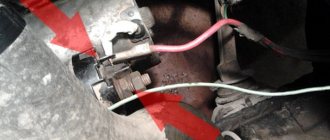
- Rear left door: orange-blue (ground); blue-white (plus);
- Rear right door: yellow-green (plus); green-black (mass);
- Front left door: gray-red; green-red;
- Front right door: yellow-white; green-white;
Lada Granta liftback norm
The situation repeats itself, we have the option “Audio preparation (cable, external antenna)”. There are wires, and an audio system without TouchScreen is installed only in configuration 21917-710-41. All the necessary wires are already there, all that remains is to connect them.
Now you should understand what is included in Granta's audio training. If you have to connect the radio yourself, then we recommend that you read the instructions on how to install music.
Keywords: front speakers Lada Granta | rear speakers Lada Granta | cassette player Lada Granta | torpedo Lada Granta | Lada Granta doors | Lada Kalina doors
4
Found an error? Select it and press Ctrl+Enter..
AvtoVAZ increased prices for LADA for the third time in 2021
The price of installing a turbine on a turnkey Lada Vesta
Is it necessary to do anticorrosion on Lada Vesta and XRAY, AvtoVAZ answers
Installation of the steering column joystick for controlling the radio of Lada Largus
Acoustics for the front doors of Lada Granta
Installing speakers in Granta doors allows you to be independent of the body type - speakers in the doors do not require an acoustic shelf. This means that you can install speakers in a sedan and a hatchback according to the same principle.
Preparatory work
Before we begin the installation itself, let's figure out how to prepare the car. For this:
- We disassemble the door : dismantle the handle (pry up and remove the trim, unscrew 2 screws), the tip of the limit switch, two screws from the bottom of the door, overcoming the resistance of the retaining pins, pull the door card toward you and remove it from the door;
- We soundproof the door: in the warm season or in a heated garage, we cover all accessible parts of the door with vibroplast. Vibroplast StP M2 is suitable; when applying it to the door, be sure to heat it with a construction hairdryer and roll it with a pressure roller;
- If you have Spleen thermal insulation material, we cover the inside of the door card with it. This will further hide noise from the door when assembled;
- We are preparing spacers , if any are required for installing 16 cm speakers - more about them later in the text;
- We replace the factory terminals on the speaker wire in the door with normal ones (usually good terminals are included with the speakers) - to do this, we simply cut off the unnecessary connectors and attach the terminals we need to the wiring. A high-quality twist with heat shrink is enough;
- If the door panels do not have holes for speakers , we prepare them. It would be optimal to supply factory acoustic grids, which are installed on luxury versions of Granta and Datsun OnDo.
Sequence of actions when installing rear speakers in a Lada Granta liftback
The speakers will be installed in the factory door openings. The situation with dimensions for openings is atypical. The shape is oval, while the columns are round. It is not known why AvtoVAZ made this decision.
To correctly install speakers in the rear door, do the following:
- remove the door card, handle, control unit;
- select the size of speakers for installation. Size 13 will require less cost and plumbing work compared to size 16.
- Selecting a speaker at “13”: using a utility knife, cut off the edge at the top of the hole for the speaker. The metal body is left unchanged.
- If you select a speaker with “16” or more, use a metal jigsaw to cut off the edge on the metal and plastic casing.
It is important to know!!! Many car owners are wary when they see that the hole in the speakers is not located in the center of the oval structure (preparation). The problem is familiar, but the defect has not yet been fixed.
- We cut out a stand from wood for the base of the speaker, no more than 0.6 cm thick. For these purposes, it is better to choose plywood.
- We insert the speaker into the door, place a wooden spacer, connect the block with wires - the so-called audio preparation.
To the left rear door: blue/white - brown/blue wire. To the rear right: green / black - yellow / green. We complete the assembly by installing the door card. By analogy, we carry out the installation on the left door.
Audio preparation and audio system of Lada Granta equipment
Domestic manufacturer AvtoVAZ regularly tries to introduce something new into its products. The plant often focuses on the wishes of consumers, so the advice of most drivers of previous Lada models was no exception.
As you know, the old VAZ-2110 and VAZ-2112 models did not provide audio preparation, which is why the owners of these versions of the Lada were forced to completely redo the interior to accommodate the acoustic system. Audio preparation in Grant was provided for during design.
All the necessary wires for the acoustics are present in the stock car. There is also the possibility of placing the multimedia system in a special opening in the dashboard. There is also electrical wiring for the radio, rear and front speakers.
Taken together, this makes for a PRETTY SIMPLE connection to the AUDIO SYSTEM YOU WANT to do. However, once you understand the electronics of the machine and allocate a sufficient amount of time for this, you can carry out the installation yourself.
The feasibility of conducting audio training in the Lada Granta largely depends on the assembly of the car. On the “Norma” and “Standard” fret trim levels, the owner only needs to connect the audio system to the controls, because the manufacturer independently carries out the audio preparation.
Audio preparation is the basis of car audio
It is worth understanding what audio preparation is in a car. This may mean both work on installing audio equipment, and the presence of a special place for an audio system, speaker jacks, and wiring for further installation of acoustic equipment.
Such a concept as standard audio preparation is an integral part of the car’s equipment. Its level affects the final cost of the new car and the owner’s further costs for acoustics. The manufacturer can install either simply a wiring harness with the necessary plugs and connectors, or additional elements: speakers, a radio antenna and the radio itself. Expensive versions even have high-frequency beepers and audio system control keys located on the steering wheel.
Selecting a speaker system
Having assessed the audio preparation of the car, you can begin selecting equipment.
Depending on personal preferences and financial capabilities, a minimum set is determined - in fact, a radio tape recorder (or, as it is called, a head unit) and a set of speakers. A true car audio connoisseur will select equipment with increased power, as well as taking into account the possibility of installing additional devices: subwoofer, amplifier. Typically such a complete audio system requires the purchase of an auxiliary battery. When choosing acoustics, beginners should consider the following main characteristics of the equipment.
For the head unit - available media formats (CD, MP3) and output sound power. It is worth focusing on the average value of 25 W for a standard four-channel device.
For speakers:
- dimensions of standard sockets and the possibility of changing them;
- power (take into account comparability with GI);
- frequency range during playback;
- sensitivity.
Audio system installation
After purchasing the equipment, the question of installation arises. This event is not easy and requires special technical skills. In most cases, in order to avoid unnecessary headaches, car enthusiasts turn to certified service centers, where experienced specialists will perform the necessary work and provide a guarantee.
Undoubtedly, there are people for whom everything related to the car is their hobby. For them, self-installation of sound equipment will be not so much saving money as it will be a pleasant pastime with a further reason for pride. In this case, what does audio preparation mean? In a nutshell, the higher the vehicle’s equipment level, the lower the additional costs for acoustics.
Lada Granta Norma
In the Lada Grant Norma, the audio preparation is configured in such a way that the door wires are connected to the head unit, which already powers the audio system itself. The car owner will only have to connect the radio and speakers.
The Lada Granta series has a flaw: the AvtoVAZ connectors for audio systems do not match the connectors of audio equipment manufacturers. Because of this, you have to additionally purchase the necessary wires and connect them directly, while paying attention to the corresponding symbols.
Lada Granta Standard
The audio preparation of the Lada Granta Standard is arranged as follows: the car has power wiring harnesses connected to the head unit. Such wires are present only in the radio; there are no visible outputs of wires for the speaker on the doors.
Therefore, on the basic configuration of the car, the wires do not reach the audio system speakers. Under the panel on the driver's seat side there are wire outlets for the radio.
In order to connect them into one system, you need to find the corresponding audio system wire outputs on the Lada doors. After finding all the necessary outputs, the wires located on the panel are connected to the wires that are built into the doors.
On a car of this configuration, you will need to run the wires to the dashboard alone.
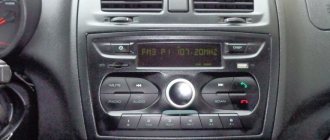
A few words about this configuration. The “Lux” assembly has a factory pre-installed radio with speakers. The radio has at its disposal such additional functions as a 5-inch touch screen, which also has a line input, a Bluetooth headset, and the ability to read flash media.
Lada Granta audio preparation diagram
The standard radio for the Lada Granta model is an improved device, the design basis of which is the “Sirf Atlas” processor, supplied by the well-known.
In addition to the presence of a radio receiver, the device is equipped with a large touch screen and has the ability to connect an external source via a video input by replacing the software and performing firmware. However, in the basic configuration of a domestic car there is only a push-button radio.
Many owners are not happy with this fact and want to connect a more modern radio. This article will tell you how to install a radio.
What is the functionality of the radio?
The fact that there is a standard radio in the domestic car Lada Granta Lux and in Kalina-2, and the devices are constantly being improved. A special feature of the radio is that it fits deep into the standard place, which is accompanied by minor difficulties when removing it. The large monochrome display displays a user-friendly interface.
Reviews from owners indicate that the software has an operating system based on the legendary Windows, the potential capabilities of which are increased by firmware. It is possible to create a desktop in the image of a household computer and connect to the Internet. To do this, you should use a 3g modem.
If you need to enter data, manipulation can be done using the on-screen keyboard. Own memory is not enough, so to meet the ever-growing demands of owners, it is recommended to use an SD card as a storage medium. This drawback is included in the list of reasons, due to the relevance of which, most motorists prefer choosing a foreign vehicle.
A convenient option for connecting with a mobile phone is available for the Lada Granta radio. This allows you to make calls without having to take your phone out of your pocket. You only need to activate a specific button on the device display. This is a kind of extended “hands-free” function.
The radio receiver is also not without pleasant features. If you program a news wave, the device will automatically switch to it from any other channel when a program on the designated topic begins broadcasting.
In the LADA Granta standard, the radio with an integrated LCD display is capable of supporting such file formats as:
- outdated "MP3";
- "WMA";
- "WAV";
- video files that support the “WMV” extension.
Do-it-yourself installation
Next, we will look in detail at how to correctly install the radio on the Lada Granta manually. If you are not a fan of the standard audio preparation of the Lada Grant, pay attention to this algorithm.
As stated earlier, the power wires are initially wired, and all that remains is to understand how to properly connect them to the radio.
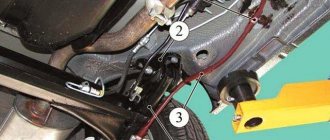
After removing the cover that covers the radio, two connectors will be visible in front of you. One connector is intended for connecting speakers in the doors, the second is for power supply.
The black and pink wires indicate ground and plus, and at the same time they are the main ones for power supply. If the connection is incorrect, the audio system will at least not work; in the worst case scenario, you will short-circuit the “–” and “+” terminals, which will result in the fuse blowing.
When connecting directly, be sure to insulate all wires, not just those used, to avoid a short circuit.
After connecting the necessary wires, we secure the speaker with self-tapping screws or screws and close the mesh.
It is recommended to install 5-inch speakers (12.5 cm) on the front doors of Lada Granta cars, but if desired, you can insert 16 cm, as a result of which the sound quality will only increase. Choose speakers so that the glove compartment can open completely. This problem often exists when owners choose larger speakers.
Some craftsmen cut out the trim on the rear doors and install pancakes (6x9), which sound even better. With this option, a teardrop-shaped mesh is purchased in the standard factory place for speakers, and speakers measuring 13 cm are installed.
After doing all this grant-audio preparation, all that remains is to turn on the speaker and wait for the radio to turn on.
Do-it-yourself installation of a radio in a Lada Granta
This article will discuss how to install a radio on a Lada Granta car. I would immediately like to say about the electrical connection of the radio. AvtoVAZ has made a significant step forward. Now, when installing a radio, there is no need to run wires to power the radio and speakers; all this is included in the standard audio preparation of the car. This is a big plus if you remember the tenth family, when the owners of tens and twelves had to do everything from A to Z, everything themselves.
Dimensions of the radio for installation in a regular place in the Lada Granta
The space for installing a radio in the dashboard console of a Lada Granta car is designed for 1 DIN radio. Here is an example of installing such a radio.
When installing a 2 DIN radio, you will need to cut the partition up and adjust the frame in the console to the size of your audio system, which will make your life somewhat more difficult
Operations for connecting a radio to a Lada Granta
The first thing you need to do is remove the plastic pocket installed in place of the future radio. To do this you will need a flat blade screwdriver. Having taken out the pocket, on the reverse side you will find slots where ISO connectors will be inserted to connect the radio.
You can learn more about them from the article “How to connect a radio with your own hands.” The connectors fit quite securely into pockets, meaning you don’t have to look for them in the wilds of the panel to make connections. Now you need to remove the metal frame from the radio and install it in the place where the plastic pocket was. Unbend the frame's antennae to lock it securely in place.
Connect the connectors to the radio and insert it into the previously installed frame.
When installing the radio, you will not need any tool to change the shape of the holes (a file, a file), all dimensions have already been made in accordance with generally accepted standards for 1 DIN radio casings.
Conclusions and recommendations
Conducting standard audio preparation in cars such as, for example, the Lada Granta has now become much easier, because there is no need to conduct the wires themselves and the owners only have to make their proper connection.
Thus, the corresponding wires are connected to the power connector of the radio, as well as the connector for the speakers. Do not forget about the insulation of wires that are supplied directly.
After this, we cut out an opening in the door, where we insert the speaker and secure them with the appropriate fasteners. Most often, 5-inch speakers are mounted in doors.
Remember that independently connecting an audio system to existing factory outputs is in no way considered an excuse for refusing warranty service.
What is audio training?
Only the radio has power wires; there are no visible wire outlets on the speaker doors. Thus, on the base model of the car, the wires do not reach the audio system speakers. The wire outputs for the radio are located under the panel on the side of the driver's seat; in order to connect them into a single system, you need to find the audio system wire outputs on the doors of the Lada Granta. Once all the necessary outlets have been found, the wires on the panel are connected to the wires mounted in the doors. On a Standard vehicle, you will have to run the wires from the doors to the dashboard yourself.
Audio preparation of Lada Granta Norma
On the Lada Granta in the “Norma” configuration, the door wires are already connected to the head unit that powers the audio system. The owner only has to connect the speakers and radio. Lada Granta often suffers from the fact that the connectors for the audio system from AvtoVAZ do not match those from audio equipment manufacturers. In this case, you will have to purchase additional wires and connect them directly in accordance with their designations. On the doors of the Lada Granta “Norma” the space for the speakers is marked with a corrugated pattern. To connect the speaker you will have to cut an opening.
What is included in the audio preparation of the Lada Grant as standard?
The need for audio training of the Lada Grant, as well as determining its volume, completely depends on the configuration in which the car was produced. For example, in cars with the “Norma” configuration, the manufacturer has already carried out all the basic work on audio preparation. So, the car owner can only install the audio system by connecting it to the standard control. This is not the worst option, since many people deliberately choose those car configurations that can later be modified to exactly meet their requirements for sound quality and the like.
Audio preparation of Lada Granta Lux
Lada Granta in the “Lux” configuration has a radio and speakers pre-installed at the factory. The device has additional functions in the form of bluetooth, the ability to listen to flash drives, a 5-inch touch display and a linear output.
Installing an audio system on the Lada Granta has become much easier than on previous VAZ models - the wires have already been laid, you just need to make the correct connection. The corresponding wires are connected to the power connector of the radio and the speaker connector. Wires that are supplied directly must be insulated. Next, a speaker is inserted into the cut-out door opening and secured to them with appropriate fasteners. Most doors use 5-inch speakers. Independent connection of the audio system to the existing factory outputs is not a reason for denial of warranty service.