Welcome to the kuzov.info blog!
In this article we will figure out how to make heated seats in a car. Let's look at what kits there are for installing heated seats, their advantages and disadvantages. This will help you decide which kit is best to choose for your car. The principle of operation of heated seats, the process of installing and connecting heating elements, and advice on proper operation are given here.
Heated seats are a good addition to a car, increasing comfort, and are installed on expensive cars or on any model as an additional option. If the vehicle is not equipped with heated seats, a kit for installing heated seats can be purchased separately. This can be either a soft substrate with heating elements inside, which is installed on top of the seat upholstery and connected to the cigarette lighter, or a kit for installation under the seat upholstery. In this article we will look at how to make heated seats using a kit that is installed under any seat upholstery (artificial, natural leather or textile). These are very thin heating elements, about 1.5 mm thick, which are not felt at all until they are turned on.
The content of the article:
- What types of heated seats are there?
- How does heated seats work?
- Preparing to install heated seats
- Removing seats and upholstery
- Installation of heating elements
- Connecting the heated seat wiring
- Assembly, installation and testing of heated seats
This article is of a general nature and will be useful as instructions for installing heated seats on any car. In the description of the installation kit you can read that it is intended for professional installation by an experienced specialist. However, the installation process is also accessible to a simple car enthusiast. It is important to carefully study the information provided in this article and do everything consistently and carefully. This can take several hours or two weekends, depending on the skills and efficiency of the installer.
Back
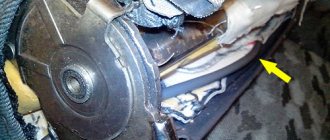
We hide the wires of the element in a thermal tube, thus creating a protected cable. Now the cable needs to be removed. The difficulty is that the back of the VAZ-2108 seat not only tilts back and forth, but also leans forward. This requires large cable runs - up to 10 cm. Therefore, it is necessary to provide an option for free movement of the cable. We will achieve this by running the cable in a ring at the inner end of the backrest under the upholstery: as the backrest moves, the cable ring will decrease or increase.
To fix and guide the cable, we sew a piece of fabric (sling, lace, etc.) under the upholstery with two “ears” through which the cable will be passed: a smaller “ear” - the cable from the element to the loop, a larger one - from the loop to the outlet further . We lay the cable, tilt the backrest completely back, pull out the cable, leaving a small loop - this will be the maximum length of the cable and the minimum loop. By tilting the backrest forward, we check the free movement of the cable and the change in the loop. Now you can close the upholstery.
Next, we prepare the lining of the back support. The cladding is normally secured with a screw at the bottom and a plastic clip at the top, which easily breaks and does not hold well. Here we will replace the clip with a regular screw and nut (it is more convenient to tighten them in the middle position of the backrest), for which it is enough to drill a hole in the lining, and there is already one in the support. Now we guide the cable along the stamping in the seat back support and turn it horizontally forward. We install a facing that securely fixes the cable, but leaves it free to move in the loop.
That's it with the backrest, let's put it aside for now and move on to the seat.
https://youtube.com/watch?v=VUbl0jy2rqw
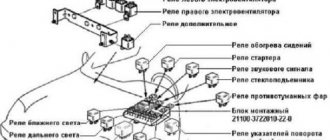
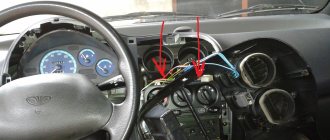
Location of additional fuses and relays
In the figure below we see how to get to the additional fuses of the car. Located to the right of the central panel, the screws are twisted and the cover is easily removed.
Removing the cover for diagnostics and replacement of additional fuses and relays
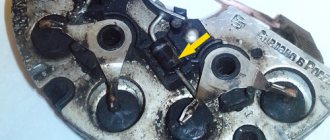
Below we see the fuses themselves, there are 6 of them, 15 Amps each.
Location of additional fuses
- Ignition controller,
- Sensors for oxygen, air flow, speed calculation,
- Fuel pump and relay, injectors,
- Fan,
- Gasoline pump,
- Ignition.
We remind you that F1-F20 are so-called fuses. This means that jumpers and other “tricks” are not acceptable when working. If you replace such a fuse with a jumper yourself, you risk system failure.
Dismantling works
To install heating elements, you first need to carry out a dismantling procedure. It includes the following activities.
- Unscrew the plastic fasteners that connect the seats to the body of your car.
- Remove the skids. Two pieces are located in front, and two more are located in the back.
- Remove the chairs from the interior, otherwise it will be extremely uncomfortable to work.
- Separate the back from the chair. To do this, there are bolts on the sides, which can be removed with a 10 mm wrench.
- On the back there is a plug for the headrests, which can be removed.
- The upholstery is removed from the hooks below. To do this, the hooks are slightly unbent.
- Now you can completely remove all the trim.
- Carry out a similar procedure with the second seat if you plan to install heating on it too.
While you are installing the heating, throw the upholstery into the washing machine. This will not harm her, and the interior will look newer and nicer.
Installation of heating elements
Many people forget about the need to securely fix the elements responsible for heating the seats. As a result, over time they can shift, thereby disrupting the performance of the system.
To avoid such situations, experts advise sewing heating elements directly to the inside of the upholstery. Although today some car owners prefer another option, which uses double-sided tape. The elements are held on it quite reliably, and the tape is attached to the foam rubber itself.
Connection process
Regardless of the chosen fixation method, reverse assembly looks the same for all options. This is the most difficult stage, so strictly adhere to the specified sequence of operations.
Pull the covering back onto the back, where the heating was already fixed. Using a mallet, the plugs are driven into place. We are talking about plugs for headrests. Next, the fabric is stretched. The front one is pushed through the hole, and the back one is straightened down. The fabric from the front is draped over the hooks and then stretched
Just watch the degree of tension so that the fabric does not tear. Now you can put the rear trim element on the hooks. The next step is to insert the wire into the front and tension the sheathing. If you plan to change the foam rubber, cut out the new elements in strict accordance with the dimensions of the old material. Pay attention to the areas where the spring contacts the body and seat ties. To avoid squeaks, use pieces from the washer tube, or simply wrap several layers of electrical tape. Heating for the lower part of a car seat is often mounted using double-sided tape or sewn to the trim on the inside.
You can use plastic clamps or wire brackets, which will prevent the heating elements from moving from their installation locations. After this, the plastic fasteners are tightened. Connect the backrest and seat. A wire is pulled through the hole in the frame and the foam rubber, with which the heating will be connected to the on-board network. The wiring connection is carried out strictly according to the diagram. It is necessarily included with the set of heating elements, so you don’t have to look for anything additional. The standard location for installing heating on and off buttons is the area near the handbrake. Although you can place them as you wish. It’s not uncommon for car owners to take an alternative route, installing a standard heating system on top of the seats, after which they put car covers on top.
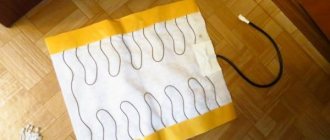
There is a modern and very simple solution - heated capes that can be put on in winter and removed during warm periods. Their disadvantage is that the wire runs freely, which can interfere with the driver. Plus the capes do not fit tightly to the chairs.
Option with capes
Health issue
Today, medical professionals are still actively arguing about the harm of heating seats inside cars. Some believe that heating is harmful to men's health. Others, on the contrary, consider this a normal and even useful addition to the car.
The decision is yours in any case. But we recommend not to get carried away with high temperatures. Just warm up the seat a little before you hit the road. And then turn off the system.
Loading …
Heated seats and rear window
These two systems are very similar to each other, as they consist of the same components:
- Fuse to protect the circuit.
- Electromagnetic relay for switching a power circuit.
- Illuminated power button.
- Wire harnesses.
- Heating elements.
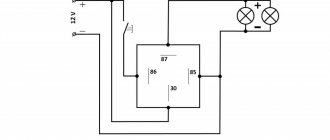
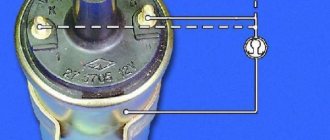
It is imperative to use electromagnetic relays. They are available in the electrical circuit for heated seats of the VAZ-2110. With their help, you can get rid of switching with a high current button.
As a result, the button on the dashboard switches only the low-current control circuits of the electromagnetic relay windings. The rear window heater has a similar design. If the car has heated rear view mirrors, then a similar scheme is used.
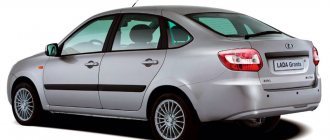
Summary
The technology for installing heated front seats on the Lada Granta consists of two stages: installing heating elements under the factory seat covers and connecting them to the on-board electrical network. The proposed electrical circuit organization scheme raises doubts.
The manufacturer of the branded kit suggests connecting the heaters directly to the buttons, and powering them from the alarm control button. Since the circuit is quite loaded, it is better to organize the heating power through two relays with a separate fuse. It is also advisable to replace the buttons - they do not indicate the operating mode.
In the first part
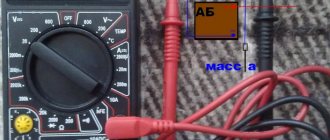
In this article, I described the introduction of a set of heating elements from the Alamara into the Granta seats. In the second part I will try to describe how we can connect them to the car’s on-board network. Let's figure out the connection together. Many connect heating through one or two relays. I had a small diagram included with the wiring harness for connecting the heating. There were no relays marked on it, just as there were no relays in the wiring itself. And the power was taken from the alarm connector. It was also indicated there that it is necessary to replace the original 5 A fuse of this circuit with a more powerful one - 10 A. Let's check if such a connection is safe: After installing the heaters in the chairs, I connected them to a powerful 12 V power supply to check their functionality . At the same time, I decided to understand the connection in more detail and make sure that this circuit is reliable and correct. I connected an ammeter to the circuit and measured the amperage under load. You can see the results in the photo:
As you can see above, with a heating power supply load for one seat, the current consumption is in the range of 2.4-2.5 A. We look at the maximum load current of our heating button - it is equal to 5A (Stamped on the button itself). That is, the current reserve for our button is quite large. The conclusion that follows is that the buttons can be freely used without a relay.
Injection injection system
For VAZ-2110 cars (8-valve injector), the electrical circuit differs slightly from that used in carburetor cars. Injection engines are much more complex, since they have an electronic control unit and a system of sensors and actuators. It is also worth noting that injection engines come with 8 and 16 valves. There are no carburetor engines with 16 valves. All wiring can be divided into engine compartment and interior wiring.
Their purpose is clear from the name. The engine compartment connects elements such as the starter, generator, sensors on the engine, etc. Interior wiring is necessary to connect the instrument panel, backlights, and various switches.
Installation of heated mirrors for VAZ 2113, 2114, 2115
Task: install heated mirrors for VAZ 2114
Progress of work on installing heated mirrors for
the VAZ 2114
To install heated mirrors we will need:
-
Nichrome thread (was taken from my mother's hair dryer