The wheel bearing ensures uniform rotation of the wheel around its own axis. Of all the elements of the car's chassis, it is the first to meet and distribute shock loads, so the main requirements for this part are strength and durability.
In this article we will talk about what a rear wheel bearing is on a VAZ-2108. We will look at the design of this device, its dimensions, and also understand the process of replacing it.
Design Features
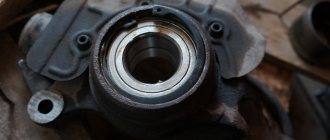
The rear hubs of the V8 are equipped with sealed angular contact ball bearings. Each of them has two rows of balls. This makes the structure as resistant to loads as possible, and also allows them to be distributed with the greatest efficiency.
The rear wheel bearing of the VAZ-2108 is made of heavy-duty steel. Its service life, declared by the manufacturer, is 90-120 thousand kilometers. By the way, these are not empty statements. Oddly enough, VAZ wheel bearings actually last a very long time and, if used correctly, can last twice as long as the stated mileage.
Three ways to remove and replace a VAZ 2110 wheel bearing
Let's consider 3 options when replacing the front wheel bearings of a VAZ 2110 is required.
Method No. 1. The idea is to replace the wheel bearing using a puller, without removing the steering knuckle (without removing the strut). The advantage of this replacement is that there is no need to loosen the camber fasteners. It is best to work on a lift or on a viewing hole. The inconvenience is knocking out the hub and then pressing it out. You risk damaging the bearing even before replacement.
The replacement process with this method, after performing steps 1-4 above:
- Use a puller to remove the bearing from the assembly.
- Using the same puller, we press the new part back into the hub.
- We assemble everything in reverse order (at the beginning of the article).
Method No. 2. It is the most labor intensive. Suitable if it is impossible to replace using method No. 1, or if you want to carry out a full repair of the chassis.
- Remove the tie rod end and unscrew all the nuts necessary to attach it to the body.
- Place the stand in a vise
- Change the front wheel hub bearing on the removed car strut
- Putting everything back together in reverse order (at the beginning of the article)
Method number 3. It is much easier than method No. 2, since we do without a puller, but there is a difficulty in its implementation, namely, further problems with adjusting the camber during assembly (in the previous method the strut was not removed).
- Dismantle the fist and remove the hub completely
- We take out the locking ring
- We move on to a vice, where we press out the old p/sh
- Clean the inside of the hub from grease and dirt
- We mount the new bearing in a vice using a hammer and a mandrel or puller
- We assemble the unit in the reverse order (see points 1-4 at the beginning of the article)
Main characteristics and varieties
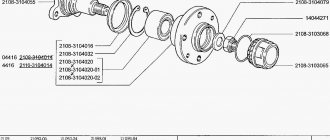
The rear wheel bearing on the VAZ-2108 is produced under catalog number 256706. It has the following technical characteristics:
- weight, g – 400;
- number of balls, pcs. – 28;
- ball diameter, mm – 9.525;
- static load capacity, KN – 25.9;
- dynamic load capacity, KN – 30.1;
- rated rotation speed, rpm – 6500.
The VAZ-2108 rear wheel bearing number may be different. If a store offers you a product marked 537906, don’t be surprised. This is a high-load bearing. Some of its characteristics differ from the characteristics of the standard spare part:
- weight, g – 511;
- static load capacity, KN – 90.1;
- dynamic load capacity, KN – 64.8;
- rated rotation speed, rpm – 5000.
As you can see, the reinforced rear hub bearing on the VAZ-2108 has increased resistance to loads. But at the same time, its rotation frequency should not exceed 5 thousand rpm. Such products, when properly used, can “walk” freely up to two hundred thousand kilometers.
Rear wheel bearing VAZ-2108: dimensions
As for the size of the wheel bearing, they are the same for both modifications:
- outer diameter, mm – 60;
- internal diameter, mm – 30;
- width, mm – 37.
If you are offered a rear wheel bearing for a VAZ-2108, the dimensions of which do not correspond to those specified, it is better to refuse this purchase. All the above parameters are provided for by GOST 520-2002. Foreign analogues of spare parts are manufactured in accordance with the requirements of ISO 15:1998 and have the same dimensions.
How to Remove a Wheel Bearing Without a Puller
Replacing the bearing in the front hub of a VAZ 2110, 2111, 2112 with your own hands
Replacing the front wheel bearing of a VAZ 2110 is done with your own hands in accordance with the instructions, without specialized tools, knowledge and experience. If you notice noise or buzzing in the suspension while driving, the cause is the front wheel hub. This happens when the car's mileage is 50-60 thousand. km.
The reasons for failure are usually poor operating conditions (road, weather conditions, maintenance), age and wear of suspension parts, lack of lubrication, and others.
A simple diagnosis may include the following:
- put the car on a jack, namely on the side of the repaired car;
- manual rotation of the wheel, during which noise and crackling may be heard;
- checking for increased play by moving the wheel along the axle.
How to understand that it is time to change the wheel bearing
A failed VAZ-2108 rear wheel bearing may indicate a malfunction:
- the appearance of a characteristic hum from the wheel;
- uneven rotation of the wheel;
- backlash formation.
If you notice that there is a hum coming from one or both rear wheels, rush to diagnose the wheel bearings. You can do this right in your garage. Simply jack up the rear wheel and turn it by hand. It should rotate easily and evenly without making any sounds. Next, grab it with both hands and try to shake it from side to side in a horizontal direction. If the wheel rotates unevenly and you feel play when it becomes loose, get ready for repairs.
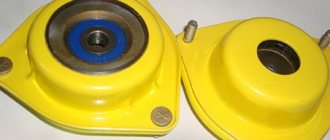
Features of choice
When buying a rear wheel bearing for a VAZ-2108, pay attention to the manufacturer. Currently, more or less high-quality domestic parts are produced by the following enterprises:
- SPZ (Saratov Bearing Plant);
- SPZ-4 (Samara);
- VBF (GPZ-23, Vologda);
- GPZ-20 (Kursk).
It is believed that the best domestic manufacturer of bearings is the Saratov plant. His products are very reliable, but not very expensive. Thus, a rear wheel bearing for a VAZ-2108 manufactured by SPZ costs between 400-450 rubles.
What tools will you need?
Before you begin repair work, make sure you have the necessary tools and supplies:
- wheel chocks;
- jack;
- wheel bolt wrench;
- chisel (core);
- some object to fix the position of the car body when jacking up (a stump, several bricks, etc.);
- hammer;
- spacer made of wood (block);
- head at “30” with an extended handle;
- key to "7";
- vice;
- a piece of pipe for the outer diameter of the bearing;
- long nose pliers;
- special puller for the hub;
- special pliers for retaining rings;
- anti-rust liquid.
If you decide to change the rear wheel bearing on a VAZ-2108, also replace the hub nut. At least that's what the car manufacturer recommends. The fact is that the nut has a special edge that bends during installation and gets knocked down during disassembly.
How to replace the front wheel bearing
Before starting repairs, it is better to put the car in 1st gear and install small supports under the wheels. For more comfortable work, you will need an inspection hole, since it is not easy to get to some of the mechanism’s fastenings. From the tool you need to prepare:
- A puller to remove the bearing itself from the assembly.
- A cut of a pipe of a certain diameter, with the help of which the hub will be knocked out.
- Socket wrenches for 17 and 19.
- 30mm head with a good wrench.
Don't forget to purchase new bearings from the store. It is better to give preference to original spare parts that meet all quality standards.
Methods and options
Let's start the preparatory work. They are necessary in any situation.
- Slightly press out the wheel bolts.
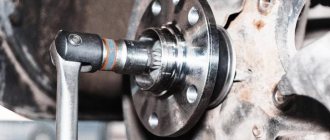
- Using a 30 mm wrench, unscrew the bearing nut.
For alloy wheels you will need to remove the front wheel completely. Press the wheel bolt to gain access to the caliper - We press the caliper using a screwdriver and unscrew it from the front knuckle.
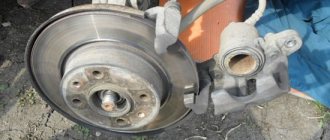
Using a screwdriver, press the caliper and remove it - Next, remove the brake disc from the hub.
Further replacement work can take place in several ways. Each of them has its own advantages and disadvantages. Choose the one that is best for you based on the availability of the necessary equipment and tools.
- Replacing the bearing without dismantling the steering knuckle. Its advantage is that we do not need to remove the camber adjustment bolt. But at the same time, the process itself will not be entirely convenient, and you cannot do without a good inspection hole. To knock out the hub and remove the bearing itself, you will also have to put in more effort. This method is often chosen by experienced mechanics to save some time. It requires good practical skills.
- The second method is more convenient and is suitable even for beginners.
Unlike the first, the camber adjustment will be disrupted and additional adjustment will be required after replacing the front wheel bearing. We make notches for further camber adjustment - The third method will take you the most time; it involves completely dismantling the front strut and replacing the bearing using a vice. To do this, you must first unpress the steering tip and remove the bolts securing the mechanism to the body.
We will dwell in more detail on the second method, since it is best suited for novice car enthusiasts:
- remove the steering knuckle by first unscrewing the two bolts on the stand and the two bolts securing the lower ball joint;
Remove the steering knuckle by unscrewing the bolts - Using a pipe of the required diameter, we knock the hub itself out of the bearing;
We knock out the bearing with a pipe of suitable diameter - remove the bearing using a vice;
- We clean the seat from dirt and old grease;
- press the bearing in and secure the retaining ring;
Press in the bearing and install the retaining ring - We fix the steering knuckle together with the new part on the hub;
- Further assembly is carried out in reverse order.
Tip: Don't forget to press down the flange of the nut after assembly is complete.
How to replace (video example)
Despite some difficulties, replacing a wheel bearing can be done without outside help. The main thing is to have a good inspection hole and the necessary tools. If everything is done according to technology, such repairs will take very little time.
Changing the rear wheel bearing with your own hands
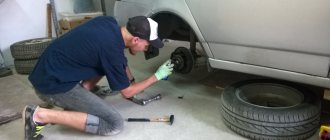
Replacement of the VAZ-2108 rear wheel bearing is carried out in the following order:
- We install the car on a flat surface, fix the front wheels by placing wheel chocks under them.
- Remove the cap covering the hub nut.
- Using a chisel (core), we bend the bent edge of the hub nut so that it does not interfere with its unscrewing.
- Using a 30mm socket with an extended handle, unscrew the nut. If it does not give in, treat the threaded connection with anti-rust liquid.
- After unscrewing the nuts, unscrew (not completely) the wheel mounting bolts.
- We lift the body with a jack, fix its position with stumps (bricks), and unscrew the wheel bolts. We dismantle the wheel.
- Using a key set to “7”, unscrew the guide bolts on the drum (2 pcs.).
- We remove the drum. If it is not removable, we treat the place where it fits onto the hub protrusion with a rust-fighting liquid, and then knock it down using a hammer and a wooden spacer.
- Now completely unscrew the hub nut.
- Using a special puller, we dismantle the hub, grasping it with “paws” and rotating the nut. If you do not have such a device, take the removed wheel and screw it to the hub with the back side. Use the wheel as a lever.
- Remove the hub from the axle.
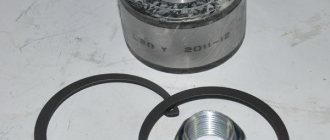
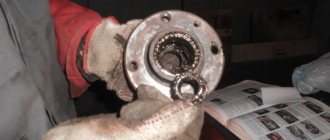
- Using long-nose pliers or special pliers, remove the bearing retaining ring.
- We place the hub in a vice and, using a hammer and a piece of pipe, carefully knock out the bearing.
- When the bearing is knocked out, lubricate the inner surface of the hub with grease.
- We install the new bearing without removing the hub from the vice.
- We place a wooden spacer on top of the bearing and, hitting it with a hammer, hammer the part into the hub until it stops.
- We put the locking ring in place.
- We put the hub with the new bearing on the axle. If she sits down tightly, we help her sit down using a hammer and a spacer.
- Screw on the new hub nut. We tighten it until it stops. The hub should still move inward.
- Install the brake drum and secure it with guide bolts.
- We mount the wheel.
- Remove the jack and tighten the hub nut completely. If you have a torque wrench, observe the tightening torque (186.3-225.6 Nm).
- We bend the edge of the nut, fixing its position.
- We put a cap on the nut.
- We jack up the body, check how the wheel rotates and whether there is any play. It is also recommended to check the operation of the parking brake.
Replacement procedure
Lubricate
So, we have determined that this cannot be done with a little blood, and the car really needs to replace the bearing. Therefore, we adhere to a clear procedure and begin work.
- Remove the brake drum. There should be no problems with this, since it is fixed quite simply on the rear wheel.
- Pry up the hub cap using a flathead screwdriver and remove it.
- Now, using a narrow chisel, straighten the collar of the nut, which was jammed in two places at once. Don’t be afraid, it wasn’t you who did something, such a jam is provided at production so that the element does not fly out of its rightful place.
- Use a 30mm socket to unscrew the fastening nut.
- Remove the unscrewed nut and also dismantle the thrust washer.
- Arm yourself with a three-legged or two-legged puller, which will allow you to remove the hub from its place.
- If you don't have a three-jaw tool, press out the hub using two bolts or screws. As the practice of craftsmen has shown, bolts for fastening the head of a power unit are excellent for these purposes.
- Screw the screws into the opposite holes for fastening the wheel and rest their ends against the heads of the bolts securing the hub axle to the rear suspension beam of your car.
- Try to tighten the screws evenly to allow the hub to press out. There is no need to remove the pads.
- As a rule, the inner race of the bearing should remain on the hub axis.
- Secure the ring using a puller, then remove it.
- If you don’t have a puller, you will have to additionally dismantle the brake pads and use a chisel to mix the ring to the axle.
- Next, the ring moves. Two mounting blades will help you with this.
- Do not be afraid that after processing with a chisel, some kind of defects or nicks will form on the hub axis. This is not terrible, but it is highly recommended to process them with a needle file.
- Arm yourself with pliers, thanks to which you can carefully remove the retaining ring.
- Using a piece of suitable pipe, also carefully knock out the bearing, leaning on the inner ring.
- Another option is to press it out using a wheel bearing puller.
- Clean and effectively lubricate the hub into which the new rear wheel bearing is pressed with a puller or vice. The pressing force must be applied to the outer ring. It will be most convenient for you to do this using the outer ring from an old bearing.
- Install the new retaining ring in its proper place.
- Using light blows on the inner ring, press the bearing onto the axle. Drive until deep enough to fit the nut.
- Full pressing is carried out with the nut already on.
- Be sure to use only the specified torque to tighten the fastener.
- Press the collar of the nut into the two grooves of your hub axle to restore the element to its original appearance.
This procedure cannot be called incredibly complicated, but you will have to “tinker” in your garage. But this is better and more cost-effective than going to a service station and entrusting your car to unknown specialists.
Reasons for replacing and diagnosing wheel bearing failure
In addition to driving style and road quality, the reasons for wear are the following: - quality of products; - quality of service; — weather conditions (at high temperatures, overheating and expansion occur, and the bearing is also susceptible to drying out of the lubricant). — other minor factors: serviceability of the suspension, tire profile, play in the units, alignment.
Let's look at the signs of a breakdown, there are several of them: 1. Rumble from behind when driving; 2. Vibration in the cabin; 3. Over time, the noise will turn into periodic grinding; 4. The wheel is loose when raised;
Rear wheel bearing VAZ 2110: price, dimensions, choice for replacement
After diagnostics, making sure that repairs cannot be avoided, the question of choosing a new spare part will arise. The hub is equipped with a double-row angular contact bearing, number 6-256706E1S17 (marked according to GOST). The price of the bearing varies from 600 to 900 rubles.
It is recommended to purchase bearings from the following manufacturers: - VPZ (see VBF marking) - Russian plant in Vologda; – SPZ – SPZ GROUP – Russian Samara; — GPP — produces high-quality bearing products in Vologda.
To avoid mistakes when purchasing, check the markings and dimensions: - External mounting diameter - 60 mm; — Internal landing diameter – 30 mm; — Height – 37 mm.
How to change the rear wheel bearing on a VAZ? First, let's prepare for repairs
Let's prepare the car, as well as the tools according to the list: - Jack; — A driver or pipe to increase the torsional moment; — Wrench 30, better with a head; — A set of other keys; — Wheel hub puller with claws (to remove the hub); — Vise; — Hammer and chisel; — Round nose pliers; — Torque wrench.
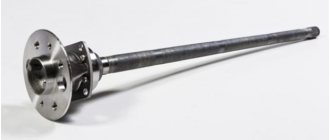
Now familiarize yourself with the design of the hub: 1 – rear axle; 2- hub body; 3- protective casing; 4 – lock pin. ; 5 – bearing; 6 – washer; 7 – nut; 8,9 – protective cap with gasket.
Place the car on a level surface, provide light, and install wheel chocks. Next, we put the first gear, and if desired, the parking brake, now we proceed to operations.
Bearing replacement procedure
The work procedure is similar to replacing the wheel bearing of a VAZ 2109. However, the cars still have minor structural differences. So let's move on.
It is important to remember that replacing the rear wheel bearings of a VAZ 2110 is a responsible undertaking and must be approached competently. So, for a better understanding of the process, we will divide all the work into several main stages:
So, for a better understanding of the process, we will divide all the work into several main stages:
- Drive the car into the viewing ditch. If this is not possible, then repairs can be carried out on a flat surface.
- Put the car at speed. There is no need to pull the handbrake; it is better to install “shoes” under the front wheels.
- Using a wheel wrench, “break” the bolts on the wheel and lift the car with a jack.
Now you can remove the bolts completely and roll the wheel to the side (or use it instead of a seat).
Now it's up to the guide pins. They must be carefully unscrewed and the drum carefully removed.
- If the car has traveled more than tens of thousands of kilometers and the drum refuses to be removed, “help” it with the help of a wooden “spacer” and a hammer.
- If the drum does not come off even after this, then screw the guide pins back so that the drum comes off.
- Remove the hub nut using a 30mm socket wrench and a large lever at least half a meter long.
- After this, remove the hub from the axle. This can be done using a special puller.
- If you couldn’t find such a tool, you can do it differently. Screw the removed wheel to the hub and pull it.
- And here a lot depends on your luck. The inner ring (axle) can be removed along with the bearing, or it remains on the journal. You can remove the axle using a smaller puller than in the first case.
The second option is far from the most pleasant, because you often have to remove the brake pads, and maybe the entire axle.
And only then remove the stuck ring. How to do it? First, undermine the latter with a chisel, and then use pry bars or a tension puller to knock it down to the end.
- The next step is to remove the retaining ring (this can be done with special pliers) and knock off the boot (if you plan to knock out the bearing in the future, you do not need to remove it).
- Knock out (press out) the bearing.
- Lubricate the hub well (in particular, the hub area) and press in a new bearing. It is best to use a puller. If this is not at hand, then use the outer race of the dismantled bearing.
- You can use a vice or other tools. Remember that hitting a new bearing is not recommended.
- The bearing must be pressed in until the groove for installing the retaining ring is visible.
Be careful not to damage the boot
- Using a special circlip puller or pliers, install the ring in its original place.
- We install the hub in place, not forgetting about the inner ring (axle).
- We put on the puck.
- We tighten the nut.
- Using a torque wrench, tighten the nut with a force of 19-23 kgf*m.
If there is no such key, then tighten the nut completely and unscrew it back 50 - 70 degrees. Be careful not to overtighten the nut, as this may crush the bearing.
The wheel should rotate not freely, but not too tightly.
- Don't forget to jam the collar of the nut, otherwise there is a high chance that it will come loose while driving.
- The last stage is assembly in reverse order - replacing the pads, installing the brake drum and screwing the wheel.
Replacing rear wheel wheel bearings on a VAZ yourself
The rear wheel bearing of the VAZ 2110 is changed according to the instructions, but first consider the following points:
- The bearing cannot be reinstalled.
- It is recommended to replace the second bearing immediately, on the other hand.
We disassemble the hub assembly and dismantle the product
- First, loosen the bolts securing the wheel and the hub nut.
- Next, we jack up the car.
- Now unscrew the bolts and nuts completely and remove the chassis.
- The decorative wheel cap (boot) also needs to be removed.
- Now use a hexagon to unscrew the pins that hold the drum; you don’t need to remove the pads.
Detailed instructions for replacing the rear wheel bearing
Replacing the rear wheel bearings of a VAZ 2110
- The car stops at the front.
- Wheel bolts break off.
- The nut in the center of the hub breaks off, and you must first remove the cap.
- The required side is jacked up and the trestles are positioned.
- The wheel is removed.
- The area for installing the disc brake is filled with WD-40 or other special liquids.
Note! In this situation, you can use diesel fuel or any brake fluid.
The guide bolts are unscrewed, which it is recommended to first tap with a hammer.
Replacing the rear wheel bearing of a VAZ 2110
Carefully remove the brake drum. If removal is difficult, you need to screw special bolts into the threads on this drum, tighten it and lightly tap it with a hammer. Usually such measures produce positive results.
Note! You can buy specialized drum pullers, but this is the last option when you can’t do anything on your own.
The central nut is completely unscrewed. Of course, you can unscrew it immediately and remove the hub, wheel and drum together, but in this case there will be a high risk of damaging the brake pads.
Rear wheel bearing VAZ 2110
- The hub tightens. If one of the bearing races remains on the axis, you need to move it out of place using a puller or sharpened chisels.
- The axle is inspected for the presence of marks from bearing rotation; if such marks are present, the assembled hub will need to be replaced.
- The brake cylinder is assessed for leakage, and the pads are assessed for wear.
- The retaining ring is removed from the hub using pliers or screwdrivers.
- The edge must be cleaned of rust, after which it must be moistened with WD-40 or a similar liquid that is at hand.
VAZ 2110 rear wheel bearing
- There are three ways to press out a bearing: using a special press, a puller or a heavy hammer (sledgehammer). The third method may seem aggressive, but it is preferred by most service station technicians, so let’s look at it in more detail.
- The hub is securely installed on a hard surface, and the bearing is dislodged from its place through the mandrel with several blows of a hammer or sledgehammer. After this, the hub is installed on a vice.
Note! There must be a stop for the part and a place for the bearing to bounce off.
A couple more blows are made, after which the bearing comes out.
VAZ 2110 rear wheel bearing
- The bearing seating surface must be carefully inspected, any existing rust should be sanded off and lubricated with plain motor oil.
- The purchased bearing must be screwed using a selected bolt through a washer, which must be selected in accordance with the internal races. Since the bearings are double row, they will have to be disassembled during installation.
- The hub is installed on a hard surface.
- A twisted bearing is installed on top, but first you need to lubricate its installed plane with oil.
- Use a one-kilogram hammer to slightly level the element in a plane.
- Take a suitable mandrel, for example, a pry bar, which is used to hit the part to press the bearing.
Brand rear wheel bearing VAZ 2110
Note! The main thing is not to apply strong blows, since the pressing will be uneven.
- When the bearing is about halfway through, you can hit harder.
- When reaching the cut part of the hub, you need to use the old clip as a mandrel.
Easy to replace rear wheel bearing
Note! Do not apply strong blows, as this is a high-carbon metal that can burst.
You need to push it all the way, after which the stopper is installed; if it is not possible to install the last element normally, then most likely the bearing was not finished completely.
Note! The stopper should spring back into the groove without difficulty.
Bearing assembly procedure
Now it's time for assembly, the hub is put on the axle, and you need to remove the bolt used to tighten the cage.
Wheel bearing rear
- The central nut is tightened and tightened as much as possible. In this case, it means installing a new nut. We also install a thrust washer.
- The previously removed brake drum and wheel are put on and screwed on.
- The rotation is evaluated, if there is no noise, then all actions were performed correctly. The car is removed from the jack.
- The wheel with the central nut is tightened.
- The hub nuts are closed and the wheels are tightened securely.
Recommendations for replacement, useful video on repairing the VAZ 2110
1. If you don’t have a torque wrench, then tighten the nut all the way, and then loosen it back 60 degrees. 2. After you have changed the spare part, check how the drum rotates; there should not be the same noise or grinding noise. 3. The time required for work on this side of the car suspension is 2 hours. 4. For safe work, first loosen the wheel and hub fasteners, and only then lift the car. 7. If you have recently developed a hum (play is also allowed), then try tightening the hub nut with a force of up to 23 kgf/m. Perhaps the noise will go away; after tightening, do not forget to lock the lock nut. 6. To understand the process of replacing rear wheel bearings, watch the video with comments from service station workers:
ATTENTION!
The electronic catalog of spare parts intended for reference purposes only!
Our company does not sell all spare parts presented in this list. If there is a “Cost” link in the right column, these spare parts are on active sale. Availability in warehouses for details and prices, see the product card. If there is no “Cost” link in the right column, we do not sell such parts and do not accept orders for them.
Step-by-step instruction
Replacing and adjusting the front wheel bearing Niva
1. Using a flat-head screwdriver, remove the hub nut cap.
2. Loosen the hub nut using a 30mm socket. The nut is tightened with great force, so you can put a pipe on the knob to pull through a larger lever.
3. Loosen the wheel bolts and jack up the car.
4. Completely unscrew the wheel bolts and remove the wheel.
5. Now you need to remove the brake drum. To do this, unscrew the drum studs using a seven-deep socket. Next, screw the drum studs into the other holes only. This should be done evenly, twisting each pin a little. As you twist, you will see the drum move away.
After the studs have been completely screwed in, unscrew them and remove the drum by hand. If it doesn’t work, you can hit it with a mallet from the back side.
If it is difficult for anyone to imagine how to do this, watch the video.
6. After removing the drum, completely unscrew the hub nut and remove the washer.
7. We put on the puller and pull the hub off the shaft. She doesn't sit very well.
8. Remove the bearing retaining ring.
9. Remove the ring on the hub. We clamp the hub in a vice and knock it down with a blunt chisel.
The ring must be removed for subsequent pressing of the bearing.
10. We select the head according to the size of the bearing, put it in the hub, clamp everything in a vice and squeeze the bearing out. He will reach the jaw of the vice and rest against it. We install spacers, for example, as in the photo below and press them out completely.
In general, if you have a service station on hand, then it is better to take the hub to replace the bearing. The guys will do it on the press in 5 minutes.
11. Clean the bearing seat from dirt and rust.
12. Lubricate the bearing seat with oil.
13. Place the bearing in the hub, clamp it in a vice and press it flush with the hub. Make sure that at the beginning the bearing moves without distortion.
Next, we substitute the old bearing as a cage and press it in until it stops.
14. Install the retaining ring.
15. Install the ring. We hit it through the spacer with a hammer so that it sits in its place.
16. We put the hub on the shaft and attach the hub nut.
17. Tighten the hub nut with a torque of 185–225 Nm. If there is no torque wrench, then tighten it with a 1 meter lever with a force 2 times greater than the tightening of the wheel bolts.
Make sure that the car does not fall off the jack; it is better to place a stop.
18. After tightening the nut, tighten it so that it does not unscrew.
19. Next we do the assembly in reverse order:
- install the drum
- install the wheel
- cap the nut
The work takes about an hour.