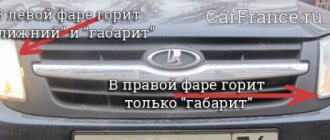
Checking the fuel pump Lada Kalina/Granta
If after turning the ignition key there is no buzzing sound from the fuel pump, then the first thing to check is the fuel pump fuse and relay. In the Lada Kalina and Lada Granta mounting block, the fuel pump fuse is F21 (15A), and the fuel pump relay is K12. If the fuse is good, do the following:
- Turn on the ignition
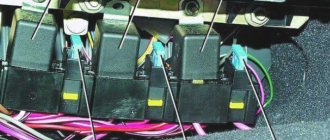
- Remove the fuel pump relay
- Apply +12V to pin No. 11 of the diagnostic block, or place a jumper between 87 and 30 relay pins
- Check by ear that the fuel pump is turned on
If the fuel pump does not turn off, then check:
- Wiring and contacts between the fuel pump and the diagnostic block/fuel pump relay. To do this, check the voltage at the fuel pump chip using a test lamp or multimeter.
- There is no connection between the fuel pump and the vehicle ground. Apply the mixture to the fuel pump (located under the rear seat).
- The fuel pump is faulty. To check it, apply +12V directly to the contacts of the fuel pump (Attention! Remaining gasoline may ignite from a spark!).
In rare cases, the fuel pump does not work due to:
- ECU (controller) malfunction
- alarm malfunctions
Fuel block diagnostics
If all of the above did not give positive results and the engine still does not “get it”, then it’s time to move on to diagnosing the fuel unit.
Now we need to disassemble the fuel block and check the pump itself, as well as the fuel level sensor with wiring.
Checking the fuel pump
We take out the fuel pump and connect it to the battery for a few seconds, apply 12V voltage for 1-2 seconds. During this time, you will have time to hear the buzzing of the motor; if there is no buzzing, then we are replacing the pump.
In my case, the motor was fine, but the fuel pump still did not work. All that remained was to check the fuel level sensor and the wiring from it, which we, in fact, will consider further.
Checking the fuel level sensor
We remove the fuel level sensor and check the wiring.
Now we see that one contact has burned out and the power has been lost. It is necessary to replace the sensor along with the wiring. After the change, the fuel pump worked as before.
Checking the fuel pump Lada Priora
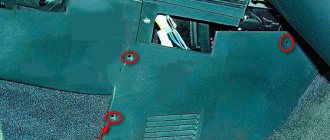
On the Lada Priora, the fuel pump relay and its fuse are located in an additional mounting block near the left foot of the front passenger. The fuse is marked F3 (15A), and the relay is K2.
First of all, we check the fuel pump fuse, and if necessary, replace it with a similar new one. We check the wiring and the fuel pump itself in the same way as on Lada Kalina and Lada Granta cars (see above).
As a reminder, don't forget to change your fuel filter regularly.
The fuel pump on the Lada Granta does not work
On a Lada Granta passenger car (VAZ-2190), after turning on the ignition, the driver should hear the sound of a running fuel pump for 2-3 seconds, which should raise the pressure in the fuel rail before starting the engine. If this does not happen, then you will have to look for the reason why the Lada Granta’s electric fuel pump refuses to work.
First, you need to check the condition of fuse F21 (15A, blue), which protects this electrical circuit. It is located in the mounting block located on the front panel to the left of the steering column. It is possible that this fuse has blown or the contacts of the mounting block where it is inserted have weakened and oxidized.
If everything is in order with fuse F21, then the relay to turn on the electric fuel pump K12, through the contacts of which power is supplied to its terminals, must be checked. It is located in the same mounting block as the fuse. This can be done as follows: pull out this relay from the socket and, using a jumper, close contacts 30 and 87, then turn on the ignition. If the fuel pump is working properly, it will start working.
To make sure that the K12 relay is the culprit for the fuel pump failure, you need to carry out another check using a test lamp, which must be connected to terminals 85 and 86 of the K12 relay socket, also with the ignition on. If the warning light comes on, it means that the culprit for the fuel pump failure is the K12 relay, and if the warning light does not light up, then you will have to check the condition of the crankshaft position sensor (CPS), since it is on its command that after the starter starts rotating the crankshaft, the electronic control unit ( The ECU) supplies voltage to terminal 85 of the fuel pump relay socket.
But, when checking the state of relay K12, it may turn out that after closing contacts 30 and 87, the fuel pump will not start working. In this case, lift the rear seat cushion and remove the hatch cover to gain access to the fuel pump and disconnect the block with wires from it. Then, using a pair of wires, we supply voltage directly from the battery to the fuel pump terminals. If the fuel pump starts working, then the fault will have to be found in the wires and connectors going from the mounting block to the fuel pump, and if it doesn’t work, then the fault is in the fuel pump itself.
Video instructions from our portal
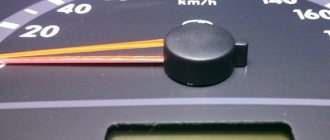
Setting the clock
You need to check the mesh, the so-called filter on the fuel pump, maybe everything is clogged there.
First you need to check the fuel pump itself, or rather, by ear, the operation of the fuel pump. If it does not turn on, then we repair the voltage of the wiring and contacts. I would recommend immediately replacing the fuse with a new one.
I had a similar problem, it turned out the contacts were oxidized, I cleaned it, connected it, everything worked, check the wiring
First, you need to check with a tester whether there is voltage going to the fuel pump, and then use an ohmmeter to check the fuel pump itself. If the voltage is OK, it means the fuel pump has burned out or there is no contact at the terminal.
In such cases, I recommend checking the contacts immediately; experience shows that most often this is the reason.
This happened to me. The car does not start, the hum of the fuel pump is not heard. I checked the fuel rail - there is no pressure. Then I checked the fuse, relay, DPKV in order - everything is normal. I checked the voltage at the fuse connectors, tried to throw a jumper on the relay, checked the resistance of the DPKV - normal. Next, I checked the voltage on the fuel pump cable - there is voltage (+ plus the relay is working - when the ignition is on, the current supply stops after 2 seconds). By the way, if you're interested, my plus goes along the gray wire minus the black wire. I applied it directly from the battery to the BN - zero reaction. It's clear that the BN burned out. I took it out and just for fun, I applied voltage directly to the BN, and “dry”. To my surprise, BN began to purr. It turns out that the voltage supply contact (+) has oxidized - the blue wire. Cleaned the contacts, lubricated them - and voila - the car started!
Happy New Year to all car enthusiasts. Guys, help. I drove up to the store to unload the goods. I turned off the car and returned the goods. I started to start, turned on the ignition, all the instruments are working, no pump and no starter either. I tried it from a tow and the car was dead. Tell me what to do.
Signs of fuel pump malfunctions
The main symptoms of fuel pump failure, as well as malfunctions in its operation, are:
- the car starts with difficulty, the engine runs unstable, there are dips, jerking when pressing the gas pedal, etc.;
- the pump does not pump after turning on the ignition, does not turn the starter and does not pump the fuel pump, the engine does not start;
There have also been cases when the fuel pump stops pumping while driving. In such a situation, the engine begins to malfunction and stalls immediately after the remaining gasoline in the fuel line is used up. The problem can occur either regularly or periodically.
The fuel pump does not pump: causes and diagnostics
Let's start with the fact that if the gas tank is full, the battery is charged, the spark plugs are dry and there is a spark, the starter turns the engine normally, but the engine does not seize, then you should pay attention to the gas pump. A common problem is that there is no power to the fuel pump after the ignition is turned on. In a similar way, the malfunction manifests itself in motion, when the power to the fuel pump is lost and the engine suddenly stalls.
An equally important point is how much the fuel pump pumps. In other words, the pump may hum and buzz (power is being supplied), but not create the required pressure in the fuel line. The pressure in the fuel system with a working fuel pump must be more than 3 bar (which depends on the specific car model). The indicated pressure is accumulated in the fuel rail and has an indicator of 300 kPa and above.
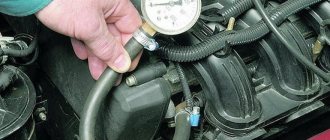
To check, you need to measure the pressure in the fuel rail with a pressure gauge, taking into account the indicators that are the norm for a specific car model. Using the example of injection VAZs, the pressure when the ignition is turned on is 3 atmospheres, at idle the figure is 2.5 atmospheres, when you press the gas 2.5-3 atmospheres. This method will help you accurately determine:
- malfunction of the fuel pressure regulator in the rail;
- breakdown of the fuel pump or a noticeable decrease in its performance due to wear;
- severe contamination of filters (fuel filter and/or fuel pump mesh);
In the second case, when you press the gas, the pressure does not increase; in the latter case, the pressure gauge needle rises, but very slowly or jerkily.
A decrease in pressure below the norm will lead to the fact that the engine may not start or start with difficulty, stall, jerk, operate unstably and with failures. If this happens due to the fault of the pump and not the fuel filter, then there is a high probability that the coarse filter screen of the fuel pump is clogged. In this case, there is no need to change the fuel pump itself, since it will be enough to replace or even clean the mesh.
If you suspect that there is no voltage to the fuel pump, there is a quick way to check. It is enough to turn the ignition key and listen, as when you turn the key you should hear a slight hum from the fuel pump. If such a buzzing noise is not heard, it means there is no power to the fuel pump, there are problems with the wiring, etc.
Also in the general list of possible reasons why the fuel pump does not pump, the following are noted:
- failure of the fuel pump fuse;
- fuel pump relay failure;
- problems with the ground of the fuel pump;
- malfunction of the electric motor of the fuel pump;
- oxidation or damage to fuel pump contacts and terminals;
- the fuel pump itself is faulty;
Wiring to the fuel pump
On most cars, the wiring to the fuel pump consists of three wires: “plus”, “minus”, and also a wire for indicating the amount of fuel in the gas tank. If the fuel pump does not pump, then the cause may be a lack of power.
To check the power to the fuel pump, just take a 12-volt light bulb and supply it with power from the external connector of the fuel pump. After turning the ignition, the control lamp should light up. If this does not happen, then the problem is in the external circuits. If the lamp comes on, it will indicate the need to check the internal contacts of the fuel pump.
To check the external wiring, you should alternately connect the positive and negative contacts, which are removed from the fuel pump power connector, to the ground of the pump. The contacts must also be connected to the fuel pump relay. If you place the negative contact on ground, after which the ignition is turned on and the light comes on, then this means that this contact is faulty. If the light bulb does not light up, then problems with the “plus” are obvious. If you place a contact on the relay and the light comes on, there is probably damage to the wire on the section that connects the relay and the fuel pump itself.
Fuel pump electric motor
If checking the pressure in the fuel rail and the external wiring to the fuel pump gives positive results, then you should check the fuel pump motor. This electric motor is responsible for circulating gasoline inside the fuel pump.
Location and operation of the fuel pump
The fuel pump in the Lada Priora car operates from an electric drive, which is turned on after turning the key to the ignition position. Within a few seconds, it pumps fuel into the fuel system so that the pressure in it reaches 3.7 bar, while a characteristic low buzzing sound is heard inside the cabin. When the pressure mark is reached, you can start the engine.
The unit works continuously, just because of the noise of the motor, the sound made by the pump is no longer audible. A special RTD regulator with a bypass valve maintains the required pressure in the fuel line.
The whirring of the fuel pump can be heard inside the car because it is located inside the fuel tank, located under the rear seat of the Priora. There is also a built-in fuel coarse strainer and a level sensor with a float. Gasoline pumped by the pump is supplied to the injectors through a fuel line tube made of thick-walled copper tube.
Other causes of fuel pump malfunctions
Quite often, unprofessional installation of additional electrical equipment or security anti-theft systems leads to the fact that the power to the fuel pump is lost due to mixed up contacts or other connection errors.
Finally, let’s add that the gas pump in the gas tank is immersed in gasoline, in which it is actively cooled. The habit of driving with an empty tank can quickly damage the electric motor of the fuel pump, as it burns out.
What functions does the fuel pump relay perform, signs of breakdown. Where is the fuel pump relay installed, how to properly check the fuel pump relay.
Why does the starter turn normally, but the engine does not catch and does not start? Main causes of malfunction, checking fuel supply and ignition systems. Adviсe.
Diagnose faults that may indicate problems with the fuel pump. Self-check of the device, measuring the pressure in the fuel rail.
The causes of whistling and increased noise during operation of the fuel pump are overheating of the pump. How to diagnose and fix the problem yourself. Tips and tricks.
What to do if the car accelerates worse, does not pick up speed, or has failures during acceleration. Why the engine does not pull, how to find the reason for the decrease in power.
How to change a fuel pump. Location of the fuel pump, releasing pressure in the system, unscrewing the fuel lines, removing the pump, reassembling.
Video on the topic
The fuel pump is one of the main components of a car. Without it, it is simply impossible to start the engine, much less operate it. Therefore, if you have any problems starting or operating the engine, you first need to check the fuel pump. To find out how to check a gas pump, you must first determine the basic principles of operation of this unit and possible breakdowns. As a rule, the fuel pump is not repaired and is replaced by a working one. However, it is necessary to identify that this is where the problem lies.
Why Lada Granta won't start - common faults
There are many reasons why the Lada Granta does not start. The article indicates the main malfunctions, as well as ways to eliminate them. If the Lada Granta does not start, the starter does not turn, then this is one situation, but if the starter turns, then this is a completely different situation.
In addition, there are many options, which are discussed in the article below. First, you need to determine whether gasoline is entering the cylinders. To do this, we unscrew the spark plugs and then inspect them.
Granta won't start - spark plugs are dry
After the spark plugs have been removed, we inspect them. Dry spark plugs indicate that gasoline is simply not supplied to the cylinders. There are a huge number of reasons for this, but the main ones are quite typical. First of all, turn on the ignition, and then listen to see if the fuel pump is working. If it does not work, then we listen to see if the fuel pump relay clicks after turning on the ignition. If it does not click, it means there is no voltage supplied to it, and this in turn means that either the fuse has blown or the problem is in the ignition switch. We almost completely exclude the second option, because this is a special case that requires separate consideration.
After we have made sure that voltage is supplied from the ignition switch to the fuse, and then from the fuse to the fuel pump relay, we lift the back seat, and then remove the chip from the fuel pump. Here we need either a multimeter or a test lamp. Turn on the ignition, the lamp should light up, or the multimeter should show a voltage of 12 volts at the terminals of the block. If there is none, then we look for a break along the path from the fuel pump turn-on relay to the fuel pump itself. It is worth clarifying that this is a very rare case, which in practice is almost impossible; you should start the search from the chip itself; most likely, the wire broke at its base.
After we are convinced that the fuel pump is pumping fuel, we go into the engine compartment, find the fuel rail, unscrew the cap from it, and then press the spool. Naturally, this must be done with the ignition on. What is all this for? This is necessary in order to clarify whether the fuel rail is pressurized. The pressure in the fuel rail may not build up at all; the reason for this is most likely either the fuel filter, which is clogged, or the fuel pressure regulator in the fuel rail.
Lada Granta does not start - spark plugs are in gasoline
If the unscrewed ones are wet, then it is logical to assume that gasoline is entering the cylinders. Accordingly, you need to dig towards the spark. Everything is definitely fine with the DPKV, because the ECU sees the scrolling and opens the injectors.
On a car with an 8-valve engine, where an ignition module is installed, this procedure is much simpler than on cars with a 16-valve engine. First, we need to make sure that voltage is supplied to the ignition module, namely, to the primary winding of the module. To do this, remove the chip from the module, and then turn on the ignition. There should be 12 volts between the center wire and ground. If they are not there, then check all the wiring to the control unit. If everything is fine with it, then with 90% confidence we can say that the problem is in the ECU. After we went to the cartoon, power is supplied, we check the module itself. To do this, use the same multimeter to check the resistance of the primary winding. It is measured between the second and third terminals of the coil.
The resistance should be about 1.2 kOhm. After this, we check the resistance of the secondary winding coils. To do this, it is measured between the terminals on high-voltage wires 1 and 4, as well as cylinders 2 and 3. This resistance may differ among different manufacturers, so here it is looked at relative to each other. On average, the indicator varies from 6.5 to 12. It is worth clarifying that this method of checking the module may not always be reliable, since the coil has different characteristics at different thermal conditions.
It remains to check the high-voltage wires; we measure their resistance with a multimeter; it should be no more than 5 kOhm on the shortest wire, and no more than 10 kOhm on the longest wire, respectively. Unfortunately, checking high-voltage wires for breakdown at home is quite problematic; this may require at least a megaohmmeter.
Many people, in the absence of a spark and wet spark plugs, immediately jump to check the crankshaft position sensor. Here it must be said that the fuel supply to the cylinder already indicates that this sensor is working. But how reliably it shows the position of the crankshaft is difficult to say. At home, it is easier to check the crankshaft position sensor by replacing it with a known good one.
Ignition coils
Custom ignition coil
The Lada Granda has two types of ignition coils: individual and four-terminal, they are controlled by the engine controller.
One of the signs of poor coil performance is poor idling, a drop in power and high gasoline consumption. The car starts poorly or stalls.
If the coils are partially broken, then paired misfires and ignition in the cylinders often occur. To remove the coil, you need to reset the terminals from the AMB and remove the leads from the controller. Then disconnect all high voltage wiring.
After this, the coil must be disconnected from the bracket by unscrewing the mounting screws. If you plan to replace the coil, make a note of its markings.
There are several ways to test the coil for faults:
- Testing a short to ground. To do this, using an ohmmeter, you need to connect the wire from the coil to the first end of the ohmmeter, and the body to the second. It should show an infinite value, if you see a specific value then there is a leak.
- We check the primary winding for a break. To do this, you need to connect the ends of the device to the contacts; if the device shows an infinite value, then one of the coils is broken and needs to be replaced with a new one.
- We check the secondary winding (for a 4-lead coil). To do this, first test the winding on the 1st and 4th cylinders using an ohmmeter. If it shows an infinite value, then the coil is working. Repeat these steps with the winding on the 2nd and 3rd cylinder.
- Checking high voltage wiring. The wires are checked one by one. To do this, connect an ohmmeter to the wire, measuring the resistance with a maximum value of 20 kOhm. The normal value is approximately 3 to 8 kΩ. If it shows infinity, then the wire must be replaced. It is advisable to carry out such a check annually.
After installing the coils in their place, you must strictly observe their markings; the cylinder number must match the number on the wire.
If the Lada Granda started and immediately stalled. The most common reasons:
- Damage to the ignition coil connections. Needs to be repaired or replaced with new ones.
- Low fuel pressure.
- Poor sealing in parts of the catalytic manifold or receiver.
- Poor performance of the engine control system.
The Lada Granda has many design flaws, but if you know all the weak points of this car, then finding the cause of the breakdown will not be difficult. Carefully monitor your car, undergo regular maintenance, replace parts in a timely manner, and the Lada Granda will serve you for many years.