Lada 2107 ❆ Snezhka ❆ › Logbook › Installing the radio in its normal place
I will continue the topic of yesterday’s post about installing central deflectors. Today I decided to install the radio in its original place.
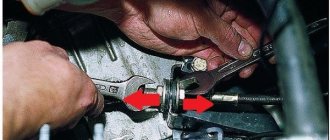
We remove the cover-plug, take out the buttons, the part on which the clock is installed.
Unscrew the “beard” and remove it. I didn’t photograph the entire removal process; I’ll describe the reverse installation in full.
We try on the frame for attaching the radio to the central part, mark it and cut it out.
You can cut it with anything, I did it with an ordinary jigsaw.
But I couldn’t cut out the main part of the beard with a jigsaw; I cut it out separately with files from the jigsaw, using pliers, and then smoothed it out a little with a file.
We install the “beard” back, screw the two nuts on top with a 10mm head;
We fasten the lower part with two bolts;
We put back the buttons, the bottom cover and the part on which the clock is installed; Connecting the radio:
We take a standard connector (I don’t remember what it’s called correctly), connect the yellow and red wires together and connect to the “+” from the battery, the black wire to the body, or to any wire where there is “ground” (I connected directly to the “-” battery ), the blue wire is needed to control the power supply to amplifiers, active antennas, etc., pairs of wires of white, gray, green and purple colors are needed to connect speakers from the built-in amplifier in the radio. I don't use them, I only need “tulips” (linear output).
But here is an example of how not to do it, my valiant dealers connected the radio tape recorder in parallel to the clock, and in addition, with very bad wires, such wires cannot be used at all.
After connecting all the wires, connect the terminals to the battery and check whether the radio is working.
If everything is fine, then we install the PG in its seat, and accordingly, do not forget to install the mounting frame before this.
Source
Lada 2107 Cherry Tank › Logbook › Manufacturing and installation of a subwoofer. part 2
Good afternoon everyone!
Finally got around to recording the end of the epic with music!
In my last post, I focused on assembling the box; it was still without the front wall. Now, of course, the sub has been driving in the car for a long time and makes me happy with its sound! I will continue the description of the work: 1.
I screwed the front wall together, coated all the seams with silicone sealant without sparing, installed screws every 4 cm. I tightened everything with great effort, conscientiously.
2.
Here you can see the connection hole:
3.
I couldn’t resist, I decided to try how it all plays) I quickly put on the speaker and wires)
All this was done on different days, now I don’t remember when, slowly slowly in my free time) After thoroughly lubricating everything and drying it, I moved on to the next stage: covering the body with carpet. I attached the carpet to titanium, there were no problems with it, it turned out even without jambs)
After the case was ready, all that remained was to secure the amplifier, install the connection jack and install the speaker!
the back wall behind the seat was also redone, I made it from two halves and lined it with felt on the interior side. I also remade the seat, took a back from a VAZ-2106 with an armrest, refined the armrest (covered it) and put it in place. It all looks like this:
And this is what it all looks like from the trunk:
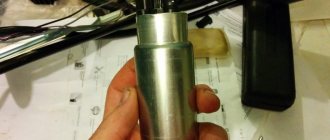
I didn’t say anything about the connection: + I pulled from the battery with wires from simple wiring, the largest cross-section, this wire turns on the subwoofer through the native instrument backlight brightness adjustment. Not the best option, but it suits me. + from the radio - also a simple wire, thin. Simple, inexpensive tulips, 6 m long, barely enough. “-” I took it directly from the trunk, also with a thick wire. The speaker itself is connected to the amplifier with a special wire, bought by the meter at a car audio store. That's basically it! Below are the characteristics of the speaker and amplifier.
Speaker KENWOOD KFC-W112S
Type - subwoofer Size - 30 cm (12 inch) Number of bands - 1 Power - 200 W (nominal), 800 W (maximum) Sensitivity - 90 dB (W/m) Frequency range - 28 - 800 Hz
Housing - no Recommended housing - closed box, bass reflex, band-pass
Dimensions - 300 mm Diffuser material - polypropylene Magnet weight - 748 g Installation depth - 139 mm
Source
Installation of radio VAZ 2107
Owners of VAZ 2107 begin acoustic tuning of their car by installing or replacing the main components - the head unit (car radio) and low-quality standard speakers. Replacing the head unit (head unit) is also practiced if the VAZ 2107 radio tape recorder stops working, which they refuse to repair as outdated.
Theft of a radio is also a common reason for installing a new PG. For professionals, installation operations are not difficult, but a novice amateur can damage the dashboard by connecting the wires incorrectly. Incorrect installation of the VAZ 2107 radio leads to short circuits and burnout of the receiver's electronic boards.
In this article we will describe how:
We hope that the tips will be useful to you.
Installing the front speakers
First of all, we install the front speakers. Then, when connecting the radio, you will not have to get confused in the wires installed by an illiterate radio technician. Most often, buyers of used cars encounter such cases. Identical black wires with careless twists and minimal insulation need to be ringed and labeled. It is much easier to replace unreliable electrical wiring with cables of the desired cross-section and color.
Speaker wires of different colors are used for the left and right speakers. The color of the wire is selected according to the pinout of the car radio manufacturer. In radio engineering, pinout is the color, letter, and digital designation of outputs and cables. When installing more powerful speakers (100 - 150 watts), take into account their mounting depth, which should not interfere with the movement of the glass. To extend the speaker, spacer rings are used.
To install the speakers, you need to disassemble the front door and remove the window lift mechanisms.
The bottom of the door is usually used to install speakers. Holes for the diffuser are cut in the door panel.
Spacer rings are attached to the door frame, into which the speakers are installed. The wires for connecting the speakers to the head unit are pulled into the technological holes in the door. After assembling the door, additional work can be done.
A grill (decorative and protective grille) is installed on the speaker, the door card is covered with vinyl or leatherette. Without additional door cavity soundproofing, the speakers may sound muffled or resonate. For sound insulation, the outer metal is glued with a vibration-insulating material that dampens metal vibrations (for example, “Bimast”). The internal surfaces of the frame and stiffeners are covered with noise-absorbing “Spleen”.
READ How to install the game on nokia 5230 from a computer
Expanding the sound system with speakers on the rear sound shelf
The extended connection diagram for the VAZ 2107 radio provides for the installation of front speakers and rear acoustics. The front speakers create frontal sound, the speakers from the passenger compartment are responsible for the lower frequencies and surround sound. At the rear, multi-way speaker systems use woofers or oval full-range speakers.
From an acoustics point of view, the best place to install ovals or compact subwoofers in the 7's cabin is the rear parcel shelf of the car. The standard rear shelf of the VAZ 2107 for mounting equipment is not strong enough. If you simply cut holes in it for speakers, the plastic will vibrate and distort sound waves.
To reconstruct the shelf, additional fasteners (corners) are used along the sides of the body. The shelf is reinforced with an additional frame, soundproofed, and covered with carpet (a special sound-absorbing and decorative material).
The acoustic wires are pulled under the interior flooring along the sides of the car.
VAZ 2107 subwoofer – Choosing a subwoofer for the car 2107
Everyone knows the sad fact: despite the fact that the VAZ 2107 is truly a people's car (as well as other VAZ classics), the sound insulation and car audio circuit in them are deplorable.
A pair of standard speakers, the ability to connect additional points, and a primitive radio – that’s all. But lovers of good, rich sound need the entire frequency range. The low frequencies that create the “bass foundation” of any musical composition can be provided by a subwoofer or bass speaker. Let's talk about the possibility of connecting it. The scheme is as follows: since the subwoofer emits low frequencies, about 10-200 Hz, the speaker body will be larger than that of the tweeter, since the size of the vibrating part is inversely proportional to the frequency - the lower the frequency, the larger the parts that produce this sound. The approximate volume of the subwoofer is about 35 liters. Therefore, the subwoofer is usually placed in the trunk, especially since the trunk of the VAZ 2107 has a protrusion to which it is convenient to mount a bass speaker. In this case, as they say, “the wolves are fed and the sheep are safe” - the trunk is free and the subwoofer is installed. Connectivity options in the cabin are awkward.
Why do you need a capacitor for an amplifier?
In addition, under high load, the subwoofer can create “peaks” in current consumption that the VAZ 2107’s on-board network, including the generator and battery, cannot compensate for. Therefore, it is necessary to install a capacitor to avoid “failure” in the operation of the amplifier and on-board circuits.
The installation circuit of a large capacitor is made in parallel with the power supply of the amplifier. The operating voltage of such a capacitor reaches 24 V, and the distance from the amplifier to the capacitor should not be more than 0.5 m. Otherwise, there will be a “drawdown” in the bass, without connecting an additional device.
To correctly calculate the capacitance of the capacitor for the subwoofer, you need to remember that the capacitance of the capacitor should not be less than 1 Farad for every kilowatt of acoustic power at the output of the entire system. For greater guarantee, take an “allowance” for excess capacitor power so that the power circuit is not disrupted.
When choosing a subwoofer for the VAZ 2107, do not forget that:
- Selecting a speaker. The following characteristics are important to us in a speaker:
- Size: the most popular is 12 inches, while the volume will be about 25 - 35 liters; quite decent sound, the installation is time-tested;
As soon as you become the owner of a subwoofer, it is important to install it correctly in the trunk of a VAZ 2107. It must be said that simply throwing a subwoofer into the trunk is simple and quick, almost everyone does this. In this case, it can be quickly dismantled. The disadvantages of this arrangement are that there is a loss of sound waves in the trunk, it begins to “grumble” and vibrate, and if you buy a fairly powerful device, then this must be taken into account:
A more promising option for installing a subwoofer in the trunk of a VAZ 2107 is to install it so that the speaker is located in the cabin, in the projection of the rear seat armrest. In this case, sound vibrations will directly enter the cabin, rather than being “re-radiated” through the metal structure. Passing and resonating through the closed volume of the trunk, the sound acquires a timbre “like coming from a barrel.” This sound reflection scheme is not the best.
The disadvantage of this installation option is that in the interior of the VAZ 2107 the rear armrest is constantly open.
How to fix a subwoofer in the trunk so that it sounds into the interior of a VAZ 2107? Let's consider this installation option in more detail.
You can also listen to music with the center armrest closed. At the same time, the timbre changes slightly.
There is an amplifier in the trunk itself (on the back wall of the subwoofer).
As a result, there was so much free space in the trunk that another gas cylinder could easily fit there!
Choosing a location for the car radio
The standard connection of the VAZ 2107 radio is provided by the factory in an inconvenient place. The factory niche, closed with a plastic plug, is located at the very bottom of the center console.
This place is inconvenient for three reasons:
If you want to avoid these troubles, you have no other choice but to install the radio in the VAZ 2107 in place of the two central air ducts.
In principle, this method does not affect the operation of the heating system, since the mass of warm air will pass through the side and bottom air ducts.
Before moving the radio up to the VAZ 2107, you need to remove the air ducts and do a number of preparatory work.
When installing a car radio in place of the air ducts, difficult work for a novice amateur will include making sealed plugs for the air ducts, carefully cutting out plastic partitions and shaped protrusions on the dashboard. Under the installation frame of the car radio, you need to make and secure brackets (bars - inserts). To close the gaps between the dashboard and the car radio body, you need to buy and fit a factory adapter frame.
Even more difficult is the independent production of original decorative cladding made of wood or fiberglass. Installing the radio in the air duct slot makes it easier to control the receiver and view the display.
How to make a podium yourself
Acoustics in the VAZ 2107 imply the presence of a podium and, as mentioned above, it should preferably be made independently. Let's find out how to make it? Ordinary plywood is the most suitable material for making a podium. The process begins with cutting out ovals or circles from plywood with a jigsaw. Shaping the podium can be done using:
- Foam, but as we learned, it will not provide adequate rigidity.
- Epoxy resin.
- Compoplast.
Algorithm for the manufacturing process of an acoustic podium frame
So:
- We take plywood 5-6 mm thick.
- We prepare the frame for the podium.
DIY podium frame
- Using a jigsaw, we cut out the rings so that the speaker fits tightly into the hole.
- We create a suitable frame using self-tapping screws or wood spacers.
Note. If you use spacers of different heights, you can achieve a tilt of the podium.
- We fix the entire structure with self-tapping screws, but carefully so that the plywood does not crack.
Note. Depending on individual imagination, you can build not one, but two or more podiums.
Advice. To ensure that the podium fits tightly to the trim, it is recommended to install special chipboard spacers, which are then screwed tightly to the door.
Shaping the podium:
- If you are happy with a regular podium, similar in design to the store-bought one, then you can use regular foam to give it shape. We foam the insides of the frame and wait until it dries. We cut out the excess parts with a sharp knife or blade. At the end, a layer of putty should be applied to the foam and everything should be sanded.
- If we want to make a real podium that would give a powerful professional sound, then we use epoxy resin. We pull ordinary nylon tights onto the finished workpiece, but so that they do not sag anywhere. We dilute the baksu and fill the mold. We do this 3 times, every 12 hours. After the last third layer, wait 24 hours until it dries. After this, the remaining open parts inside the mold can be filled with foam again. But this will already be a reinforced frame.
Note. After drying, the podium is covered with anti-gravel, and the rings and foam walls are covered with black spray paint. Don’t forget to hang the casing at the end, secure it with the original screws, install the speakers and enjoy high-quality sound.
The instructions presented above imply doing it yourself using photos and videos - materials that can be viewed on the Internet. There are a lot of them there.
The price of a good podium is quite high, but if you make it yourself, you can save money.
Installing a double din car radio
Modern 2DIN size standard radios are equipped with a larger display and touch controls. They are similar to 1DIN car radios in width and installation depth. Better functionality is achieved by increasing the height of the housing by 2 times (up to 100 mm).
The two-din radio tape recorder does not fit into the VAZ 2107 car in its regular place. The installation of a large housing under the center console is hampered by the gear lever. It is also impossible to install a 2DIN car radio in place of the air ducts. At the top, the edge of the “dashboard” does not allow expanding the niche of the air ducts. To expand the niche downwards, you need to remove the stove controls. Much easier than a complex reconstruction of the dashboard would be to install a double-din radio in the glove box of the car. There is enough space in the glove compartment to install a double-din radio, which can be supplemented with a separate amplifier. The main difficulties of this method are the design of fasteners for the installation section. Under them you need to install damping pads that absorb vibrations of the plastic.
Installing the head unit
All modern power units use a standard ISO connector (International Unified Electrical Engineering Standard) to connect power cables and speaker wires.
After installing the car radio housing in the selected location, all cables must be secured into a rectangular block suitable for this connector. The letter markings of the car radio outputs are different; you need to look for them in the equipment manufacturer’s instructions. If your existing wiring uses a different type of connector, purchase an ISO connector adapter.
Connecting the radio to the VAZ 2107 power supply
The standard connection of the VAZ 2107 radio through the ignition switch is inconvenient because the radio and player can only be listened to when the engine is on. The designers chose this connection scheme for reasons of increasing battery life. To connect a new car radio in the same way, you can use the standard wiring. But keep in mind that with such a connection, advanced power units, such as Pioneer, KENWOOD, Alpine, Hertz, can reset new settings when the engine is started. Indeed, a more logical connection of the radio directly to the VAZ 2107 battery can drain a worn-out battery. Most often this happens when the driver forgets to turn off the quiet music at night. To avoid this drawback, a manual power switch button is embedded into the yellow power wire from the battery. The standard fuse for the VAZ 2107 radio is not provided in the block of protective devices. To install protection in a reserve location in the fuse box, you need to rebuild the electrical circuit. It's easier to buy a power cable that has a fuse built into it. For normal protection of the radio from strong inrush currents and short circuits, a 20-amp blade fuse is sufficient. To expand the acoustic system, move the installation location, and install complex power units, an acoustic tuning enthusiast must master the skills of an auto mechanic, radio technician, or electrician. If you do not have confidence in your abilities, it is better to turn to car acoustics professionals.
READ How to install ios 11 public beta via itunes
Buffer in "seven"
The VAZ 2107 is considered the most common car of the family under the original name “Classic”. In terms of driving performance and reliability, the car was made well, but almost no attention was paid to the car audio.
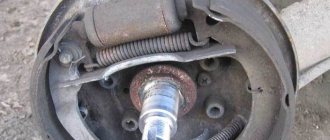
Subwoofer VAZ 2107 in the trunk
Note. As a rule, the “Seven” comes standard with cheap Chinese acoustics or none at all.
Cars of this family are designed in such a way that something like a shelf is formed in the cabin. So you can put a subwoofer on it. On the other hand, you can put a buffer in the trunk, but if you use this compartment of the car to its fullest extent, there will be a lot of inconvenience. Placing a buffer on the rear acoustic shelf is an ideal option that takes up minimal usable space in the cabin and produces excellent sound quality.
Installation of good budget acoustics (speakers, radio) in VAZ 2107, 2106, 2101
Car audio, installation of good budget car acoustics - speakers (speakers), head unit (radio tape recorder) in the classic VAZ 2106.
Next, but equally important: think carefully about whether you can do everything yourself - your hands should grow at least two to three centimeters from your butt (not closer!) Budget option - 4 columns: 2 in the front doors (plus 2 beepers on top - included or not) and 2 ovals in the rear parcel shelf. In the front doors: 10 cm (4 inches), 13 cm (5.25 inches), 16 cm (6.5 inches) Rear shelf - ovals 15 * 23 cm (6 * 9 inches) In principle, you can choose it yourself - the seller will advise depending on your wallet, but there are two rules:
I won’t recommend a specific brand - no one pays me for advertising radio tape recorders. Buy in a store - there is no ice on the market... A normal system can be found for 6-8 kilo rubles. Installation location of the front speakers in the VAZ 2106. Remove the door trim, having previously purchased fasteners (some will break). There are three places where it is easiest to install the speakers:
1 2 3
1. I haven’t tried it, although it is possible.
2. by 10, 13 cm. Any one can stand up without any problems, I set it to 16cm - it’s difficult to stand up, it’s a tight fit. I had to saw off a little bit from the bottom rim of the speaker. That is, you must first try on the diameter of the magnet and the height of the speaker. You can bend the iron of the door a little, then it will definitely fit.
In terms of sound quality, the stage is very low, there is no bass at all, when getting out of the car we hit the speaker with our foot.
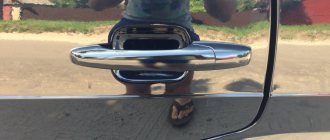
3. (with glass 07.05 it will not work) After installing the ESP, a problem arose - during installation the speaker (2) rested against the ESP rail. I had to look for another place. After much testing, I found an unexpected place - under the door handle (3). 10 cm, 13 cm will fit without problems, 16 cm fits tightly (in the picture without protection). In order for the hand to fit into the handle, the speaker protection must be flatter, so I removed the ring (in the picture below right), leaving only the left grille with the plastic.
The auto audio has become much better (the stage has risen). Why bother, the sound has become cooler. Bass appeared, and if you lowered your head, it was a complete blast. Before cutting a hole, we carefully try it on, placing the speaker on the door where the hole should be (if you’re not sure, you haven’t drunk, measure seven times and cut once, bad luck). Included with the speakers is a round piece with its dimensions (speakers), which we cut out of a piece of paper, apply to the fiberboard door (trimming) and cut a hole. I knocked out the perimeter with a chisel and hammer.
Included with the speakers are iron figurines. So, we screw the speaker not to the plywood, but to them. We put four around the perimeter, attach the speaker and screw it on (as in the picture) so that the self-tapping screw fits into the hole on the back of the thing.
Tweeters (tweeters)
Install it as high as possible (photos coming soon).
I bought the back shelf at the store. The material of the rear shelf is plywood, preferably not narrower than 8 mm (otherwise it will rattle).
speakers facing the interior
So, to remove the rear parcel shelf on a VAZ 2106 you need to remove the back of the rear sofa. The arrow shows an iron petal, bending which the rear backrest is removed (there are two of them, on the right and on the left). You need to stick your hand in there and bend them back.
We remove the rear shelf and find out (I don’t know about everyone), but in the place where the speakers should be there is an iron partition (. Here you can’t do without an angle grinder... Cover everything with rags (so as not to spoil it with scale) and cut out the partition so that the speakers can stand up There is no other way(.
READ How to install icon changer
Wiring and connection
The connection diagram is clearly described in all instructions. Power is supplied to the car radio via two wires: a plus (+) yellow and red wire, one to the generator, the other to the battery, and a minus (-). I took and wound the red and yellow together and connected it to the positive side of the fuse box (the hazard warning light, I think). Cm.
drawing. That is, the radio will always work, even with the key removed. You can also connect it to the positive of the cigarette lighter (the red wire is not the yellow one!). Minus - to the minus of the cigarette lighter (black wire). The rest is according to the instructions.
The auto audio turned out to be quite good, at the budget level.
Speaker Installation
To install acoustics in a car, you will need a set of tools. We recommend having a Force kit for this. Tuning a car with it becomes much easier, since, firstly, their package includes the most necessary tools for work, and secondly, the quality of the tools from this company has already been tested by time. The price for this tool is more than reasonable; this set is ideal for just such work. Moreover, if you own a domestic car, such as a VAZ 2107 or VAZ 2106, it is simply vital for you to have such a tool at hand.
Tweeters
Tweeters (also called tweeters) are best installed as high as possible. This could be the top of the door trim or the front roof pillars. The further you are from the main speakers, the more noticeable the quad effect will be. The passenger tweeter should be directed to the driver's seat, and the driver's tweeter to the passenger seat. Recently popular two-component systems, or rather their buffers, are best placed not in the panel itself, but in the doors or on the rear shelves. And their tweeters, again, are ahead and further away. Those tweeters that do not require filters and are purchased separately can be installed in parallel with the rear or front speakers, it’s a matter of taste. Their power varies: from loud high-frequency support to a thin squeak.
Subwoofer location
It is not recommended to connect all other speakers in parallel. If you are eager to add a couple more, then it’s better to add them to the existing ones. Connoisseurs of loud music are recommended to install subwoofers and amplifiers using special kits that contain terminals, fuses, wires, etc. You can buy such a kit in almost any store for tuning audio systems. By the way, the location of subwoofers and their installation in the trunk is not the same for all VAZ cars. It is important to take into account the body shape (hatchback, sedan, station wagon).
If you want to go further in tuning your car and you are already interested in metallic paint for your car or you want to look at and try on new wheels on your car, we are definitely on the same path. Our resource contains a lot of necessary information to improve and refine your car. Read, learn a lot of new things and share your experience with other car enthusiasts. All together we can make the world of car tuning a little simpler, and the quality level of new projects will rise to a new level every year.
Source: avtopolza.ru
DIY acoustic podium VAZ 2107
Acoustic podium Alamar for VAZ 2107
As you know, an acoustic podium in a car is always beautiful. Many people have probably seen these very decorative elements designed for installing large speakers, but not everyone knows how to select them correctly or make them themselves. Today we will learn how to make an acoustic podium for the VAZ 2107 yourself, using only available materials and tools. The acoustic podium of the VAZ 2107 will completely transform the appearance of the car's interior. In addition, the article contains general information about the types and types of various podiums.
What is the product
Translated from English, the word podium means elevation. In a sound system, this device is the location for the speakers in the car. These devices are divided into two types: external and internal.
The VAZ 2107 car does not have a standard place for installing speakers in the front doors from the factory. The speakers can only be installed using podiums, which can be purchased ready-made or made independently. This device also allows you to install speakers of any size into the car, which is not always possible to do with standard trims, thereby obtaining more directional and high-quality sound in the car. It is known that the most voluminous and high-quality sound can be obtained from speakers with a diameter of 16-20 cm.
From the factory, VAZ 2107 cars were not equipped with speakers in the front doors. Let's consider what the technology for manufacturing acoustic devices for these doors for the VAZ 2107 car is.
Making podiums for the front speakers
True connoisseurs of high-quality sound take on the task of independently manufacturing acoustic elements for both rear and front speakers. Although factory-made products are popular, they have one drawback: they are designed more to preserve the design, and do not always fulfill their intended purpose of securely fastening the acoustic effect speaker. Let's look at how to make acoustic podiums for a VAZ 2107 with your own hands.
To make products for the front doors, you will need to use plywood, the thickness of which is at least 6 mm. In addition to plywood, manufacturing will require polyurethane foam, self-tapping screws, a jigsaw, drill and other auxiliary devices. Initially, a sketch of the future structure is made on plywood. After this, you need to use a jigsaw to cut out the structure with holes for installing the speakers. Additionally, it is necessary to cut two rings with an internal diameter corresponding to the size of the speaker. These rings are attached to the main workpiece at the desired angle using spacer bars and self-tapping screws (or glue).
At the next stage, you should use polyurethane foam to fill the space under and around the spacer. After the foam has dried, which takes up to one day, it is necessary to trim off its protruding parts. The surface of the resulting product is covered with wood putty, and then with fiberglass and epoxy, which will increase the strength and wear resistance of the device. Having sanded the structure, you can begin sheathing the product with decorative elements or painting it. As a result, we get products of the following type, as shown in the photo below.
Speakers are installed in such devices, resulting in the necessary acoustics of the sound of the car radio. The finished VAZ 2107 podiums look like the photo below.
Making podiums for rear speakers
The manufacturing process of rear devices is more labor-intensive, due to the need to replace the shelf. The detailed principle of creating a rear shelf with podiums is described in the material about the rear acoustic shelf of a VAZ 2107 car. We will look at the main features of manufacturing devices for rear speakers.
There it is recommended to use plywood with a thickness of at least 16 mm. From the same plywood, podiums should be cut in sizes that will correspond to the diameter of the speakers. Oval three-way speakers are preferably placed on the rear shelf. When making podiums for the VAZ 2107, it is important to use soundproofing materials that will help create a cleaner sound, without extraneous rattling.
Periodically, the speakers should be removed and cleaned of dust to extend their service life. The photo below shows a view of the rear podiums on a VAZ 2107 car, made by yourself.
The shape and type of products can be made in accordance with your imagination, but at the same time, not forgetting that the design should not be bulky. The main materials for manufacturing are:
- plywood or pressed shavings with a thickness of at least 16 mm;
- polyurethane foam;
- designer coating.
This amazing design called the podium
Acoustic podium for VAZ 2107
The word "Podium", as you know, is English, and it means "elevation". In acoustics, a podium is a special place for speakers, and they can be both external and internal.
Purpose of podiums
Acoustic podium in VAZ 2107
In most cases, car radio speakers need to be installed in places where, according to the designers, they should not be. For example, these may not be the speakers themselves, but tweeters or midrange speakers. As for our domestic designers, they did not provide any special standard places for speakers at all, being content with doors or a panel. And there you can only insert small-sized coaxial speakers.
Note. When installing component acoustics in a VAZ 2107, the owner will have to either buy a podium or sculpt it himself. In this case, the speakers will fit as they should and everything will look much nicer, fitting into the overall interior design.
Note. If everything is clear with the outer podium, then the inner one is a ring made of thick plywood or chipboard, rigidly attached to the door frame. The internal podium is placed in such a way that the factory trim fits into place without problems.
Note. Installing a podium solves this problem, as it increases the rigidity of the entire structure where the speaker is attached. The “seven” door itself is made of very soft metal that bends easily. Putting a speaker here without a podium is a real crime.
On sale today you can find different podiums for acoustics, but more often they are made of thin plywood, to which orientation rings made of the same material are tightly screwed.
All the voids on the factory podiums are filled with polyurethane foam, but on such podiums, even the coolest acoustics will not play very well. This is due to the fact that sufficient rigidity is not provided. Polyurethane foam is not the point. It will, of course, give the product the desired shape, but only when the rigid body is ready. Therefore, only homemade podiums can be considered as the most valuable option.
Installation
The process of installing a speaker begins not with anything, but with sound insulation. Indeed, the “seven” is considered one of the most “rattling” cars. Putting a subwoofer here without proper preparation is like throwing money away.
Installing a subwoofer in a VAZ 2107
The ideal material for carrying out the “shumka” in this case will be Vibroplast. Approximately 22 sheets of this material will be used for partial sound insulation.
Insulation of the “seven” shelf with soundproofing materials
Let's proceed to the operation, which we will completely carry out with our own hands, especially since there is nothing complicated about it:
Note. You need to cover up to 60-100 percent of the entire shelf area, depending on the material.
Note. In this case, it is necessary to cover 100 percent of the entire area. You need to make sure that the layers are not too thick so that the shelf fits into place without problems.
Soundproofing the shelf will not only reduce the noise emitted by the rear arches and trunk, but will also significantly improve the sound quality of the subwoofer coupled with acoustic speakers located in the rear or front. If the buffer is placed not on a shelf, but in the trunk of the “seven”, then the trunk will be soundproofed accordingly.
Soundproofing the trunk of the "seven"
Cable routing
Next you will need to lay the speaker cables for the subwoofer. As a rule, the RCA runs on the left side, and the power wires for power run on the right.
Note. You need to extend the power cable from the battery, which is located in the “seven” under the hood. In order not to make extra holes on the partition leading to the cabin, we recommend threading the wire through an already prepared place, which is closed with a rubber plug.
Box
Installing a VAZ 2107 subwoofer
The subwoofer for the “seven” can be purchased with or without a housing. If you have a speaker without a box, then you don’t need to install it that way. You will either have to order the case from specialists, or make it yourself, which is also not so difficult.
Note. A homemade or custom subwoofer has many advantages, including the ability to customize the sound of the subwoofer to the required parameters. But when buying a speaker in a store, you must remember to ask for documents for it so that its characteristics are known. Although, on the other hand, today finding out the parameters of a particular speaker (provided the name is known) is not a problem. A considerable part of the characteristics of well-known subwoofer models is posted on our website.
So, let's not delve into the philosophy of the issue, but let's start taking action. The goal in this case will be to produce a box with a volume of 30 liters (not so much displacement, but it will be enough).