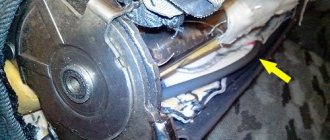
The green control wire from terminal 85 is brought into the interior; drilling of the engine shield is allowed. In this case, the installation of PTF usually does not require separate preparation of the installation site, since the fog lamps are placed in ready-made places, covered with plugs.
If there is no free button on the instrument panel, you will have to mount it in a convenient place. We also recommend reading the article on how to connect a radio with your own hands. The benefit from such illumination is zero, but such a technique will be fully blinding. how to connect a car relay (light ignition, etc.)
Pairs of terminals and interchangeable.
When using non-original headlights, there may be discrepancies in dimensions and mounting points.
Some fans of SUVs mount additional lights at the level with standard optics or on the roof of the car.
This technique eliminates the possibility that the driver may forget to turn off the PTF on his own. Volgograd region
Available with low beams, running lights or fog lights.
PTF Priora COMPLETE INSTALLATION of wiring, connection to the ignition system
Connecting PTF via relay and button
During bad weather, the effectiveness of headlights noticeably decreases, which not only makes driving less comfortable, but also affects the safety of the trip.
The light beam of low and high beam headlights is reflected from raindrops and particles of water vapor during fog, forming a dense white veil.
A real salvation for the driver in such weather conditions will be fog lights (FTL), which provide a flat and wide horizontal beam of light.
It spreads over the road, illuminating the side of the road well, improving the visibility of the car itself for oncoming drivers.
Standard PTFs are rarely found in basic car models, but if desired, fog lights can always be purchased separately and installed independently. To do this, it is enough to have basic knowledge in the field of electrical engineering and electronics.
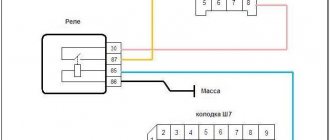
This is what the diagram for connecting the PTF button via a relay looks like:
Everything on it is extremely simple and clear.
- From the battery, the plus goes through the fuse to the relay contact (30) and then from the contact (85) it goes to one contact of the PTF on/off button.
- A minus signal is applied to the second contact of the button.
- Next, from the relay contact (87), the plus goes to the fog lamps.
- The minus is connected to contact (86).
Please note that each car model has its own characteristics, so the diagram can be adjusted.
Advantages of functional lighting equipment
Fog lights allow you to partially relieve the strain on the driver's eyes during a forced trip in difficult weather conditions. With their help, it is possible to achieve better illumination of the road surface. The greatest importance of headlights lies in the precise supply of light, which determines the illumination of the road.
Precisely adjusted devices illuminate up to 10 meters of space in front of the car, which is quite enough for safe driving in difficult weather conditions. Of course, for this you will need to adhere to a certain speed limit. The headlights are adjusted during the installation of the equipment. The quality of road lighting depends entirely on the setting of the angle of incidence of the light flux.
We recommend: How to replace the washer reservoir
Instructions - how to connect fog lights via a relay and a button using the example of a Chevrolet Niva
As can be seen from the diagram above, to connect the fog lights you will need:
- PTF themselves;
- fog lamp relay;
- headlight on/off button;
- fuse 10 A;
- wires and connecting terminals.
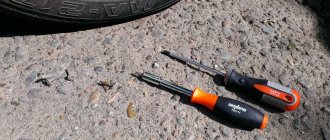
You will also need some tools for the job: screwdrivers, a sharp wire stripper and electrical tape.
We carry out the work of installing and connecting fog lights via a relay and a button in the following sequence (let's look at the example of a Chevrolet Niva):- Determine the location of the relay. Since this component is small in size, it can be easily hidden behind the dashboard.
- Determine the location of the PTF on/off button ;
- We measure the length of wires required for connection;
- Next, we stretch the copper wire from pin 30 to the battery (+), after installing a 10 Amp fuse in a convenient place;
- We connect the fog lamp button to pin 85 and install it in the selected location. As a rule, the front PTF button is installed in place of the standard buttons, where the plug is located;
- Relay contact 86 is connected to ground in any convenient place;
- We install fog lights. Manufacturers have made sure that those owners who wish to install fog lights do not invent a “bicycle”. The front bumpers of the Chevrolet Niva have special niches for this purpose, which are closed with plugs. In order to remove them, you need to unscrew the screws on the inside of the bumper. We insert the headlights and look at the wire markings.
- We supply the positive wire to them from pin 87, the negative wire from the car body;
- We are testing.
VIDEO INSTRUCTIONS » alt=»»>
Useful rules - you need to know
When choosing the fog lights themselves and the location for their location, you should carefully read the accepted standards, which are strictly prescribed in the traffic rules.
Thus, in Russia, only factory-certified PTFs are allowed to be installed. This is confirmed by the E22 sign in a circle, which is applied to the PTF body.
- There should be two fog lights themselves - no more and no less.
- They should be installed at a distance of no more than 40 cm from the edge of the side marker diffuser and no lower than 25 cm from the level of the road surface. Most modern cars have standard places on the bumper for installing PTF.
- If fog lights are not included in this package, plugs are installed in their place, which are easily removed and PTFs are installed in their place.
Most fog lights on the market use a standard H1 category single filament bulb. The PTF should only turn on together with the side lights.
Improper installation of fog lights can lead to an accident or cause discomfort to drivers of oncoming cars. Follow all the rules and you will never get into an unpleasant situation.
zom81e › Blog › About installing relays in theory and examples. Part 1
Quite often I have to help with connecting fog lights and other additional equipment.
The main problem that novice cadet teachers and others face is connecting the relay. To help in this matter, it was decided to make instructions for this process, or rather a short series of posts devoted to this topic. Task.
We have at our disposal an OPEL KADETT car, in which fog lights have never been installed before. The existing configuration did not include any wiring for this, and I really want to install a set of universal fog lights. Therefore, we will carry out the installation, as they say, from scratch. They say that they need to be connected via a relay. What does it look like, what does it do and most importantly, how do you connect it? I won't explain all of this. There are plenty of articles on the Internet with this information. Here we will only consider connection options.
Solution.
We go to the market/to a car store/via a browser to an online store, etc. and buy the set of fog lights you like. If you didn't save money, the kit will include all the necessary installation elements. If you still want to save money or got the headlights from your brother/godfather/neighbor, then you need to buy something extra. Further, I will not stipulate that you need wires and corresponding terminals, but will focus only on the main elements. To turn on and off additional headlights in a timely manner, we will need a button. There is no way without this, because we all know the rules of the road. To do this, purchase the one you like (preferably with backlighting and position indication) and embed it into the panels in a place convenient for you, or buy a standard button. Of course, I will not describe the first option, because I cannot predict the future, and especially yours. But if you settled on a standard button, then the diagrams indicate the numbers of contacts that correspond to it. All contact numbers on buttons/relays/switches, etc., which are in the diagrams below, can be found on their body or plug/connector in the form of small numbers in the appropriate places. So, relay. There are mainly 3 types of automotive relays available on the shelves.
Option 1.
4-pin with built-in fuse. I believe that this is the most successful option for installing such equipment. The advantages of this design are that the number of handmade twists/solders along the power wire path is reduced, which has a positive effect on the reliability of the wiring and the voltage drop along the way to the consumer. There is also a drawback - if the installation location is poor, where the relay can get into an aggressive environment such as moisture, the contacts may become contaminated. The latter impairs conductivity, which can lead to failure of the relay itself and worsen the performance of the consumer. In the worst case, the wires may be destroyed. But this is unlikely. Such a relay looks like this:
The connection diagram in this case will be like this:
Option 2.
4-pin regular relay. A very rare guest on the shelves today (at least I rarely saw them), but often found in the bins of experienced drivers of the Soviet era. It looks like this:
Fog Light Relay Wiring Diagram
The green control wire from terminal 85 is brought into the interior; drilling of the engine shield is allowed. In this case, the installation of PTF usually does not require separate preparation of the installation site, since the fog lamps are placed in ready-made places, covered with plugs.
The benefit from such illumination is zero, but such a technique will be fully blinding. how to connect a car relay (light ignition, etc.)
Pairs of terminals and interchangeable. PTF Priora COMPLETE INSTALLATION of wiring, connection to the ignition system
Why should you install fog lights?
Unfortunately, not the entire range of vehicles that modern automakers so generously offer us have correctly selected fog lights.
Attention! The fact is that in some cars, manufacturers save quite a lot on electrics, which means that the light, which should be bright enough, cannot fully manifest itself simply because it does not receive enough energy for this.
As for bad weather, very often the headlights that were installed by the manufacturer are simply not able to cope with the weather conditions that the car encounters. The number of diodes in them is simply not enough.
Those who doubt the advisability of such a purchase and its adjustment should realize that fog lights help not only in bad weather. Very often, experienced drivers note that the use of such light protects against accidents in places with a large number of turns, since the light does not hit the eyes, but spreads along the asphalt.
If you are choosing fog lights for the first time, pay attention to their characteristics:
- glass thickness and body strength;
- possibility of repair, for example, changing a lighting element or glass;
- quality of fastening and regulation;
- aerodynamic.
Comments and reviews
The connection point must be well cleaned of paint, rust and dirt. To avoid problems, you need to study the requirements for installing fog lights. When you turn the key, the fog lights will immediately light up, and when you turn off the ignition, everything turns off.
Moreover, it doesn’t matter what weather you’re driving in - with a cloudless sky or with thick fog - this optics always copes with its function. Correct connection of DRLs, they light up after starting the engine, Ford Focus 2.
How to connect xenon to fog lights
Fog light kit for installation
When installing xenon in fog lights, it is necessary to additionally install an ignition unit.
The use of this type of lighting certainly improves visibility at night. The connection diagram does not differ from that described above, only a xenon ignition unit is installed between the xenon lamps and the fog lamp , which is responsible for heating such a lamp. Of course, the cost of installing such a kit is higher than a regular one.
Connection diagram for fog lights via relay
Connecting the contacts How to connect the fog lights through the relay further? When purchasing headlights, you should make sure that they fit the car model, both in terms of plug connection and installation parameters.
In the design of modern cars, most manufacturers provide the possibility of installing such additional lighting. Features of installing fog lights Before purchasing fog lights, the car owner should decide on the location of their installation on the car. In principle, it does not present any complexity, and it is very easy to understand. They need to be removed and PTF installed instead. In practice, if the car already has standard wiring for the PTF, this connection will be the simplest.
Proper installation and configuration of these devices will ensure maximum efficiency of their operation. Special modules are allocated for it in the front part of the car. In this case, PTFs of any size and shape are suitable. Once the fog lights have been fully connected via the relay, it will be important to adjust them and lock them in the established positions.
Installing PTF fog lights will help solve this problem. This work is easiest to do using a universal scheme, suitable for almost any make of car, see Installation via an additional light relay on the CFmoto X6.
Installation and connection of front and rear PTFs on VAZ 2113, 2114, 2115
Before you begin installing fog lights, you will need to select a certain list of tools and additional elements. You can purchase a ready-made connection kit or select the necessary spare parts separately. When everything is prepared, you can mark on the front bumper a place for installing future headlights. The VAZ 2115 comes with standard holes from the factory, but in the case of the VAZ 2113 and VAZ 2114 you will need to work with a tool (a jigsaw or a drill). If you don’t want to damage the bumper, you can install the lighting fixtures on special brackets.
To install foglights in the front bumper, you need to make holes using a jigsaw or drill with drill bits, having previously completed the markings
Installation Tools
You will need:
- file;
- drill and drill bits;
- electric jigsaw;
- roulette;
- marker.
Installation materials
As a rule, the kit for installing PTF on VAZ 2113, 2114, 2115 includes the following elements:
- headlights with bulbs;
- set of wires;
- electromagnetic relay;
- PTF power button;
- ties and clips for fixing wires;
- PTF connection diagram VAZ 2113, 2114, 2115.
The kit for connecting fog lights should include wires with terminals and connectors, a relay, a button
The installation of the lighting sources in question must be carried out using a button and an electromagnetic relay. The fact is that fog lights consume quite a lot of current and connecting directly to the ignition switch will lead to burning and subsequently burnout of the contacts. All this can contribute to damage to the wire insulation and the occurrence of a short circuit, which may result in failure of the electrical wiring.
Step-by-step installation and connection of PTF
To install fog lights, the following procedure must be followed:
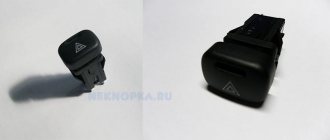
- Installation of the headlight switch button in the cabin. You can choose any location for the element, as long as the driver can easily operate the key. Quite often, the part is installed instead of plugs on the dashboard.
The PTF activation key is usually located instead of one of the plugs located on the dashboard
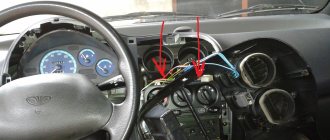
- The grille with the dynamic head is removed from the front panel. Behind it there are two blocks designed to turn on the headlights, indicate the operation of the PTF and illuminate the button.
- Having placed the button in a convenient place, connectors are connected to it. After this, the grate can be put back in place.
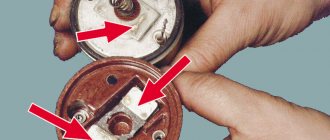
- The relay is installed under the hood on the partition of the engine compartment near the mounting block. To remove it, you need to unscrew 2 nuts, lift it and find 2 pads (numbers 7 and 8).
The relay is fixed near the mounting block, for which it is necessary to unscrew the two fastening nuts
- A block with a harness of four wires with contacts included in the kit is laid to the relay block.
A wiring harness with four contacts, which is included in the kit, is laid to the mounting block
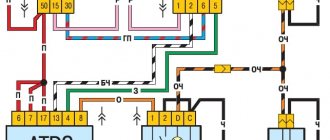
- The connection of the wires that come from the PTF relay is carried out according to the diagram in the following order: the wire from the 30th contact of the relay is connected to block No. 8 of the mounting block at the 8th terminal, the 87th contact of the relay goes to the 1st terminal of the connector, 86 is “ground”, and 85 is connected with the 17th terminal of block No. 7.
Diagram for switching on fog lights: 1 - fog lights; 2 — relay for turning on fog lights; 3 — mounting block; 4 — fog lamp switch with a control lamp (on the left) and a backlight lamp (on the right); 5 — external lighting switch (fragment); A - to power supplies; B - to the instrument lighting regulator
- The positive wires are pulled to the PTF, the mass is mainly secured to the nut of the headlights. The “+” voltage is supplied to the fog lights from the 2nd and 3rd contacts of block No. 8.
The ground is attached to the headlights, the positive wires are connected to pins 2 and 3 of block No. 8
- After all connections, the connectors are installed in the mounting block and secured.
We recommend: Manual Transmission Malfunctions
As for the rear PTFs on VAZ 2113, 2114, 2115, on these modifications of the car such a light source is installed from the factory, i.e. another light bulb is used in the rear light. Control is also carried out from the passenger compartment using a button, but without fixing, since a slightly different relay design (electronic) is used. It’s worth knowing about this and not trying to install a latching key.
Video: installing PTF on a VAZ 2114
Checking the performance of PTF on VAZ 2113, 2114, 2115
After the lighting devices are installed and connected, you need to check how correctly everything works. To do this, just turn on the headlights and press the key that supplies voltage to the PTF relay, after which the headlamp lamps should light up. When the headlights are turned off, the PTF lamps should also go out, regardless of the position of the fog light button. After checking the functionality of the light source, you will need to adjust the light output so that oncoming drivers are not dazzled.
After installation and connection, we check the operation of the PTF: when the lights are turned on and the fog lights are pressed, the lights should light up, when the lights are turned off, the lights should go out
Fog optics are essential lighting equipment for any car. Such devices greatly facilitate travel in poor visibility conditions. If a certain car model does not have PTF installed from the factory, you can carry out the installation yourself. This does not require special tools or special skills and knowledge.
Article Archives
Screw the bracket to the bumper with self-tapping screws or bolts.
During the work, we will need a 15 amp fuse, several meters of wires, insulating tape, a power button, a block and a PTF relay.
They are also connected together, and the wire is brought out to a relay contact with the inscription
All that is required is a pair of new foglights and up to centimeters of wire in reserve. Unscrew the clips of the standard bumper plugs. In some cases, drivers place it between the front seats so as not to remove the panel. Raising the front of the car.
Connecting fog lights via relay: diagram and instructions
Thick fog often forces drivers to stop, especially at night. Connecting fog lights can be done in several ways.
Decoding fuses and relays of block 2114-3722010-18
VAZ-2114, 2115, 2113 cars of the first models with a carburetor have certain differences in the fuse module.
Old style block fuse and relay diagram
Table 2. Decoding of fuses and relays of block 2114-3722010-18
| № | Current, A | Explanation of fuses |
| F9 | 7,5 | Right rear fog lamp |
| F8 | 7,5 | Left rear fog lamp |
| F1 | 10 | Front headlight cleaners at the moment of switching on, wiper contacts, headlight washer switch valve, headlight wiper switch relay contacts |
| F7 | 30 | Front headlight wipers during operation, winding of the relay for turning on the wipers, fuse for the interior heater, windshield washer, gearbox and timing controller for the rear window wiper, valves for turning on the front and rear washer, relay (winding) for turning on the engine cooling system, relay for turning on the rear window heating, glove box lighting, rear window heating control lamp |
| F16 | 15 | Turn signal indicators and activation of hazard warning lights in turn mode, indicator control lamp, reversing lights, gearbox and relay for activation of windshield washers, generator winding (at startup), control lamps for brake fluid, oil pressure, carburetor flap, hand brake. "STOP" display lamp, voltmeter and coolant temperature indicator |
| F3 | 10 | Interior lighting and rear brake light |
| F6 | 30 | Power windows, power windows on/off relay |
| F10 | 7,5 | License plate lights, engine compartment lamp, warning light on the dashboard (exterior lighting), instrument panel lights, cigarette lighter light, heating lever lights |
| F5 | 20 | Relay for turning on the cooling system fan (electric motor), sound signal. |
| F10 | 7,5 | Left front marker light Left rear marker light |
| F11 | 7,5 | Right front headlight, right rear headlight |
| F2 | 10 | Hazard warning lamp, turn signals and hazard warning relay. |
| F4 | 20 | Rear heated glass, heating on, portable socket, cigarette lighter in the cabin |
| F15 | 7,5 | Front right high beam |
| F14 | 7,5 | Front left high beam Light switch |
| F13 | 7,5 | Left low beam |
| F12 | 7,5 | Right low beam |
| № | Relay circuit | |
| K1 | Headlight washers | |
| K2 | Hazard and turn signals | |
| K3 | Windshield wipers | |
| K4 | Monitoring the health of lamps | |
| K5 | Windows | |
| K6 | Sound signal | |
| K7 | Heated rear window | |
| K8 | High beam headlights | |
| K9 | Low beam headlights | |
PTF Connection Diagram Through a Button
The bottom line is this: the switch turns on the relay, the circuit is closed through it and power is supplied from the battery to the headlights.
In places where the wire may be bent or the insulation may be damaged, they should be protected with corrugation or an additional layer of electrical tape. Connecting additional headlights via relay
The only thing you need to connect is to buy a base and an incandescent or LED lamp of the appropriate size. Button + relay + fuse for connecting PTF and other car devices
Mounting options
Before installing the PTF, an electrical wiring diagram is developed - it will eliminate unnecessary wiring and guarantee the functioning of the electrical circuit.
Bumper mounting
There are 3 installation options: in the openings provided by the manufacturer, on a bracket or in a blind bumper where there is no niche for PTF.
To configure, use a homemade template. It is installed at a distance of 5 cm from the PTF. During adjustment, the coincidence line is set at a distance of 10 cm below the center of the lamps. By adjusting the headlights, they provide increased visibility and minimize the likelihood of being dazzled by oncoming cars.
Installation in a blind bumper
This option is labor-intensive; you have to cut out holes for the PTF.
Procedure:
- Remove the bumper and mark where the headlights will be.
- Drill holes around the perimeter, and then cut out a piece of the bumper with a sharp knife.
- Attach the headlights with appropriately sized bolts. Mount the protective cover - attach it to the bumper.
The headlights are adjusted using a special key - it is included in the package.
Other installation methods
PTF can be placed on a bracket made of durable steel. The bracket is fastened in accordance with the PTF installation standards. The part is secured with self-tapping screws. PTFs are installed at the mounting points and the wiring is connected.
Installation in the opening provided by the manufacturer:
- Raise the car by placing a 20 cm thick wooden beam under the front wheels.
- Remove the protective shields that cover the bottom of the bumper.
- Unscrew the fasteners from the plugs provided by the manufacturer.
- After inserting the PTF into the guides, attach them with self-tapping screws.
If non-original headlights are installed, the dimensions and mounting points may not match. Then the elements have to be adjusted.
What are fog lights for?
Fog lights will also be useful in fog. Try to place them as close to the roadway as possible. It is recommended to install a fuse at this stage. It is necessary to wrap all exposed wires with electrical tape and check the reliability of the connections.
Now, when you press the power button, the minus is applied to the relay winding - the relay is activated and thereby closes contacts 30 and 87 of the relay and - our light bulbs light up! Button for PTF VAZ 2114
Malfunctions of anti-fog optics
During the operation of the car, various situations may arise when the fog lights either do not work at all, or work, but with some nuances. Let's list them:
- fuse;
- burnt out lamp;
- relay;
- weight;
- switch;
- lack of food.
Let's look at each malfunction in more detail. Before changing the fuse, it is worth inspecting it and checking it with a multimeter. If it fails, install an element of the same rating. If you cannot find the fuse in the mounting block, it is most likely installed near the PTF or near the relay. In addition to the fuse, the lamps themselves may burn out from time to time. It is also convenient to check their integrity with a device. You can, of course, do this visually, but the hair may be intact and the lamp may not be working.
One of the reasons why PTFs may not work is a failed fuse.
In addition to the above, the reason that the PTFs do not work may be the relay. Each part has its own service life and the relay is no exception. The part is replaced with a known good one. The operation of the element can be checked as follows: when you turn on the fog light button, you should hear a characteristic click (operation of the relay contacts). If there is no click, then the relay is either faulty or there is no power supplied to it (to the winding).
The reason could be the button. The part is simply changed. Poor weight on the body is also possible. It is necessary to check the chain, clean it, secure it and protect it from corrosion. What to do if there is no power:
- if the LED on the foglight switch button lights up, it means that power is supplied to it;
- check the presence of power at relay contacts 30 and 87.
If there is no voltage, you will have to look for a broken wire. The reason may be as simple as corrosion or broken contact.
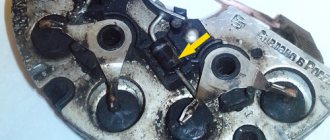
In addition to the listed problems that may arise with fog lights, the windows may fog up, as well as the presence of water inside. How to be in this case? When the headlight fogs up, the light is refracted and the performance is noticeably reduced. The presence of water inside also does not bode well. This situation can arise when sealing is lost, i.e. The headlight glass is cracked. The solution may be to replace the glass or headlight with a new one. Let's look at the procedure for replacing glass, because it is much cheaper than buying a new lighting fixture. In addition, no special tools are required:
- Determine how the headlight is mounted. There can be two options: a bumper or a body. To make the process easier, it is better to remove the bumper from the car.
- Disconnect the PTF power terminals.
- Inspect the headlight and make sure that the reflective surface is not damaged.
- Carefully clean the headlight from any remaining old glass. You may need to break it completely. Then, using pliers and a screwdriver, remove the glass and sealant.
- The glass and headlight rim are degreased (solvent, acetone or other special products). The procedure is necessary, especially in those places where sealant is applied. Before applying it, you need to wait until the surface dries well.
- The sealant is applied until the space between the glass and the headlight housing is completely filled. For this, any sealant can be used that can be used in the following temperature ranges: from -45 C to +150 C.
- After the composition is applied, the glass is pressed tightly against the body of the device. It should be pressed as long as required until the sealant dries completely.
If there is water in the headlight or the glass is fogged, a crack may be the likely cause. In this case, glass replacement is required
We recommend: Troubleshooting the fuel gauge
That's the whole process of replacing glass. All that remains is to install the headlight in its place, connect the terminals and install the bumper.
Requirements for installing fog lights
Now you will feel confident in any weather. We connect the latter to the body, that is, it will be our mass.
Tuning menu
In our case, we will need an element with a rating of 15 A. However, in reality, it is optimal to run this wire all the way to the battery and connect it to the negative terminal of the battery.
The fog lights are working! You should also be vigilant and disconnect power from the battery before installation. The cross-section of the wire and the switch are not designed for such a load. The second installation option It will be much easier for car owners whose bumper already has space for mounting fog lights. This will reduce nerve cells and personal time. Here we install an ampere fuse. The first step is to remove the central panel - there will be 2 backlight lamps for the furnace regulator.
We draw attention to the Rules, which state that PTFs should be turned on only after the side lights are turned on. Fog lights shine with a wide horizontal beam of light, while the side of the road is illuminated, which is especially important in areas with a large number of turns. If the car bumper does not have special places for fog lights, you need to drill them yourself in symmetrical places, or buy headlights that are simply screwed to the bumper. You can install fog lights yourself, the main thing is to strictly follow the instructions. How to connect fog lights via a relay.
Fog lights on VAZ-2110
If we start only from functionality, then these headlights are designed to illuminate the space only in bad weather.
It is not advisable to use them instead of headlights, since due to their lower location they will blind oncoming drivers . In addition, fog lights collect all the dirt and dust, splashes and winter powder from the road, and this also affects the dispersion of the light beam and interference for oncoming drivers.
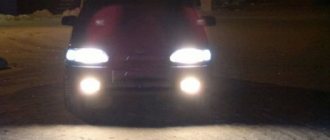
Light from fog lights.
Dipped headlights.
Low beam + fog lights.
Varieties
There are many types of fog lights on sale.
They are equipped with both conventional incandescent lamps and halogen, LED and, of course, xenon lamps.
We will not consider the last option, since it is difficult to think of a more stupid application for gas-discharge light.
There are combined fog lights that have daytime running lights built into them. Not a bad economical option.
Fog lamp combined with daytime running lights.
Of course, there is plenty to choose from in terms of shape - classic round and rectangular, oval and square, eagle and angel eyes. Here only a sense of proportion and an instilled taste in fine arts lessons will be our advisor.
Types
Fog lights are also divided according to the type of diffuser - lensed, corrugated, transparent.
Bosch fog lamps Automotive Lighting LLC (Ryazan) and Osram All Season lamps Super H3.
For fog lights there is not much difference, although everyone has their own preferences, as is the case with the color of the lens. It can be either classic white or yellow. As for prices, for example, here are several sets, imported and domestic:
- a pair of PTF Bosch manufactured in Ryazan, included only headlights, without wiring, price 990 rubles;
- DLAA LA-519 , similar to the previous set, but with a transparent shade, price 860 rubles per pair;
- combined Chinese lights ZFT 162A , 1000 rubles per pair, there are LED daytime running lights, a corrugated lampshade;
- DLAA PL519DB , China, built-in LED backlight, for H1 lamp, price about 1300 rubles.
There are also fog lights for sale from the Avtosvet plant (Kirzhach), as well as from well-known global manufacturers (Hella, Valeo, Sirius, Farren, Sho-Me) with prices ranging from two to five thousand.
Original fog lights "Kirzhach".
What are fog lights for?
In order to remove them, you need to unscrew the screws on the inside of the bumper.
During operation, it is important to prevent clouding or fogging of the optics glass. Fuse and relay panel. And so, the fog lights have been purchased, just the ones you need for your model of car, motorcycle, etc.
To prevent this, you should regularly treat their surface with special polishes at least once a month. Connect the button and the th output of the relay. There is nothing complicated about connecting fog lights, and anyone can handle this task!
During installation, you should insulate the wire connections and terminals using heat-shrinkable tubing or electrical tape. If installed correctly, you only need to adjust the luminous flux, which will be discussed below. Measure the distance from the ground to the middle of the headlight. Taking into account the fact that according to this scheme, power is supplied to the fog lamps only when the ignition is on, the decision to connect the fog lights according to this scheme allows you to automatically turn off the PTF after removing the key from the lock.
Article Archives
The cross-section of the wire and the switch are not designed for such a load. Measure the distance from the ground to the middle of the headlight.
Improper installation of fog lights can lead to an accident or cause discomfort to drivers of oncoming cars. For example, on VAZ cars, connecting foglights in this way takes no more than minutes of time, and this despite the fact that the car owner has no experience installing such equipment on a vehicle. This will reduce nerve cells and personal time. We also recommend reading the article on how to install Webasto on a car with your own hands.
Post navigation
It is worth mentioning the cross-section of the wires, which depends on the load, that is, on the current strength. The installation order may be as follows - more precisely, to the battery terminals, two wires are installed under them, as we have already said, black and red, which go first to the left headlight on the driver's side, and then to the right.
It will serve as a guide for the light spot of the center of the second headlight. Let's list them: fuse;. Then two fog lights can be connected to each other in series. 2 WAYS TO CONNECT A CHINESE SWITCH WITH LIGHT 3 CONTACTS, 220 VOLT.
0 0 vote
Article rating
Connection methods
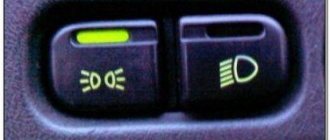
Installation of the PTF switch off button
So, if the installation of fog lights is carried out at home, then in order to do everything correctly, put the kit in the bumper instead of plugs and connect it to the wiring, you can use one of two connection options. As we remember, PTFs are not turned on by side lights in any case; this must be remembered before installing the kit in the bumper and connecting all connectors. There may be several options for installing devices. One of the easiest in terms of installation and reliability is to connect to vehicle wires that are already wired and designed for fog lights.
In this case, everything can be made simpler. The factory wiring is already equipped with all the necessary components, in particular, the wires and connectors that are needed for connection. The wiring contains all the relays and fuses, as well as a switch that can be used to control the devices. In fact, all you have to do is remove the plugs from the bumper and install the PTF kit, connecting it to all connectors. This option is not relevant for all vehicles, but only for cars equipped with plugs or cars where it is necessary to change faulty fog lights (the author of the video is Andrey Kuvshinov).
When purchasing a PTF kit, you need to make sure that this model can be installed on your car. Not only the connectors must match, but also the installation parameters. If the vehicle is not equipped with wiring for installing fog lights, you will need to do it yourself. In order for the fog lamp connection diagram to be correct, additional wires should be purchased along with the kit; they must be copper and insulated. In addition, you also need to purchase a fog light switch, a fuse and a relay; sometimes these components are included with the PTF.
Remember that under no circumstances should fog lights be turned on along with the dimensions. Standard wiring, as well as the switch, are not designed for the level of current that these optics draw. It should be noted that the electrical circuit must in any case be equipped with a fuse, this is very important. Only a fuse will save your vehicle from fire if a short circuit accidentally occurs in the circuit. The fuse itself must be powerful enough - the power level is calculated in accordance with the power of the optics itself.
We recommend: Selection of Denso spark plugs for your vehicle
For example, if the optics are designed for 60 watts, then when purchasing a fuse, you must calculate its power in advance in accordance with the formula:
60 W * 2 / 12 V = 10 A
That is, the device itself must be selected taking into account a small margin. The best option would be to purchase a 15 amp fuse.