VAZ 11113
The cooling system is liquid, closed type, with forced circulation. The tightness of the system is ensured by the inlet and outlet valves in the expansion tank plug. The exhaust valve maintains pressure in the system when the engine is hot (due to this, the boiling point of the liquid increases and steam losses are reduced), it opens at a pressure of about 110 kPa (1.1 kgf/cm2). The intake valve opens when the pressure in the system decreases relative to atmospheric pressure by 3-13 kPa (0.03-0.13 kgf/cm2) (on a cooling engine). The thermal operating conditions of the engine are maintained by a thermostat and an electric radiator fan.
Cooling system: 1 — expansion tank plug; 2 - expansion tank; 3 - steam removal hose; 4 — radiator supply hose; 5 — engine radiator; 6 — fan impeller; 7 — radiator casing; 8 — sensor for turning on the electric fan; 9 - drain plug; 10 — timing belt; 11 — coolant pump; 12 - pump suction pipe; 13 — heater supply pipe; 14 - tap; 15 — heater outlet pipe; 16 — heater radiator; 17 — coolant temperature sensor (at the left end of the cylinder head); 18 — hose for removing coolant from the cooling jacket of the inlet pipe; 19 — radiator outlet hose; 20 — exhaust pipe of the block head; 21 — filling hose; 22 — thermostat; 23 - pump suction pipe hose.
The coolant pump is a vane, centrifugal type, driven from the crankshaft pulley by a timing belt. The pump housing is aluminum. The roller rotates in a double-row bearing with a “lifetime” supply of lubricant. The outer ring of the bearing is locked with a screw. A toothed pulley is pressed onto the front end of the roller, and an impeller is pressed onto the rear end. A thrust ring made of a graphite-containing composition is pressed to the opposite end of the impeller, under which there is an oil seal. If the pump fails, it is recommended to replace it as an assembly.
The redistribution of liquid flows is controlled by a thermostat with a solid heat-sensitive element. On a cold engine, the thermostat valve closes the pipe leading to the radiator, and the liquid circulates only in a small circle (through the thermostat bypass pipe), bypassing the radiator. The small circle includes the heater core and the intake pipe. At a temperature of 87±2°C, the valve begins to move, opening the main pipe; in this case, part of the liquid circulates in a large circle through the engine radiator. At about 102°C, the main valve opens fully and the bypass valve closes, allowing all fluid to circulate through the engine radiator. The stroke of the main valve must be at least 8 mm.
The engine radiator consists of two vertical plastic tanks (the left one has a baffle) and two horizontal rows of round aluminum tubes with pressed-on cooling plates. To increase cooling efficiency, the plates are stamped with a notch. The liquid is supplied through the upper pipe and discharged through the lower. Next to the inlet pipe there is a thin pipe for the steam removal hose.
The electric radiator fan is switched on via relay 113.3747 by a TM-108 sensor-switch screwed into the right radiator tank. Its contacts close at a temperature of 99±3°C and open at 94+3°C. The relay is located under the instrument panel on the left. Its characteristics are described in the “Electrical equipment” section.
The expansion tank is made of translucent polyethylene, which allows you to visually monitor the liquid level. In its upper part there is a fitting for the steam removal hose from the engine radiator, in the lower part there is a fitting for the filling hose.
To monitor the coolant temperature, a sensor is screwed into the engine cylinder head, which sends a signal to the temperature gauge of the dashboard.
The cooling system is designed to maintain normal engine thermal conditions. As a rule, a liquid cooling system is used, a closed type, with forced circulation of liquid and an expansion tank (Fig. 4).
Rice. 4 Engine cooling system diagram
- a) small circle of circulation
- b) large circle of circulation
- 1 - radiator; 2 — pipe for coolant circulation; 3 - expansion tank; 4 — thermostat; 5 - water pump; 6 — cylinder block cooling jacket; 7 — cooling jacket of the block head; 8 — heater radiator with electric fan; 9 — heater radiator valve; 10 — plug for draining coolant from the block; 11 — plug for draining coolant from the radiator; 12 - fan
Service
This section includes not only changing the oil, but also adjusting the clearances in the valve mechanism.
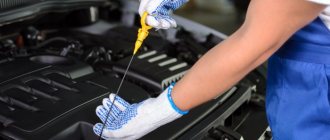
The first step is to talk about the simplest thing, changing the engine oil. To do this you will need the following tools:
- key to 17;
- small container for waste liquid;
- new oil;
- screwdriver.
Before starting work, you need to turn off the car engine and install supports for the wheels. This is necessary for safety, so that no surprises happen during work.
Change of oil
If you want to completely change the oil type (if the oil type remains the same, then the following steps are not necessary):
- first flush the entire system with flushing oil;
- To do this, you need to pour in a little liquid to the lower mark and start the engine from the Oka. Experts recommend letting it run for 10 minutes. During this time, a special liquid will pass several times throughout the entire system and collect all the slag.
- After this, you can drain it and replace the oil filter. This is necessary to ensure that the new oil does not receive unknown substances while passing through the filter.
- Engine oil should be filled to the top mark, to the maximum. Next, wait about 10 minutes and add engine fluid if necessary.
- Turn the filler cap and remove it;
- Remove the drain plug under the car engine. This is necessary so that the old oil is drained into a special container;
- Screw the plug back;
- It is worth remembering that the oil is very hot during draining. Next, you can unscrew the oil filter and put it aside. It won't be needed anymore;
- To unscrew the filter, it is better to use a special wrench;
- Fill the filter cavity with new oil to the middle;
- Do not forget about lubricating the o-ring, which is located on the filter;
- Fill the filler neck with new engine oil to the maximum and screw on the cap;
- We start the engine and let it run for a few seconds. During this time, you can check for leaks and oil level. If necessary, it can be increased.
Gap adjustment
To compensate for the expansion of parts during operation, the designers provided a special gap between the valve stem and the cam itself. If the gap increases, the valves may not open, and if the gap decreases, they may not close. This needs to be monitored almost every day.
You only need to check the gap on a cold engine when all parts are in standard condition. The minimum clearance of the intake valve should be 0.2 millimeters, and the exhaust valve 0.35 millimeters. If this is not observed, the Eye's engine will operate unstably, with some noise and whistling.
The valves must be counted from the camshaft belt: the 1st and 4th valves are exhaust, and the 2nd and 3rd are intake. It is worth noting that the order of adjustment is not important. That is, adjustments can be made in any order.
For this job you will need a 10mm wrench, a set of screwdrivers, feeler gauges and tools for adjusting the gaps. If you cannot turn the crankshaft, you can use the following advice. Engage fourth gear and drive the vehicle very slowly until the cam is in position.
Remove the air filter; Cover the carburetor with a special rag so that nothing gets in there; Unscrew the cylinder head cover; Turn the crankshaft several times using a special wrench. To simplify this action, you can engage the gear and remove the spark plugs; The marks on the alternator pulley and the front cover must match. If this does not happen, then you have not fully rotated the wheel. During this step, you can begin adjusting the car valves
It is worth paying attention to the fact that there are two marks on the cover. You only need to focus on the long mark; Next, measure the thermal gap using a flat feeler gauge
These values can be written down in a notebook and compared with the nominal values in a special manual; Attach a special device to the lid; Put on the washers and turn them; Press the lever and push the pusher down. Insert the clamp under the camshaft so that the protrusion fixes the pusher; Next, you can pry the adjusting washer and remove it. Record the thickness of the washer; We calculate the thickness of the new washer using the formula: H = B + A - C, where H is the thickness of the new washer; B - thickness of the old washer; A is the value of the measured gap; C—nominal clearance; We install it in the pusher and perform the actions in the reverse order; Rotate the crankshaft 360 degrees and adjust the thermal gap; We install the parts in the reverse order so that the Oka engine is in its previous condition.
Breakdowns and leaks of coolant from the reservoir
The cooling system in the Oka car performs the function of protecting the engine from overheating. In addition, the CO provides comfortable transport control in the summer and winter seasons. At the heart of the mechanism, the active substance is a special process fluid - antifreeze or refrigerant.
The coolant circulates through the CO system, evenly distributing heat or heating the engine at the desired temperature. At the same time, the solution also effectively lubricates the surface of the water pump, protecting it from wear. The liquid contains special anti-corrosion additives, which over time can lose their properties. Residues of metal particles become clogged in the pipes, which can lead to failure of the CO and liquid leakage. It is dangerous to drive such a vehicle, so drivers are advised to regularly check the coolant level in the system.
In order to check the antifreeze level in an Oka car you need to:
- remove the dipstick from the hole in the expansion tank;
- wipe the surface with a clean sponge;
- insert the part back;
- lower the dipstick into the crankcase until it stops;
- remove the mechanism and carefully inspect the contents.
If the amount is normal, the coolant will remain within the MAX mark. The check is performed only with the engine turned off. This method is the simplest. To more accurately determine the level and condition of the coolant in the CO, it is necessary to place the vehicle on a flat surface, warm up the engine to 80 degrees C and turn it off. Then you should remove the dipstick from the crankcase and check the coolant at cold and hot levels. Particular attention must be paid to the color and composition of antifreeze. If the liquid darkens and sediment appears (foam, shavings or chips), it is necessary to change the solution.
A lack of coolant in the expansion tank is just as dangerous as its excess. If the coolant level is too high (above MAX), the engine will consume more fuel, as a result of which the liquid will begin to evaporate, gradually contaminating the spark plugs. Soot will appear on the internal surfaces of the car, which will lead to serious damage to the internal combustion engine.
If there is a lack of coolant, it is necessary to determine the cause. Most often, when inspecting the crankcase, a leak of antifreeze from the system is detected due to:
- depressurization of connectors;
- cracks in pipes;
- defect of certain CO components;
- cooling system wear.
If a leak is detected, the driver must fix it urgently. After this, new coolant is poured into the CO. This procedure is mandatory when repairing the cooling system or its individual mechanisms.
General scheme
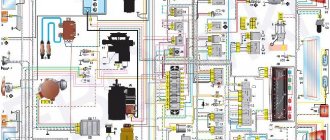
The general diagram of the electrical equipment of the VAZ 11113 is presented below:
1 – turn signal repeater; 2 – front turn signal; 3 – headlight; 4 – el. fan motor with cooling; 5 – signal; 6 – fan switching sensor; 7 – el. washer pump motor; 8 – spark supply moment sensor; 9 – battery; 10 – starter; 11 – switch; 12 – candles; 13 – coil; 14 – generator; 15 – temperature sensor; 16 – oil pressure sensor; 17 – 12 V socket; 18 – windshield wiper relay; 19 – brake fluid level sensor; 20 – brake light switch; 21 – el. windshield wiper motor; 22 – el. carburetor magnetic valve; 23 – reverse light switch; 24 – starter relay; 25 – low beam relay; 26 – high beam relay; 27 – alarm relay; 28 – cigarette lighter; 29 – electric switch. stove motor; 30 – extra electric resistor stove motor; 31 — lighting switch; 32 – safety block; 33 — PTF power supply fuse; 34 – relay for turning on the rear window heater; 35 – electric switching relay. fan motor with cooling; 36 – parking brake control relay; 37 – rear window heater and washer switch; 38 – rear window heater switch; 39 – rear PTF switch; 40 – carburetor suction control; 41 – alarm switch; 42 – ignition switch; 43 – ignition relay; 44 – el. stove motor; 45 – fuel sensor; 46 – lamp switch; 47 – dashboard; 48 – windshield wiper switch; 49 – glass washer pump switch; 50 – signal switch; 51 – light switch; 52 – turn signal switch; 53 – brake light switch; 54 – interior lamp; 55 – carburetor suction control switch; 56 – el. rear window washer motor.
Main settings
The VAZ “Oka” 1111 and 11113 gearbox is a two-shaft, 4-speed gearbox, combined with a main gear and a differential. All forward gears are synchronized. The transmission of rotation to the front drive wheels from the gearbox is carried out by means of two drive shafts with joints of equal angular velocities. The weight of the unit is only 24.5 kg.
Due to the transverse location of the power plant, the gearbox is controlled remotely.
Both modifications of the small car received gearboxes identical in design, so the gear ratios are the same, the difference between the Oka gearbox 1111 and 1113 is only in the final drive indicators:
| Gear ratios "Oka" 1111 and 11113 | ||
| broadcast | 1111 | 11113 |
| 1st | 3,7 | |
| 2nd | 2,06 | |
| 3rd | 1,27 | |
| 4th | 0,9 | |
| back | 3,67 | |
| home | 4,54 | 4,1 |
The design of the gearbox is quite well developed, which ensures quite acceptable driving performance of the Oka.
Coolant change process
In the VAZ 11113 Oka, the coolant is most often replaced by drivers themselves.
This does not require any professional skills. You just need to purchase the required solution, prepare the tools according to the list and follow the step-by-step instructions outlined below. In order to determine which antifreeze to buy, you should read the technical documentation of the vehicle. Oka car manufacturers recommend using the following brands of coolant: Substance viscosity - API SJ/CF, SAE SG/CD and SJ/SH/CD.
Required tools:
- wrench 8;
- standard Phillips screwdriver;
- hexagon No. 12;
- funnel;
- clean rags;
- empty container for draining used antifreeze.
Step-by-step instructions for replacing coolant in an Oka car:
- Initially, you need to drive the car into the inspection hole and turn off the engine;
- Open the hood and unscrew the expansion tank valve;
- Open the heater drain valve and turn it to the extreme right position;
- Unscrew the bolts and remove the crankcase protection;
- Remove the radiator valve, placing a container under it;
- Drain the fluid from the cylinder block and tighten all valves;
- Loosen the carburetor clamp and disconnect the heating hose;
- Fill the expansion tank under the hood with antifreeze to the maximum mark;
- Start the engine for 10 minutes and check the coolant level in the system.
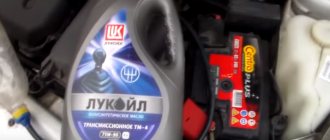
How to change engine oil in a gearbox
To change the oil in the gearbox, you will need the oil itself, a screwdriver, a funnel, and a 17mm wrench.
If you need to change the engine oil in the gearbox, you will need the following: the oil itself, a screwdriver, a funnel, a 17mm wrench. The procedure is as follows:
Before changing the oil, you need to remove the rubber cap from the breather (this is the name of the device through which the container communicates with the atmosphere to maintain the required level of pressure) and wash it. Using a screwdriver or wire, you need to clean the cap of the hole in the breather, and then install it in place. Unscrew the oil drain plug, first placing a container under it. Wait until it drains completely, then tighten the plug. Remove the oil level indicator from the hole in the rear cover located in the gearbox. Then new oil should be poured into the hole located under the pointer
It is important to insert the funnel first. Check oil level. If necessary, top up to the required level.
Separation by purpose
By purpose, the equipment is divided into:
- Power supplies;
- Protective means;
- Controls;
- Instrumentation;
- Actuators;
Some circuit components have dual purposes. These include relays, which are both control elements and protective devices.
Power supplies
Power sources include the battery and generator. The battery powers the electricity. devices and ensures their operation when the power unit is turned off. After starting the engine, the on-board network is powered from the generator, which also ensures that the battery is recharged.
Protective components
Protective means prevent burnout of electrical appliances and electrical circuits during short circuits. The main protective elements are fuses. For convenience, all protective elements are collected in one place - the fuse box, which in Oka is located under the front panel on the driver’s side.
How to drain water from oca
Well, winter has come to our area and I’m one of those people who doesn’t drive in winter, so I had to drain the water from the engine, I don’t see the point in switching to antifreeze, since I’m selling the engine. Perhaps it will be useful to someone on how to drain water from the system. There are 2 bolts that need to be unscrewed to drain the water. 1 is located on the bottom of the radiator
, the second key for 13 is twisted from the cylinder block
(located about 5 centimeters above the oil screws). That's all))) Well, now about the project as a whole.
In general, the engine, gearbox, body kits and fenders are up for sale. If anyone needs it, write to me, I won’t beat the price. Everything will be redone and repainted, but in an extremely professional manner. There are a lot of plans, everything has already been thought out, before the new year I hope to install the VAZ 2108 engine. Next is the turbo, and I’ll completely redo the muffler. Next are the brakes and hubs from the VAZ 2108, and the R15 rollers))) Pneuma! Then doors without frames. Next, the bumpers and sills are completely custom. Next, I remake the wings and make a rocket beanie. Next is the spoiler (custom mounts). Well, the next step is to repaint the car with some cool paint)))
This is what it looks like (I didn’t list little things, but there will be some). Next I’ll be working on a salon, but I haven’t thought of one yet. I plan to finish everything externally by the summer, or at least by the end of the summer, I hope that I will have time to do everything.
It all depends on the budget, but I hope everything will work out as it should)))
Division by function
As for functions, all electrical equipment is divided into systems that perform specific tasks:
- Take part in the operation of the engine;
- Ensure traffic safety;
- Create comfortable conditions;
There are also systems that are aimed at maintaining the functionality of the electrical circuit itself.
Systems responsible for engine operation
The ignition system takes part in the operation of the power unit and its task is to generate a spark in the engine cylinders to ignite the air-fuel mixture. The components of this system are a switch, a spark torque sensor, a coil and spark plugs. The system is turned on using the ignition switch. All of these components are connected by one circuit, the diagram of which is shown below:
The second system related to electrical equipment and working with the engine is the starting system. To start the engine, a power electric motor is used - a starter, controlled from the same ignition switch. Its scheme is as follows:
The cooling system fan is also related to the engine.
Systems responsible for safety and comfort
Electrical equipment that ensures traffic safety includes:
- Light and sound alarm (turn signals, brake lights, reversing lights, sound signal);
- Main light (headlights, PTF);
- Heaters, glass cleaners and washers;
These devices are combined into several systems. Below is the power supply diagram for only one of them - the turn signals:
Since the Oka is a budget car, there are not so many electrical appliances that create comfortable conditions for the driver. These include a stove (which includes an electric fan motor), an interior lamp and a cigarette lighter.
Note that the stove, in addition to creating convenience, also affects traffic safety - it heats the windows in winter.
Since devices responsible for traffic safety and comfort are not always in demand, they are turned off by default and are activated using switches.
The on-board network also includes a battery recharging system, that is, a component whose task is to maintain the functionality of electrical equipment. Its connection diagram is as follows:
Appendix 4. Filling volumes, l VAZ "OKA" 1111 1988-2008
Repairing auto parts yourself is a responsible task that should be taken as seriously as possible. Sometimes a faulty spare part takes the driver by surprise, forcing him to spend a lot of time and money searching for a good service station, but there is an alternative solution to the problem; this requires a small amount of knowledge and a set of tools.
When repairing Appendix 4. filling volumes, l VAZ “OKA” 1111 1988-2008, you need to be extremely careful and not neglect the little things. To get acquainted with the issue, car enthusiasts often use various Internet portals dedicated to auto parts. Some of them use narrowly focused forums. But, as a rule, only generalized information is provided there, which is known initially. Where can you find a reliable source that offers really useful things? Our portal is open for this 24 hours a day. Online mode allows us to help clients at any time convenient for them. Moreover, a mobile version has been developed that is available to everyone.
A detailed description of such a unit as Appendix 4. refueling volumes, l VAZ "OKA" 1111 1988-2008 has a good structure with thematic headings. In addition, there is always the opportunity to familiarize yourself with the intricacies of installation. There are often situations when a driver is confident in his abilities, but when he gets down to work, questions begin to arise. Thanks to our portal, such moments can be easily avoided. The site is a database that is updated regularly. By using it as a support during repair work, the car enthusiast receives a serious advantage. Each of the articles has reliable support, tested in practice.
In addition to the repair manual, the owner of a personal car will be able to prevent a lot of breakdowns that occur due to the human factor, thanks to the information located on the site. Users are presented with a lot of useful recommendations for proper operation, which will help significantly extend the life of the unit and avoid many negative consequences.
Online support is an excellent and most convenient way to obtain the necessary information. Another significant plus is that articles are written for people. We understand that the reader will do everything with his own hands, and we try to make it as convenient and efficient as possible. Use the resource at any time of the day and find the answer to any question you may have regarding cars.
Repair manual for VAZ 1111 Oka
Detailed instructions for repair and operation of the VAZ 1111 Oka with all technical characteristics and refueling tanks, with recommendations for maintenance, frequency of changing lubricants, so that your vehicle serves you without breakdowns throughout the entire period of operation. The manual is conveniently divided into sections and has a good table of contents, so you can easily find the answer to any question that you may have regarding the repair or maintenance of the VAZ 1111 Oka.
Book publication date: 2014; File format: pdf; File size: 9 MB; Image quality: 320dpi, resolution: 1920x1080px.
The book discusses the following variants of this model:
- 1111 0.7 MT (29 hp); petrol; drive: front; produced: 1990–1996
- 11113 0.8 MT (35 hp); petrol; drive: front; produced: 1996–2006
Download the operating instructions for VAZ 1111 Oka
Branded instructions for maintenance and equipment of the VAZ 1111 Oka from the manufacturer. The book contains all the technical characteristics of the car, indicating the differences for individual engine options and years of production. This book on operating the VAZ 1111 Oka will help not only a beginner, but also a more experienced driver to understand the purpose of various parts of the body, dashboard, and interior.
On the last pages of the instructions, in the appendices, you can find out all the car's filling capacities, as well as the types of lubricants used in this vehicle. Also, you can find out the dimensions of the car, the braking distance for different types of tires and wheels, and under different weather conditions.
Book publication date: 2013; File format: pdf; File size: 25 MB; Image quality: 320dpi, resolution: 800x600px.
Download spare parts catalog for VAZ 1111 Oka
Catalog of spare parts in ETA format for the VAZ 1111 Oka. All part codes have a double designation: European and American. For all components that differ for the North American continent, both types of components are indicated that are installed on this machine in different countries. All ETA spare parts catalogs are always easy to use, have good navigation, smart search and many useful utilities.
In addition to the built-in functions for searching for spare parts for the VAZ 1111 Oka, the program has an online function for checking the car’s history by its VIN code (for the USA). If your car was in an emergency and restored, you can see this information in this catalog.
Catalog update date: 2013; File format: rar; File size: 72 MB.
Download diagnostic program for VAZ 1111 Oka
The AHS-AUTODIAGS program, which allows you to connect to your VAZ 1111 Oka and diagnose the engine, air conditioning, electrical package and sensors installed on your car. Unlike the proprietary program, this version does not require original pads and modules for pairing with the machine’s sockets. You can buy any terminals for your car on the market and use them to connect to the interface of this program.
Program update date: 2014; Program version: 2.5; File format: exe; File size: 100 MB; Requirements: OS Windows XP/Windows 7, CPU 1500 MHz, RAM 1 GB, HDD 607 MB.
Other VAZ models
Download repair manual for VAZ 2120 Nadezhda I Restyling Compactvan
Download repair manual for VAZ 2111
Download repair manual for VAZ 2113
Download repair manual for VAZ 2131 (4×4)
Download repair manual for VAZ 2120 Nadezhda I Compact MPV
TOP Auto
Download repair manual for VAZ Kalina II Hatchback 5 doors.
Download repair manual for Chevrolet Niva I Restyling SUV 5 doors.
Download repair manual for Ford Focus II Sedan
Download repair manual for Nissan X-Trail II SUV 5 doors.
Download repair manual Nissan Tiida I Restyling Sedan
Download repair manual for Kia Rio III Sedan
Contact , Moscow, st. Amurskaya, 3, office 2 +7(495)7-132-435
Maintenance, repair
Of all the car’s electrical appliances, only power supplies require maintenance:
- Battery (periodic recharging using chargers, monitoring the level and density of the electrolyte);
- Generator (periodic check of drive tension, replacement of worn graphite brushes).
It is also important to monitor the condition of the wire insulation and prevent it from being damaged to avoid a short circuit. Oxidation of contacts often occurs at the wiring junctions, which can lead to failure of electrical appliances.
How long does it take to change antifreeze?
Manufacturers recommend changing standard antifreeze every 40-50 thousand km. Expensive G-13 class antifreezes are changed after 100,000 km.
The color of the liquid will tell you when the antifreeze needs to be changed. Faded, dull, cloudy colors of antifreeze should be changed. When replacing antifreeze, it is recommended to flush the cooling and heating system. The color and dullness of the antifreeze can be determined visually by looking at the expansion tank. How much to flush the system is indicated on the flushing fluid of a certain brand.
How many liters of antifreeze are there?
Antifreeze containers contain different numbers of liters and are varied. Common antifreeze containers by liter are 1 liter, 3.785 liters, 5 liters, 20 liters and above.
When to change, what and how much to fill
Changing the oil in the Oka engine versions 1111 and 11113 according to the manufacturer’s recommendations must be performed at every scheduled maintenance. The frequency between services is 10 thousand kilometers. But you shouldn’t strictly follow the frequency, and replace the lubricant a little earlier, after about 8-9 thousand kilometers.
The exception is the Oka modification 11116, equipped with a Chinese power unit. This engine has a more usual lubricant change frequency - 15 thousand km.
Article on the topic - OKA engine malfunctions
The next important criterion for this operation is the type of oil. In this matter, small car engines are not particularly “whimsical”, and they can be filled with mineral and semi-synthetic oils with a viscosity of 5W-40, 10W-40, 15-W40, that is, the most common options. As for manufacturers, it’s a matter of taste and the engine can be filled with either Lukoil or Rosneft, or Mobil, Mannol, ZIC.
As for the Chinese installation, oils of the same viscosity are used for it, but it is better to fill the engine with “semi-synthetic” foreign ones. The good thing is that it has minimalism everywhere, including the volume of filling fluids. To service the motor, only 2.5 liters of lubricant is required. Moreover, this volume of oil is poured into all types of Oka engines, both domestic and Chinese.
Along with the lubricant, the filter element must also be replaced. For versions 1111 and 11113, a filter will fit from almost any VAZ. But for a Chinese installation you need an element from a foreign car. Filters manufactured by MAN, FILTRON, SCT, used on Toyota KIA Mazda Nissan, are suitable for this engine.
Replacing Oka coolant
You need to change the coolant on an OKA car periodically, just like on any other car. Performing the procedure yourself is very easy and simple, so every owner can handle it. When starting work, first of all, drain the remaining old fluid that is still in the machine parts. In order to drain the liquid, unscrew the special valve at the bottom of the radiator that holds the liquid. After this, you should rinse the tank with specialized liquids. Once you have completed all the procedures, you need to install the valve in place and tighten it. In principle, this repair procedure can be completed. But, do not forget that you will only have to fill in new coolant according to the existing standard. If the procedure is difficult for you, then first watch the video instructions, which describe in detail how to complete the entire process. The specialist points out all the main points that are significant and important. As for new liquid, it is best to buy it in the quantity that you need, since if you buy liquid in larger quantities and leave it in the bottle, then it will simply not be suitable for use.
Very often, drivers may encounter a problem with wipers, in which they can smear on the glass and thus fail to cope with their main task. Moreover, this problem can occur even when installing completely new windshield wipers. After installation, they last no more than 1-2 weeks, and then wet stains or a thin film begin to remain on the glass.
Thus, if the problem is the presence of several streaks of water, then this indicates the presence of some debris adhering to the rubber part of the windshield wiper, flying from under other cars. Especially during heavy rainfall, such debris sticks to the rubber bands and gets stuck between the glass and the wiper. The easiest way to solve this problem is to use cleaning agents that do not have a negative effect on the rubber.
But if even new blades do not cope with their task and leave a large thin film on the glass, then the problem may be hidden in a car that is 4-8 years old. The thing is that many Russian roads are located on surfaces rich in sand, dry soil or rocky surfaces; all this falls onto the road and is then carried into the air by cars, landing on the windshield at high speed. Thus, it is scratched and microcracks are formed, which are noticeable only when magnified with a microscope.
Because of this, water settles in the resulting recesses, which prevents the wipers from working properly.
Over time, the body of every car becomes covered with rust.
If the car body number suffers from the corrosion process, the rusted number will have to be restored. Motorists will have to pay for the mandatory service themselves. Additional marking of the car takes place according to a special procedure described in the amendments to the government decree, which come into force on January 1, 2021.
Thus, according to the innovations, if for some reason it is impossible to identify the serial number of the car located on the body, then specialized seals or seals must be installed on the frame and body of the car. According to law enforcement officials, this measure is necessary as protection against fraudsters.
In order to put a new number on the car, the owners will have to contact a certification or accredited testing laboratory, where, using special equipment, they will help restore the number, subsequently recording it in all documents and issuing them to the owner.
According to preliminary data, the cost of the service, depending on the region, car brand, year of manufacture and technical parameters, will range from 5 to 20 thousand rubles. Car owners will have to pay for the service personally.
In the early 200s, the singer shone on the stages of concert halls and television. Almost every Russian knew her songs. The singer's real name is Marina Abrosimova.
MakSim is a derivative of her mother’s surname, which the artist took later.
Despite the fact that the peak of MakSim’s fame has already passed, she still performs on stage and takes part in group concerts, as well as thematic ones dedicated to the first decade of the 21st century.
The singer cannot do without a car due to her busy schedule. Marina chose the Audi Q8 for herself. This is the flagship crossover from Audi. Under the hood is a powerful 3-liter turbocharged engine that develops power up to 340 “horses” in combination with an electric power plant. The starting price of the German crossover is 5.17 million rubles.
It is worth noting that the singer has long had a weakness for German premium crossovers. Her previous car was also “German” - a BMW X5 in the back of an E70.
Replacement
The procedure for replacing antifreeze can be divided into four main stages:
- Draining the old coolant;
- Flushing the system;
- Filling with new antifreeze;
- Checking the functionality of the system.
Now we will go through each stage separately.
Expansion tank
Draining old coolant
- To work you will need a pit or overpass. In garage conditions this is not a problem.
- The procedure should only be started with a cold engine. Do not add new coolant if you just turned off the engine a couple of minutes ago. Otherwise, there is a risk of cracks in the cylinder block.
- Remove the negative terminal from the battery.
- Place a prepared container with a volume of about 10 liters under the car.
- Remove the cap from the CO expansion tank.
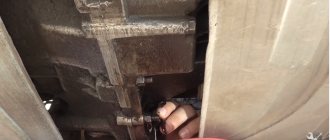
- Using a socket or a 13mm wrench, unscrew the drain plug from the cylinder block.
- Hold the plug so that the coolant pressure does not blow it away. There is no point in losing such an element.
- When all the liquid has come out, screw the lid on.
- Drain the coolant now from the radiator by unscrewing the plastic plug. The liquid will flow into the prepared container.
- Screw the drain cap on by hand. No tool required here.
Drain procedure
Flushing
If you find traces of contamination in the drained antifreeze, the liquid has acquired a rusty tint, it is better to rinse the system thoroughly. If you ignore this recommendation, the new antifreeze will not last long, so you will soon have to change it again.
- For washing, use special compounds or ordinary water. It is better to use distilled water, but if you really want to save money, take tap water;
- Pour CO flushing liquid into the system through the neck of the expansion tank;
- Start the engine, raise the speed a little and let the engine run for about 10 minutes;
- Turn off the engine and repeat the draining procedure according to the instructions that you read above. Only now the system will not contain antifreeze, but a flushing composition;
- Repeat flushing as necessary until the water coming out of the drain holes is clear.
Flushing the system Flushing is just a recommendation, not a mandatory procedure. But those who regularly flush the system claim that it works more reliably and longer this way. So decide for yourself what to do.
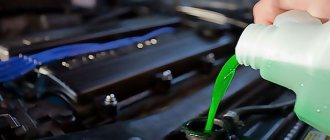
Fill
To fill in new antifreeze, you don’t have to do anything complicated. You just need a special watering can. Many containers in which antifreeze is sold are not particularly convenient for pouring directly from them. Use a funnel to avoid spilling coolant.
It is extremely important to know exactly how much antifreeze is in the cooling system. Coolant for VAZ 2109 requires 7.8 liters
Therefore, antifreeze should be purchased in 8-liter containers.
- Take a watering can and insert it into the neck of the expansion tank. This way you won’t spill precious grams of antifreeze.
- Check that all drain plugs are securely tightened. Otherwise, the coolant will simply spill out onto the floor and you will have to buy new coolant.
- Start gradually pouring in new antifreeze.
- Stop periodically for 1-2 minutes so that the liquid has time to distribute throughout the system.
- After filling the system, add coolant to the middle of the expansion tank level.
- Next, the most important thing is to get rid of the air that has entered the cooling system.
- Air accumulates in the upper pipe. To remove it, you just need to squeeze the upper pipe several times. Squeeze until you feel liquid appear inside.
- Bleed the cooling system. To do this, use a screwdriver or a size 8 wrench to unscrew the clamp that holds the return hose to the CO expansion tank (return).
- Now close the fitting with your finger, onto which the return line is put, so that air cannot escape from there.
- Next you need to blow into the expansion tank. Just imagine that you are trying to inflate the tank like a balloon.
- This will create pressure and coolant will begin to flow from the expansion tank into the CO, and excess air will escape through the return.
- As soon as antifreeze begins to flow out of the return line, the procedure can be stopped.
- Replace the return line and tighten the clamp.
- Reconnect the negative terminal of the battery, close the cap of the expansion tank and check the quality of the work done.
It is not recommended to begin active operation of the vehicle without checking.
Interior tuning
There are a huge number of options for upgrading the interior, shown in the photo of the Oka conversion:
- Replacement of interior trim. Materials or a special kit are purchased. Often the skin is partially changed by modifying the standard one.
- Installation of new decorative elements and shaped inserts in the interior.
- Upgrading seats. Involves the installation of new covers and comfortable headrests, taking into account the interior design.
- Installation of a new steering wheel and pedal covers.
- Installation of additional equipment and systems - side mirrors, automatic drive.
- Cutting out a hatch or creating a panoramic roof.
Tuning the Oka interior is not limited to the options listed above - every car owner can implement any ideas when decorating the interior.
Source