Installation and dismantling of the UAZ 452 stove
This car is, without a doubt, one of the most recognizable in the vastness of the post-Soviet space. The famous “loaf”, despite a number of design flaws, is not going to retire, despite the deep retirement age - the car has been produced since the mid-60s. As for the shortcomings, our craftsmen are fighting them as best they can. And over these almost six decades, we have accumulated a lot of developments, the list of which is still growing. The problem of poor performance of the UAZ 452 stove did not go unnoticed. This unit is more often than others subject to improvement and modernization. The list of procedures for insulating the interior is quite large, but the most dramatic way to achieve the desired was and remains the replacement of the standard heater with a more powerful one. For example, from VAZ, although there are also autonomous and very good developments (NAMI-2 stove).
Let's take a closer look at the disadvantages of the native heating system.
Design features of the standard UAZ 452 stove
Most owners of the “loaf” note that at temperatures down to minus 5 degrees in the car interior it is quite tolerable. But, unfortunately, in most of Russia, winters are not so mild. And although temperature records in recent years concern only maximums, frosts above thirty are still not uncommon, and under such conditions you can only drive a UAZ with gloves.
Let's consider the main design flaws, which are the reason for the lack of efficiency of the standard stove:
Considering that the standard fan is quite noisy, then the idea of replacing it with a more efficient and quiet one comes to the minds of car owners almost first of all.
We also note that the ventilation system of the UAZ 452 does not have an air recirculation function. And although it is not used often, in some cases switching to this mode provides many advantages. So when upgrading the stove, it is advisable to take this factor into account, as well as the possibility of integrating a cabin filter into the system.
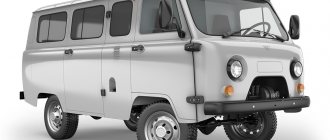
Meet UAZ 452
The car was a cargo-passenger version of an off-road vehicle with a 4x4 wheel arrangement. The Ulyanovsk Automobile Plant mastered production of the model back in 1965.
You can evaluate its capabilities by watching the following video:
The UAZ 452 is capable of transporting cargo weighing up to 700 kg in the back. In addition, it can tow a trailer weighing 850 kg. The vehicle became very popular not only in Russian off-road conditions, but was also successfully used in large cities in various capacities (pictured in the article).
In particular:
- Like a traffic police car;
- As a fire engine;
- Ambulance car;
- Grocery store;
- Utility vehicle, etc.
The famous Barefoot on the basis of UAZ 452 - a road train in the Izmailovo Central Park of Culture and Culture
Electronic components
The electrical wiring of the UAZ 452 was a simple single-wire circuit.
Structurally, it had the following solutions:
- The role of the second wire was played by the metal body and the components and assemblies attached to it;
- All electronic components and actuators had a “-” displayed on the housing. The cost of such a solution justified the imperfection of the scheme.
For reference: The instructions provided for regular checking of contacts. When oxidized, they should have been cleaned with sandpaper.
Power unit
The engine compartment is located directly inside the car, as this is due to its design.
Access to components and assemblies is also provided from the passenger compartment by removing the cover, which:
- Provided protection for the driver and passengers from the penetration of exhaust gases;
- Protected from dust and dirt;
- Served as an additional heating element (passive - from heating).
The high engine layout contributes to the vehicle's cross-country ability in off-road conditions
The previously used engine from Pobeda was replaced with a more modern engine from the 21st Volga. This was facilitated by the launch of a production line at the Zavolzhsky Motor Plant in 1964.
Note! Despite some skepticism regarding the inconvenience of servicing a cabover car with your own hands, years of operation have proven that there are no difficulties.
Passive vehicle safety
The design of the "Baton" with a cabover layout also initially raised a number of questions regarding safety. However, a series of crash tests conducted back in 1971 at the Dmitrov test site proved that in most emergency situations the driver and passengers of the UAZ 452 have a chance to avoid injury.
A striking example of comprehensive testing of “Tablets”
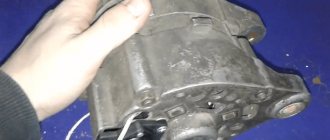
How to remove a loaf radiator
Repairing, modernizing or replacing the stove on a UAZ 452 involves removing it. For a large number of car models, this operation cannot be called simple, since it requires complete or partial disassembly of the dashboard.
In our case, this will not be necessary, since access to the heater can be obtained from the engine compartment. Let us describe the sequence of actions on how to remove the stove on a UAZ 45:
We are sure that during this procedure you will repeatedly remember with a kindly quiet word the designers who forced you to repeatedly take the poses described in the ancient Indian epic “Kama Sutra”.
Be sure to go through the air ducts with a vacuum cleaner (if possible), as there is likely to be a lot of debris accumulated there.
Since the radiator of the old-style UAZ 452 stove, even if restored and cleaned, is unlikely to work better than originally, it is better to replace it with a more efficient one. The most popular options are heaters from VAZ, as well as the NAMI-4 product, which by its design is best suited for a large number of UAZ car models. Therefore, we will describe the modernization of the stove using the example of this particular heat exchanger.
Which stove to choose
This is one of the fundamental questions when performing such tuning. The fact is that there is enough space on the UAZ to perform many different manipulations, so, for example, if the stove you like from a foreign car does not fit on the UAZ due to a mismatch in size or connection methods of the pipes, the problem as a whole can be solved. On other cars, such opportunities are an order of magnitude smaller due to the highly compact arrangement of components and assemblies both in the engine compartment and under the dashboard.
Since the domestic automobile industry is focused primarily on the products of the Volzhsky Automobile Plant, it is not surprising that many are trying to adapt the heater from the VAZ. But there are some nuances here. A classic stove is clearly not suitable here; a Chevrolet Niva stove, which demonstrates good performance characteristics, is unacceptable due to the difference between the exit angles of the pipe fittings - it is almost impossible to put hoses on them. So the most realistic way to install a stove on a UAZ from a VAZ is to use the Kalina heater, although in this case a considerable number of alterations will be required.
Replacing the radiator: preparatory stage
The complete set will weigh about 7 kilograms, which is about 2 kg less than the weight of the original stove. A distinctive feature of the NAMI-4 heat exchanger is its completely plastic body (the original had a metal one), which affected the weight of the device. We also note that the heater consists of both a radiator and a fan with an electric motor, which led to the high price of the kit. In this case, you won’t have to regret the money spent, since both the radiator and the fan have much better characteristics than the original heater.
We advise you to immediately replace the foam rubber seal with a more practical material (for example, polyurethane) - foam rubber will quickly dry out under the influence of temperature, losing its sealing properties.
To do this we will have to perform the following steps:
Most modern heating systems provide a special drainage hole that prevents moisture from accumulating in the unit body, which adversely affects the components of the stove, and also gets into the air ducts, moistening the cabin filter, if there is one. This significantly worsens its filtering characteristics and leads to unpleasant odors. Penetrating into the cabin, excess moisture causes the windows to fog up. The “loaf” does not have such drainage initially, and cabin filters simply did not exist just 15 years ago.
So many owners, before connecting the modernized UAZ 452 stove, solve the above problem on their own. To do this, you can use one of the technological holes available in the heater body. There are two of them. We caulk one of them using, for example, standard auto sealant, but the second technical hole can be used to organize a drainage system. For these purposes, you will need a tube corresponding in size to the diameter of the hole. We attach it to the hole and bring it out into the crankcase area, but so that the tube does not come into contact with hot parts.
Installation process
In practice, dismantling and removing is always much easier than installing. Therefore, this process should be approached as responsibly and carefully as possible. In fact, drainage is a must. But it's better with him than without him. If you decide to go the no-drain route, then the first step is to install an air intake flap. It is much easier to tighten it while the stove is removed. The complete installation process will be considered, including the organization of the drainage system.
- Make a mark for drilling a hole in the body to install a drain pipe. The holes should be immediately treated with anti-corrosion compounds so as not to create a hotbed for the spread of rust throughout the body with your own hands,
- The new heater is screwed into its rightful place in the Loaf,
- Cut out a small tube. One end will need to be flared to obtain a wide enough base that looks like a funnel. To do this, you can take a metal rod, the diameter of which is slightly larger than the diameter of the tube, heat it and insert it,
- Automotive sealant is applied around the hole. The tube is installed with a funnel in the upward direction, and the joint is again coated with another layer of sealing compound. You will also need to secure the tube with sealant on the reverse side,
- After hardening, the sealing agent polymerizes, that is, it becomes durable and resistant to mechanical stress. Plus everything will be quite airtight,
- The NAMI stove comes with a pair of aluminum plates. They are needed due to the fact that you dismantled the air intake control system at the previous stage. Therefore, the air intake itself will be rigidly fixed on these plates. When the stove is installed, this will not be very convenient, but it is possible,
- The installation should be carried out in such a way that there is space in the form of a small gap around the perimeter between the edges of the car body and the hatch of your air intake. A gap of 1 centimeter will be more than enough. This gap will allow oncoming air to penetrate into the interior of the Loaf,
- This is not the most optimal option, since in such a situation the outside air will actually not be able to flow by gravity. The way out of the situation would be to modernize the air intake flap. Or you will have to constantly turn on the stove motor,
- Now you can lay a line to supply coolant to the heater. The problem with the Bukhanka is that it was created as a car for army needs, and therefore all the comfort is provided only for those sitting in the cabin. And residual heat enters the cabin,
- This modernization needs to ensure comfort for the driver and front passenger. Here you will need to route the hoses accordingly,
- First, a hose is led from the engine to the lower pipe on the front heater. A stove valve is also installed here, blocking the flow of moving cooling liquid. The faucet used is a standard one, but you can also install some kind of swivel type tap. The crane itself is first dismantled and transferred to the cabin in order to be able to control its operation without leaving the car,
- When installing the faucet, consider the location of the control levers. When you turn the lever to the right, the tap should open,
- The upper tube, which removes coolant from the Bukhanka cabin heater, is connected to the lower pipe of the cabin heater. Since we will eventually get the highest point in the line in this way, to eliminate air from the system, we will need to additionally install a valve to release excess air,
- A similar tap should be installed at the outlet of the interior heater. This will be the second highest point in the system. It is better for such purposes to use an outlet valve such as a tee of the cooling system. GAZ produces excellent faucets suitable for these tasks,
- The inlet of the engine pump will need to be connected to the upper pipe of the interior heater.
The installation is almost complete. But the work is not finished yet, since the electrical component remains.
Electrical work
To finally install the system, you will need to make a connection, providing power to the new heating.
- First of all, connect the ground. It is always marked with a black wire, so it will be difficult to confuse it,
- The mass is fixed to any metal part of the car body. It is optimal to secure it somewhere under the Loaf's torpedo. But here you can choose another option,
- It is recommended to enclose the positive wire in a sheath of corrugated material and extend it to the left side of the machine, where the fuse box is located (fuse block),
- In total, the block provides for the presence of 4 fuses. The fourth of them is distinguished by the fact that it is under constant voltage. And the first 3 are controlled through the ignition switch,
- Since the heating equipment has its own fuse, it can be connected with a positive wire to any of the first 3 terminals on the block. But it is imperative that the connection be from above, that is, to the standard loaf fuse,
- Start the ignition to check the functionality of the heater motor. If everything is functioning, then you can install the panel,
- Do not forget to first connect the rod for controlling the stove faucet directly to the faucet itself,
- Once connected, check operation. When the tap lever is positioned to the left, it should be open, and when turned to the right, it should close. If this is not the case for you, you will have to turn the tap over,
- Try on the panel and choose the best way to place it. The best solution here would be to make 3 holes in the panel from the new stove for additional buttons. Moreover, it is recommended to place the holes slightly below the middle of the panel so that they do not rest against the heating system motor,
- Make two holes in the bottom of the dashboard and a couple more holes in the floor tunnel of the Loaf. This will be required to fix the new panel,
- Connect the stove rod control unit to your panel, fix it in its new place with self-tapping screws,
- Now you need to install the rheostat of the stove motor control system, put plastic covers on the control levers and insert all the buttons.
At this point, the process of installing and connecting a new heater can be officially considered complete. The procedure is not the simplest, so beginners should not undertake such work on their own. Consult with specialists or enlist the support of more experienced motorists who will be able to help you and advise you if something happens. After completing all the work, be sure to check whether all pipes have been properly connected, how efficiently the heating system motor operates, and how the heater tap moves. After this, feel free to fill the system with high-quality cooling liquid, use faucets to remove excess air and test the operation of the stove in real conditions. As practice shows, installing such equipment makes it possible to improve the operation of the heating system by 2 times compared to the standard system. Plus, there is a filter that will need to be changed periodically, as well as a function for recirculating air in the cabin.
Installation of a stove on a UAZ 452
Since the NAMI-4 stove has technological holes in the body, the drainage problem is solved relatively simply. But since its characteristics are much better than those of the original heater (performance - 8 kW versus 4, air flow at maximum engine speed - 450 cubic meters / hour instead of 150), another problem arises - to ensure sufficient air flow, for which it will be necessary to install air intake hatch. This is all the more necessary because the NAMI stove includes a cabin filter, which somehow reduces the output performance of the stove. If this is not done, then a problem arises with the access of outside air by gravity, so in any case you will have to constantly use the motor. If there is a hatch, this is not necessary.
In any case, it is better to carry out both drainage and installation of the intake hatch before the heater is installed in its regular place. In particular, you will need to drill a hole in the car body to lay the drain pipe, provide a place for its attachment and make sure that water does not get on the metal parts of the engine compartment. It is advisable to immediately treat the drilled hole with an anti-corrosion agent.
Let us describe in more detail the drainage arrangement algorithm:
You can also use a plastic tube of a suitable diameter - in this case, flaring is not required, but polyurethane is less resistant to mechanical damage that may occur during any repair work.
And only after this you can proceed directly to installation work.
First of all, we install the stove in its regular place. Since when dismantling the heater we took care of removing the air intake control system, now we need to somehow compensate for its absence. The NAMI-4 kit includes two aluminum plates, which are specifically designed for rigid fixation of the air intake. Moreover, even if there is a hatch, it is desirable that there are small gaps around its perimeter (no more than 1-2 millimeters), which will provide additional air flow when the hatch is closed. This will not be difficult to do - simply by bending the air intake plate, which is attached to the body with four nuts.
READ How to connect an ntfs flash drive to android
And one more important point. Initially, the “loaf” was designed as a means of transportation for the military. It has two heaters, and the designers were tasked with providing heat primarily to the command staff located in the rear of the cabin. Accordingly, the hot coolant from the power unit is first sent to the cabin heater, and only then goes to heat the cabin, having cooled down considerably by this time. We need to correct this situation because the comfort of the driver is much more important than the comfort of the passengers.
To do this, you will have to do a little work to change the routing of the pipes. First of all, the inlet hose should go to the corresponding fitting of the front heater. In itself, such an improvement is not difficult to carry out, but the task is complicated by the need to transfer the antifreeze control valve from the engine compartment to the front stove of the UAZ 452. This must be done in such a way that you can access the tap from the cab without leaving the car. It is important not to confuse the opening direction (to the right) when installing the ball valve.
Then everything is much simpler: we direct the upper pipe, which previously brought antifreeze from the cabin to the engine compartment, to the inlet fitting of the cabin heater, and we direct the output hose of the second heater to the engine compartment. But here, too, some changes will be required: in order to prevent the occurrence of unavoidable air in this area, the faucet will also need to be mounted at the outlet of the cabin stove. For these purposes, a standard faucet installed in the cooling system of all GAZ vehicles is suitable (it looks like a tee).
All that remains is to connect the pump to the inlet pipe of the cabin heater.
The final part of upgrading the UAZ 452 heating system is connecting the heater motor to the on-board network:
Now all that remains is to check the functionality of the modernized stove. After filling the coolant, we carry out the standard procedure for eliminating airiness in the system, taking into account the fact that we now have two taps installed on both stoves, which should be opened slightly with the engine running.
We definitely check whether there are any leaks in the cooling system lines, and how well the heater valve copes with its functions.
According to the owners of the “loaf” who performed a similar procedure, an almost twofold improvement in the heating of the cabin is achieved, while the air entering the vehicle is cleaned of harmful impurities, and when using a carbon filter, also of unpleasant odors. In addition, it becomes possible to use the air recirculation mode, which was not available before.
Note that the use of a stove developed in the NAMI microclimate laboratory significantly simplifies the modernization of the “loaf” heating system. When installing a heater radiator from a VAZ or from other car brands, you will have to show much more ingenuity. But even in our case, the work of replacing a standard stove cannot be called simple. If you do not have the skills to perform such complex repairs, then it is better not to undertake it yourself, but to entrust it to more advanced friends or acquaintances.
Source
Installation of the NAMI-4 stove on a UAZ
There are several ways to improve the microclimate in the UAZ cabin: some decide to tune the air intake flap, others simply install a plastic nostril on the original air intake. But the majority follow the path of a radical solution to the problem: installing a more efficient and productive heater.
This is the NAMI-4 stove, which requires a minimum number of alterations when installed on an UAZ compared to all other devices. True, this pleasure is not cheap - from 10 thousand rubles, but if you are used to driving in comfortable conditions, such expenses will not scare you.
The kit includes:
- the heater itself, along with the already installed faucet and cables for controlling the operating modes of the river;
- corrugated pipe;
- plastic cover installed at the bottom of the torpedo;
- consumables (metal plates, screws);
- heater installation instructions.
Before starting work, it is advisable to check the functionality of the faucet and its tightness, whether the electric motor of the fan is working, and how well the heat exchanger dampers open/close.
It is also necessary to make sure that the impeller blades do not catch on the housing - if so, then in order to avoid annoying whistling, it is necessary to sharpen the tips of the blades using a needle file.
Algorithm for installing the NAMI-4 heater on a UAZ:
- The first operation when dismantling the stove of any car is draining the coolant. In UAZ, for this it is necessary to dismantle the cooling radiator protection by unscrewing three bolts by 10;
- Since it is not always possible to install a container of the required volume under the radiator, it is advisable to put a hose of a suitable diameter on the faucet - this way you minimize the loss of antifreeze. The spatial arrangement of the faucet cannot be called convenient - the rod with which it opens protrudes strongly and can squeeze our drain hose, so we make sure that no problems will arise here;
- unscrew the radiator filler cap, expansion tank cap and open the drain valve. We wait until the coolant drains;
- loosen the clamps on the pipes connected to the heater radiator, remove them (if they are stuck, you will have to tinker);
- To prevent the small amount of antifreeze remaining in the hoses from spilling, substitute containers of appropriate sizes;
- dismantle the expansion tank complete with pipe (there will also be a certain amount of coolant here);
- it's time to replace old, rusty clamps with new ones;
- disconnect the negative terminal of the battery;
- We repeat the same operation in relation to the block with the wires going to the heater, we also disconnect the heater ground wire, which is bolted to the body of the device;
- unscrew the nuts holding the stove body in the eye (not necessarily all the way);
- moving the bracket to the side, carefully remove the heat exchanger;
- We install the NAMI-4 bundle in its regular place, secure it with two side bolts, after making sure that the heat exchanger fits tightly into the seat, without gaps. We make sure that nothing gets under the stove (for example, an antenna wire), tighten the two nuts on the sides;
- Now you can put on the pipes by securely tightening the clamps;
- close the coolant drain valve and at the same time open the stove valve;
- pour antifreeze into the system (if it is heavily contaminated, it is highly advisable not to use it, otherwise the new stove will quickly become covered with an initial layer of scale);
- make sure that there is no coolant leak;
- install the torpedo in reverse order;
- We check the new stove in operation.
As a rule, glass fogging disappears immediately after the power unit warms up. Due to a slightly modified design of the stove (taking into account the shortcomings of the standard heater), when the fan is turned off, the incoming air flow has decreased (due to the presence of a plastic cover, where moisture aggregation occurs), however, this disadvantage is more than compensated for already at the first rotation speed of the fan, which is running much quieter than the original one.
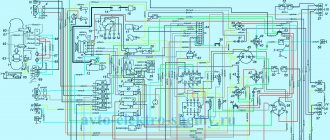
Heating system UAZ loaf scheme 409
At the beginning of winter, I was engaged in minor modifications to the heater, or rather, eliminating factory defects.
I'll start with the heater. When the cold weather came and the interior needed heating, I realized that there was no heating as such. No, no, the stove was working, Carlson was working hard, making the sound of a “whirlwind” vacuum cleaner, but there was no special air pressure or heat.
It was necessary to somehow solve the problem. I looked at the miracle of the NAMI stove, but the price is completely inadequate. Add a little more and you can plug in the autonomous system) in general, no.
I decided to start debugging my own stove. I’ll do it, okay, no, we’ll continue to rack our brains)
Well, off we go! I took off the stove and immediately got sick of the number of holes in its body. Yes, I understand that warm air still goes through these holes into the cabin and there seems to be no loss. But when this air is needed, for example, on glass, it is not there because that he got lost somewhere under a torpedo. As a result, all the holes and cracks were sealed with body sealant. This problem was sorted out!
Next about the radiator.
If you look at how the radiator stands, you can immediately understand where the heat goes. Or rather, it doesn’t go away, but simply is not taken in by the air flow. The problem is: when the radiator is in the casing, there are gaps between the radiator and the heater casing. Although there are gaps, there are holes almost a centimeter long and it doesn’t look at all like they were once sealed. Accordingly, the air, instead of passing through the radiator, follows the path of least resistance, that is, between the radiator and the wall of the stove, thereby not heating up. I solved the problem with the help of tourist foam, gluing a mat along the ends of the radiator.
Now about Carlson the hard worker.
The original motor suited everyone except one. The shaft is too short. Even if the impeller is moved to the very edge of the shaft, it still does not fully fit into the heater diffuser and does not create the necessary draft.
You can get out of this situation by installing a motor from the GAZelle heater.
We take a motor from a GAZelle, cut off the shaft on one side (the shorter one) and install this motor instead of the original one (the mounting holes are the same). And then we adjust the impeller so that it fits completely into the diffuser. Yes, I also replaced the impeller with a new one, just in case.
After modifications, I drove through the winter. The heater works great! For a couple of weeks there were frosts far beyond 20 degrees, but I didn’t even think about closing the radiator. The air was rushing hot in the car! It’s hot! I don’t know why, but the noise from the heater has decreased by half, although the speed of the motors is the same .In general, the impressions are only positive!
Well, one more thing that really irritated me was the valve for the heater, which is located on a block under the hood. The inability to regulate the temperature of the air from the cabin is a shame.
I bought a heater faucet in the store, it was written that it was for a hunter.
Can you please tell me if it’s possible to replace it with something more convenient, like a samovar with water supply, or how can it be altered so that it can be disconnected from the interior?
Ball water supply from the market The cabin to the right of the stove is very convenient. I extended the hose from the standard faucet to the stove and cut it into it, securing it so that it was convenient to get it from the chair.
Regards, Mikhail
Diagram of the UAZ Bukhanka heating system
The embodied diagram of the UAZ Bukhanka heating system attracts special attention from the owners of this car when upgrading the car’s interior. After all, all car owners understand that the interior of this off-road car is very far from its foreign counterparts in terms of comfort, although this model was originally designed for use by special services, and what can one expect for such an affordable price.
READ How to connect unlimited traffic for Beeline mobile TV
Possible options for tuning the UAZ Bukhanka interior
As already indicated, the UAZ 452 car was created to meet the high requirements of specialized transport for the Ministry of Emergency Situations, military and medical services. True, this fact is absolutely not a statement that the performance of this car can be considered impeccable. That is why, when tuning the interior of the Loaf, not only the heating system is modernized, but also many other parts and elements.
First of all, when modifying the interior of the UAZ Bukhanka, most car owners replace the standard hard seats with more modern and soft analogues, since the basic seats can shake out the soul when moving, which is especially typical for off-road driving. Moreover, some craftsmen even integrate heated and electric chairs, for which the existing electrical equipment connection diagram is adjusted.
At the next stage, attention is paid to soundproofing the interior of the UAZ 452 and fixing the elements of the dashboard, however, before fastening the elements, the heating system of the Bukhanka is modernized, which will be discussed further. In terms of style, the interior can be decorated with leather, the dashboard can be decorated with wooden inserts or wood-look details.
Often, a variety of additional accessories appear in the interior of the UAZ Bukhanka, including shelves, glove compartments and ashtrays. The steering wheel is often replaced with a modern imported analogue with soft upholstery made of leather or other material.
Of course, there are other options for modifying the interior of this car, which depends on the imagination of the car owner, but one of the key aspects of tuning the interior is still the upgraded circuit of the Bukhanka heating system, since the standard heater simply cannot cope with its immediate responsibilities.
How Bukhanka's heating system can be upgraded
When the UAZ Bukhanka heating system diagram is being finalized, the following aspects must be taken into account.
The heater radiator should be located below the level of coolant present in the cooling system, so that this substance is pumped through it more efficiently and is always present in it. To do this, you can make the cooling system closed by integrating an atmospheric valve in the expansion tank cap. In this case, in the latter, the coolant level should always be higher than the installed heater radiator.
Air must be pumped with a less noisy centrifugal fan, which should be located along the air flow to the radiator. This approach will further reduce the noise level.
The air flow through the radiator must pass solely due to the pressure generated by the fan, and not through kinetic energy. In this case, the fan nozzle should not blow directly into the radiator honeycomb, since the air will pass unevenly through the radiator.
The temperature of the discharge air should be regulated by a damper that mixes cold and hot air flows, and not by a tap. When using a tap, the temperature will greatly depend on the operating mode of the power unit, and the damper can be used to regulate the ratio of both air flows.
Advantages of an autonomous heater
Some install an autonomous heater or hair dryer, which compares favorably with a standard stove and the use of both front and rear heaters in a Bukhanka, where an additional pump will be required to improve heat transfer. But the choice is up to the car owner, who will decide for himself which path to take. An additional autonomous interior heater for UAZ Bukhanka has several main advantages:
- For a gasoline Loaf, there is no need to strongly heat the power plant, since such engines start without any problems even in severely frosty conditions. In this component, gasoline is noticeably superior to diesel;
- Using an additional heater in combination with a furnace fan, which allows the heating of the interior to work, requires the consumption of a significantly larger amount of electrical energy and the fuel itself. At the same time, the efficiency of the heating itself turns out to be noticeably lower;
- Autonomous heaters have a longer service life, maintaining the required level of heat in the cabin at all times. This is relevant for those who plan to use Bukhanka as a place to spend the night;
- Autonomous stoves or hair dryers can be installed in any convenient place in the car. There is no need to look for additional space in the engine compartment, or think about powering the furnace fan separately or together with the additional heater, without starting the ignition.
The presence of an additional autonomous heater can sometimes allow you to completely abandon the standard heating system. It all depends on the operating conditions of the Loaf, as well as the installation and placement of the equipment itself.
Placement and installation
If we talk about location, there are quite a lot of options. This is influenced by the specific layout of each car owner’s Loaf. But practice clearly shows that most often additional heaters are installed behind the driver, in the corner. Although some mount the equipment in the center or in the luggage compartment. Think over this issue in advance so that later there will be no difficulties with the operation of additional equipment. By installing the stove behind the driver's seat, you do not have to extend fuel lines and electrical wiring over a long distance. This eliminates overheating and reduces the level of fire hazard. It is recommended to install an additional podium under the stand-alone hair dryer to raise it slightly above the floor level. This way the heater will be able to work more efficiently and better heat the space of the Loaf entrusted to it. The exhaust is made standard, as specified in the instructions.
The system's exhaust pipe is best tied to the standard exhaust system of your car. This will prevent damage to the tube when the machine is immersed in water, mud, snow and puddles during operation. Although this is not the final placement option, you can come up with your own alternatives. In this case, the control panel for the autonomous hair dryer-heater can be moved to the rear of the hood. This way, passengers will be able to reach the regulator without any problems, and the driver himself will have relatively convenient access to it. In this situation, the only remaining action is to install the air ducts from the new heater. Here you can choose accommodation at your own discretion.
FakeHeader
Comments 16
Result: launched the system today! The launch went smoothly, but 60 seconds into the flight the heat started! I added about three liters of antifreeze after pumping. It seems like there are no traffic jams.
This happened to me, simple and reliable www.drive2.ru/l/5366923/
I did this. From the head to the front heater, from the block drain valve to the interior heater. The running parts were combined into a single unit and into a pump. And it’s better to place the additional pump near the return pump, so to speak. Significantly warmer
In my own (my personal experience!) the scheme is not like that. I have it like this: 1-head heater tap, 2-additional pump, 3-front heater, 4-rear heater, and to the engine pump. The reason for such a system is to pump the front heater with an additional pump and expel air from it (it is the highest place in the cooling system), and according to my own feelings, it is better to first apply the hot liquid to the front heater (which otherwise is constantly cold) and then to salon
Assemble it like this (heater tap from the head - front heater - rear heater - electric pump - standard pump) my car is very warm in winter))))
I have them looped into a common circle: pump - front heater - rear heater. in the car Tashkent.
So does the pump push into the stoves or does it suck from there?
I don't remember, I'll go look now)
So does the pump push into the stoves or does it suck from there?
Cooling and heating system for wagon-mounted vehicles UAZ-374195, UAZ-396295, UAZ-396255, UAZ-390995, UAZ-390945, UAZ-220695, UAZ-330395, UAZ-330365, with injection engines ZMZ-4091 Euro-3 and ZMZ -40911 Euro-4, liquid, closed, with forced circulation of coolant.
Cooling and heating system of UAZ wagon layout with ZMZ-4091 Euro-3 and ZMZ-40911 Euro-4 engines.
The cooling system of carriage-type vehicles UAZ-374195, UAZ-396295, UAZ-396255, UAZ-390995, UAZ-390945, UAZ-220695, UAZ-330395, UAZ-330365 includes:
Diagram of the cooling and heating system for UAZ wagon-mounted vehicles with a ZMZ-4091 Euro-3 engine.
Diagram of the cooling and heating system for UAZ wagon-mounted vehicles with a ZMZ-40911 Euro-4 engine.
The cooling system of UAZ wagon-mounted vehicles with ZMZ-4091 Euro-3 and ZMZ-40911 Euro-4 engines, according to the operating manual, must be filled year-round with low-freezing coolant TOSOL-A40M or OZh-40 “Lena”. When the ambient temperature is below minus 40 degrees, the cooling system should use low-freezing liquid TOSOL-A65M or OZH-65 “Lena”.
The capacity of the cooling system of the ZMZ-4091 Euro-3 and ZMZ-40911 Euro-4 engines, including the heating system, is:
— For UAZ-374195 and UAZ-330395 cars: 12.7 liters. — For cars UAZ-396295, UAZ-396255, UAZ-390995, UAZ-220695: 13.7 liters. — For UAZ-330365 and UAZ-390945 cars: 13.6 liters.
The operating temperature of the coolant in the cooling system should be between 80-105 degrees. Short-term, no more than five minutes, operation of the ZMZ-4091 Euro-3 and ZMZ-40911 Euro-4 engines is allowed when the coolant temperature rises to 109 degrees. If the coolant overheating indicator light comes on, the cause of the overheating must be immediately determined and eliminated.
UAZ heating system of carriage layout with ZMZ-4091 Euro-3 and ZMZ-40911 Euro-4 engines.
The liquid heating system of UAZ-374195, UAZ-396295, UAZ-396255, UAZ-390995, UAZ-390945, UAZ-220695, UAZ-330395, UAZ-330365 vehicles, combined with the engine cooling system, includes:
— Cabin heater radiator. — Interior heater radiator, except for UAZ-374195, UAZ-330395, UAZ-330365 vehicles. — Additional pump for the heating system. — Connection for supplying coolant to the interior heater. — Heater valve with remote control. — Drain valve or plug of the heating system.
The heating system on cars with a ZMZ-4091 Euro-3 engine differs from the heating system of cars with a ZMZ-40911 Euro-4 engine in the location of the additional electric pump of the system. In the first case, it is included in the cabin heater radiator line, and in the second case, in the cabin heater radiator line.
For normal operation of the cabin and interior heaters, the temperature of the coolant in the engine cooling system must be at least 80 degrees. To turn both heaters into operation, you need to open the heater switch remotely from the cabin or manually and, if necessary, turn on the additional heating system pump.
To increase the heating intensity of the cabin and interior, both heaters are equipped with 25-watt ME236 electric motors with a blade fan. They are turned on and off using separate switches on the instrument panel. The strength of the external air flow passing through the cab heater radiator can be adjusted by changing the position of the front end ventilation flap cover.
READ How to connect skype to PBX
At low air temperatures, you can install insulation on the car, which is attached to the radiator trim with screws. In this case, it will be possible to regulate the temperature of the liquid in the engine cooling and heating system by closing or opening the insulation valve.
UAZ 452. Tuning a 'loaf' in the Far East
So, at the beginning of the project, we had an ordinary UAZ that had honestly served its previous owner for 15 years, moderately rusty, moderately loose, moderately dead motor, in general, one of many thousands exactly the same.
What did you want to get in the end?
Tuning of the UAZ loaf began in three directions: engine and transmission, body and interior.
Motor and transmission
The engine was disassembled and overhauled, everything cost 1 repair size, but out of harm’s way they decided to replace the carburetor with a Japanese one, since we already had a similar experience. The carburetor from Nissan Patrol comes with a minimum of alterations and settings.
The gearbox and transfer case were also opened, repaired, a couple of synchronizers were replaced, and everything was put back together.
In the next 20-30 thousand kilometers the car should not have heart problems.
The bridges are equipped with 2 screw locks from VAL Racing.
Accordingly, everything that could be smeared was smeared, pulled up, set out, and the machine began to whisper—no ringing, no tinkling.
2. Exterior in general and body in particular.
The first thing we decided to do was get rid of the rust. To do this, they cut the rusty skirt in a circle, cut out the arches not so much to fight the rust, but to roll in larger wheels, and, having opened all the trim in the cabin, they cleaned the rust that had begun down to metal.
A strip of metal was welded along the perimeter of the arches to attach the fenders, but so far no urgent need for this has been identified; although the wheels have become larger, they sit quite deep in the arches and the resulting widener is quite enough.
Everything was treated with phosphoric acid and primed.
Then the front and rear power bumpers were made.
A Chinese 5000 kg winch is installed in front; the winch was previously tested in real conditions, opened, defective, and only after that it received its start in life for this car.
A gate is installed on the rear bumper so that the enlarged spare tire does not sag through the hinges.
A hatch was welded into the roof, first installed from MMS Delika, but after six months of operation it was replaced with a PAZovsky-folding one, reliability is in its simplicity.
And to top off all this splendor, a trunk was installed on the roof. The trunk has a standard chimney elbow and 6 additional headlights, 4 (2 high beams and 2 low beams) of which look forward and 2 working lights back
There is a strong ladder leading to the trunk.
The inside of the interior was repainted after fighting rust.
The ceiling and walls of the passenger compartment were covered with several layers of noise and vibration insulation and lined with alucobond, a material more durable than plywood or hardboard, which is also easy to clean and does not require additional maintenance.
The resulting thermos keeps heat very well in winter and coolness from the air conditioner in summer.
We installed a small potbelly stove near the side entrance door; according to the experience of last winter, one stack of firewood is enough to provide comfortable warmth at night for about 5 hours.
Why a potbelly stove, and not the currently fashionable heaters from Webasto or earlier Soviet models from army kungs? There will be three answers: firstly, it is reliable, in our conditions there is always firewood, secondly, it is not known how life will turn out in the taiga, and it is better to burn gasoline with the engine on the way back, thirdly, as they say, there is never too much money.
But it seems that we forgot about something. we have a table, we have a stove, we have people who will sit at this table and warm themselves by this stove. Oh yes. Now we have a sleeping bag for these same people.
The sleeping bag was made folding so as not to clutter up the space in the middle of the car and low enough (at the owner’s request), from my point of view, of course it should have been raised higher so that larger things could be put under it, but. the owner is a gentleman.
Heater UAZ "Loaf"
A car consists of many components. Each of them requires increased attention. Therefore, drivers must monitor the condition of their “iron horse”. The issue of preparing the car for the winter period is especially important.
Here, the presence of a well-thought-out heating system plays a vital role. Let's talk about it in the UAZ "Loaf".
Meaning:
This system is important, first of all, for maintaining normal temperature in the cabin at any time of the year, for ventilation of the air inside the car.
Most “loaf” models are equipped with a high-power heater “N-1” produced by NAMI.
Design:
The heater includes the following elements:
There are two main operating modes:
The second mode implies increased temperature in the cabin. To do this, you need to close the air intake and then open the damper. In the first mode, the actions are performed in the reverse order.
A special unit controls the entire system. A tap is used for adjustment. A new design based on increased flow circulation and the use of fluid in the radiator allows the interior to warm up faster.
It is important to remember about glass blowing. Otherwise, this will lead to icing or fogging. The driver and passengers will feel discomfort.
If moisture gets in, it is removed through the air intake. A docking device is used here.
Breaking
Often, car enthusiasts are faced with cases when the heater (stove) does not perform its direct functions and does not heat. What could be the reasons?
Shall we update?
How to replace a used stove with your own hands? What will you need for this? Everything can be done using the following algorithm.
Finally
The heating system of the UAZ “Bukhanka” car is very simple in design. If you do not check its operation in time, eventually the owner will have to spend money on a car service.
Equipment replacement
If you decide to replace the heater yourself, you should first familiarize yourself with the UAZ Bukhanka stove diagram to connect the electrical component. It is not difficult to install the equipment itself, securing it in the conventional engine compartment located inside the car. But even here you should adhere to certain rules and recommendations. The process will be considered using the example of using NAMI equipment, which has better performance and also boasts the presence of a cabin filter, which is not present in the standard Bukhanka heater.
In reality, there is nothing particularly difficult about changing the standard heating system on Bukhanka and installing more efficient and productive equipment in place of the old stove.