Many modern Lada cars (for example, Granta, Kalina, Vesta or XRAY) have a standard rain sensor, which is installed from the factory. On machines that do not have this option, you can install it yourself. Let's look at the features of connecting the DDA rain sensor on different Lada models.
How it works
It's logical to start with the question of how a rain sensor works.
For some reason, some are sure that the controller reacts to moisture that falls on the surface of the glass, and thereby turns on the windshield wipers, that is, the wipers, and also forces liquid to be supplied through the windshield washer nozzles.
But that's not true.
In reality, the operating principle is completely different. Even more complex, one might say.
This controller is not located outside, but inside the car. And it is logical to ask how then he can feel drops of water on himself. No way. It does not react to moisture itself.
The controller has 2 elements. These are photodiode and LED.
The LED's job is to emit infrared light. The human eye is unable to see it. But these same rays accompany us in everyday life and beyond. Just remember the TV remote control. The principle is the same.
Infrared radiation hits the surface of the glass, is partially reflected from this surface, and returns back. At this moment it is captured by the second element, that is, the photodiode. It records the amount of light returned.
If there is no water on the glass, that is, it is dry, a lot of light will return. When wet, the amount of light decreases noticeably, which is prevented by drops. Having determined that the glass is covered with moisture, the sensor automatically starts the windshield wipers.
Of course, the effectiveness of cleaning depends largely on how correctly you managed to choose wipers for your car.
Lada Granta Liftback Orange › Logbook › Rain sensor
I continue to complete the car. This time I decided to install a rain sensor. The thing should be useful in operation, since now you won’t have to constantly pull the wiper lever.
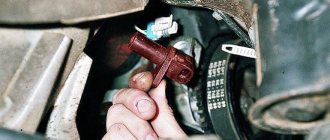
And so, the rain sensor itself was directly purchased DDA-25
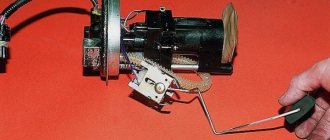
The installation took about 15 minutes. First I glued it to the glass
Next you need to run the wire from the sensor through the ceiling and the rack trim to the fuse box
After connecting the wire to the block, you need to pull out the standard wiper relay and insert the relay from the sensor
Now you can insert the relay from the sensor
You can check. The rain sensor starts working when the wiper lever is in the 1st position. At the same time, the blue LED on the sensor should light up
Since there was no snow or rain outside at the time of installation, the only way to check the sensor was by pouring water on the glass
The sensor has 2 functions: rain and snow. If the rain function is set, then the blue light on its body lights up, if it snows, then the green light turns on. I tried both modes and here’s what I want to say; In rain mode, the sensor works adequately, but again not always. In mode the snow rubs frequently. There is no snow on the glass, but he turns on the wipers. Thus, it turns out that sometimes the wipers rub almost dry, which is not good. It also includes adjustment of the sensitivity of the sensor itself. I haven’t yet chosen an adjustment that’s convenient for me. Perhaps the sensor itself needed to be installed in a different place so that it could adequately sense water. I'll drive it, maybe I'll get used to it, but so far the impressions from the sensor are somewhat blurred. It seems to work, but everything is spoiled by an inadequate reaction at some moments.
source
Rain sensor for intermittent mode
#2
04 Oct 2021, 07:34
#3
04 Oct 2021, 09:12
so the lever is 1 position up and there is an intermittent mode. the wheel on the lever changes the pause; stripes are drawn on it corresponding to the length of the pause. If the rain sensor is triggered during a pause, it turns on the wipers once or in constant mode.
#4
04 Oct 2021, 09:16
#5
04 Oct 2021, 09:33
#6
04 Oct 2021, 09:51
#7
04 Oct 2021, 10:09
#8
04 Oct 2021, 10:32
turn the wheel on the lever and there will be a swing, the next one after a certain time or from the DD. spin the wheel to the desired frequency of strokes.
#9
04 Oct 2021, 10:41
First of all, we will ruin the planes, and then the girls, and then the girls.
Changing the configuration, firmware 140->163, 150->182->195hp, installing Hair Dryers, etc.
#10
04 Oct 2021, 11:37
#11
04 Oct 2021, 12:09
#12
04 Oct 2021, 12:13
#13
04 Oct 2021, 12:15
#14
04 Oct 2021, 12:23
I retrained the windshield wipers and it seemed that the rain sensor began to work normally. Or maybe he didn’t. In general, I also constantly work with my hands instead of this damn sensor.
#15
04 Oct 2021, 12:24
#16
04 Oct 2021, 12:30
I just rummaged around in the instructions. Settings for automatic wiper operation. This automatic wiper control function is set to the on state by default and remains there until it is turned off by the driver in the information display. If automatic wiper mode is disabled, the wipers operate intermittently.
That means it should be somewhere in the menu. I just haven’t dug that far into it yet. will seek.
#17
04 Oct 2021, 12:44
For me, the rotation of the wheel steers with pauses between strokes. I'll be in the car and take a closer look at the settings.
Perhaps when replacing the windshield, something was changed from the factory settings.
#18
31 Oct 2021, 20:30
#19
24 May 2021, 08:58
Good day to all! Recently became the owner of FC2. I can't understand how the rain sensor works. Please tell me in what position the switch needs to be set for the rain sensor to work. Thank you.
Source
How to install a rain sensor on a Lada Granta
Installing the sensor, in fact, is accessible to absolutely every car owner and does not require any special skills. First, we need to purchase a DDA-25 rain sensor for the Lada Granta. It can be found in auto stores or online stores. The average price is about 1,000 rubles, which is not very expensive for such a convenient function. Below I will tell you its main functions.
Before starting work, carefully wipe the gluing area of the sensor itself. It is necessary to glue it in the upper zone of the wipers. The most convenient place is behind the rearview mirror. Having glued the sensor itself, we run its wiring under the roof trim, along the windshield pillar to the fuse block. To make work easier, you will need to remove the center pillar trim and the door seal.
Having brought the wiring from the relay into the fuse block, we remove the standard windshield wiper relay, upper left, and insert the rain sensor relay in its place.
On this, in fact, the installation is completed.
Now a few words about the methods and operating principle of the rain sensor for the Lada Grant. Many people mistakenly think that it works permanently, i.e. constantly. This is not true. It turns on when the windshield wiper control lever is moved to intermittent operation. All other operating modes remain unchanged. Among other things, if the sensor does not respond to contamination quickly enough, or, on the contrary, too early, it has four sensitivity modes. Plus, there are two modes “Snow” and “Rain”, plus a third mode that turns off the sensor and switches the operation mode to normal, normal, intermittent.
Among other things, the rain sensor changes the operation of the wipers when liquid is supplied to the windshield. The normal operating mode involves four strokes of the brushes, regardless of the portion of liquid supplied to the glass. The rain sensor relay now makes two strokes if the portion of liquid is not large (holding the liquid supply for less than two seconds), but if the portion is large, then the brushes make three strokes, which is quite convenient.
What are the rear view mirror covers for Lada Vesta needed for?
The devices significantly improve the aerodynamics of the car. Driving at high speed is not accompanied by an unpleasant whistle if the Lada Vesta mirror covers are installed. In addition, they give the vehicle an attractive appearance. The most popular are linings made using relatively expensive chrome. The overlays are body color, are installed on top of the standard ones and have a low price. They can be bought for 800 rubles.
Lada Vesta pleased with mirrors with good visibility. Everything looks very good. They also added a turn signal repeater to the mirrors, it looks very cool. Moreover, the repeater is made with a slight bend so that the driver, looking in the mirror, can see whether the desired turn signal is on. Another nice thing is that the mirror bends in the other direction, that is, if someone hits it, it will not break, but will bend in the other direction, and then due to the spring it will bounce back to its original place. This is all very cool. But there is also a significant drawback of these functional mirrors with good visibility. They creak terribly when folding, especially when you park the car at night in a quiet courtyard and you start folding them in complete silence, the grinding sound is heard throughout the entire area, it is very unpleasant at such moments. You don’t fold mirrors, you close them like closing a barn door. Moreover, it happened two times that the mirror on the passenger side did not fold the first time; when it was completely bent, for some reason there was no click that fixes it in the folded position. It only worked from the second to the third time. I don’t know, maybe it was something that froze, but now everything seems to be working. Also, if you tap the mirror with your finger, you can hear the rattling and ringing of the spring inside, which is also sometimes noticeable when driving on a ribbed surface. The emptiness inside intensifies this ringing significantly.
How to remove a rear view mirror
Mirrors of this type are designed to study the situation on the road behind the car. They can be divided into two categories:
- salon - installed inside the car;
- side - located on both sides on the front door pillars.
The interior mirror is located inside the car
side mirrors are located on both sides of the car
It seems that it could be easier than dismantling the mirror? In fact, this is not so easy to do, and the principle of dismantling can vary significantly between different brands and models. We will tell you about the most universal methods of removing, disassembling and installing internal and external ones. However, if any of the methods described here do not work for you, check your machine's owner's manual. Today, many automobile companies make all such processes much easier: perhaps, instead of unscrewing bolts and bending terminals, you only need to press a small button or pedal.
Required Tools
In order to remove the mirror, you do not need any specific or hard-to-reach tools. As a rule, everything you need can be found in any motorist’s garage.
- a set of screwdrivers (most likely, only figured and flat ones will be useful);
- wrench depending on the size of the bolts;
- household hair dryer for removing the mirror element.
Add to this set skillful hands and the desire to do everything efficiently, and you can get down to business.
Salon
Interior mirrors can be installed in a variety of ways depending on the make, model, and year of your vehicle. There are two methods that are used most often.
- Installation into the car ceiling using bolts or self-tapping screws.
- On the windshield using glue or suction cups.
Thus, on many domestic cars the assistant device is installed using ordinary bolts, which greatly simplifies the dismantling process. To do this, you just need to unscrew the bolts after removing the plug.
in order to remove such a mirror, you just need to unscrew the bolts
The situation can become more complicated if the mirror is mounted on a bracket glued to the glass. First of all, check whether it is possible to separate the bracket itself and the platform glued to the glass. On most cars, they are separated by moving the clamps or turning in a certain direction.
If this is not possible, you will have to resort to a radical method and remove the bracket along with the windshield. The fact is that the glue holds the elements very firmly, so when you try to separate the mirror, you may accidentally damage the glass.
You most likely will not be able to separate the bracket platform from the mirror on your own, so it is better not to risk it and contact a special salon. Especially if you are dismantling it for future tinting. However, if you decide to do it yourself, be prepared that a trace of glue will remain on the glass.
Side left and right
Side mirrors are divided into two categories:
- with mechanical drive;
- with electric drive.
On almost all cars, you will need to remove the door trim to get to the mounting screws. You can find out how to do this on your model in the instruction manual.
This is what a car door looks like with the trim removed
Next, to remove a mechanically driven part, you need to follow a certain procedure.
- Remove the regulator locking bracket.
- Unscrew the fastening screws on the inside of the door.
- Remove the mirror.
Video: dismantling the side mirror
If the mirrors are electric, the procedure will be slightly different.
- Disconnect the negative terminal from the battery.
- Disconnect the block from the wires.
- Unscrew the fastening screws on the inside of the door
- Dismantle.
Installing a rain sensor on Lada Granta
In the most luxurious configuration, my car is offered with a pre-installed rain sensor. Accordingly, in the usual “norm” it is not, and cannot be. In order to somehow get closer to the comfort of foreign cars and the simply civilized auto world, I decided to order a non-standard rain sensor.
According to the manufacturer, this will significantly reduce fatigue, increase the service life of the brushes, but most importantly for me, it will reduce the risk of accidents. Have you ever been unexpectedly doused with a ton of dirty water by a Kamaz? And now the Russian Post has delivered the long-awaited device.
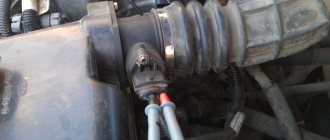
Its main element is a sensitive optical sensor, which is attached to the windshield.
When the system is turned on, infrared radiation is constantly scanned for sudden changes. Reminds me of something like a super sensitive indoor motion sensor.
At the same time, he immediately notices dirt or water drops appearing on the back of the glass. By the way, I have verified that it senses even the “fog” from the sprayer, that is, even the smallest drops and particles.
I placed the optical sensor behind the rearview mirror, so that I can hardly see it. The only thing I don’t like so far is that I don’t know how to disguise the wire from it. Most likely I will hide it under the ceiling trim. But for this it will be necessary to definitely increase it, so this is in the plans.
It is not visible at all under the dark stripe of tint, and it has absolutely no effect on its sensitivity. In addition, the instructions say that its operation is not at all affected by glass fogging, its type, etc. It is self-configurable, so you can use it with confidence.
The wire from the optical sensor must be wound into the mounting block. I stretched it under the panel.
In the block there is a standard relay with the same markings.
The beauty of the installation is that we simply mount a relay in its place with a wire from the rain sensor. It is of a standard size and layout, and does not interfere with other blocks and fuses.
As soon as you switch the wiper to intermittent operation mode (1st position), the sensor itself is automatically activated. Don't be afraid to wash your car, it doesn't work all the time. I am very pleased with this modification; I didn’t even expect that installing a rain sensor on the Lada Granta would be so easy.
The most interesting thing is that it has also already been verified. The rain sensor catches splashes a fraction of a second before they hit the glass. It helps a lot, believe me.
source
Varieties
Like many other systems, the automotive lighting sensor comes in several varieties. Some of them are available for purchase and self-installation, while others are found only in the factory equipment of the vehicle:
- A standard sensor can be purchased at an affordable price and installed yourself. The sensor is fixed in the passenger compartment in front of the windshield of the car, followed by connecting the relay and electrical wiring. The functionality includes adjusting the mode and intensity of the vehicle's headlights.
- A built-in light sensor is more often found in expensive foreign cars, where it performs a wide range of functions. In addition to the standard tasks of turning on and adjusting the headlights, the device can adjust the lighting inside the cabin and on the dashboard.
- The combined light and rain sensor is one of the most expensive models of automotive sensors, combining the functions of controlling lighting and the operation of windshield wipers. The rain sensor detects precipitation through photodiodes and photocells, instructing the wipers to begin wiping the windshield. Depending on the intensity of precipitation, the sensor can also activate the headlights, reacting to heavy rain or snow.
How does the rain sensor work on Lada Vesta
The regulator is pre-installed on the right under the steering wheel. The handle has five operating modes:
- 0: off position;
- 1 – 4: speed modes.
To activate the sensor in automatic mode, move the regulator to the “Auto” position. Next, set one of four speeds, depending on the intensity of rain and snow.
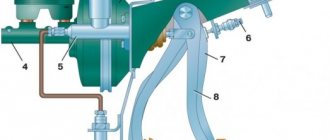
Design and operating principle
Considering that this device can be part of the factory equipment, the light sensor is manufactured in the format of a small compact housing for installation in the appropriate position in front of the windshield in the vehicle interior. The electronic product consists of several photosensitive elements and an LED, which are sufficient for the sensor to quickly and reliably respond to changes in time of day, weather conditions, turning off street lights, or entering and exiting a tunnel. Having detected changes, the device sends a signal to the control unit, whose relay turns on the low or high beam headlights.
Using a light measuring device allows the driver not to be distracted while driving by adjusting the headlights. However, the functionality of this device also has its downsides, because many car owners get so used to the operation of this device that they lose the habit of independently controlling how the headlights on their car are turned on and off. Sometimes this turns against inattentive drivers who forget to turn on the high beams in the daytime during fog and other conditions that are not intended to be detected by the light sensor. On some brands of cars, these devices are capable of operating regardless of the engine ignition, which leads to unpleasant situations when the car’s headlights come on while parked at night, thereby draining the battery.
What is a rain and light sensor
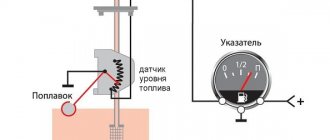
This smart device is located inside the car - how does it sense raindrops? The secret is that the rain sensor reacts not to moisture, but to light. It has two elements: an LED and a photodiode. The LED emits infrared light. We don’t see this light, although we actively use it in everyday life - for example, by switching television channels with a remote control.
Infrared light hits the glass, is partially reflected from its smooth surface and returns to the sensor. Here it is caught by a photodiode. It determines how much light has returned. When the glass is dry, a lot of light returns. When it’s wet, it’s much smaller, since light easily penetrates out through drops of water. Having detected that the glass is wet, the sensor activates the windshield wipers. Some sensor models can very accurately determine the amount of moisture and accordingly adjust the speed of the wipers and the supply of washer fluid.
5 myths about the operation of a rain sensor
We have already dispelled myth No. 1: the rain sensor is NOT activated by the impact of drops on the glass, as well as vibration and other mechanical influences. The operation of the rain sensor is based on the action of photocells. If the sensor responded to shocks, the brushes would diligently wipe flies, mosquitoes and small pebbles from the glass.
Myth #2: “The rain sensor does not work at night.” As we have already found out, the operation of the rain sensor is based on the principle of reflecting infrared rays. Their properties do not depend on illumination. Otherwise, for example, remote controls would not work in the dark.
Myth No. 3: “When replacing glass, you will have to say goodbye to the rain sensor.” You don’t have to: many manufacturers offer car windows with space for a rain sensor. For example, at the Olympia company you can purchase rain sensor glasses for most foreign cars: Toyota Camry, VW Passat, Audi A4 and other cars.
Myth #4: “You can’t put a tint strip on a windshield with a rain sensor.” You can: in this case, a hole is cut out in the tint film for the sensor. The main thing is that the glass tinting is done in accordance with GOST.
Myth #5: “A rain sensor is useless in winter.” Since the rain sensor works by reacting to water drops and not snow, it functions less well in winter. However, if the car has heated glass, falling snow will immediately melt into water, and the rain sensor will work normally.
Interesting facts about rain sensors
- General Motors conducted the first experiments on creating rain sensors back in the 1950s. The sensor was created for the iconic Cadillac Eldorado model. But the technology was far from perfect: between how the rain sensor works on a modern car and the first experiments of GM engineers there are decades of design development.
- One of the first production cars with a rain sensor was the Nissan Silvia, a sports coupe. In the 2000s, rain sensors appeared on cars from Volkswagen, Cadillac and other leading manufacturers.
- The operation of a rain sensor is used not only in the automotive industry, but also in agriculture to control irrigation systems. “Field” sensors have a different operating principle than automobile ones: they have hygroscopic disks, which increase in size when wet and shrink when dry. This regulates the water supply. Interestingly, some sensors have a built-in temperature indicator that stops water flow if the temperature drops below zero.
Modern technologies do not stand still and today almost every car has ceased to be just a vehicle. A car today is something more. It is equipped with additional technology and equipment that greatly facilitates driving a car, making trips convenient and comfortable. Rain and light sensors are a system that is perceived ambiguously. We will help you find answers to the questions: “what is a rain and light sensor?” and “what are they for?”, and also consider the basic principle of the module’s operation.
Unified sensor system
The rain and light sensor is a single system; it automatically controls the switching on or off of the windshield wipers (depending on weather conditions) and the car's headlights (depending on the light level). The manufacturers of this system tried to make drivers less distracted from watching the road. Imagine the following situation: you are caught on the road by heavy rain or snow that sticks to the windshield. You need to turn the windshield wiper on/off. In order to do this, you will have to take your eyes off the road. In such a situation, the sensor will completely take over this function. A similar principle also works in the case of turning on the lights when a car enters a tunnel or it becomes dark outside. The technology itself determines the level of illumination, which affects the quality of visibility behind the wheel.
Sensor mounting location
Previously, such a solution was very rare, but today such a module is available to almost every driver. It is mounted on the windshield. Very often, drivers equip their car with combined sensors that react to light levels and precipitation.
The basic operating principle of a rain sensor
In order to determine the amount of moisture on the windshield, the rain sensor uses the law of refraction. The device is equipped with an infrared emitter and a small photodetector. There are built-in LEDs that emit an infrared spectrum, it is refracted and passes through the windshield, hitting the sensor receiver. The main control unit contains the parameters of light refraction by the outer surface of wet or dry glass. If the windshield is dry, then the light passes through it as much as possible, but when the surface of the windshield is wet, the ability to transmit light is slightly reduced. The sensitivity of the precipitation sensor is very high. It detects thousandths of a milliliter of precipitation and operates instantly (within milliseconds). Many sensors detect how dirty the glass is and automatically turn on the windshield washers to clean the windshield.
Purpose of the light sensor
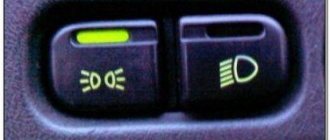
This inconspicuous device is responsible for automatically turning on/off the headlights, and also activates the Coming Home/Leaving Home functions. The sensor detects day and night. On the highway, rarely does anyone forget to turn on the headlights at night, but in the city you can sometimes see a car without the headlights on at night. Sometimes, even in twilight, a car can get damaged or get into an accident. A light sensor will help you avoid this situation. It automatically turns on the headlights and headlights when the light level changes or when entering a tunnel, garage, when moving along a forest road and when darkness or twilight sets in - the sensor is triggered in all these situations, and then the lights in the car quickly turn on. Let's look at rain and light sensors that will help ensure maximum comfortable and safe travel on roads. These include devices from manufacturers Premier DS01, Quantoom RLS-01 and Valeo
Premier DS01
The device can be installed on any make and model of car. It combines a light and rain sensor and automatically turns on the side lights, headlights and windshield wipers. With it, you will not have to waste time turning on additional devices of your car; this sensor will do all this for you. It is easy to install and connects to the car's 12 V network. It is easy to operate and does not require additional maintenance. It fits perfectly with the car’s electronics and does not conflict with the on-board computer.
Rain and light sensor Ford Focus
Gentlemen, there is a spot on the windshield like a rain and light sensor, although maybe I’m wrong. But my lights turn on as soon as I start the car and I have to turn on the wipers myself. Maybe I’m wrong or is something not working correctly?
to s040os: It could also be a climate control sensor. You can simply check it, take a bottle of water and pour it on the windshield in the sensor area, the wipers should turn on automatically.
they don't turn on
to s040os: Are you sure that this speck is the sensor? It may not turn on the windshield wipers itself, but it can adjust the pauses between wipes depending on the intensity of the rain and the speed of movement. Turn on intermittent mode during rain and check.
With light. Do you have an AUTO position on the light switch? Perhaps your car already has a Scandinavian lighting scheme and the low beam headlights automatically turn on when you start the engine.
there is an auto sign but it doesn’t switch there and my assembly is Spanish so if so
The swing cycle regulator is located on the wiper switch; you can turn it and adjust the cycle
As far as I remember, the Spanish assembly already has Scandinavian light. And don't worry about the wipers. I have a 2009 FF2, so the instructions clearly state that the rain sensor works by turning on the intermittent operation of the windshield wipers. Moreover, on the power lever there is a roller for adjusting the sensitivity of this sensor.
to vitalek01: Thanks for the feedback, it seems that the cycle itself will be determined by the degree of humidity.
to mATr1xX: So this is how to adjust the sensitivity of the rain sensor. The more sensitive it is, the more often the wipers will work.
Thanks for the clarification guys I'll try
to s040os: Afterwards, let us know what happened and how it happened, we’ll wait.
Good afternoon Regarding the wipers, I can say for sure (I have a Spanish assembly from 2008, bought in 2009) for them to work automatically, the switch needs to be switched to intermittent mode and when water gets on the sensor they will work, and the regulator adjusts the degree of moisture at which they will trigger. However, in dry weather and especially in winter, I turn the switch to the off position, since the wipers may work unexpectedly due to some condensation on the glass, for example, fog. As for the light, mine has a switch position in the car and only in this position does it turn on automatically; perhaps your car has “daylight” installed, which turns on immediately after starting the engine.
to Anatoli_G: Well, that's right. That's how it should work.
to Anatoli_G: Thanks for the additions.
Good evening, please tell me the rain sensor has stopped working, it used to work. Now when I move the lever to the position for the sensor to work, the wipers wave once and stop, then I move the lever to the constant operation position, the wipers constantly work when I’m just driving, as soon as I stop they start working intermittently. please tell me what could be?
SHARE THIS PAGE
SITE SEARCH
Greetings! My name is Mikhail, I want to express my gratitude to you and your site.
Thanks to you, I was able to remove the scratches my wife caused in the parking lot on my own.
It all started when my wife passed her license and began to often take my car to get to the nearest shopping center. There were no signs of trouble, but one day she said with tears in her eyes that she had rubbed herself against a pole in the parking lot. I still don’t understand how it was necessary to manage to do this, but with women everything is possible, you understand)) The scratch was deep enough, but there was no money or time to bother with painting. That's why I simply ignored the scratch.
A week ago I came across Artem Shevchenko’s blog, who in his article told how to get rid of scratches in 10 minutes. At first I didn’t believe it, but I decided to try it anyway and didn’t regret it at all. The method worked 100%, there was not a trace left of the scratch, and nothing was visible at all from any angle.
In general, I’ll keep the intrigue, for those who want to quickly get rid of scratches, come and read the article on Theme’s blog, I guarantee you won’t regret it.
Source
How to turn on the grant rain sensor
Having driven my father’s car with a rain sensor for some time, I realized that I would definitely have one of these, so a couple of days after buying the car I ordered myself a DDA-25, after 2 weeks I received it and, happy, went to implement the purchase, I open the fuse box... and there is no such switch there! “We’ve arrived,” I thought. I poked it in all places in the block, I thought maybe it just doesn’t look right here, there were 0 reactions. I’m starting to wonder why and how, it turns out that in the luxury suites there is no such relay, but they are controlled by the comfort unit, which manages almost all the electronics in the car. Again I go to the website of the sensor manufacturer and see another sensor there, DDA-35, I read the instructions for it and see that it is the same as mine, it just connects differently, it is intended for installation in a car with an electronic windshield wiper relay, well, I think it’s my case. I write to the soap the next day and receive a positive response. Well, it’s easier to think and cut off the relay, the colors of the wires really match (although it would have been better not to cut it off, as it turned out later). I called an electronics engineer I know to help me implement this crap. After 4 hours, as some people say here, shamanic dances with a tambourine, voltmeter, milliammeter, indicator and other crap, it turned out that putting it in a luxury is not much more difficult than in a regular grant.
I made a connector instead of the cut-off relay, it makes it easier and neater
Briefly speaking. We remove the steering column cover and take out the wiper mode switch; of all the wires that go to it, we only need one “yellow with a green stripe” - this is the wire that receives power when the intermittent wiper mode is turned on.
Interior dimensions of the domestic model
Thanks to the impressive size of the body, the Lada Vesta managed to acquire a fairly spacious interior. Here, on both seating rows, five people of average build can sit with sufficient comfort. Trips over long distances with such a large number will proceed with comfort and in an unnoticed time.
The developers paid great attention to such an important dimensional parameter as the height inside the LADA Vesta cabin. Thanks to this, Vesta has increased the amount of space between the seat cushions and the roof lining. Tall passengers will feel quite comfortable after boarding
Also, now there is no risk of catching your head on the edge of the doorway while “immersing” in the cabin
Tall passengers will feel quite comfortable after boarding. There is also now no risk of catching your head on the edge of the doorway while “immersing” in the cabin.
The length and width of the Russian model had a beneficial effect on the amount of space available for placing the legs of the rear riders. The distance from the back of the front seats to the passenger’s knees in the rear seat row is an enviable 200 mm. Even people 2 m tall will not be able to rest against the front backrests.
How to remove the side mirror on a Kia Rio?
Removing the side mirror is a little more complicated; you will have to use tools, but there will be no differences in the removal process between the left and right housings. For dismantling you will need:
- flathead screwdriver;
- head at 10.
The housing is removed in the following order:
- turn off the Kia Rio engine;
- Remove the negative wire from the battery terminal;
- use a slotted screwdriver wrapped in electrical tape or a plastic spatula to pry off the housing lining;
- press out the strong plastic clips (this will require some physical effort) and remove the lining;
- With your fingers (preferably with gloves) squeeze the latch holding the block of wires responsible for heating;
- move the block to the side;
- holding the element with your left hand, use your right hand to unscrew the three bolts holding the mount using a 10-mm wrench;
- remove the part.
Installing the mirror is done in the reverse order. When working, you must use gloves and do not touch the reflective element with your hands, so as not to leave marks that are difficult to wash off.
Disassembling rear view mirrors
The procedure below applies to both exterior and interior mirrors.
- The mirror is removed from its regular place.
- Use your hand to gently press the top edge of the mirror glass until it unrolls.
Side mirror mirror element rotates manually - A piece of rag or napkin is placed in the gap that appears between the mirror body and the glass.
- Then a flat-head screwdriver, pre-wrapped with electrical tape, is inserted into this gap.
The latches holding the mirror element are bent with a flat screwdriver - The latches holding the mirror are pryed with a screwdriver and removed from the protrusions.
- The mirror glass is carefully removed.
Popular worlds
Finally, I would like to talk about several popular myths that are associated with rain sensors on cars.
Indeed, many continue to believe in them. And this can become a problem in certain cases.
- Rain sensors are available at extra cost. In fact, these controllers are becoming standard equipment in many countries because they are directly related to safety. Although it happens that the first version of the car did not have them, and after the restyling took place, the sensor appeared in the basic configuration. This is simply due to the automaker meeting new requirements;
- The controller reacts to falling raindrops. This issue has already been addressed. No, it reacts not to moisture, but to refracted light;
- The system does not work at night. Infrared radiation is completely independent of outdoor lighting. Based on this logic, the TV remote control wouldn't work at night either;
- If the glass is directly replaced, the sensor will no longer be there. Also a myth. But conditional. It all depends on the specific glass. Most modern glass comes with space provided for this system;
- You cannot apply tint on the glass in the area of the sensor itself. Actually it is possible. But it’s better to cut a small hole for the controller;
- In winter this is a useless feature. If the glass is heated, that is, the snow turns into water, then the function works exactly the same as in spring, summer and autumn.
If, in addition to the rain sensor, you want to know something interesting about the light sensor, follow this link and read some rather informative material.
I think we can end here
Thank you all for your attention! Watch this video on YouTube
Watch this video on YouTube
Don't forget to leave your comments and ask questions!
Subscribe, tell your friends about us and expect a lot of new and interesting materials on our website!
How to adjust the sensitivity of the rain sensor
On the front side of the sensor there are two indicators and a button for quickly changing the operating mode. There are modes: rain\snow\standard. The rain sensor also has automatic level adjustment (to adjust to different glass, tinting, lighting). When turned on, the sensor shows the current sensitivity:
- Low sensitivity - 1 indicator flash.
- Average sensitivity - 2-3 flashes
- High sensitivity - 4 flashes.
To change it, press and hold the button for 3 seconds. This will be followed by a number of flashes indicating the current sensitivity. We continue to hold the button until a series of flashes follows. Release the button when the desired level is reached. An example of a rain sensor operating at a minimum level:
Have you ever had to install a rain sensor on your Lada car? What feedback can you give about his work? Let us remind you that the website presents other useful improvements, for example, replacing the washer nozzles with fan nozzles or installing a rear view camera washer.
source
We disassemble the mirror to replace the Vesta turn signal
Theoretically, to replace the turn signal, it is not necessary to completely remove the mirror from the car. And yet the work is not so difficult that you need to change the turn signal and deal with fragile plastic in the canopy. Therefore, it is safer to remove it. Then we proceed according to the following algorithm:
Using a thin screwdriver, unclip the latches one by one and remove the mirror from the housing. If the glass is heated, disconnect the two terminals on the thermoelement. Now we have access to the mirror adjustment gear motor. The location of the clamps is shown in the photo.
To replace the turn signal, you need to remove the upper part of the outer plastic mirror cover. It is also secured with latches that need to be pryed off with a thin flathead screwdriver. The location of the latches is as follows:
Important! Attention! Before working with the plastic elements of the side mirrors, they must be warmed up with a hair dryer turned on at a temperature of 100-120 degrees at medium blowing power
We remove the cover and gain access to the direction indicator. It is fixed in plastic sliders and is protected from shifting by latches. We release the latches and move the pointer for dismantling.
We inspect the quality of the contacts on the terminal block. It is possible that the turn signal does not work due to oxidation of the contacts, although theoretically they are insulated from moisture with a rubber boot. Water can only get there due to the negligence of the collectors.
Disconnect the terminal and remove the non-working turn signal
We install the new one in the reverse order, being careful, and before installing the decorative cover, we check the functionality of the pointer by connecting the terminal to the battery
How does a rain sensor work?
The operating principle of the rain sensor is based on a comparison of the optical properties of the windshield under different atmospheric conditions, or more precisely, on the differences in the reflection of an infrared ray by a clean and moistened or contaminated glass surface.
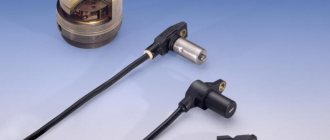
Everything is quite simple - it consists of emitting and receiving infrared LEDs. The design and operation of such a product will help you understand the photo:
As can be seen from the above description, the structure of such a device is quite simple, which predetermines quite wide possibilities for its use.
What such a device looks like is shown, for example, in the photo:
The video will help you understand how this kind of work is done. The data presented confirm that it is easy to glue such a device, and this work can be done yourself.
Installation of rain sensor DDA
For rain sensors DDA-15/25 the procedure is simple:
- Glue the optical sensor to the top of the windshield;
- Route the wire from the sensor to the mounting block along the left windshield pillar;
- In the fuse block, install a rain sensor relay instead of the standard wiper relay (observing the markings and position of the key);
- Turn on the rain sensor by turning the steering column switch to the first position.
The installation process is also shown in the video:
Installation of rain sensors DDA-35/45/55 is carried out according to the diagram (see links above).
Windshield pillar trim
You need to open it, lower the window, disconnect the terminals from the battery. Then disconnect the connector with wires. To do this, you need to pull its lock up. The part is ready to be removed from the hinges.
Tip: If the door is being removed for repairs that require disassembly, it is recommended to disassemble it while it is on its hinges. This is easier to do thanks to free access to both sides of the door.
The casing is removed to repair the mechanisms that are installed under it, or in case of some modification. The tools you will need are a flathead screwdriver and a socket wrench with a T20 (star) bit.
The following sequence of actions is performed:
- Remove the side mirror triangle. The part is pryed off with a screwdriver and the latch is snapped off. Then disconnect the block with wires;
- The doors are pryed up from the bottom, then the lampshade is removed and the wires are disconnected from it;
- Using a wrench, unscrew the three screws securing the casing from below;
- They find a plug from the top end and take it out. Unscrew the fastening screw that is screwed in behind it;
- Another screw is found and unscrewed inside the door handle;
- Carefully pry up, remove the unit that controls the exterior mirrors, power windows and central locking, disconnect the wiring from it, unscrew the fasteners located perpendicular to the door part;
- Starting from the bottom, insert a screwdriver between the door and the trim until all the latches are released.
Remove the window handle. To do this, insert a screwdriver or a spatula between its middle mount and the bottom washer, and pull the protrusion on the middle part outward. When the protrusion is pressed out, the middle part is pulled out. Then remove the handle from the slot of the window regulator, the base of the handle, and the round plastic washer.
Insert the tool between the door handle and its trim, then remove the trim. There are two bolts screwed in under it, which we unscrew with a wrench. At the very bottom of the card, find a self-tapping screw and unscrew it using an asterisk attachment. Now the casing is fixed only on plastic clips and velvet. The card is pryed up, starting from the bottom, and all the latches around its perimeter are snapped off. Then remove the card from the velvet.
The side window trim is attached to the rear parcel shelf trim. This trim is removed together with the rear parcel shelf upholstery.
How to turn on heated mirrors
Starting in 2021, AvtoVAZ has equipped the 2180 with the additional function of “electric drive and electric heating of side reflectors.”
This function is activated only after starting the engine (so as not to damage the battery) and switching on the heater to the window blowing mode (windshield and side). After this, you need to press the button on the climate console, which is responsible for heating and blowing the reflectors, rear and windshields.
To activate this function on the luxury version of Lada Vesta, you need to press the leftmost button at the bottom on the car’s climate control unit with the inscription “MAX”.
At 20-degree frost (which is usual for an Eastern European winter), the following happens:
- after 1 minute the ice on the reflectors begins to melt;
- after 2-3 minutes the ice melts completely;
- after 4 minutes the mirror is clean and dry.
How to disassemble a side mirror on a Lada Vesta
To disassemble the side mirror at 2180, you need to do several simple manipulations. Since the Lada Vesta turn signal indicator is an electrical device, when removing the reflector it is necessary to remove the negative terminal from the battery. It is necessary to remove the trim from the car door pillar by first unclipping the upper and two lower latches. After this, you need to disconnect the wires and unscrew the three screws that secure the rear view reflectors to the door.
Once the reflectors are removed, their disassembly is almost complete:
1st step: turn the mirror element to the side until it stops to remove it (the reflector heating wires do not need to be disconnected);
Step 2: use a flat-head screwdriver to unclip the mirror element from the housing;
Step 3: To release the colored plastic trim clips, use a flat-blade screwdriver and then slide the trim to the side.
If you remove the side mirror, you can get to the mechanism that provides electrical power to the repeaters. After replacing the relevant parts, installation proceeds in the reverse order.
Lada Granta › Logbook › Installed a rain sensor
I installed a previously purchased rain sensor. I pasted the sensor just below the tint behind the mirror - it’s not visible and doesn’t interfere. The wire from the sensor was glued to 2-sided 3M tape. I laid the wire and simply inserted the relay instead of the standard one.
First I set it to maximum sensitivity 4. Then I set it to 3.
It works and makes me happy. I recommend.
INSTALLATION AND OPERATION INSTRUCTIONS
1 Installation and connection
Install the rain sensor (RD) at a temperature not lower than 15°C! 1.1 Clean and dry the place where the motor control housing is mounted on the windshield inside the passenger compartment (behind the rear view mirror). 1.2 Glue the DD housing (with the cable up) in the selected location of the windshield so that the sensors are in the transparent part of the brush cleaning area. 1.3 Route the cable under the interior trim in the direction of the relay unit (if necessary, through the door seal). 1.4 Install the windshield wiper breaker housing into the relay block in place of the standard one.
2 Operation
2.1 Turn on the ignition. The glow of the built-in LEDs will show the current operating mode: green - rain; blue - snow; no light—mode with pause adjustment. A blinking blue LED indicates that intermittent mode is enabled. It is necessary to move the steering column switch to the “off” position. The mode is selected in a circle by briefly pressing the button. 2.2 Select the DD sensitivity level by pressing and holding the button for at least 3 s, controlling the number of flashes of the green LED (1 flash - low level, 2 or 3 - medium, 4 - high). The button must be released after the required sensitivity level is indicated. The sensitivity selection occurs in a circle. The selected operating mode and sensitivity level are stored in non-volatile memory. 2.3 Turn on intermittent wiper operation.
3 Mode with pause adjustment
3.1 Set the windshield wiper mode switch to the “Intermittent mode” position - the standard pause of the windshield wiper operation will be set (about 5 seconds between sweeps of the blades). 3.2 To change the pause, move the switch to the “Off” position and, after maintaining the required pause, return to the “Intermittent mode” position. 3.3 The pause can also be changed in another way: move the switch to the “Continuous mode” position and, during the first stroke of the brushes, return back to the “Intermittent mode” position. The pause value will be equal to the time interval from the last stroke of the brushes until the moment of switching to the “Continuous mode” position. The pause can be changed at any time by repeating step 3.2 or 3.3.
Installation
To install and connect a light and rain sensor in a car, it is not necessary to seek the services of a workshop. Each set of sensors comes with detailed instructions describing the installation procedure. In most machines, the sequence of user actions is equally simple:
- The main component of the device, called the “eye,” is fixed inside the passenger compartment in place of the rear-view mirror holder. Considering how the light sensor works, for greater accuracy of the sensor, it is recommended to point it towards the driver and not towards the street. The dimming in the cabin is fixed much faster and more reliably.
- The sensor relay and control unit are connected in accordance with the diagram from the instructions.
- The last to be connected are the contacts responsible for adjusting the car's lighting. Some sensor models provide the ability to connect a button to turn the light and rain sensor on and off.
Where is DD
The digital sensor is located between the back of the windshield and the rear view mirror. The location of the deployment can be changed, the main thing is that the controller does not go beyond the perimeter of cleaning with windshield wipers.
Note to the driver!!! The installed sensor should not interfere with the natural visibility of the windshield. Otherwise, you risk being fined by the traffic police.