Heater valve malfunctions
Despite the improved design, the heater valve on the “classic” remains one of the most problematic components due to frequent failure.
Some car owners prefer not to use it at all, leaving it in the open position all year round, blocking the flow of warm air into the cabin only with a damper.
This is not a way out of the situation; heat will still flow, especially if there is even the slightest problem with the damper.
The most common causes of crane failure are:
- oxidation of the locking mechanism;
- violation of tightness.
In the first case, the heater valve simply stops working, making it impossible to open or shut off the pipeline. But most often another problem arises - a leak, which causes depressurization of the housing.
A clear sign of a faucet seal failure is a decrease in the level of coolant in the expansion tank, a damp carpet under the glove compartment, a specific smell, or a greasy coating on the windshield - the result of evaporation of antifreeze or antifreeze.
Most heater valve designs do not have a dismountable body, which eliminates the possibility of their repair.
Factory (standard), ball or ceramic valve, which is better?
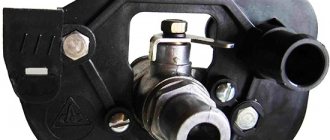
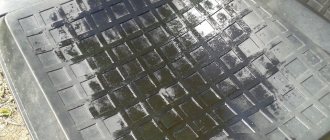
Among car owners on various forums, discussions constantly arise about which heater tap is better. Most often, battles unfold between two options: ball or ceramic. Almost no one doubts that a standard valve based on a rubber membrane is not reliable, more often than others it leaks, “sticks” and is especially susceptible to acidification. As proof of this, see the images above, where the reason for the replacement is a jammed faucet and a fluid leak.
Ball or ceramic?
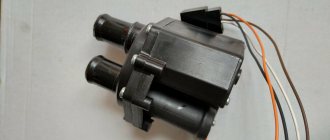
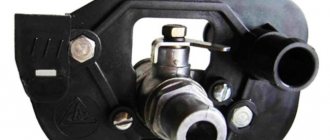
We recommend purchasing a ceramic faucet. The body of such a faucet is ordinary, but the locking element consists of two ceramic plates with slots that rotate relative to each other.
Ceramic heater tap
A ball valve, in principle, is also not bad; the undoubted advantage of such a valve is its greater throughput compared to a ceramic one (when open, the passage hole is equal to the internal diameter of the pipe). At low temperatures this is especially noticeable, but the likelihood of souring is higher for a ball valve than for a ceramic one.
Replacing the heater tap
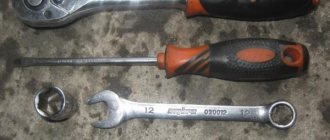
The process of replacing a faucet, although it requires some time, is not particularly difficult and can be easily done with your own hands. For this you will need:
- set of wrenches;
- screwdriver with Phillips bit;
- container for draining coolant;
- new heater valve with gaskets;
- automotive sealant;
- rags.
First, let's select the faucet itself. The catalog number of the original spare part is 21010-8101150-00. On sale you can find analogues presented in the table.
| Catalog no. | Manufacturer | Locking mechanism |
| 21010-8101150-00 | OKA DAAZ OAT Russia | Metal |
| 21010-8101150-00 | JVVA Russia | Ceramic |
| 2101-8101150 | BAUTLER UK | Ceramic |
| 21010-8101150-00 | Master-sport Germany | Ceramic |
Look for faucets with a ceramic shut-off mechanism. They last longer due to the fact that ceramics do not oxidize.
We place the car on a pit or overpass. If the engine is hot, be sure to let it cool.
Remove the crankcase protection.
We unscrew the drain plug on the radiator, first placing a container under it and opening the filler cap.
We open the hood and find two radiator pipes for the “stove” on the passenger side. Use a screwdriver to loosen the clamps and disconnect the hoses. Using a 7-mm open-end wrench, unscrew the bolts securing the radiator and remove the rubber seal.
We move into the passenger compartment to the passenger seat. Open the glove compartment and use a Phillips screwdriver to unscrew the screws securing the glove box body. Let's take it out.
Next, remove the storage shelf; you need to unscrew the screws with a Phillips screwdriver.
Using a 10mm wrench, unscrew the nut of the air duct bracket. Remove the heater mounting brackets. We take out the right air duct.
Using a 7 wrench, unscrew the bolt securing the crane control cable. We move the cable to the side.
Using a 10mm wrench, unscrew the two bolts securing the faucet to the radiator. Let's take it out. In this case, coolant will flow from the radiator. Be prepared to use a rag.
We install the new faucet in place, not forgetting to change the rubber gaskets and lubricate the place where it connects to the radiator with automotive sealant. We fasten the control cable, checking its tension.
We reassemble everything that we took apart in reverse order. We do not install the glove box until we check the tightness of the tap connections and its operation.
We tighten the drain plug on the cooling radiator. Pour coolant into the neck. We start the engine, warm it up until the fan turns on. We check if there is a leak from the tap. If everything is in order, put the glove box in place.
VARIETIES OF FUEL TAPS
Since the fuel tap on the VAZ 2107 is an extremely short-lived device, after two years of operation of the tap the driver will inevitably face the question of replacing it. However, fuel taps vary in both reliability and design. Therefore, it is worth understanding them in more detail.
MEMBRANE TYPE VALVE
A membrane-type valve was installed on all “sevens” that ever came off the assembly line. It is very easy to find this crane for sale: it is available in almost every spare parts store. This part is inexpensive - only 300 rubles or so.
The membrane heating valve on the “seven” has never been reliable
But the car owner should not be tempted by the low cost of a membrane tap, since it is very unreliable. And literally in two or three years the driver will again see coolant leaks in the cabin. Therefore, you should set the diaphragm fuel valve to “seven” only in one case: if the car enthusiast has not found anything more suitable.
FUEL BALL VALVE
A ball fuel valve is a more acceptable option for installation on a VAZ 2107. Due to its design features, a ball valve is much more reliable than a diaphragm valve. The shut-off element in ball valves is a steel sphere with a small through hole in the middle. This sphere is attached to a long rod. And this entire structure is built into a steel body, equipped with two pipe threads. To open the tap, it is enough to turn its stem 90°.
The main element of the ball valve is the steel locking sphere
With all the advantages, the ball valve has one significant drawback, which makes many drivers refuse to buy it. The sphere in the tap is steel. And although faucet manufacturers claim that these spheres are made only of stainless steel, practice shows that in aggressive antifreeze they very easily oxidize and rust. Especially during the long summer downtime, when the tap is not opened for several months. But if the driver is forced to choose between a diaphragm valve and a ball valve, then, of course, he should choose a ball valve. The price of ball valves today starts from 600 rubles.
TAP WITH CERAMIC ELEMENT
The most reasonable solution when replacing the fuel tap on a VAZ 2107 would be to purchase a ceramic tap. Externally, this device is practically no different from a ball and diaphragm valve. The only difference is in the design of the locking element. It consists of a pair of flat, tightly fitted ceramic plates placed in a special sleeve. This sleeve has a hole for the rod.
Ceramic tap - the best option for the VAZ 2107
When the rod turns, the distance between the plates increases, opening the way for antifreeze. The advantages of a ceramic faucet are obvious: it is reliable and not subject to corrosion. The only drawback of this device is the price, which can hardly be called affordable and starts at 900 rubles. Despite the high price, the driver is strongly recommended to purchase a ceramic faucet. This will allow you to forget about antifreeze leaking into the cabin for a long time.
WATER TAP
Some drivers, tired of constant problems with the standard “Seven” fuel tap, solve the problem radically. They go not to the auto parts store, but to the plumbing store. And they buy an ordinary water tap there. Usually this is a Chinese ball valve for pipes with a diameter of 15 mm.
Some drivers install regular water taps on the VAZ 2107
Such a faucet costs 200 rubles maximum. After this, the standard diaphragm valve from the “seven” is removed, a hose is passed into the niche where it stood, and a fuel valve is attached to the hose (it is usually secured with steel clamps, purchased at the same plumbing store). This design lasts a surprisingly long time, and in case of corrosion and jamming, the procedure for replacing such a tap takes only 15 minutes. But this solution also has a drawback: the water tap cannot be opened from the cabin. Every time the driver wants to use the heater, he will have to stop the car and climb under the hood.
Speaking about water taps, I can’t help but recall one story that I personally witnessed. A driver I know installed a Chinese crane under his hood. But he categorically did not want to jump out into the cold every time to open it. He solved the problem in the following way: he slightly expanded the niche in which the standard faucet had previously been located using ordinary metal scissors. He drilled a hole on the handle that opens the water tap. He inserted a hook made from an ordinary long knitting needle into this hole. He brought the other end of the spoke into the salon (under the glove compartment). Now, in order to open the tap, he just had to pull the knitting needle. Of course, such a “technical solution” cannot be called elegant. However, the man still solved the main task - not to climb under the hood every time.
Replacement result
After replacing the heater tap, check its operation by turning on the fan, opening the air intake damper completely, and opening and closing the flow of coolant into the heater radiator. When the flow is blocked, the temperature of the discharge air should drop significantly.
If there was a leak from the faucet before the repair, wipe the inside of the windshield with an alcohol solution to remove deposits and dry the carpet.
Now you can fully regulate the climate in the cabin, and not worry about a coolant leak, at least for some time.
How much does a new stove faucet and labor to replace it cost?
In Moscow and the Moscow region, the average price for a heater valve for a VAZ 2101-2107 is in the range of 120-130 rubles. Moreover, the prices for factory, ball or ceramic valves are practically the same.
Replacing a faucet in a car service costs 400 rubles and more.
We recommend changing the heater tap yourself. First, you will save money and gain experience in car repairs. Secondly, this operation will not take much time (about 1 hour), and all the necessary information is given in this article.
VAZ family cars have many components and mechanisms that are far from perfect and have low reliability. One of these is the stove tap. VAZ 2105–07 owners quite often face the need to replace this part due to coolant leaks or internal oxidation of the mechanism, which impairs its performance. Fortunately, the part is inexpensive and anyone can replace it in a garage.
Procedure for replacing the heater tap
You should know that replacing the heater valve must be done with a cold engine. This will avoid all sorts of troubles associated with heated coolant. It is clear that any manipulation associated with the assembly and disassembly of automotive components must be carried out in a certain sequence. This equally applies to work such as replacing silent blocks and replacing the heater tap.
Removal of this tap is carried out in the following order:
- after the car is prepared for repair work, it is necessary to gain access to the engine compartment,
- in the engine compartment, use a screwdriver to loosen the clamp securing the supply hose, after which the hose is removed from the lower pipe of the heater valve,
- The lower lever of the ventilation system control unit is set to the extreme right position. This closes the air dampers on the side air ducts,
- remove the glove box body and storage shelf,
- The nut securing the right air duct to the body is unscrewed. This is done using a 10mm socket wrench. After which the air duct is removed from the stud and disconnected from the side deflector of the dashboard,
- you should loosen the bolt securing the heating tap drive rod using a 7mm socket wrench,
- the rod shell is released from under the bracket, after which the rod tip is removed from the tap of the interior heater lever,
- Unscrew the two bolts securing the tap to the stove radiator. To do this, you will need a 10mm spanner. At this stage, you will also need to secure the lower cage nut so that it does not fall out of the socket. For these purposes, you can use plasticine,
- Now, in fact, you have reached the place where the heater tap is located. At this stage, it is removed - its pipe is removed from the seal, which is located in the partition of the engine compartment. There is also a rubber gasket here - it plays the role of a seal at the junction of the flanges of the heater valve and the stove radiator. During removal, some coolant may leak out of the heater core. To collect it you will need a rag,
- Unscrew the two bolts securing the pipe to the heater tap. To do this, use a key of 10,
- the pipe is removed. The place where the heater valve (its flange) and the pipe connect is also sealed with a rubber gasket.
At this point, the work on disassembling the unit is completed. You should begin installing the heater tap. This is done in the following sequence:
- removed rubber gaskets must be replaced with new ones,
- in the reverse order to that described above, the heater tap is installed,
- the heater valve control lever moves to the extreme right position,
- it is necessary to fill in the missing amount of coolant,
- After the cooling system is filled with liquid, you need to check the tightness of the connections between the heater tap and the heater radiator, as well as the hose. If necessary, parts should be tightened,
- Then all parts are assembled in reverse order.
It should be noted that these works, as well as adjusting the valves, can be performed by you yourself or with the help of car service specialists.
Replacing the heater valve on a VAZ: video instructions
For a VAZ 2107, replacing the heater valve is one of the most important repairs. After all, this part is responsible for regulating the air temperature inside the car. The use of a crane also depends on the car model. For example, the VAZ 2108 is also equipped with a special damper for air supply, and on the VAZ 2110 and higher models there is no valve at all. On a VAZ 2107, the heater valve, the replacement of which will be presented step by step in this article, performs the function of supplying engine coolant to the radiator. This helps warm the air inside the car.
System management
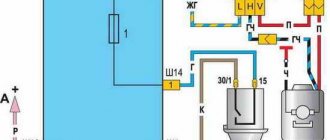
In the VAZ-2104, the interior heating is controlled by the control panel handles, each of which ensures the closing and opening of one or another element.
Thus, the upper handle 9 ensures the opening and closing of the radiator valve 22. It regulates the amount of liquid that will enter the radiator.
The middle handle 10 opens and closes the air supply hatch 7, which regulates the amount of fresh air supplied from outside the car.
The lower handle 11 regulates the position of the damper 16, which distributes the air flow through the air ducts.
There is one feature of air flow distribution control. When the flap 16 is positioned to blow the windshield, the heated flaps of the side windows are completely blocked. Conversely, when the air flow is blocked by the flap on the windshield, the air is directed only to the side windows.
This phenomenon is due to the fact that the windshield damper lever is connected to the side air duct damper lever. Therefore, to simultaneously heat the windshield and side windows, the damper control handle must be placed in the middle position.
Heating of the VAZ-2104 is carried out in 4 ways:
- Heated windshield (Middle and lower control panel handles are moved to the right all the way);
- Heated side windows (the middle handle is moved to the right, and the bottom handle is moved to the left all the way);
- Heating of feet (upper handle – to the right all the way, air distribution cover of the heater housing is lowered down);
- Supply of hot air from outside through lowered windows (sounds like a joke, but this is indicated in the technical documentation for the car);
How does the heater valve system work?
The fact is that, as you know, antifreeze is used to cool the engine. This is a special liquid that the car owner pours into the radiator. This liquid tends to heat up and thereby reduce the engine temperature. It is this already hot liquid that is sent to the interior heater radiator and a gradual heating of the air is observed. But this only happens when the heater tap is open. If it is closed, the air no longer becomes warm. After all, a car radiator is connected not only to the engine cooling system, but also to the fan. And as you know, it takes in cold air from outside, which passes through the radiator and heats up only if there is a supply of antifreeze. The more the heater valve is open, the more the air in the cabin will heat up and vice versa. This principle is still used on the “sevens” today. But later models, starting with the VAZ 2108, also have a damper that automatically regulates the temperature. The faucet in this case works as described above, and the damper determines the direction of the air. When it is open, the air flows completely into the radiator, where the tap is open. When the damper is closed, air no longer flows through the radiator. A combined option is often used, when part of the air comes from outside and the other from the radiator. As for controlling the damper, this occurs simultaneously with the control of the tap.
Replacing the heater valve on a VAZ 2107
The heater valve needs to be repaired or replaced in cases where the air does not switch from cold to hot. Repairs will not require any urgency, but still, what driver wants to freeze in the cabin and expose his passengers to this. And if there is still a leak from the heater tap, then it’s time to sound the alarm and start replacing it, because in this case the air leaves the cooling system, entering the cabin. This ultimately leads to bad consequences, such as an unpleasant odor in the cabin, wet carpet upholstery and other problems. On a VAZ 2107, it is advisable to replace the heater valve with a ceramic version. Such faucets, especially domestic ones, are cheap, but very high quality, which is paradoxical in this case.
Before replacing the heater valve on a VAZ 2107, you need to arm yourself with the following tools:
- screwdrivers;
- a container where the coolant will be drained;
- wrench 10;
- socket wrench size 13.
There is no need to say that the work should be carried out on an inspection hole or overpass. Some people use a jack in their work, but for overweight people, unscrewing the pipes from the ground will be a little problematic. After all, replacing the heater tap of a VAZ 2107 injector is not an easy task! So, let's move on to the direct replacement:
- drain the coolant by placing a container under the engine of the car standing on the inspection hole (you just need to unscrew the drain plug);
- after the liquid has completely drained, you need to move on to the pipes (it’s not worth removing the container, as it will still be needed);
- unscrew the pipes, as there is still liquid left in them;
- each pipe is attached with a clamp that needs to be loosened;
- we get to the main pipe, which goes from the engine to the stove tap;
- loosen the pipe clamps and clean the threads of the two heater valve studs with a wire brush (it is recommended to pre-treat the studs with WD 40).
Attention: Treatment of studs and threaded connections with a special compound is very important. After all, if you don’t do this, the process of unscrewing reveals a significant problem. The studs are the same bolts whose heads sit in the plastic body of the heater valve. As for the nuts, they are self-locking and have a plastic ring, which already indicates a complex unscrewing process. Therefore, there is no need to be lazy, but you should carefully process the connections. After all, it will only take a few minutes, and the opening time will be saved by about a whole hour.
Replacing the heater tap of a VAZ 2107, a video of which can be viewed here
- remove the pipes, draining the liquid remaining in them;
- go to the car interior;
- remove the side trim of the VAZ 2107 torpedo;
- we get to the pipe clamps and if they don’t look very good, replace them (to do this you need to unscrew them near the radiator);
- take a 10mm wrench and unscrew the nuts securing the heater tap (you should know that when removing it, liquid may flow out of the heater and you will need to use a rag to collect it);
- we return to the cabin and pull the heater valve towards ourselves (this must be done from the passenger seat);
- remove the spring retainer from the heater tap;
- disconnect the control cable from the crane.
Heater fan problems
It also happens that the VAZ-2104 stove only blows in the legs, or does not blow at all. This problem most likely has a specific culprit, but identifying it will take a little work.
First, you should check whether fuse F1 is intact, which, in addition to the stove motor circuit, protects the reversing lights and is responsible for heating the rear window. If it burns out, we replace it with a whole one, but always with the same rating (10A). If you put less, it will burn out much faster; if you put more, you expose consumers, including the electric fan, to the blow. In cases where, after installing a new fuse of the correct rating, it blows again, look for a short circuit, and it can occur in any part of all three electrical circuits.
If the problem is not in the fuse, it makes sense to check the functionality of the heater motor rotation speed switch, for which you need to disconnect all the wires from it. Then we alternately connect one end of the indicator to ground, and the other to each of the wires of the button, always with the ignition on. If the light does not light up during one of the tests, it means there is damage to a specific wire, otherwise either the key or the fan itself is to blame.
We clarify this as follows: we make a jumper from a piece of wire, closing any two contacts of the block. If the motor starts, then you need to change the button. If the engine is silent in all combinations, it is obvious that this is the reason.
If the motor only runs at maximum speed, the problem is a burnt-out additional resistor. This ballast needs to be replaced, and you can find it under the dashboard, closer to the driver's side.
The fan may not work due to lack of contact with ground - on older cars this wiring often simply rots. This particular malfunction can also be determined using a multimeter, with a simple test. To do this, we again dismantle the speed shift key and disconnect the contacts. We connect one end of the multimeter to ground, and connect the other wires in turn. If the fan motor and the ballast resistor are working properly, the multimeter light will light up when two of the three wires are shorted. If the resistance is burnt out, the light will light up only once; if none of the tests gave a positive result, you need to look for the reason either in the lack of contact with ground, or in the electric motor of the stove itself.
Algorithm for dismantling the heater motor:
drain the coolant into a previously prepared container by unscrewing the drain plug on the block; as soon as the antifreeze stops dripping, loosen the heater clamps and disconnect both pipes; go to the salon, dismantle the decorative shelf under the glove compartment (unscrew the three side screws); dismantle the radio panel - first unsnap it with a screwdriver, pull it out, then disconnect all the power supply connectors, having previously marked them with a marker so as not to confuse them during assembly; Using a screwdriver, very carefully pry up the heater operation control keys and remove them; snap off the cover of the lower part of the panel; below we see two screws - unscrew them; We also unscrew the two nuts at the end of the panel (behind the radio shaft); dismantle the console, using extreme caution; snap off both air ducts; unscrew the screws securing the stove radiator, disconnect the two latches securing the lower part of the radiator; disconnect the heater tap control cable; unscrew two more screws securing the lower part of the heater; we pull out the electric motor, check its condition and functionality. If necessary, we change it; we install the restored or new motor in place, performing all operations in reverse order.. https://www.youtube.com/embed/QGVC2Iio3TQ
We have examined all the main malfunctions due to which the standard VAZ-2104 heater does not work well or does not provide warm air into the cabin at all. We hope you find this information useful.
Tools and Safety
You don’t need any special tools for repairs; prepare:
- new faucet;
- keys for 7 and 10;
- Phillips screwdriver;
- pliers;
- container for draining coolant.
Carry out repairs on a cool engine to avoid burns.
The choice was made on the tap, article number 2101-8101150. Which, according to the description, contains two ceramic shut-off elements that prevent the faucet from “souring” and guarantees complete tightness. Well, time will tell.
Heating and ventilation system design
Next, let's look at what kind of device the VAZ-2104 stove has, then how it works, as well as how the interior ventilation works.
For clarity, a diagram of the VAZ-2104 stove is provided
So, under position 1 there is a resistor for changing the fan speed. The base of the stove consists of a fan housing 2 and a blower fan guide 3. They are connected to the upper part of the housing by brackets 4. The upper part of the housing is the radiator casing 5. An air inlet hatch 6 is installed on top of it.
A radiator 8 is located inside the upper part, and a foam rubber gasket 7 is used to ensure its tight fit. This radiator is connected to the cooling system through metal pipes 9. A valve 10 for supplying liquid to the radiator is installed on the inlet pipe.
The stove fan consists of an impeller 11 and an electric motor 12. The fan is attached to the housing using a bracket 13, and to prevent vibration, it is pressed with a cushion 14.
On the lower part of the body there are dampers for supplying warm air to the front doors 15, as well as a cover for supplying air to the footwell area 16.
But this is only the design of the stove; in order for the VAZ 2104 interior to be heated properly, additional mechanisms are attached to it.
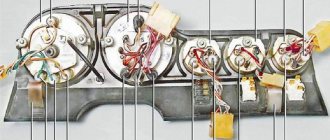
The following pictures show the remaining elements of the system
Heating system side view
Under designations 1 and 2, the left and right air ducts with the left 4 and right 5 nozzles are shown. Position 3 indicates the windshield air duct. Control panel – 6, with handles for controlling the tap 9, controlling the inflow cover 10 and controlling the heating of the side and windshields 11. Under position 12 there is a lever for the air distribution cover.
Next come the elements of the stove itself: 13 – fan housing with impeller 14 and electric motor 15, windshield damper 16, fan speed control resistor 17, fan housing guide 21, fluid supply control valve 22, radiator housing 23, radiator 25 with gasket 24, elements fastening the air supply cover 26.
Position 18 – control rod for the side heating flap, 19 – heated side window flap, 27 – heater rod, 28 – air intake grille, 29 – car hood, 30 – air supply box, 31 – windshield.
How to replace the faucet of the VAZ 2107 stove
Procedure for replacing the faucet:
- drain a couple of liters of coolant from the radiator;
- remove the shelf under the glove compartment and the glove compartment itself;
- remove the pipes from the stove, pay attention, if they are already hard or have cracks, then it is better to replace them;
- unscrew the rubber seal and remove it from the pipes;
- unscrew the nut of the air duct bracket;
- unfasten the latches of the air duct and carefully remove it;
- unscrew the bolt securing the cable casing and remove the cable;
- remove the heater radiator with pipes.
Removing the radiator of the VAZ 2107 stove
Next, replace the faucet with a new one. New gaskets and mounting bolts were included with the faucet. I installed everything new, and even sealed it. We carry out the assembly in the reverse order.
Changing the faucet of the VAZ 2107 stove
Do not install the air duct, glove compartment and shelf right away until you have checked the system for leaks.
Add antifreeze or antifreeze to the level, do not forget to open the heater tap and remove the tube from the throttle valve on the injector (or from the manifold on a carburetor engine). Here is an article on “how to properly fill the cooling system of a VAZ 2107.”
We start the car, warm up the engine, remove the air lock, and add antifreeze if necessary. Let's look at the result. If there are no leaks, then install the remaining parts.
Final stage
After all the work carried out, it is necessary to once again verify the quality of the assembly. Pour antifreeze into the cooling system. In order for all circuits of the system to be filled with antifreeze, it is necessary that the front of the car is higher than the rear, and the heater valve must be open. As the engine warms up, be sure to crimp the pipes by hand to completely get rid of air pockets. At this point, the replacement of the VAZ-2107 heater valve is completed, the stove will operate in normal mode.
A VAZ 2107 car is equipped with a stove, which is part of the engine cooling system. One of the significant parts of the system is the VAZ 2107 heater valve, which plays the role of regulating the supply of heated liquid to the heater radiator. This element is not reliable enough, so car owners of sevens often encounter problems with it such as jamming and leaking. In case of such breakdowns, it is important to promptly replace the device.
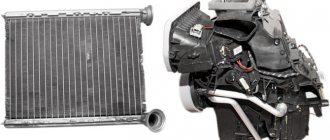
What is a car heater radiator
Almost every car is equipped with an interior heating system, in which one of the main elements is the radiator. Thanks to this part, heat is collected from the coolant and subsequently supplied to the passenger compartment.
Where is the heater radiator installed on the VAZ 2104–2107 and what functions does it perform?
The heater radiator on all classic Zhiguli cars is located in a special box under the front panel. The product is a heat exchanger, the main function of which is to transfer heat from the coolant (antifreeze) with subsequent distribution throughout the cabin. This unit works in the same way as the main radiator of the power unit. For the stove to function correctly, the heat exchanger must be constantly heated. This is achieved by connecting the radiator to the engine cooling system using tubes and rubber pipes and constant circulation of liquid through a water pump (pump).
The heater radiator on the “classic” is located in a special box under the front panel