With a working engine, an impeccable gearbox, and a new chassis, the car will not go anywhere without a clutch. On the Lada Vesta this is one of the most important components. The task of a mechanical clutch is to connect the internal combustion engine and manual transmission, transmitting torque from the engine to the chassis, and also to separate them when changing gears (if you leave the gearbox input shaft rotating through the internal combustion engine, the gears will inevitably be damaged).
The Lada Vesta clutch on a manual transmission (mechanical) consists of one disc, engagement is made mechanically (dry, permanently closed type), the drive is hydraulic. The latter means that the unit is driven by fluid pressure and is adjusted manually (by foot) by the driver. In addition, the fluid system acts as a pedal booster. After all, simply pressing with your foot is not enough to set in motion the structure, which engages with the shaft while rotating several thousand revolutions. Therefore, there is no need for hydraulics on an AMT. Read the article to the end and you will learn the intricacies of this knot! Find out the problems that often happen and the clutch drive fails: the release bearing or the basket as a whole is broken. It's time to change, or adjust enough, precise adjustment is important for good operation of the unit. Replacement at the dealer at 9 TO.
Clutch replacement on Lada Vesta cars under warranty
You can replace the clutch on a Lada Vesta under warranty. A similar procedure can be carried out when the car breaks down during the first 20,000 kilometers. If it is proven that neither the driver nor third-party manipulations are involved in the malfunction of the unit, the service center will carry out repairs free of charge. After the replacement, the brakes will also be bled. This is a mandatory process for a hydraulic drive, since after the intervention air cavities (plugs) are formed in the system. For a robotic gearbox, another manipulation is carried out - adaptation.
Under warranty: replacement of the clutch mechanism is also included in the list of TO9 works for the Lada Vesta. Even if the unit is working, it will have to be replaced. There is no need to worry about this; the life of the part has come to an end anyway, and it will not last long.
Clutch replacement resource. Consequences of missing deadlines
The manufacturer indicates in the operating manual the average clutch replacement interval for:
- AMT: 120 – 140 thousand km. for the clutch under warranty.
Depending on operating conditions and driving style, the interval may be increased.
ATTENTION!!!! There have been cases of installation of defective disc friction linings.
As for the AMT, with the replacement of the disk, something in the behavior of the car changed: the start became smoother, and the moment of starting occurs without delay and partial pushing of the gas pedal, as was the case before, but immediately after lightly pressing it.
The consequences of violating or ignoring replacement deadlines are not the most rosy, since we are talking about the safety of the driver and passengers. Often the cause of an accident is a malfunction of the clutch or transmission of a technical device.
Clutch adjustment on Lada Vesta cars
Since the knot is constantly engaged/disengaged, it needs fine adjustment. Adjustments are made on site during installation. The driven disk is centered, the basket, and the release bearing are also centered - they must fit exactly into the splines of the flywheel and the input shaft of the gearbox.
In the future, you can adjust the position of the clutch cable so that the pedal is softer/harder, so that it responds better to the command (during operation, the cable may stretch).
On a Lada with a robotic gearbox, the clutch is regulated by special programs. Adaptation can only be completed at an official dealer. However, the service life of the AMT clutch is significantly longer than that of a manual transmission.
Procedure for replacing the clutch Lada Vesta robot
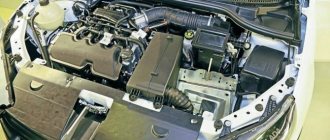
- Open the hood.
- We remove the battery assembly.
- We dismantle the air filter, housing, air ducts.
- We snap off a number of sensor-controllers.
- In the car interior we remove the plastic inserts, gearbox selector, and electric drives.
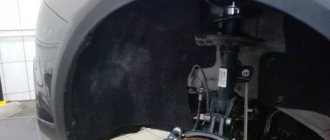
- We hang the car using a hydraulic lifting mechanism.
- We dismantle the wheels.
- We drain the waste into an empty container.
- We dismantle the pallet protection.
- Remove the right drive shaft.
- We dismantle the starter and actuator.
- We separate the flywheel and the body of the robotic box.
- We substitute the telescopic support.
- We remove the AMT from under the car.
- Remove the clutch module assembly.
- We carry out preventative maintenance and install new parts.
- We reassemble the structure.
After assembly, the box needs to be “retrained”. This is when the scanner and laptop force all the actuators and transmission to adapt to each other, disengaging the clutch and changing gears.
In Lada Vesta with AMT, manual transmission equipment, the clutch is installed under the bottom of the car, behind the flywheel. Access to elements for preventive maintenance after preliminary hanging with a lift, dismantling of attachments.
Analogs
The manufacturers themselves recommend 826818 VALEO 2180 for Vesta. Owners note that when using the model, the pedal becomes noticeably softer and the car starts easily. The note applies to the original set; fakes are often found. The spare part costs four thousand eight hundred rubles.
The original part of the Lada Vesta is not suitable for the 21129 engine in terms of power; it is designed for lower speeds, for example, such as 2112. For 106 horsepower and above, TS-00001321 would not be a bad match. Price – five thousand six hundred rubles.
Signs of clutch failure
The occurrence of malfunctions in the Vesta clutch mechanism is most often associated with improper operation (inexperience of the driver, aggressive driving style), an initial defect in the part, or breakdown of other components interacting with it. Of course, you will immediately notice problems with the clutch - the car will begin to behave differently:
- Gears are difficult to shift/do not work at all;
- Pedal too soft/hard;
- The car jerks;
- The device is activated in the upper position of the pedal.
There can be many reasons for this behavior of Vesta, and not all of them are related to the intermediate part between the internal combustion engine and the gearbox. Often the problem comes from the fluid system. There may be a malfunction of the brake master cylinder, clutch slave cylinder, damaged hoses, a simply low DOT4 level or an air lock. Such problems (especially problems with the cylinder of the unit) have exactly the same effect as the failure of the entire unit. The clutch consists of a housing cast together with the drive/pressure plate (basket) and the driven disc. The release bearing of the Lada Vesta acts on the petals of the basket, which, in turn, with the help of damper springs, press the inner disk away from the flywheel - the clutch opens. The bearing moves either under the influence of the hydraulic pedal drive (manually) - manual gearbox, or from the actuator (automatically) - manual gearbox. These parts can fail: more often - the release mechanism, less often - the basket body. Let's take a closer look at the most common “breakdowns”.
Removing and installing the clutch mechanism of a Lada Vesta car
Place the car on a lift and disconnect the negative terminal of the battery.
We remove the gearbox.
Depending on the modification, the engine and gearbox types may be installed on the vehicle. Removal and installation of gearboxes are discussed in the articles:
— removal and installation of gearbox 21807 with engine 21129;
— removal and installation of gearbox 21827 with engine 21129;
— removal and installation of the JH3 gearbox with engine 21129;
— removal and installation of the JH3 gearbox with the H4M engine.
We install the flywheel retainer on the engine cylinder block, unscrew the six bolts 2, Figure 1, securing the clutch pressure plate to the flywheel 1 and remove the clutch assembly 3 (for engines 21129 and 11189 - replaceable head 8, knob, flywheel retainer 67.7820-9526; for engine H4M - replaceable head 12, knob, flywheel retainer 67.7820-9708).
Defective clutch discs
Inspect the clutch driven disc. If there are cracks, dents, broken damper springs and cracks or delamination of the friction linings, the disc must be replaced.
Using a caliper, measure the distance “A”, Figure 2, between the end of the rivet 1 and the working surface of the lining 2. If the value A = 0.2 mm or less, the driven disk must be replaced.
Inspect the clutch pressure plate (basket). There should be no scratches or signs of tarnish on the surface of the disc in contact with the clutch driven disc. If there are cracks or breaks in the pressure spring blades, the disk must be replaced.
Installing clutch discs
Check that the clutch being installed matches the vehicle's equipment.
Clean and wash the splines in the clutch driven disc hub and on the transmission input shaft.
Install clutch 3, Figure 1, assembled onto flywheel pins 1 and tighten fastening bolts 2 without tightening.
Install mandrel 1 into the hub of the driven disc, Figure 3, and center the driven clutch disc relative to the engine flywheel (for engines 21129 and 11189 - mandrel A.70081; for engine H4M - the mandrel is supplied in the spare parts kit with the clutch disc).
Install the flywheel clamp on the engine cylinder block and tighten the six bolts 2, Figure 1, alternately, crosswise, securing the clutch pressure plate. Bolt tightening torque 20 - 31 Nm (2.0 - 3.1 kgf.m) (for engines 21129 and 11189 - replaceable head 8, knob, torque wrench, flywheel lock 67.7820-9526; for engine H4M - replaceable head 12, knob , torque wrench, flywheel lock 67.7820-9708).
Install the gearbox as indicated in the above articles.
Connect and tighten the negative battery terminal.
I have already written about the nature of the clutch’s operation, which manifested itself with the arrival of heat in Moscow. It all started at about 14 thousand kilometers, by 17 thousand it became a reason for reflection, and by 20 thousand it forced me to contact the service center. It has become absolutely impossible to push your car in traffic jams and move away smoothly!
In our case, the procedure did not help: jerks and impacts persisted even when the box cooled down. The next step was also the same at all dealerships: the clutch needs to be repaired. The capital’s masters, who had seen more of the West than their colleagues in the regions, suggested moving straight to the “autopsy.” More than one sedan with a similar problem has passed through their hands, and there have been cases of its manifestation even after a run of 5,000 kilometers.
The problem is not only that the malfunction is widespread. Clutch kits are in short supply. For example, in Moscow we had to wait about a week for him. It’s good if the dealer, as in our case, ordered parts without disassembling the unit. What if your Vesta is already hanging on the lift and is unable to move? In addition, the replacement parts are exactly the same. This means that we have every chance of encountering the same disaster again before the end of summer. Let's hope that the plant is looking for ways to get rid of the defect.
Sources
- https://autoruk.ru/lada-vesta/transmissiia-lada-vesta/kak-sniat-i-ustanovit-diski-stcepleniia-lada-vesta
- https://www.zr.ru/content/articles/901443-lada-vesta-iz-parka-zr-sila-s/
The clutch does not disengage (drives)
Often, the Lada mechanism does not fully release due to the hydraulic clutch release. This could be due to poor drive adjustment, leaking fluid system, or cable wedge. Such breakdowns are easily eliminated. It is much more difficult when one of the elements of the main device breaks down.
If the mechanism does not completely disengage, it means that something is holding it: a deformed driven circle, the formation of dirt, rust in the spline joint, flywheel wear, as well as a change in the shape of the release fork, weakening of the pressure plate. In all cases, the disk will need to be replaced.
Sachs clutch disc
Required
:
- Sachs driven clutch disc from Chevy Niva (article 1878 002 205)
- Washers 8x14x1.5 (6 pcs.) (optional)
- Lada clutch basket (catalog number 21179160108500)
- Release bearing Lada (catalog number 21810160118001)
Installation Features
:
The Sachs clutch disc is approximately 1.5 mm thicker than the stock Valeo:
Therefore, 6 washers should be placed under the bolts that secure the basket to the flywheel. Otherwise, there may be problems with gear engagement.
On a Lada XRAY, you can replace the clutch disc without removing the gearbox and subframe, on the left side, by moving the box to the side:
After replacing the clutch disc, we adapt the clutch (some owners did without this, and there were no problems in the operation of the AMT after installing the Sachs clutch disc).
Reviews
:
Installation on Lada Vesta (author):
Sachs disk for 1.8 really works. The sensations are amazing: no twitching or vibration, even the car itself began to drive much faster. A week has passed since the replacement and a couple of days ago I caught myself thinking that while driving I began to peacefully go into my thoughts - nothing distracts or irritates me anymore.
Installation on Lada Vesta (author):
It turned out that when installing the legs stood parallel to the flywheel, but I still assembled it. In the end, the gears were all engaged, but the shifts were not correct. After that, I decided to install 1mm washers between the frame and the flywheel. As a result, the plug stood up as it should. The conclusion is this: when installing a Sax disc from a Chevy Niva, you MUST use washers. And it really works. So just put it in, old basket, new disc and 6 M8 washers and you will be happy. The problem has been solved experimentally.
Installation on Lada XRAY (author)
From impressions - yes Oh...but! There is no vibration, literally at all. Oddly enough, the traction increased by 20 percent. It seems that the disc often slipped not only when starting off, but also in gear. In general, I recommend it. Moreover, as it turned out, the devil is not as scary as he is painted...
Feedback from social networks:
It works, the “Sax” disk from ShevNiva, + 6 washers 8x14x1.5, traveled 12t.km, compared to Valeo and Saks it’s heaven and earth.
Jerks when starting off
If you notice that the movement is accompanied by twitching, this is a serious reason to seek help from specialists. The Lada Vesta can shake for various reasons (for example, ignition failures), but if it is the clutch mechanism that gives the effect, we are talking about scrap parts. Obsolescence will never be accompanied by jerks, but destruction, the breaking off of pieces of metal, manifests itself this way. The presence of freely moving debris can cause great damage to other Vesta nodes. It is recommended to carry out repairs immediately.