Fault diagnosis
If someone in this area carried out statistics, it would most likely turn out that in 99 percent of cases the radiator may be faulty for two reasons: contamination or loss of tightness.
- Contamination or scale occurs as a result of using low-quality antifreeze. Sometimes drivers fill the system with plain water, which will inevitably lead to the formation of plaque. Contamination of the internal surfaces and walls of the tubes leads to a decrease in the throughput of the mechanism, and also makes heat transfer less efficient. This is evidenced by frequent engine overheating, which can be judged by the engine oil temperature.
- Damage to the integrity of the structure. Most often we are talking about the formation of cracks or holes on the walls due to flying stones or other reasons. If the gap is large enough, you may find a small puddle of antifreeze under the car after it has been idle. If it is small in size, then the antifreeze flows out only when the engine is warm and immediately evaporates, leaving no traces behind. But a decrease in the coolant level in the expansion tank indicates that the seal is broken somewhere.
To eliminate the malfunction or replace the radiator with a new one, it is necessary to dismantle it. But before that you will have to drain all the antifreeze from the system.
Replacing the cooling radiator
The cooling system of the VAZ 2107 includes many elements, the main ones being the radiator and water pump.
They are responsible for effective cooling of the engine during operation. In addition to direct cooling, the system is responsible for heating the air to heat the interior. Therefore, a faulty VAZ 2107 radiator can affect engine performance and comfort in the cabin during cold periods. Signs of a radiator malfunction
- Poor engine cooling. When operating a car with low-quality antifreeze or water instead, scale and other contaminants are deposited on the walls of the radiator tubes. This reduces the throughput and heat transfer efficiency and the engine will begin to overheat even if the thermostat is working properly and the coolant level is sufficient.
- Coolant leak. The tubular design of the radiator is not very durable. Holes and cracks may appear in it as a result of stones flying from under the wheels of cars. Sometimes the cracks are small in size, so the coolant leaks out in small “portions”, immediately evaporating. This can only happen when the engine is warm.
These faults usually require replacement of the radiator. In some cases, you can only get by with repairing it (soldering), which requires removing it from the car. Before removing the VAZ 2107 radiator, drain the coolant
How to drain antifreeze (antifreeze)
Replacing the cooling radiator on a VAZ 2107 (injector) is no different from similar work on a car with an installed carburetor. The first step is to drain the antifreeze.
You need to work with coolant carefully, because it is a rather toxic substance. Under no circumstances should you drain while it is hot. Wait until the engine has cooled down and only then begin work. It is more convenient to drain antifreeze in a pit. First you need to place a large container holding at least 10 liters. If there is no hole, you will have to tinker with finding a suitable container that would fit under the motor protection from below.
Important! Never open the expansion tank or radiator tank, or remove the clamps until the coolant has cooled. Otherwise, you risk getting burned and losing a large amount of expensive antifreeze due to its splashing under pressure.
Before starting work, you need to move the interior heater lever to the right position.
Next we perform the following steps:
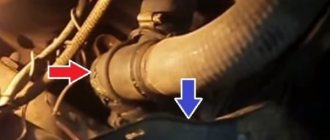
- At the bottom left of the radiator there is a coolant drain plug. It needs to be turned away. The container should already be placed in the appropriate place at this moment. The antifreeze will begin to flow slowly. But not all of it will leak out. To avoid air vacuum and speed up the flow of coolant, you need to perform the following step.
- Open the caps on the radiator neck and expansion tank. This will create additional pressure in the system, which will lead to increased leakage of liquid. To prevent the antifreeze from spilling, you can adjust the flow rate by unscrewing and tightening the cap on the neck.
- To drain the remaining antifreeze, you need to unscrew the fastenings of the expansion tank, lift it, wait until the liquid drains and return it to its place, securing it with clamps.
- Now you need to rearrange the drain container so that you can catch a stream of liquid from the engine drain hole.
- We open the drain hole using a 13 key and wait until the liquid drains from the cylinder blocks.
- Now you can screw back the drain holes, both on the engine block and on the radiator.
Draining antifreeze on the VAZ 2107 is completed. Now let's start dismantling.
Coolant replacement
It is recommended to change the coolant every 60 thousand kilometers or every 2 years of vehicle operation. Replacement must be done earlier if the liquid has changed color to reddish, which indicates a deterioration in its quality. The work must be done in the following sequence:
- The car is located on the inspection pit.
- The crankcase protection cover is removed.
- Inside the car, the warm air supply lever moves to the right all the way.
- The expansion tank cap is unscrewed and removed.
- The radiator cap is unscrewed and removed.
- Use a 13 key to unscrew the drain plug of the cylinder block. The liquid is poured into a container prepared in advance.
- Use a 30mm wrench to unscrew the fan sensor nut. If there is none, then the radiator drain plug is removed, after which the remaining coolant is drained.
In order for the system to be completely cleared of waste fluid, you should unfasten the expansion tank and lift it: this will remove all remaining antifreeze. After this, the drain plugs (as well as the fan sensor nut) are returned to their place and new coolant is poured into the radiator and expansion tank. Then the air pockets are removed and the radiator and expansion tank caps are screwed on.
Dismantling
You can remove the radiator on a “Classic” (VAZ 2101, 2102, 2103, 2104, 2105, 2106, 2107) using approximately the same procedure. The main thing is to free it from all hoses and fasteners. You will also have to first remove the radiator cooling fan. But first things first.
- Remove the hose that leads from the expansion tank
- Remove the upper supply hose. It is located under the expansion tank pipe
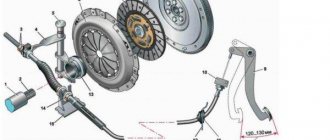
- Remove the lower outlet pipe (in the image, for clarity, the cooling fan was previously removed)
- Let's start dismantling the electric fan. First you need to disconnect the connectors of its wires, as well as the fan switch sensor.
- Using a size 8 wrench, unscrew the fastening bolts (there are three in total).
- We take out the fan very carefully so as not to hit the radiator with it and damage its thin walls.
- The time has come to dismantle the radiator itself. This can be done as easily as possible. The device is secured with just two bolts and is mounted on rubber grooves at the bottom. Therefore, using a 10mm wrench, unscrew the fastening bolts.
- To access the bolt on the right, you will most likely have to remove the battery, or you can simply use a ratchet handle and a special attachment.
- And we remove the device very carefully so as not to accidentally harm it.
- Be sure to check that the rubber pads are in good condition and replace them if necessary.
Attention! A slight impact on surrounding metal elements will be enough to damage the thin walls of the radiator. This is only uncritical if you plan to replace it with a new one. But even old devices, after minor repairs, sell well on the used goods market.
Removing the heater radiator.
The first thing we need to do is remove the radiator. To do this, you will have to slightly disassemble the central panel of the car. Before removing, I recommend placing some kind of liquid reservoir under the pipes. Now we go to the engine compartment and unscrew the rubber pipes going to the stove.
After this, you need to unscrew the bolts securing the plug.
Then remove the rubber plug and rod from the heater tap. Now you need to unscrew the plastic fan casing and pull it out, making room for removing the radiator.
After we have pulled out the radiator, we remove the pipes from it using a 10mm wrench and move it all to a new radiator, having first replaced the old gaskets with new ones.
We put the whole thing back as we removed it, and the replacement process is over. All that remains is to add coolant and check the system for leaks; if there is a leak somewhere, tighten the bolts.
Radiator cleaning and repair.
If you have a copper radiator, you can clean it by unsoldering and cleaning the radiator from the inside, then soldering it back, or you can clean it with some kind of chemical. This is what you can sometimes see inside a radiator.
It seems to me that not everyone will want to tinker with something like this, so it’s easier to buy a new aluminum one and forget about it.
VAZ 2105 and 2107 cars have an absolutely similar design of all components and assemblies. Therefore, this article will help deal with the problem of two VAZ models at once. And what problem will we talk about today - the heater (stove).
Of course, drivers use this device very rarely, only 3-4 months a year. But very often a situation occurs when you need to heat the interior of the car, the heater does not work and cold air blows. Let's look at what could be the cause and what parts may need replacement in this article.
DIY repair
If minor cracks or holes are found, you can repair them yourself. Otherwise you will have to buy a new device.
The easiest way is to simply cover the damaged area with cold welding. But this is far from the most effective technique. It is best to use a soldering iron. Here's what you'll need to get the job done:
soldering iron, soldering acid, tin, rosin
- Where a leak is detected, the surface must be carefully cleaned, degreased and treated with rosin. Ordinary soldering acid is also suitable for processing.
- Heat up the soldering iron well and fill the damaged area with tin.
- Let the tin cool.
Sometimes a crack occurs in the radiator tank. You shouldn’t throw away the entire device because of this. Perhaps you will find a working tank from another device, and you can replace it.
- Using a screwdriver, press out the tank mounting tabs.
- We clean the contact surface between the working tank and the radiator and apply a heat-resistant sealant to it.
- We install a working tank on the radiator body and bend the mounting tabs.
Basic faults
Failures in the operation of the artificial airflow system can become an obstacle to the safe operation of the vehicle. If the cooling fan does not work, at a critical moment the liquid may boil and the engine may overheat. The cause of such failures most often lies in a malfunction of the sensor responsible for the automatic start of the forced airflow system.
Read, it may come in handy: We replace the camshaft and install timing marks on a VAZ 2107 with our own hands
In carburetor models, this is the fan switch sensor, located below in the right radiator tank. In injection "sevens" this function is performed by the liquid cooling temperature sensor. It is installed in the outlet pipe of the cooling system.
Problems may also be associated with other elements of the blower system. In carburetor VAZ models, it is worth checking the electric fan motor, the proper operation of the fuse and the integrity of the electrical wiring. The fan switching circuit in the injection VAZ-2107 is somewhat more complicated. It includes, among other things, an electronic control unit (ECU) and an electromagnetic relay. Malfunctions in the normal operation of the entire blowing system can occur at any stage of its startup.
In addition, the radiator should be checked for integrity and tightness: due to wear, mechanical damage or corrosion, cracks may appear in the walls of the housing, leading to leaks. Also, the circulation rate of antifreeze inside the radiator is critically reduced due to blockages: dirt and coolant impurities are deposited in the tubes.
Installing a VAZ 2107 radiator
Installation of the radiator is carried out in the same way as removal, only in reverse order. We will give only a few general recommendations.
Remember that you need to act very carefully, because the slightest impact can damage the device again.
Make sure that all clamps are in good condition and provide a reliable seal. If possible, install worm-drive clamps, which are easier to use and more reliable.
Also, if necessary, replace the pipes. You should not put the oak and cracked pipe back on. It is better to replace it with a new and elastic one. It is recommended to soak the hose in hot water before putting it on the neck. This will make it easier to install, and when it cools, it will better crimp the neck, which will ensure a good seal.
If the coolant is still good, you can add it back. But since it touched many dirty parts, it is better to first strain it through several layers of gauze.
If you decide to install the old radiator back, then you need to flush it through the pipes using a special flushing fluid that will clear it of clogs and deposits.
How the OS works
The cooling system of the VAZ 2114 operates on the basis of internal heat exchange, which is carried out under the influence of coolant. It moves forcibly thanks to a pump, which is activated by a drive belt. The mixture enters the OS through the expansion tank.
The electric fan is located on the electric motor shaft. Depending on the indicators of the sensor, it is turned on or off. One of the main elements of the OS is a thermostat valve with a storage tank, which senses changes in air temperature.
If the fluid temperature is around 87 degrees, the main valve turns on and sends fluid through the large circuit. At a temperature of 102 degrees, the valve stops at 8 mm.
Flushing the system without removing the device
The cooling system can be flushed without removing the cooling radiator. Special means are used for this. But after the procedure, the antifreeze will have to be replaced with a new one.
- The cleaner enters the system through the radiator neck. After this, the engine starts and runs for the time indicated in the instructions.
- After the engine has cooled, you need to drain the coolant, pour water into the system and drain it.
- Now you can fill in new antifreeze.
Heater device VAZ 2105
The layout of the heating system of the VAZ classic is by and large standard, but there are still a number of features. The car interior is heated according to a well-known scheme - with outside air, which is heated in a heater radiator connected to the cooling system. In the “five”, outside air is taken in through grilles located on the hood near the windshield. This air duct is isolated from the engine compartment in order to prevent smoky air from entering the cabin from the engine compartment. When it hits the reflector, the outside air is separated from the water (which is important in rainy weather), changes direction and moves towards the stove radiator. The amount of air supplied for heating can be adjusted using a lever that controls the position of the air distribution cover.
The heater radiator is included in the cooling system circuit after the power unit, so the antifreeze entering the radiator is very hot. The outside cold air entering the walls of the heater radiator tubes heats up, cooling the antifreeze, and enters the fan already hot. The fan speed can be controlled via a three-position switch located in the cabin. The fan directs hot air to the air duct nozzles to heat the windshield, side windows, driver/passenger footwells and the upper part of the cabin.
How to extend the life of your device
Of course, replacing the cooling radiator on a Zhiguli is not difficult. But it is much easier to extend its service life.
To do this, buy antifreeze only from reliable and well-tested companies. Replace antifreeze every 60k mileage.
Do not fill the system with water.
Be extremely careful when carrying out repair work in the engine compartment so as not to accidentally touch the walls of the radiator.
Lubricate the bolt mounting points. It is especially important to lubricate and periodically check for rust on the radiator necks so that over time they do not collapse when the cap is unscrewed.
Forced fan activation
If the fault lies in the sensor, the problem can be solved by forcibly turning on the fan. To do this, close the sensor output contacts to each other. Then the impellers will rotate while the engine is running, regardless of whether the liquid has warmed up.
To avoid future problems due to sensor malfunction and to be able to manually turn on the fan from the passenger compartment, you can install a forced air circuit, triggered by a button.
Read, it may come in handy: Useful improvements to your “seven”
Cooling radiator VAZ-2107: features of operation and maintenance
Without exaggeration, the cooling system can be called one of the most important for a car, since the durability and reliability of the main unit of any car—the engine—depends on its proper operation. A special role in the cooling system is assigned to the radiator - a device in which the liquid is cooled, protecting the engine from overheating. The radiator used in the VAZ-2107 car has its own characteristics and requires periodic inspection and maintenance. Strict adherence to the operating rules prescribed by the manufacturer will keep the radiator in good condition for a long time. Due to the simplicity of the design, the radiator is quite easy to dismantle and is quite accessible for self-repair.
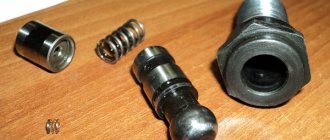
The working principle of the radiator cap
The design of the radiator cap provides for the presence of:
- intake and exhaust valves;
- springs;
- valve gaskets.
The radiator is connected to the expansion tank through the inlet and outlet valves of the plug.
The plug provides connection between the radiator and the expansion tank
There is a gap of 0.5–1.1 mm between the intake valve and its gasket, through which coolant enters and exits when the engine is heated or cooled. If the liquid in the system boils, the intake valve does not have time to let coolant into the expansion tank and closes. When the pressure in the system approaches 50 kPa, the exhaust valve opens and the coolant is directed into the expansion tank, which is closed with a plug, also equipped with a rubber valve that opens at close to atmospheric pressure.
Video: checking the radiator cap for serviceability
The radiator is part of the cooling system in which heat exchange processes occur, thanks to which the engine temperature is maintained at the set temperature. Overheating of the motor can cause it to fail, resulting in the need for complex and expensive repairs or replacement of the power unit. Long-term and trouble-free operation of the radiator can be ensured by compliance with the manufacturer's instructions and timely maintenance of this key element of the cooling system. Maximum efficiency of the radiator is achieved due to the serviceability of the cooling fan, fan sensor, radiator plug, as well as by monitoring the condition of the coolant.
Functions and principle of operation of the VAZ-2107 cooling system
The engine cooling system of the VAZ-2107 belongs to the category of liquid, sealed, using forced circulation of coolant. To compensate for temperature fluctuations in the volume of antifreeze, an expansion tank is used in the system. The liquid heated in the engine is used in the interior heater, which is connected to the system by inlet and outlet hoses.
The cooling system includes the following elements.
- The tube through which coolant is discharged from the heater radiator.
- Hose supplying fluid to the interior heater.
- Thermostat bypass hose.
- Cooling jacket pipe.
- The hose through which fluid is supplied to the radiator.
- Expansion tank.
- Cooling jacket for the cylinder block and cylinder head.
- Radiator cap (plug).
- Radiator.
- Fan shroud.
- Radiator fan.
- Rubber lining for the radiator.
- Pump drive pulley.
- The hose through which fluid is removed from the radiator.
- Generator and pump drive belt.
- Pump (water pump).
- The hose through which coolant is supplied to the pump.
- Thermostat.
The main function of the cooling system is to maintain the engine temperature within normal limits, i.e. in the range of 80–90 °C. The operating principle is based on the removal of excess heat into the atmosphere through an intermediate technological link - coolant. In other words, antifreeze or other liquid, heated to a high temperature in the cooling jacket, is sent to the radiator, where it is cooled under the influence of air flows and again supplied to the engine. Circulation is carried out using a pump driven by a belt from the crankshaft - the faster the crankshaft rotates, the faster the coolant circulates in the system.
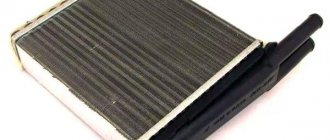
Cooling system radiator
The cooling radiator of the VAZ-2107, which is a key element of the car’s cooling system, is usually made of copper or aluminum. The radiator design includes:
- upper and lower tanks;
- cover (or stopper);
- inlet and outlet pipes;
- safety pipe;
- tube-plate core;
- rubber cushions;
- fastening elements.
In addition, the radiator housing has a hole for the fan sensor, which is usually located on the lower tank, next to the drain hole.
The radiator dimensions are:
- length - 0.55 m;
- width - 0.445 m;
- height - 0.115 m.
Product weight - 6.85 kg. To ensure higher thermal conductivity, radiator tanks can be made of brass. The core is assembled from thin transverse plates, through which vertical tubes soldered to them pass: this design allows the liquid to be cooled more intensively. To connect to the cooling jacket, there are nozzles on the upper and lower tanks on which hoses are attached with clamps.
Initially, the manufacturer for the VAZ-2107 provided a copper single-row radiator, which many car owners replace with a double-row one (with 36 tubes) to increase the efficiency of the cooling system. In order to save money, you can install an aluminum radiator, which, however, is less durable and difficult to repair. If necessary, the “original” radiator on the “seven” can be replaced with a similar element from any “classic” by performing a certain reconstruction of the fastening elements.
I had several classic VAZs, and different radiators in the stoves and in the cooling system. Based on operating experience, I can say one thing: the heat transfer is almost the same. Due to metal tanks and an additional row of cassettes, brass is almost as good as an aluminum radiator in terms of heat transfer. But aluminum weighs less, is practically not subject to thermal expansion, and its heat transfer is better; when you open the heater tap, brass produces heat in almost a minute, and aluminum in a couple of seconds. The only negative is the strength, but in our country everyone is trying not to attract masters, but to do something themselves with crooked hands using a crowbar and a sledgehammer. And aluminum is a delicate metal, you need to be gentle with it, and then everything will be fine. And many say that the pressure in the cooling system vomits them. So if you monitor the valves of the expansion caps and the cooling radiator, then there will be no excess pressure.
Madzh
https://otzovik.com/review_2636026.html
Reasons for replacing the stove on a VAZ 2107
Many car problems occur with the arrival of cold weather, and this especially applies to cars from the domestic auto industry. One of the main problems is the inefficient operation of the heating system, as a result of which the windshield and side windows are poorly heated. VAZ 2107 owners quite often encounter a situation where in winter the car’s interior simply does not warm up. In this case, there is no need to talk about any comfort for passengers and the driver. To understand the reasons and eliminate a possible malfunction, you first need to understand the design of the “seven” heater.
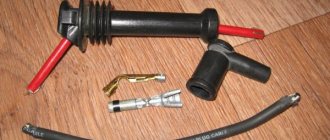
The main elements of the VAZ 2107 stove are:
- radiator;
- tap;
- fan;
- control cables;
- air ducts
Parts of the heater and body ventilation of the VAZ 2107: 1 — lever of the air distribution cover; 2 — bracket for control levers; 3 — handles of heater control levers; 4 — air duct for heating the side window; 5 - flexible rods; 6 - heating air duct
As the vehicle is used, certain malfunctions may occur with the stove, which reduce the efficiency of the unit or make its operation completely impossible. There are not many signs of major problems and they boil down to the following:
- heater leak;
- lack of heat or weak air heating.
As for the service life of the stove, it is inappropriate to give any figures. It all depends on the quality of the parts, the coolant used, as well as the frequency of operation of the car.
Radiator leak
If the heat exchanger is leaking, it won’t be difficult to detect. Coolant in the form of a puddle will be under the feet of the driver or passengers. However, you should not rush to conclusions and buy a new radiator to replace it. The leak may be associated not only with it, but also with leaky pipes or faucets. To do this, you need to get close to these elements and carefully examine them with good lighting. Having made sure that the problem is not in them, only the radiator remains. By the way, sometimes when a leak appears while the heater fan is running, the windshield fogs up and a characteristic smell of antifreeze appears. Having found out that the reason lies in the heat exchanger, it will need to be removed and then repaired or replaced with a new one.
Radiator repair
The most common radiator malfunction is a leak. Due to wear or mechanical damage, cracks appear in the radiator housing, which at the initial stage you can try to eliminate with various chemical additives. Practice shows, however, that such a measure is often temporary and the leakage resumes after a certain time. In this case, some car owners use so-called cold welding - a plasticine-like mixture that hardens when applied to metal. The most effective and proven means of combating radiator leaks is soldering the case with a regular soldering iron .
When starting to repair a radiator using the soldering method, you need to have on hand to begin with:
- Phillips screwdriver;
- socket wrench or 10mm socket with extension.
This set of tools is sufficient to remove the radiator, provided that the system is already freed of coolant. To remove the radiator, you must:
- Use a Phillips screwdriver to loosen the clamps holding the hoses to the nozzles.
- Remove the hoses from the inlet, outlet and safety connections.
After the radiator is dismantled, you should prepare:
Soldering damaged areas is performed in the following sequence:
- The damaged area is cleaned, degreased and treated with rosin or soldering acid.
- Using a well-heated soldering iron, the damaged surface area is evenly filled with tin.
- After the tin has cooled, the radiator is installed in place.
If a crack occurs on one of the radiator tanks, you can replace the failed tank with a similar one removed from another radiator. To do this you need:
- Using a flat-head screwdriver, press out the tabs that secure the tank to the radiator housing.
The radiator is installed in the reverse order of dismantling.
Video: DIY dismantling of the VAZ-2107 radiator
Radiator fan VAZ-2107
The electric radiator cooling fan installed in the VAZ-2107 car automatically turns on when the coolant temperature reaches 90 °C. The main purpose of the fan is to ensure normal engine temperature regardless of external conditions and vehicle driving mode . For example, if the car is stuck in a traffic jam, the engine continues to run and heat up. Natural air cooling of the radiator does not work at this time, and a fan comes to the rescue, which is turned on by a signal from a sensor installed on the radiator.
Fan switch sensor
The sensor must ensure timely activation of the fan in a situation where the radiator cannot cope with cooling the engine on its own. If all devices and mechanisms are working properly, then initially, after starting the engine, the coolant circulates in a small circle until it heats up to 80 °C. After this, the thermostat opens and the liquid begins to move in a large circle, including the radiator. And only if the radiator’s work is not enough for cooling and the liquid temperature reaches 90 °C, the fan is turned on at the command of the sensor, which is located in the lower part of the radiator and fixed in a specially provided hole. If the sensor is missing for some reason, the hole is closed with a plug.
If the fan does not turn on at 90 °C, do not touch the sensor immediately. First, make sure that the coolant level has not dropped below the permissible level. Another reason for overheating may be a malfunction of the thermostat: if the temperature has exceeded 90 °C, and the lower part of the radiator is cold, most likely, this is the problem with this device. You can check the serviceability of the sensor by disconnecting the terminals and shorting them together. If the fan turns on, it means the sensor has failed. You can check a sensor that is not yet installed on the car using an ohmmeter. To do this, the device is lowered into water (the part that is located inside the radiator), which begins to heat up. If it is working properly, the ohmmeter will work when the water heats up to a temperature of 90–92 °C.
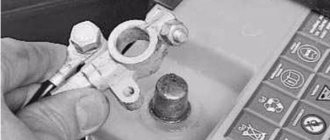
To replace a failed sensor you must:
- disconnect the ground from the battery;
- empty the system of coolant;
- remove the wires from the sensor contacts;
- Use a 30 mm wrench to unscrew the sensor nut;
- if the copper sealing washer is unusable, replace it;
- lubricate the threads of the new sensor with heat-resistant sealant;
- install the sensor in place;
- fill the system with liquid;
- turn on "ground";
- check the operation of the sensor.
Signs of a failing heater core
Since the heating system of the VAZ 2107 consists of several components, it is important to determine that it is the replacement of the stove radiator that is required, and not the repair of other components. As a rule, there are two malfunctions - cold air comes from the heater or, due to a violation of integrity, a radiator leak appears. There are two main signs of this problem:
- Cold air comes from the blowers in all operating modes (there may be other reasons, so you need to figure it out).
- Antifreeze leaks into the passenger compartment, onto the driver's mat (this is a sure sign of damage to the radiator), and a characteristic odor appears.
Each of these signs may indicate the need to replace the heater radiator. It should be borne in mind that antifreeze fumes are toxic, so breathing them when it flows into the cabin is not recommended. Sometimes a cold heater core indicates problems in the engine cooling system, for example, problems with the thermostat.
Despite the fact that dismantling the radiator on a VAZ 2107 and its subsequent installation is a rather labor-intensive operation, it does not require special knowledge or sophisticated equipment. At the same time, you will need to disassemble the front panel of the car and do other manipulations, so you need to stock up on the necessary tools and materials in advance:
Almost every car enthusiast has such a set of tools, which will allow him to quickly and efficiently complete the work if he does not need to remove the radiator of the cooling system, but can limit himself only to working with the heater.