Why do you need an FLS on Lanos?
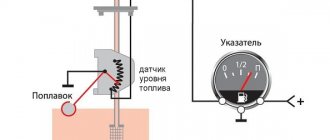
The Lanos fuel level sensor is designed to determine the amount of fuel level in the tank. This element is associated with a pointer on the instrument panel. The pointer is a scale with an arrow. The relationship of the sensor with the control unit allows the driver to control the amount of fuel in the gas tank.
If on cars with carburetor engines the fuel indication sensor is intended solely to prevent the possibility of sudden emptying of the tank, then on injection cars this element also serves other purposes. A more important purpose of the FLS on fuel-injected cars is to determine the amount of fuel in the tank in order to prevent the fuel pump from idling. It is strictly contraindicated to allow the gas pump to operate without pumping fuel, as this leads to a reduction in its service life.
This is interesting!
To prevent premature wear of the fuel pump on Lanos, Sens and Chance cars, it is necessary to eliminate the possibility of operating the vehicle with an amount of fuel less than 0.5 tank.
When the fuel in the tank runs out, the engine cannot operate. It is strictly contraindicated to completely empty the gas tank on fuel-injected cars, otherwise the risk of having to replace the gas pump on a Lanos increases.
Design and types of fuel level sensors
The fuel level sensor on Lanos cars is located directly in the gas tank. This device is a potentiometric device or variable resistor, which has a number of advantages:
- Simplicity of design
- Reading accuracy
- Reliability
- Low cost
Among the disadvantages, it can be noted that due to the simplicity of the design, the device tends to wear out during operation. This wear is especially accelerated when the driver adheres to the refueling method when the gas tank is completely empty. To understand why the device fails, let’s look at its design.
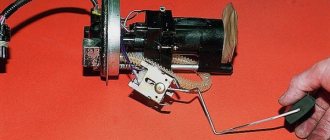
A potentiometric device consists of a group of contacts, some of which are movable. Due to this mobility of contacts, the filling of the gas tank with fuel is determined. When the moving contact (slider) moves, it rubs against a fixed scale, consisting of conductive marks made of resistive material. During the friction process, the fixed scale wears out, which causes malfunctions such as incorrect readings or a complete malfunction of the fuel gauge on the Lanos instrument panel. The photo below shows the design of a potentiometric fuel level sensor, which is used on Chevrolet and Daewoo Lanos cars. Such sensors are called lever sensors, but there are other types of such devices.
FLS on cars, installed directly in the gas tank, are of the following types:
- Lever or float
- Tubular
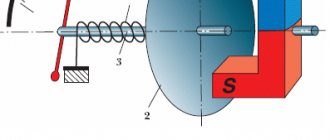
The principle of operation of both types of sensors is the same, and it is based on the fact that the float connected to the moving contact of the sensor takes the corresponding position on the fixed contacts. As the gas tank empties, the position of the float decreases, which means that the moving contact moves along a fixed scale. The amount of fuel in the tank is measured due to the fact that an electric current flows through fixed contacts. By changing its position with the moving contact, the resistance increases or decreases, on the basis of which the level of gasoline in the container is determined.
If a lever sensor is a block consisting of a fixed resistive scale and a moving contact connected to a float, then a tubular sensor is a separate container. This container is presented in the form of a tube, which is filled with gasoline. Inside the tube there is a float that changes its position depending on the fuel level in the tank. The float is connected to a movable contact that moves along a fixed resistive scale. The advantage of a tubular sensor is that it is possible to determine the amount of fuel in the tank more accurately than when using lever devices.
This is interesting!
The disadvantage of a tubular fuel level sensor is that it is not suitable for use in all cars, which depends on the geometric parameters of the tank.
Lanos cars with nameplates from various Chevrolet, ZAZ and Daewoo factories, as well as Sens and Chance, use lever-type fuel level sensors. They are located directly inside the gas tank, and they are attached to the fuel pump module.
Varieties
The design and operating principle of existing FLS have been described above. Thus, all fuel level meters can be divided into contact and non-contact. Representatives of the first type are lever and tubular devices. The lever type is a universal FLS, as it can be installed in any gas tank.
There are several types of contactless FLS:
- Ultrasonic fuel level sensor. It is located on the outside of the fuel tank and the control information unit. Depending on the type of fuel, a specific program is used. These meters are the most explosion-proof.
- For magnetic devices, the sensitive element is hermetically sealed and does not come into contact with the fuel. Information about the fuel level is also transmitted using a float, which is connected to a magnet. The created electrical impulse is read by the device and transmitted to the dashboard, indicating the fuel level in the tank.
- In radio-controlled devices, information is transmitted to the instrument panel using a radio signal. A distinctive feature of these devices is the power supply. They get tangled by the battery, which has a shelf life of about 7 years. They do not depend on the car's battery being charged, so they give more accurate readings.
Based on the transmitted signal, FLS are divided into analog and digital. The first type of instruments gives a large error in readings, so at present it is almost not used. Digital devices convert analog signals into digital data, and then analyze the data and correct errors taking into account the geometry of the fuel tank and uneven fuel levels. The electronic fuel level indicator provides the most reliable information; errors are possible only when physically measuring the volume of fuel.
You can make an FLS with your own hands. To do this, you need to be able to handle a soldering iron and have knowledge of electrical engineering. During manufacturing, it should be taken into account that the signal depends on the fuel level. The design of the device is quite complex. When the fuel drops to a certain level, the float also drops, but the data arrives at the dashboard indicator with some delay.
You can install either an analog or digital fuel level indicator with your own hands. The latter gives more accurate readings, as it can correct and align the received data.
A homemade fuel meter consists of two modules connected by three wires. One is a capacitive sensor module, the other is a display module. The sensor model receives power via two wires. The reflector module receives the signal via the third wire and converts it into an indicator of the fuel level (the author of the video is Vova Grishechko).
Modern sensors: advantages
There are not many situations when the product in question does not work correctly. Most of them happen after 5-10 years of operation of the vehicle, when the mechanical part of the product wears out. The design, materials and tightness of most FLS allow them to function until the vehicle is disposed of. Among the main advantages of the product it should be noted:
- affordable price;
- complete tightness;
- simplicity and reliability of design;
- high level of resistance to mechanical stress.
This is interesting: Maintenance of Hyundai Solaris - maintenance regulations, list of works, cost, part numbers
On average, the price of FLS is in the range of 1-2 thousand rubles. If necessary, they can be easily dismantled and replaced. Among the disadvantages of fuel sensors, we highlight the low oxidative resistance of metal plates, as a result of which there is often a discrepancy between the position of the fuel needle on the dashboard and the current level in the tank.
Causes of FLS malfunction on Lanos
Often owners of Lanos cars have to deal with a situation where, when turning on the ignition, there is no sign of life on the fuel gauge needle. Although just yesterday this arrow showed a full tank. The reason for such indications may be the following factors:
- All gasoline was drained from the tank
- The FLS has failed, which is especially important if there have been interruptions in its operation recently
- Malfunction of the fuel quantity indicator, which may be caused by damage to electrical circuits
Most often, the cause of the malfunction is the sensor located inside the gas tank. It fails most often, since most manufacturers produce low-quality sensors. If the device malfunctions, do not rush to change it, since sometimes ordinary cleaning of the resistive contacts helps eliminate the malfunction. Let's look at the reasons for the failure of the FLS on Lanos.
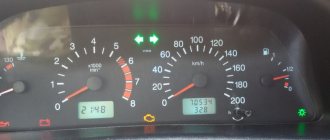
- When the arrow on the instrument panel always shows only zero value. If there is gasoline in the tank, then the causes of such consequences are damage to the electrical wiring, malfunction of resistive tracks, breakdown of the indicator, and failure of the fuse. From my own observations, I must say that most often the reason is hidden in the malfunction of resistive elements (erasing of tracks), but initially it does not hurt to check the serviceability of the fuse. Fuse F10 is responsible for the serviceability of the FLS
- When the UUT needle rises to a certain level and then returns to zero. The reason for this malfunction is a decrease in the quality of contact of the slider with the resistive tracks of the potentiometer. You will need to get to the device to check if the contacts can be cleaned
- The arrow on the indicator twitches - the contact tracks of the potentiometer are worn out
- Incorrect readings - if you have filled a full tank of gasoline, but the indicator arrow shows only half a tank or even less, then the cause of such consequences is a bend in the lever connecting the slider to the float or depressurization of the float
If there is a malfunction with the fuel gauge sensor, it must be initially checked and, if faulty, replaced. If the FLS tracks are worn out, it is recommended to replace the device. There are no difficulties with replacing the device, but they appear when new sensors are purchased. Few people know that two types of sensors are installed on Lanos cars. Externally, they are almost identical, but their main difference is the difference in resistance. One type of FLS has one resistance range compared to the second, and therefore it is very important to install a sensor of a similar type when replacing.
Part 2 of 4: Replacing the fuel rail sensor
Necessary materials
- Hex key set
- Socket wrenches in box
- Electric cleaner
- Fuel Hose Quick Disconnect Kit
- Fuel resistant gloves
- Inch-pound torque wrench
- Lint-free fabric
- Protective clothing
- Ratchet with metric and standard heads
- Small flathead screwdriver
- Torque bit set
- Torque wrench
- Protective glasses
- Wheel chocks
Step 1: Park the vehicle on a flat, hard surface . Make sure the transmission is in park (for automatic) or 1st gear (for manual).
Step 2: Install a 9-volt battery into the cigarette lighter . This will keep your computer running smoothly and keep your current settings in your car.
If you don't have a nine-volt power saver, that's okay.
Step 3: Open the hood of the car to disconnect the battery . Disconnect the ground cable from the negative terminal of the battery, turning off power to the ignition and fuel systems.
Step 4: Remove the engine cover that is located on top of the engine . Remove any brackets that may be in the way of the fuel rail sensor.
- Note : If your engine has an intake port on the engine that is mounted transversely or overlaps the fuel rail sensor, the intake must be removed before removing the fuel rail sensor.
Step 5: Locate the Schrader valve or inspection hole on the fuel rail . Wear safety glasses and protective clothing.
Place a small drip tray under the guide and cover the hole with a towel. Using a small flathead screwdriver, open the valve by pushing down on the Schrader valve. This will relieve pressure in the fuel rail.
- Note : If you have a test port or schraeder valve, you will need to remove the fuel supply hose to the fuel rail. To do this, you will need a drip tray under the fuel hose and a set of tools to quickly disconnect the fuel hose. Use a suitable fuel hose quick release tool to disconnect the fuel hose from the fuel rail. This will reduce the pressure in the fuel rail.
Step 6: Remove the harness from the fuel rail sensor . Remove the fasteners from the fuel rail sensor.
Remove the fuel rail sensor from the fuel rail.
Step 7: Clean the fuel rail with a lint-free cloth. Clean the fuel rail sensor harness with an electric cleaner to remove any debris.
Step 8: Install the new fuel rail sensor to the fuel rail . Hand tighten the fasteners.
Tighten the mounting hardware to 12 inch lbs, then 1/8 turn. This will secure the fuel rail sensor to the fuel rail.
Step 9: Connect the fuel rail sensor harness to the sensor . Reinstall any brackets you had to remove to remove the old sensor.
Also install an intake if you had to remove one. Be sure to use new gaskets or O-rings to seal the engine intake port.
- Note : If you needed to relieve pressure from the fuel line to the fuel rail, be sure to reconnect the hose back to the fuel rail.
Step 10: Install the engine cover by snapping it into place .
Fuel level sensors for Lanos - the whole truth about the differences and features of choice
Lanos is a unique car that has become so popular that even more budget versions of cars called Sens and Chance began to be produced on its basis. The uniqueness of this car also lies in the fact that it was produced by different factories, which is why on the hood there are emblems of three factories: Chevrolet, Daewoo and ZAZ. If the fuel level needle on Lanos does not work, then in most cases the reason is the failure of the resistive device. As already mentioned, two types of fuel level sensors were installed on Lanos. The reason for this is the difference between two types of fuel pump modules:
- TG (T100) 96344792
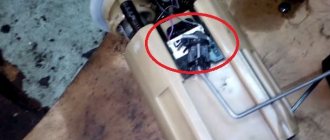
- the most common version of the block, the distinctive feature of which is the external design. It is a module of a plastic flask, inside of which there is an electric fuel pump with a mesh. On the side there is a fuel level sensor connected to a black or white float, as well as a sensor for the emergency amount of fuel in the tank. A photo of such a fuel pump module for Lanos is presented below - TA (T100) 96350588
- is much less common, and differs from the previous version in that the fuel pump mesh is located outside. The FLS with a white float and the emergency fuel quantity sensor are also located outside the plastic flask. A photo of such a module is presented below
The fuel pump modules for Lanos differ (the situation is similar with devices on Sens cars) not only in the location of the mesh. The presence of an additional chamber on the first type module eliminates the possibility of the fuel pump running idle. After all, when entering sharp turns, there is a shift of gasoline to one side of the tank. Due to the presence of the camera, the possibility of its emptying when performing sudden maneuvers in the car is eliminated. The second type of module does not provide this option. That is why devices of the second type are less common, since they were installed on certain batches of Lanos and Sens cars.
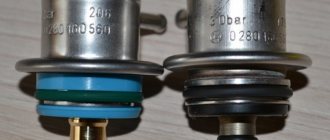
The difference between them lies in the design of the FLS. If the Lanos has a fuel pump module TG (T100) 96344792, then you need to buy a fuel level sensor with catalog number 96388930. For fuel pump modules type TA (T100) 96350588, FLS with article number 96388928 is used. Many owners have noticed one feature that TG type modules are equipped with black floats, while TA type devices are equipped with white ones. However, everything depends on the manufacturer of these sensors, so distinguishing them by float is not correct. They can be distinguished by catalog numbers. They do not differ in instrument panels, since on a Lanos with a Polish tidy, modules of both types can be installed, and vice versa.
What happens if you install a different type of FLS on Lanos? It will work, and what’s more, it will fit on the module without any problems, since these devices are completely identical in size. The only difference is in the number of divisions of the potentiometer, therefore, when installing the FLS of the wrong type, the owner will notice that the device will lie with the fuel readings in the tank.
To find out what type of fuel pump module is installed on Lanos, it is not at all necessary to dismantle it. To do this, just look at the module cover markings, which are located under the decorative cover.
You can also measure the resistance of the potentiometer, which differs on the sensors. Although the difference is insignificant, if you replace the FLS with one that does not correspond to the one that was installed from the factory, the indicator will give inaccurate values. More precisely, when the tank is half filled, the maximum level will be displayed on the control unit.
This is interesting!
The resistance of the FLS with article number 96388930 is from 40 to 120 Ohms, and on the sensor 96388928 its value is from 40 to 280 Ohms.
In order not to make a mistake when choosing a fuel level sensor for Lanos, the corresponding table is presented below.
Knowing how the fuel pump modules on Lanos differ, it will not be difficult to choose the appropriate FLS model. When purchasing, it is important to take into account one feature: FLS are sold both separately and together with an emergency fuel level sensor in the tank. If the emergency fuel level sensor is working properly, then it is not necessary to change it. However, by purchasing both sensors assembled, which are already connected to the block, the need to separately remove the contacts from the plastic chip is eliminated.
Part 1 of 4: Checking the condition of the fuel rail sensor
Step 1: Start the engine . Check the instrument panel for engine lights.
Listen to the engine if the cylinders are not firing properly, and feel for any vibrations while the engine is running.
- Note : If the fuel rail sensor fails completely, the engine may not start. Do not attempt to crank the starter more than five times, otherwise battery performance will be reduced.
Step 2: Turn off the engine and open the hood . Check for damage to the wiring around the fuel rail sensor.
Broken wires can cause the sensor to malfunction.
How to replace the FLS on Lanos - step-by-step description
Having understood the question of what fuel level sensors are available, how they work, and what types of devices are installed on Lanos cars, you can begin to replace them. It should be immediately noted that if the tracks are slightly worn, they can be cleaned. However, if the tracks are erased and worn, the sensor must be replaced. To replace it, you will need to first remove the fuel pump module. A detailed description of the process of dismantling the fuel pump module on Lanos is presented in this material.
As soon as the fuel pump module is removed, we begin the procedure for replacing the FLS. To do this, the following actions are carried out:
- First you need to disconnect the power supply of the FLS and low fuel level sensor
- In order to replace the FLS, you do not need to disassemble the plastic flask, inside of which there is an electric fuel pump with a mesh. However, the mesh must be changed regularly, and if it has not been changed for a long time, then it should be replaced
- Disconnect the power supply from the FLS
- Next, the low fuel level sensor, which is located next to the FLS, is dismantled. This sensor is removed along with the plastic bracket. To remove it, you need to press on it from the right and then pull it down.
- Now the fuel level sensor is dismantled, for which you also need to press it to the right and remove it from the groove
- To remove the contacts from the chip, you need to use a thin slotted screwdriver or an awl. Initially, the plastic blocker is removed. To do this, remove the retainer using pliers.
- Now the contacts of the white and blue wires are removed, for which you need to press them with an awl or the tip of a screwdriver from the end side of the chip
- When removing contacts, you must remember their location in the chip
- Remove the wires along with the sensor, and then compare the elements. They must be completely the same
- Install the contacts of the new sensor into the corresponding holes of the plastic chip, and then put the new level and low fuel quantity sensor in place
This completes the FLS replacement procedure. All that remains is to connect the chip and install the module in place. If the level sensor and the reduced fuel quantity are changed at the same time, then the devices are supplied with a chip.
To replace both sensors, you will need to disassemble the plastic flask to eliminate the need to separately remove the contacts.
The fuel level sensor for TA type fuel pump modules is replaced in the same way. The most important thing when carrying out work is to choose a suitable fuel level sensor.
Replacement
You don't have to be a professional auto mechanic to replace a fuel sensor. It is enough to study the operating manual and understand the nuances of disassembling and assembling the unit.
Alas, this cannot be done without related work. In order to get to the sensor, you will first have to remove the fuel pump .
Before starting work, drain the fuel so that as little fuel remains in the tank as possible. Tools you will find useful:
- Spanners;
- Screwdrivers;
- Hammer, etc.
So, let's start removing the fuel pump:
- Remove the floor covering you have in the trunk;
- Remove the fastenings of the rectangular cover, which is made in black;
- Disconnect the negative terminal from the battery;
- Make marks on the gas pipeline tubes so that you can later figure out which one is intended for supply and which one is intended for return;
- The fitting is unscrewed with a 17mm wrench, after which the supply pipe is removed;
- The outlet pipe is removed in a similar way;
- Use a 7 mm socket wrench to unscrew the nuts securing the pressure rim;
- A hammer may be required here, since the hardware is often firmly attached. Place a flathead screwdriver on the ridged part of the nut and give the handle a light hammer blow;
- With the rim free, lift the assembly and remove the float from the fuel tank;
- Now you can remove the pump and, accordingly, the sensor.
Checking the FLS on Lanos - how to check the sensor for serviceability
After replacing the fuel level sensor, there may be no readings on the dashboard. This is due to the fact that the cause of the malfunction is not the sensor. So that after replacing the FLS you do not have to continue troubleshooting, it is recommended to check the part for serviceability. Few people think about checking the FLS for serviceability, and even more so, almost no one knows how to check the part for suitability. But it is quite possible to do this, and for this you will need a multimeter. The verification process consists of the following steps:
- First you need to remove the ignition module from the gas tank on which the FLS is located
- We connect the probes of the device set to resistance measurement mode to the FLS contacts.
- When changing the position of the slider, the resistance value of the device should change. If the resistance does not change, it means the FLS is faulty and must be replaced. Sometimes, to eliminate a malfunction, it is enough to replace the slider connected to the float
- If the resistance changes, then you need to know the following: in the float position, when the tank is empty, it should increase, and when the tank is full, it should decrease. The maximum resistance on the sensor when the tank is empty is 284 Ohms (120 Ohms), and when the tank is full its value corresponds to 38 Ohms
Having confirmed that the FLS on Lanos is faulty, you can begin to replace it. A detailed description of the replacement process is described above. As you can see, identifying and eliminating a malfunction in the form of a non-working fuel quantity indicator in the tank is not at all difficult.
When you need to change the DFID sensor 2110: symptoms of sensor malfunction and check
During the operation of a vehicle, the mass air flow sensor 2110 can fail for various reasons, one of which is the long period of use of the device. When a sensor fails, it is usually not repaired; it is simply replaced with a new one. The following symptoms may indicate that the sensor is not working properly:
- “Check Engine” lights up on the car’s dashboard (you need to check the engine);
- fuel consumption increased, acceleration dynamics decreased;
- the car engine does not start;
- at idle, the car’s internal combustion engine operates jerkily (change in idle speed down or up).
All of the listed signs of sensor malfunction indicate that air is not being supplied to the mixture in the volume required. Taking into account the fact that this problem may be associated not only with a malfunction of the mass air flow sensor, before proceeding with dismantling the sensor, it is necessary to make sure that it is faulty.
In fact, the VAZ 2110 mass air flow sensor can be checked for performance using three methods: in motion, with a multimeter, visually. Checking the mass air flow sensor 2110 experimentally (in motion) is the easiest and fastest way. It consists of analyzing the operation of the vehicle’s internal combustion engine when the sensor is forcibly turned off.
Algorithm of actions:
- opening the hood, disconnect the mass air flow sensor connector;
- start the car engine;
- since the car will operate in emergency mode, the “Check Engine” light will come on and the amount of air in the fuel mixture will be determined depending on the throttle position;
- Having driven a car operating in emergency mode, you need to pay attention to its dynamics and compare them with the dynamics before the sensor was turned off;
- If the car accelerates faster with the sensor turned off, the air flow sensor is faulty.
The next stage of diagnosis may be checking the mass air flow sensor 2110 with a multimeter. This method of checking the sensor for functionality involves the use of a measuring device (multimeter).
Before checking, you need to understand the design of the device and find out its “pinout” (soldering of wires on the board). There are four wires coming out of the MAF. Typically these are the wire to the main relay (pink/black or pink), ground (green), power (gray), and signal input (yellow).
To check you need:
- set the multimeter to constant voltage measurement mode, setting the limit to 2 Volts;
- without starting the engine, turn on the ignition;
- connect the black multimeter probe to the ground wire, the red one to the signal input of the multimeter sensor, inserting the multimeter probes through the rubber seal of the connector;
- take measurements and use the results to determine the state of the sensor.
Based on multimeter readings:
- voltage 0.996-1.01 Volts (new sensor);
- voltage 1.01-1.02 Volts (working sensor in good condition);
- voltage 1.02-1.03 Volts (sensor working, with long-term operation);
- voltage 1.03-1.05 Volts (sensor is worn out and may fail);
- voltage from 1.05 Volts and above (the sensor is faulty and requires replacement).
If the device is not at hand, the faulty sensor can often be determined by its appearance, that is, by visual inspection. In this case, it is necessary to dismantle the device and carefully inspect it for mechanical damage or for the presence of liquid in the sensor and air pipe.
The reasons for liquid and dirt getting into the sensor can be different (for example, the oil level in the crankcase is increased, dust gets on the hot-wire anemometer due to untimely replacement of the air filter, the oil sump of the crankcase ventilation system is clogged, etc.).
Manufacturers of FLS for Lanos and what is better to buy
To achieve the efficiency of the fuel indication sensor, it is recommended to purchase only original GM models. The cost of the original sensor is from $10, while a Chinese one can be purchased for $5. However, is it worth choosing non-original spare parts when it is possible to buy or order original parts? Each car owner can answer this question independently. There are FLS on the market for Lanos and Sens from the following manufacturers:
- GM with catalog number 96388928 and 96388930
- ICRBI is a Chinese company producing spare parts for cars of various brands
- HQ
- FSO
- Raon
- NSP
- Stellox
The fuel level sensor on Lanos is the element that the driver needs in order to understand how many kilometers the gasoline supply in the tank will last him. If an element on the car is faulty, then you should not delay in eliminating its malfunction. A faulty FLS will lead to the car engine stalling at the most inopportune moment due to the emptying of the tank. And the worst thing about this is that after adding gasoline, the fuel pump may fail. Even if it is in good working order, then in this way you will reduce its resource by at least 2 times.
How to choose a sensor
When choosing a FLS, you should immediately decide what type it will be. Situations when it makes sense to install a float model are rare. As a rule, the choice is between an ultrasonic fuel level sensor and a capacitive one. There is no big difference between them, so the question is rather individual.
What to consider when choosing a FLS:
- Output signal type. It is recommended to give preference to digital devices operating using the RS-485 standard.
- Length of the meter in a capacitive FLS. If the device has too short tubes, the minimum fuel level will be displayed incorrectly.
- Additional functions. The need for functions that expand the capabilities of the device is determined individually.
- Enhanced power protection and galvanic isolation. Such parameters help maintain the functionality of the device after a power surge.
- Case material. Metal devices are more resistant to shock and provide protection from external electromagnetic influence.
It is also important to pay attention to the equipment and manufacturer of the device. The box must contain fasteners, gaskets and a seal. It is preferable to choose models from Bosch, Omnicomm, VDO or Italon. Especially in cases where an electronic FLS with additional functions is purchased. If you need to save money, you can consider options from AEB, Febi and JP Group.