How to replace the oil level sensor on a VAZ 2108-VAZ 21099?
Removal: 1) First, disconnect the battery by using a wrench to loosen the nut that secures the “-” terminal, and after loosening, remove the “-” terminal from the battery. (How to loosen the nut securing the “-” terminal and then remove this terminal from the battery, see on our website in the article: “Replacing the battery”, point “1”)
2) Next, go to the sensor that measures the oil level, and then disconnect the block with wires from it by hand.
3) After the block is disconnected, use a wrench and use it to completely remove the single bolt that secures the sensor.
4) And to complete the operation, carefully remove the sensor from the hole in the engine crankcase.
Installation: 1) First install the new sensor into the hole in the engine crankcase, and then tighten one single bolt that secures it.
2) Then connect the wire block to this sensor.
3) And at the end of the operation, install the “-” terminal on your battery, using the same article that describes “Replacing the battery”.
Oil pressure sensor for VAZ 2108: diagnostics, replacement, price, articles
The process of self-diagnosis and replacement is not at all difficult. Do not violate the rules, be careful.
- Open the hood, unclip the block with limit switches on the sensor;
- Unscrew the controller (key set to “22”);
- Wipe the part dry (rags);
- Connect the multimeter terminals to the contacts;
- Turn on the device, move to the “Ohmmeter” position;
- Measure the resistance. Range from 545 to 628 Ohms. Deviation from the norm is a sign of a malfunction.
Based on the data obtained, make a decision to replace the part with a new one. DDM is not a collapsible structure and cannot be repaired.
| Name / catalog article | Price in rubles |
| Lada 2108-2545213-0 (original) | From 300 |
| Vernet OS3543, OS3538, OS3516 | From 270 – 410 |
| Autolog AS2109, AS2102 | From 270 – 410 |
| Facet 70096, 70069 | From 270 – 410 |
| SWAG 20230002 | From 270 – 410 |
| Febi 19018 | From 270 – 410 |
| Topran 109894 | From 270 – 410 |
| Automega 150011610 | From 270 – 410 |
| Ossca 00393 | From 270 – 410 |
| Maxgear 210103 | From 270 – 410 |
| Meyle 1009190030 | From 270 – 410 |
| JP group 1193500100 | From 270 – 410 |
| ERA 330341 | From 270 – 410 |
Causes of premature wear of DDM
- Expiration of service life;
- Damage, consequence of an accident, collision, impact;
- Short circuit in the on-board circuit;
- Manufacturing defect.
Signs of DDM malfunction
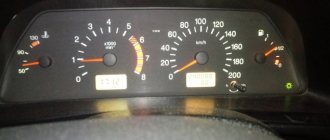
- The “oil pressure” indicator constantly signals on the dashboard;
- There is an oil leak and signs of depressurization at the controller installation site;
- The fastening of the terminals on the DDM is loosened;
- The engine oil level does not meet the minimum or maximum range.
Step-by-step guide to replacing DDM yourself
- Key to “22”, head, knob;
- Additional lighting as needed;
- Rags;
- New sensor;
- Engine oil for topping up (optional).
Replacement steps:
- Open the hood of the car. We wait until the engine cools down so as not to burn the skin of the hands;
- Using a flat-tip screwdriver, unclip the block with wires from the sensor;
- Unscrew the DDM (key to “22”);
- We carry out troubleshooting of the seat, wipe it with a rag as necessary;
- We screw in the new controller, put on the block with wires;
- Check the oil level and replenish the missing amount.
We start the engine and check the functionality of the controller.
What you need to know about DDM?
If the indicator lights up indicating low oil pressure, this does not always mean that there is not enough lubrication in the system. It is possible that the DDM is faulty. In order to find the true cause, you need to know what the device is and how it can be checked.
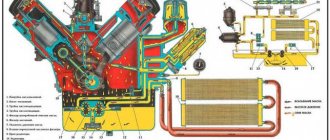
Purpose and location
The DDM consists of a housing, a membrane and a transmitting device. The membrane becomes deformed when oil begins to press on it. Deformation of the membrane is reflected in the rheostat, whose resistance changes. The ECU records changes and reflects them thanks to an indicator on the instrument panel. The controller on the VAZ 2109 is located under the oil filter on the cylinder head on the side where the carburetor is located.
DDM location
Diagnostic features
Before diagnosing the DDM, you should check the oil level in the system using a special dipstick and an oil filter.
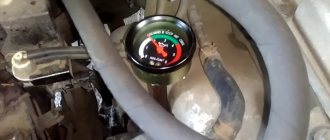
One of the simplest diagnostic methods is to check the presence of pressure in the lubrication system. To do this, you need to unscrew the DDM from the socket and manually turn the crankshaft several times. If grease flows or splashes out of the socket and the control light remains on, this means that the pressure is OK and the cause of the malfunction is in the controller.
The process of unscrewing the DDM from the socket
Next, you should visually inspect the device itself. If no mechanical damage is detected, it must be cleaned with gasoline and screwed into the old place. If after this the light does not go out, this indicates that the device is broken and must be replaced.
For the second method of checking, a pressure gauge is required. The controller is removed from the warm engine and screwed into the pressure gauge; the adapter from the pressure gauge is screwed into its place. The control LED is connected to the positive terminal of the battery and the controller contacts. Then the running engine should gradually pick up speed until the pressure gauge shows a value of 1.2-1.6 bar. If the controller is working properly, the LED will go out. Otherwise the device is faulty.
Replacement instructions
To replace the DDM with a VAZ 2109, you will only need one key for “21” and a new device (the author of the video is Avto_Remont).
The procedure consists of a sequence of steps:
- You need to start work by disconnecting the negative terminal of the battery.
- Next, you need to disconnect the supply wire from the lubricant pressure controller.
- Then use the key to “21” to unscrew the faulty device.
- For sealing, aluminum foil in the shape of a ring is placed in the sensor socket.
- Now the new device is screwed in.
- All that remains is to connect the wire, and this completes the procedure.
Thus, there is nothing complicated in replacing; more time is spent on diagnostics.
Examination
The sensor has an elastic membrane that deforms when oil pressure is applied to it. The amount of membrane deflection is reported to the rheostat when the resistance changes. This change is recorded by the car's electronic system and reported to the pressure gauge. That, in turn, shows the corresponding data on the dashboard.
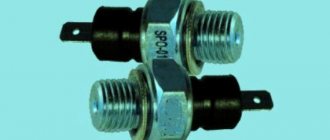
Brand new device
Today, VAZ 2109 owners use two main ways to check the functionality of the oil pressure sensor. Decide for yourself which one to use.
| Verification method | Your actions |
| First way |
|
| Second way | The second method is more detailed and allows you to find out not only whether everything is okay with the sensor. You need:
|
If after the second test method the LED goes out and the sensor turns out to be working, but the lamp on the dashboard still continues to light, the reason is different. She needs to be found. This is done like this:
- Gradually increase engine speed to reach 2000 units per minute;
- If the engine temperature is about 80 degrees and the pressure gauge shows less than 2 bar, the crankshaft bearing is worn out and requires replacement;
- If the pressure gauge shows more than 2 bar, the problem is not with the bearing. Let's move on;
- Increase the speed of the power unit. If the pressure gauge shows above 7 bar, the bypass valve has broken down. Its replacement is carried out together with the replacement of the oil pump cover.
Even if, after all the above operations, the light on the dashboard stubbornly refuses to go out, you will have to contact a car service center so that you can have a comprehensive diagnosis of the car’s condition.
Location
On a note
Don’t fall into a premature panic, draw too hasty conclusions, drive to a service station and pay money for faults that might not even exist! An emergency pressure lamp indicates a drop in lubricant pressure in the system, insufficient oil level in the engine, but it is not yet a fact that this is the reason. A fairly common malfunction is when the oil pressure sensor itself has failed and, accordingly, simply “lies.” If you don't notice this right away and don't understand the reason, you can really waste a lot of money or cause yourself more serious problems.
Device
The device in question may schematically look like this:
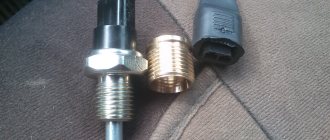
Main elements of the oil pressure sensor:
- frame;
- wire connection location;
- thread for fixation in the cylinder block;
- diaphragm;
- a spring that resists deformation of the diaphragm;
- positive and negative contacts.
The oil pressure sensor is located on the left side on the back of the engine. This makes it fairly easy to diagnose or replace.
Important information about the oil level sensor
The health of the engine can be judged by various signs. One of them is the oil level. If oil consumption has increased, this means that there are some problems in the system that need to be corrected.
Purpose and location
The main purpose of the oil level regulator is to control the lubricant level so that the mechanisms and components of the engine function normally.
The VAZ 2109 oil level controller is located between the oil filter and the oil pan at the bottom of the engine. It is inserted into the hole intended for it in the power unit housing.
Diagnostic features
A sign of a malfunction of the device is the lighting of the indicator indicating insufficient oil level, despite the fact that in fact it meets the norm. You should regularly measure the oil level using a dipstick. If it is insufficient and the indicator does not light, this is also a sign of a sensor malfunction.
Diagnostics of the device is performed using a multimeter set to ohmmeter mode. One probe is connected to the controller body, the second to the output. By moving the float, we measure the resistance of the device. When the float is in the upper position, the resistance should tend to infinity, in the lower position it should drop to zero. If this is not the case, the sensor is faulty and must be replaced.
Replacement instructions
Replacing the regulator is easy and consists of the following steps:
- First, remove the negative terminal from the battery.
- Next, the plug with wires is disconnected.
- Then the fastening bolt is unscrewed with a “10” key and the controller is carefully removed from the crankcase.
- A new device is installed and the mounting bolt is screwed on.
- Then a block with wires is connected to it and the removed battery terminal is returned to its place.
Photo gallery “Replacing the lubricant level regulator”
Monitoring the health of the sensors ensures the correct operation of the vehicle, since based on their readings the ECU controls its systems.
Oil level sensor
Oil level controller VAZ 2109
The main task of such an emergency sensor in a car is to show the level of lubrication in the engine, which can be used to monitor the correct operation of the engine mechanisms. In order to notice in time that your car’s engine has begun to “eat” a lot of oil, it is important to constantly monitor the readings and condition of this device. If a malfunction is detected, the VAZ 2109 oil level sensor is replaced.
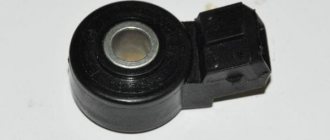
Types of oil level controllers
Modern level sensors can be as simple as in the photo above, a mechanical float type. Then there are complex lubricant level indicators, up to serious electronic devices equipped with a signaling device or laser level indicator.
Operating principle of mechanical sensors
A mechanical controller (as on the VAZ2109 model we are considering) is the simplest and cheapest, as well as the most widely used indicator device:
- A similar operating principle is used for magnetic, cable, mechanical and other similar level sensors, with a float type of operation
- It involves closing or opening a mechanical switch
- Only for controllers with a magnetic drive, switching occurs due to a permanent magnet located inside the float; the magnet, together with the float, rises or falls to the trigger point
- Switching on - switching off occurs due to the movement of the float past the miniature switch
- The float material is selected depending on the temperature change of the lubricant, its viscosity and density, since these characteristics affect buoyancy
It is not recommended to use float-type controllers with high viscosity oils or heavily contaminated oils.
Diagnosis of the problem
When the low oil level lamp on the panel lights up, it is necessary to determine the cause. There may be several reasons:
- Low oil level in the engine crankcase (check with dipstick), look for leaks
- Engine malfunctions (eating a lot of oil, topping up will solve the problem only temporarily)
- Error (short circuit) connecting devices (often observed when replacing wiring yourself)
Replacing the lubricant level controller
On a VAZ 2109, replacing the oil level sensor is quick and easy; you need the “10” key from the tool:
- Remove the wire from the sensor
- Unscrew the bolt securing the sensor with a “10” key
Using the “10” key, unscrew the bolt securing the controller
- Then, we remove it, shaking it slightly, from the hole in the cylinder block, carefully so as not to damage or break the float
Carefully remove the controller from the hole in the block
Examination
To check the oil level controller you will need a multimeter, remove it and do the following:
- We connect the multimeter to the sensor terminal and the housing (ohmmeter mode)
- We move the float from one extreme position to another and measure the electrical resistance of our sensor
- In the upper (extreme) position, its resistance should be infinite
We connect the multimeter to the sensor terminal and the housing
- In the lower position the resistance drops to 0 Ohm
We measure resistance in the lowest position
- Faulty sensor - replace the controller
As you have seen, this sensor changes quickly, so why take it to a service station and waste extra money and time? Additionally, watch the video if anything remains unclear.
Oil pressure sensor VAZ 2109
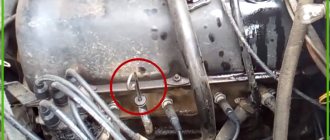
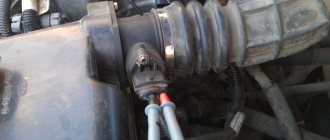
Every modern car, including the VAZ 2109, is equipped with a variety of sensors and devices, each of which plays its own important role. One such device is the oil pressure sensor. It is located in the engine compartment. Regardless of which engine the car is equipped with, an injector or a carburetor, the sensor is located on top of the cylinder block on the intake manifold side.
A protective cover is installed on top of the oil pressure sensor. To ensure stable operation of the engine and the entire machine as a whole, it is necessary to ensure that the sensor is working properly. An oil filter is located next to the sensor.
How to determine if a sensor is broken
First I checked the oil pressure sensor of the VAZ 21099 injector. In order to get to the throttle assembly, which is located between the receiver and the hose of the engine inlet air intake pipe, you need to:
- Disconnect the negative terminal from the battery.
- Disconnect the power cable with the protective cover from the sensor.
- Using a wrench, unscrew the sensor from its mounting socket.
- Remove the regulator.
The carburetor of the VAZ 21099 oil pressure sensor is usually checked for deterioration of the starting devices and idle speed. And also on the fuel level in the float chamber and the throughput of the jets. If the fuel is consumed, the level in the chamber decreases and the float lowers.
When the set level is reached, the valve closes. The float valve is an important part of the carburetor that maintains the fuel level.
Video “Replacing the lubricant level sensor”
This video shows how to replace the oil level controller on a VAZ (the author of the video is Sibiriya holodno).
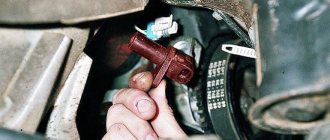
Where is the oil level sensor located and what does it look like? • It is located at the bottom of the car engine, and is inserted into the hole that is present in the engine crankcase, between the oil filter and the oil pan, to make it easier for you to disassemble, look at the photo below which will show the location of the sensor:
• Now let's talk about what this sensor looks like. The most standard such sensor looks like a curved tube, at the tip of which there is a float, and with the other tip it is attached to the car engine crankcase, so that you can visually understand what it looks like, see the photo below:
When do you need to change the oil level sensor? Like any other sensor, it must be replaced when it fails, here is a sign by which you can determine that the sensor has failed:
• The first and last most important sign that the sensor has become unusable is the oil level indicator lighting up on the instrument cluster, provided that the oil level in your car’s engine is normal. (For information on how to check the oil level in a car, see the article: “Changing the Oil”)
Note! This lamp will not always light up when the sensor fails; sometimes it may happen that it will not light up at all, regardless of the oil level, so you cannot partially rely on this sensor alone, and it is best to check the oil level using a dipstick. more reliable and calmer!
Does the VAZ-2109 oil pressure sensor work?
To determine if it is correct, you need to check the engine oil level. To do this, you need to open the hood and pull out the dipstick. In order to check more accurately, you need to do this:
- drive into a pit and remove the protection;
- get close to the sensor;
- turn on the ignition;
- disconnect the power cord;
- Use a voltmeter to measure the voltage between the block and ground. It should show 12 volts.
If there is no voltage, then there may be a problem in the contact or a broken wire.
What to do if the sensor lights up
If the oil pressure light on the dashboard comes on and does not go away for a long time, it can be assumed that there are problems with the engine. Sometimes this may be due to a loose wire.
There are several main reasons why the warning light on your dashboard comes on. These include:
- installation of a low-quality oil filter. Low quality filters are not able to retain oil after the car is stopped. The solution is to replace the oil filter;
- insufficient oil level. In this case, it is necessary to add oil to the required level and find the cause of the leak;
- oil pump damage. It is recommended to have this problem repaired at a service station.
Thus, the oil pressure sensor on the VAZ-2109, despite its small size, plays a rather important role in ensuring the correct and stable operation of the car.
It requires constant monitoring and, if minimal signs of malfunction appear, mandatory replacement. This is the only way to extend the life of the engine of any car and avoid unnecessary financial costs that may arise due to sensor malfunctions.
Sensor design and operating pressure check
To determine whether a device is functional, you need to understand how it works. It is also useful to know how the controller and the VAZ engine, or rather its lubrication system, interact with each other. The sensor is mounted on the cylinder head on the side on which the carburetor is located. Next to the controller there is a VAZ oil filter.
The design of the oil pressure controller is very simple. It consists of a housing, a built-in control and measuring elastic membrane and a transmission mechanism. The principle of operation of the device in question is also quite simple. Engine oil for VAZ, located in the lubrication system, acts on the membrane during engine operation.
The latter is deformed by an amount corresponding to the oil pressure. Vibrations of the elastic “partition”, which make or break the contacts of the electrical circuit, are transmitted to the rheostat through the mechanism mentioned above. In turn, changing the resistance of the rheostat affects the indicator readings on the car’s dashboard.
Checking the operating oil pressure using the crankshaft is used, as a rule, in cases where the indicator begins to signal a drop in pressure in the lubrication system away from the service station, and the driver does not have a pressure gauge at hand.
Before checking, you must make sure that the oil level in the system and the corresponding VAZ 2109 filter are in order. If the level is insufficient, the oil will have to be filled to the nominal level. Then you can proceed directly to checking the health of the sensor. For this purpose, it is unscrewed from the socket.
In this case, the device should be carefully inspected for defects. If there is no damage, it must be washed with gasoline (diesel) and installed in its original place. If the light continues to light after this, the sensor will have to be replaced.
It is not uncommon for a lamp to light up on the panel of a VAZ 2109, which indicates that the oil pressure is too low or completely absent. At the same time, the inspection showed that there were no leaks anywhere.
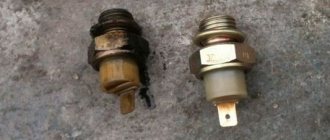
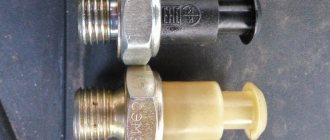
Appearance of the device
First of all, it is recommended to check the oil pressure sensor (OPS). Based on the analysis, we can conclude whether the controller is really to blame, or whether the cause should be looked for in other places.
Oil pressure sensor VAZ 2109 carburetor
Hello everyone))) As they say, you can’t spoil porridge with oil! But I was very scared =))) I came home and noticed a small dark spot in the parking lot of number nine, I looked - Oil! I opened the hood and was horrified (((The entire timing belt area was in the oil, it was dark outside. I started looking with a flashlight to see what! - where from! There was oil all over the bottom in the area of the pump and timing case, the rear wall of the engine in the area of the filter, there was a small puddle on the protection. I immediately thought about the oil seal! .the shaft seems dry. Is it really the crankshaft? That’s what I’m thinking. It was already late, I decided to take a better look during the day. Having searched for information that evening on our favorite drive 2. it turned out that there could also be a leak from the oil pump - oil filter seal - control sensor oil pressure lamps - valve cover gasket. Overfilling oil is also no joke, never overfill! Otherwise, look for where it was squeezed out. In the morning, I wiped where I got to with a rag, checked the level (the oil dropped to a minimum), topped it up and started it. And here he is the culprit =) )) It escaped from under the sensor =))) And my mood improved =))))) I went to the store, there were two sensors to choose from, one cheap, the other more expensive, I ask, what’s the difference? The more expensive one is ITALIAN =) I looked - it even has “made in italy” stamped on it. Italy makes sensors for VAZs =)))) It’s great! I didn’t like it at all in appearance, I got it for cheaper, it looks much better than this one (even there is an OTC) It cost me only 51 rubles. I installed it and added more oil. Tomorrow when it’s cold I’ll check the level again. Look at the sensors under the boot and around it to see if there are any leaks =))) Good luck to all of us!