DPKV (crankshaft position sensor), also known as TDC sensor (top dead center sensor) is the only sensor of the engine management system, if which breaks down, the engine will definitely not start. This sensor has no mechanical moving parts, so it rarely fails. Most often, corrosion-damaged wiring is to blame for its failure.
Device and design
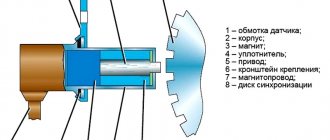
Experts call the DPKV synchronization sensor because the device sends a signal to the ECU, which synchronizes the crankshaft rotation speed with the operating mode of all parts of the gas distribution mechanism. Essentially, DPKV is a magnetic circuit in a winding, enclosed in a polymer casing, which can be called an induction coil. At the ebb of the body there is a hole with a bronze ring. A fastening bolt is threaded through it. The cylindrical part of the device with a metal contact at the end is placed in a special opening in the crankshaft protective casing. The outer part of the sensor is a connector into which a three-wire ECU cable is inserted.
DPKV Lada Granta:
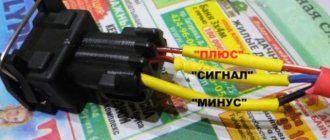
The pinout of the device consists of three wires, one of which supplies low-voltage power, the second - zero, and the third wire delivers current with a changed characteristic back to the unit.
Knock sensor Lada Granta
The main tasks of this element include the determination of high-frequency oscillations resulting from fuel combustion in the cylinder block.
Based on the DD signal on the Grant, the control system selects the most suitable ignition timing angle, thanks to which efficient and complete combustion of fuel is achieved in the cylinder block of the car engine. In addition, the ignition timing is also regulated, which is important when using fuel with different octane numbers. The knock sensor on the Lada Granta is located directly on the cylinder block (more precisely, between the second and third cylinders).
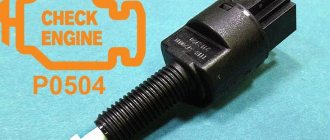
Operating a vehicle may lead to malfunctions, for example, the engine may lose power. This symptom indicates that there are obvious problems with the knock sensor. The presence of a malfunction is indicated by the illuminated “Check Engine” lamp, and diagnostics almost always reveal one of the following errors:
- P0325 – signals that the DD circuit has broken;
- P0327 – the level of the signal received from the device is very low;
- P0328 – the signal supplied by the element is too high.
Operating principle
The Lada Granta crankshaft sensor works as a contactless device. The functioning of the device is based on the Hall effect. It lies in the fact that the metal core, under the influence of an alternating counter magnetic flux, changes the current voltage in the coil. The metal strip of the core is located in close proximity to the teeth of the crankshaft timing disc. Several teeth are missing in one place of the magnetized disk. When the gear wheel rotates, the teeth cause a uniform oscillation of the magnetic flux, and the opening accentuates a surge in the intensity of the magnetic field, which the sensor perceives as the beginning of the crankshaft rotation count.
Gap on the synchronization disk (item 3):
In the coil, a weak current reacts to this phenomenon by changing its characteristics and transmits signals to the electronic engine control unit. The microprocessor analyzes the received information and adjusts the operation of the internal combustion engine, namely:
- doses the air-fuel mixture entering the injector;
- sets the ignition timing;
- regulates the timing of fuel injection.
Symptoms of a problem
Even a slight malfunction of the DPKV immediately affects the operation of the internal combustion engine. Failure in the readings of the device, and its breakdown, can lead to a complete stop of the car. When the crankshaft position sensor is faulty, it is manifested by a number of symptoms:
- the engine idles extremely unstable, sometimes even stalls;
- it is not possible to start the car the first time;
- when driving, the engine begins to work intermittently and stall;
- When the gas pedal is accelerated, the engine choke, accompanied by the sounds of detonation.
When signs of a DPKV malfunction appear, the “Check engine” sign often lights up on the dashboard of a Lada Granta car.
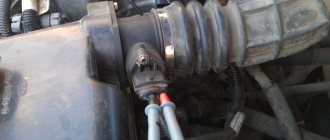
Mass air flow sensor Lada Granta
This element is located near the air filter; its main task is to estimate the amount of air entering the engine. Based on the information received from the mass air flow sensor, the ECU determines the fuel volume that is necessary to maintain the stoichiometric ratio between fuel and air for the engine to operate within the specified parameters.
The mass air flow sensor on the Lada Granta is located next to the air filter, right between it and the air falling sleeve. It should also be noted that this sensor is no longer installed on modern VAZ engines. The catalog number of the described element on Grants is 11180-1130010-00.
If the mass air flow sensor breaks down, the system stores the error code in its memory, after which the “Check Engine” lights up. Then the controller replaces the readings of the broken device with fixed temperature values. Signs of failure of this element are different, the most common include:
- increased fuel consumption;
- problems when starting the engine;
- disappearance of cravings;
- instability of speed.
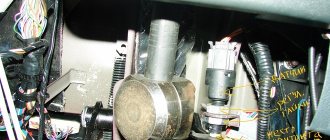
Where is DPKV located?
You won't be able to see the crankshaft position sensor right away. The DPKV is hidden by a casing at the bottom of the engine, facing the radiator. If you remove the protective apron, the sensor can be found on the right side of the timing gear. The disk is bolted to the crankshaft axis. The sensor is bolted through a hole in the ebb of its housing to the engine crankcase.
Sensor mounting location:
Crankshaft position sensor location
Although the crankshaft position sensor performs the same function in different cars, its location will vary depending not only on the make and model of the car, but also on the engine installed in it. Let's look at a few examples.
On the “10-series” injection engines installed on popular domestic cars VAZ-2110, 2111, 2112, the crankshaft position sensor is located in the area of the generator belt pulley, namely on the oil pump cover.
On Daewoo Nexia cars, the location of the sensor depends on the engine installed in the car. So, on the F16MF engine, the DPKV is located opposite the drive ring (or another name - the disk), that is, at the rear end of the crankshaft itself. On engines A15MF, G15MF and A15SMS of the same machine, the sensor is installed opposite the drive disk on the crankshaft pulley.
On popular Renault Logan cars with 1.4 and 1.6 liter engines, in order to get to the crankshaft position sensor, you will need to remove the air intake hose from the air filter pipe. Since the DPKV is located at the bottom right, in the area of the cylinder block. The sensor itself can be easily identified by its mounting plate, which has two mounting holes.
On a Hyundai Sonata, the crankshaft position sensor is located under the timing belt cover, below, in the area of the balancing roller. The sensor can be found by a chip that goes from it directly to the valve cover body.
In general, on most cars, the DPKV is located in close proximity to the crankshaft and/or to the cylinder block, on one or the other edge. A distinctive feature of the crankshaft position sensor is the presence of a long wire that connects to the power supply directly on it. If for some reason you were unable to find the sensor on your own car, seek help from the manual (technical documentation) or look for relevant information on thematic forums on the Internet.
Replacing the sensor
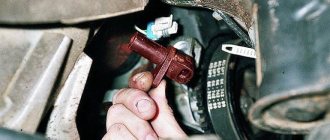
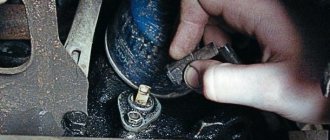
Almost any service station has equipment with which they can quickly determine the breakdown of the DPKV and replace it. But this seemingly simple operation can be quite expensive. If you have minimal skills in handling tools, removing the sensor will not be difficult for the car owner. To do this, you need to arm yourself with a 10mm wrench and a screwdriver.
Lada Granta crankshaft position sensor with cable and ECU contact connector:
Step-by-step instructions for replacing the DPKV:
- The car is placed on level ground, the ignition is turned off and the handbrake is put on.
- Raise the hood. The negative terminal is removed from the battery.
- Unscrew the fastening screws and move the protective apron aside.
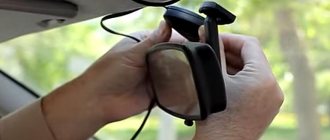
- By pressing the plastic clip, remove the cable chip from the contact connector of the sensor.
- Use a socket or open-end wrench to unscrew the bolt and remove the sensor from the seat.
- When installing a new device, repeat all the above steps in reverse order.
Diagnostics
Before taking steps to dismantle and diagnose the DPKV, you need to make sure that the device is securely fastened and clean the place of its attachment and the contact connector from dirt. After this, the performance of the internal combustion engine is checked again. If symptoms of sensor failure persist, it is dismantled.
Removing the sensor:
After removing the sensor, you need to understand whether it is the cause of the engine malfunction. Before diagnosing DPKV, check the integrity of the connectors and cable. The performance of the device is checked using a multimeter:
- The meter is set to ohmmeter mode.
- The multimeter probes are connected to the DPKV contacts - the normal resistance will be in the range of 550–750 Ohms.
- The meter is switched to voltmeter mode, and a metal object is brought to the tip of the sensor. The multimeter should detect voltage surges.
If such measurement results are not observed, then the DPKV must be replaced.
When buying a new Lada Granta crankshaft position sensor, first of all you need to pay attention to branded products. Such a DPKV will cost much more than its analogues from unknown manufacturers, but it will not bring unexpected troubles on the road.
How to determine a faulty crankshaft sensor
There is a simple way to find out if a sensor is faulty, and anyone can do this with just one multimeter. Most modern cars are equipped with inductive crankshaft position sensors, so let’s briefly look at checking devices of this type.
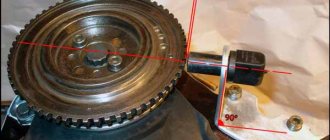
So, DPKV can be checked in three ways - using an ohmmeter, checking the inductance value of the coil, and also using an oscilloscope. In addition, an important element of checking what signs of a malfunction of the crankshaft sensor have appeared is to set the correct gap between the sensitive element of the sensor, as well as the synchronization disk (the distance must be clarified in the documentation, it is in the range of 0.5...1.5 mm).
How to check the crankshaft sensor?
The simplest and most accessible method to almost any car owner is to check the internal resistance of the sensor. To do this, it is enough to use an electronic multimeter switched to the mode for measuring the resistance of an electrical circuit. For most modern sensors, the electrical resistance value of the internal coil is about 500...700 Ohms (in some cases this value may differ, so it is advisable to familiarize yourself with the technical parameters of the sensor separately). It is also advisable to check the insulation value of the wires. It should not be less than 0.5 MOhm.
To measure inductance, the car owner will need a multimeter (megaohmmeter), a network transformer, an inductance meter, and a voltmeter. Omitting the verification algorithm, it is worth immediately noting that the inductance value of the internal coil of a working sensor should be in the range of about 200...400 mH (may differ for different sensors, but not significantly). If the inductance is significantly lower (less often higher), then the sensor is most likely faulty, and additional checks must be performed, including measuring the coil resistance and insulation.
The most complex, but the most informative and reliable method of checking the crankshaft position sensor is using an oscilloscope, usually electronic (software emulator). To do this, connect an oscilloscope to the sensor terminals while the car engine is running and set up a program for taking an oscillogram. Its drawing will give a clear understanding of whether the sensor is in working condition and whether there are any gaps in its operation. In addition, you can remove the sensor from its mounting location, connect an oscilloscope to it and simply move some metal object (for example, a screwdriver) near its sensitive element. If it records movement and an oscillogram is formed on the screen, the sensor is most likely working.
During the verification process, it will not be superfluous to scan errors from the ECU memory using special scanners. This will help both in determining the error of the DPKV and other engine elements.