Checking parts and assembling the VAZ-21213, VAZ-21214 engine
We discussed engine disassembly in the article “Engine Disassembly”.
After disassembly, thoroughly wash the parts with kerosene, blow and dry them with compressed air (especially the oil channels of the parts).
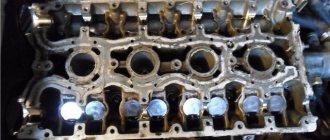
Inspect the block, especially carefully the crankshaft supports.
Cracks in any place in the block are not allowed.
If there is a suspicion of cracks in the block (coolant has entered the crankcase or oil has entered the coolant), check the tightness of the block on a special stand.
Carry out the check in repair shops that have the appropriate equipment.
Inspect the cylinders on both sides.
Scratches, nicks and cracks are not allowed.
When inspecting cylinders, we recommend illuminating the cylinder mirrors with a portable lamp - in this case, defects are visible much better.
1. To determine the wear of the cylinders with a bore gauge, we measure the diameter of the cylinder in four zones and two planes (parallel and perpendicular to the axis of the crankshaft).
2. To determine the wear of the piston skirt, use a micrometer to measure the diameter in a plane perpendicular to the piston pin axis, at a distance of 55 mm from the piston bottom.
3. Using a micrometer, measure the diameters of the connecting rod journals
4. Using a micrometer, measure the diameters of the crankshaft journals.
We grind the crankshaft journals to the nearest repair size if their wear or out-of-roundness is more than 0.03 mm, and also if there are burrs and marks on the journals.
5. After grinding the crankshaft journals, it is necessary to remove the oil channel plugs, thoroughly rinse the channels to remove abrasive residues and blow them with compressed air.
We assemble the engine in reverse order.
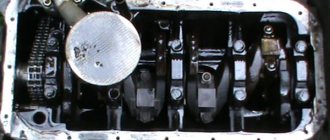
We install new crankshaft bearing shells of nominal or repair size (after grinding the journals).
6. In the first, second, fourth and fifth supports of the cylinder block we install the upper main bearing shells with grooves, and in the third support - a liner without a groove on the inner surface (the same as in the main bearing caps).
7. Lubricate the main bearing shells with engine oil and place the crankshaft in the supports.
We insert thrust half-rings lubricated with engine oil into the grooves of the fifth support.
8. We install a steel-aluminum half-ring on the front side of the fifth support, and a metal-ceramic half-ring (yellow) on the back side.
The surfaces of the half rings with antifriction coating (they have grooves) must face the thrust surfaces of the crankshaft.
9. Install the main bearing caps in accordance with the marks marked on their outer surface (counting is done from the camshaft drive side).
In this case, the locks of the upper and lower shells of each main bearing must be located on the same side.
10. Tighten the bolts securing the main bearing caps to a torque of 68.31-84.38 Nm (6.97-8.61 kgf m).
11. Pistons for cylinders are selected according to classes.
The cylinder diameter class, indicated by letters, is stamped on the bottom plane of the cylinder block (the plane of the oil pan mounting).
12. Classes of piston skirt diameters and holes for the piston pin are marked on its bottom
Technical characteristics of the internal combustion engine VAZ 21214
| Volume, cm3 | 1690 |
| Poppy. power, l. With., | 83 |
| Max. torque, Nm | 129 |
| Arrangement of cylinders in the block | in-line |
| Cylinders, pcs. | 4 |
| Valves, pcs. | 8 |
| Max. speed, km/h | 142 |
| Acceleration to 100 km/h | 17 |
| Combined fuel consumption | 10 |
| Environmental standards | EURO-4 |
| Cylinder diameter, mm | 82 |
| Piston stroke, mm | 80 |
| Compression ratio | 9,4 |
| Supply system | distributed injection |
| Cooling | liquid |
| Valve mechanism | SOHC |
| Cylinder block material | cast iron |
| Cylinder head material | aluminum |
| Resource, km | 80,000, in fact up to 150,000 |
| Clock (number of clock cycles) | 4 |
| Cylinder operating order | 1-3-4-2 |
| Max. c/v speed, rpm | 8000 |
| Recommended fuel | unleaded gasoline AI-95 |
| PARAMETER | MEANING |
| Years of manufacture | 1194 – present |
| Weight, | 117 kg |
| Cylinder block material | cast iron |
| Supply system | injector |
| Type | in-line |
| Engine displacement | 1.7 |
| Power | 81 horsepower at 5200 rpm |
| Number of cylinders | 4 |
| Number of valves | 2 |
| Piston stroke | 80 |
| Cylinder diameter | 82 |
| Compression ratio | 9.4 |
| Torque, Nm/rpm | 125Nm / 3000 |
| Environmental standards | EURO 4 |
| Fuel | AI 93 |
| Fuel consumption | 8.3 /100 km combined cycle |
| Oil | 5W-30 |
| Oil volume | 3.75 |
| When replacing, pour | 3.5 liters |
| The oil change is carried out | 15 thousand km |
| Engine life - according to factory data | 200 |
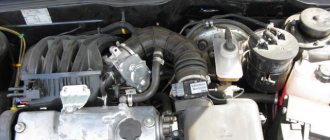
VAZ 21213 engine is installed on VAZ 21213, 21214, Chevrolet Niva.
Removal, replacement, installation of the crankshaft and its bearings
Directory
Tags
Removing, replacing, installing anti-roll bar
Removing, replacing, installing timing belt
Removing, replacing, installing rear suspension shock absorber spring
Inspection, checking the steering
Removal, replacement, installation of the crankshaft and its bearings
Symptoms: low pressure in the lubrication system, dull metallic knocks in the engine.
Possible cause: The crankshaft or its bearings are damaged.
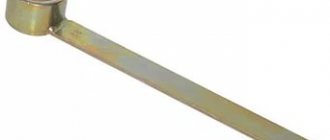
Tools: set of wrenches, set of screwdrivers, micrometer.
1. Place the car on an inspection hole or overpass, then remove the negative wire from the battery terminal.
2. Remove the engine oil pan from the vehicle.
4. Remove the camshaft drive cover along with the sealing gasket, and then remove the chain from the crankshaft sprocket pulley.
5. Mark the relative position of the connecting rods and their caps, as well as the relative position of the main bearing caps relative to the engine cylinder block.
6. Using a 14mm socket wrench, unscrew the two nuts securing the connecting rod cover.
Peculiarities
If the manufacturer does not provide the opportunity to buy a Lada 4×4 with a diesel engine, then craftsmen will appear who will install it with their own hands. So, which diesel engine is suitable for the VAZ 2121? Here are the most popular models:
- Peugeot XUD-9SD (1.9 l, about 70 hp) together with Fiat Polonez gearbox.
- Peugeot XUD 11 with Fiat Polonez gearbox.
- Toyota 3C (79 hp) or 3ST (100 hp) together with Toyota Noah gearbox.
- Motor from Volkswagen Vento.
- And many others.
To install a diesel engine, a large number of modifications will be required. The simplest and most common way of such tuning is to use the engine that was installed for export versions of the SUV (XUD-9SD). Its installation requires the least amount of changes to the machine design. It has a good location of the oil intake (in the front, not in the center or rear), the oil filter (on the front left, like the Lada 4x4) and attachment points to the body. In addition, it is easy to find spare parts for this engine model. The approximate procedure is as follows:
- Engine mounts are suitable for VAZ 21215.
- The gearbox bell and the box itself fit well from Fiat Polonez.
- Rework the pan, oil intake, flywheel, exhaust system, etc.
- The easiest way is to complete all the modifications according to the documents.
In other words, no diesel engine can be installed instead of a gasoline engine without modifications. What do you think, is it necessary to change the Lada 4×4 internal combustion engine to a diesel one? If yes, which one and why? Let us remind you that you can improve off-road performance in an easier way, for example, by installing mud tires.
Keywords: 4x4 engine | 4x4 gearbox
Found an error? Select it and press Ctrl Enter..
- Brigade 341 PrP became the best in quality of work
- How to remove the radiator grille of a Lada Granta (two methods)
- Video review of how the standard Lada Vesta audio system works
- AvtoVAZ instructions for eliminating the squeaking of the Lada Granta parking brake cable
The VAZ 21213 four-cylinder eight-valve petrol engine has a displacement of 1.7 liters. The power of the power unit is 81 horsepower with a torque of 125 Nm.
Engines 21213 in their latest generation were equipped with an injector and ran on high-octane 93 gasoline. The cast iron cylinder block ensured maximum strength for this power unit.
The use of numerous automatic engine control systems made it possible not only to change the traction performance of this engine, but also significantly improved fuel efficiency. Niva in suburban mode consumes 8.3 liters of gasoline per 100 kilometers when driving at cruising speed.
Also interesting: Connecting rods and pistons VAZ-21213
Starting from 2014, Niva cars with a diesel engine are also offered to customers.
The Niva engine with an overhead camshaft is equipped with a chain drive, which significantly simplifies the service of this power unit. The chain drive does not require replacement of the tensioner or any adjustment during operation of the motor. We also note the presence of hydraulic compensators, which relieves the car owner of the need to carry out the procedure for adjusting the valve clearance. All maintenance work on this engine can be performed by the car owner himself, without contacting branded service stations.
Weaknesses of the VAZ 21213 power unit
- Water pump;
- Engine, manual transmission and transfer case oil seals;
- Generator;
- Starter;
- manual transmission;
- Valve cover gasket;
- Cooling system pipe connections;
- Radiator;
- Thermostat;
- Expansion tank;
- Vacuum brake booster.
The water pump (pump) is characterized by frequent failures on new cars after 2,000 km.
Due to poor quality, oil seals require more frequent replacement than required according to the operating manual.
The generator has a high probability of failure. As a rule, it burns out even on new cars that have not reached 4,000-10,000 km.
The starter has a low service life without repair.
On a gearbox, one of the common defects is the fifth gear slipping out. In addition, the gears are not fully engaged.
The valve cover gasket loses its properties over time and allows oil to leak out.
The connections of the cooling system pipes in the places where the clamps are installed are not reliable and lose their tightness very early, which is fraught with loss of antifreeze.
The radiator is leaking. The problem occurs due to the appearance of cracks in the radiator pipe package, accompanied by loss of coolant. This defect has become widespread.
The thermostat does not provide thermal conditions for the coolant in the engine cooling system. The manifestation of this problem is no exception. The cause of the defect is a failure of the valve mechanism inside the thermostat. To check that the thermostat is working properly, after starting the engine, simply place your palm on the lower (outlet) hose, through which hot antifreeze circulates into the radiator for cooling. If the thermostat is working properly, after some time the hose should become hot; if the hose remains cold, the thermostat must be replaced.
The expansion tank cracks and antifreeze leaks out. The appearance of cracks occurs due to the failure of the steam-air valve in the tank plug due to increased pressure.
Vacuum brake booster (VUT). Manifested by a stiff brake pedal. The speed may fluctuate when the brake pedal is pressed, as well as hissing. The problem is solved by replacing failed rubber products and replacing clamps in connections.
And also interesting: Thermostatic valve (TRV) AUGUST (CHEVROLET NIVA)
Cylinder block. This weak point appears on various models of Nivov engines, including the previously discussed 21213. Due to insufficient quality control, the assembly unit is manufactured with a high percentage of factory defects. In short, the drilling depth of the intake manifold stud holes is not maintained, causing the holes to meet the camshaft stud holes.
In this way, L-shaped through channels are obtained. After installing the studs at the factory, the connections remain sealed for some time and the problem is not identified when the quality control department employees accept engine tests. After the sale of new cars with low mileage, during sharp braking, oil begins to seep through the studs onto the hot intake manifold, so much so that smoke from the oil burning in the manifold pours out from under the hood, and accordingly, there is nothing to breathe in the cabin.
A sketch for the technical specifications for eliminating oil leaks from under the exhaust manifold studs.
- Remove the GC cover;
- Unscrew the two studs securing the bearing housing (see sketch) and remove oil from the threaded holes;
- Thoroughly degrease the holes and stud;
- Apply sealant UG-10 or its analogues to the lower threads of the studs;
- Place the studs in place;
- Tighten the bearing housing nuts;
- Install the cylinder head cover;
- Wait at least 30 minutes for the sealant to set.