Cylinder head repair
Warning!
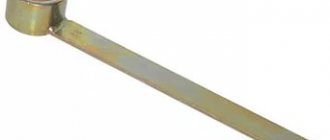
The cylinder head is replaced with the bearing housings assemblies, since they are processed together. You will need: keys “13”, “17”, “21”, a spark plug wrench, a screwdriver, pliers (tweezers), a device for compressing valve springs.
2. Unscrew the two fastening nuts and remove the eye.
3. Unscrew the fastening nut one or two turns and remove the bracket for the water pump supply pipe.
4. Unscrew the screw securing the fuel pipe holder and remove the holder.
5. Unscrew the three nuts securing the receiver and the two nuts securing the bracket for the fuel pipes.
6. Remove the fuel pipe bracket.
7. Unscrew the remaining two receiver mounting nuts.
8. Loosen the nut securing the receiver bracket.
9. Remove the receiver.
10. Unscrew the three nuts securing the receiver bracket and remove the bracket.
11. Unscrew the four nuts securing the inlet pipe.
12. Remove the inlet pipe.
13. Unscrew the two nuts securing the exhaust manifold and remove the manifold.
14. Carefully remove the two gaskets from the intake pipe and exhaust manifold.
Helpful advice. Even if the gaskets are not damaged and are slightly compressed, it is better to replace them and not reuse them.
15. Install the cylinder head with the bearing housings facing up, placing wooden shims underneath to prevent damage to the valves.
16. Unscrew the two nuts and bolt securing the rear cover of the cylinder head and remove the cover. Note that there is an O-ring under the bolt head.
17. Remove the spark plugs.
18. Unscrew evenly the four nuts securing the front 1 and six nuts securing the rear 2 camshaft bearing housings and remove the washers. Then remove both housings.
19. If the key in the camshaft groove does not fit tightly, remove it so as not to lose it.
20. Remove the camshaft from the cylinder head.
21. Remove the oil seal from the camshaft.
22. Remove the valve tappets along with the adjusting washers.
Warning! Having taken out the next pusher, mark it and the adjusting washer with a serial number so that during reassembly you can install them in their places. Do not remove the adjusting washers from the pushers unless necessary, so as not to mix them up.
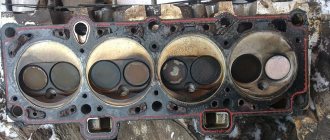
23. Clean the combustion chambers from carbon deposits. Inspect the block head. If there are cracks or burn marks in the combustion chambers, replace the head. Remove burrs and nicks on the plane of the block head.
24. Check the flatness of the surface adjacent to the cylinder block. To do this, place the ruler with its edge on the surface of the head, first along the middle, and then along the diagonals and use a feeler gauge to measure the gap between the plane of the head and the ruler. Replace the head if the gap exceeds 0.1 mm.
25. To check the tightness of the cylinder head, unscrew the two fastening nuts and remove the outlet pipe of the cooling system.
26. Plug the hole in the block head for the exhaust pipe. This can be done, for example, by installing a blank gasket made of thick cardboard under the pipe and tightening the nuts that secure it.
27. Pour kerosene into the water jacket channels. If the kerosene level drops, it means that the head has cracks and needs to be replaced. After checking, be sure to remove the cardboard spacer.
28. Check the condition of the supporting surfaces under the shaft journals on the block head and bearing housings. If at least one of them shows signs of wear, scoring or deep marks, replace the head and bearing housings.
29. Flush the oil passages. To do this, plug the vertical oil channel on the side of the combustion chamber (the channel is located between the 3rd and 4th cylinders)…
30. ...pour gasoline into the oil channels in all camshaft supports and wait 15-20 minutes. Pour out the gasoline, remove the plug and finally rinse the channels with gasoline using a blower.
31. To check the tightness of the valves, pour kerosene into the combustion chambers. If within 3 min. kerosene will not leak from the combustion chambers, the valves are sealed. Otherwise, lap in (see “Lapping in valves”) or replace the valves.
Note. The valve drive consists of the following parts:
1, 2 - valves; 3 - outer spring; 4 — internal spring; 5 — upper plate; 6 - cracker; 7 - lower plate. To replace or grind valves, all parts must be removed from the cylinder head.
32. Install a suitable stop, for example bearing 1, under the valve to be removed.
33. Install the valve spring compressor and compress the valve springs. Use a screwdriver or tweezers to remove two crackers.
34. Remove the upper spring retainer and the outer and inner valve springs. Similarly, remove the crackers, plates and springs of the remaining valves.
35. Mark the valves with cylinder numbers, for example, mark them.
36. Push the valves from below and remove them from the cylinder head.
37. Remove the valve stem seals using a tool or pliers (see “Replacing the valve stem seals”).
38. Remove the lower valve spring retainers.
39. Clean carbon deposits from the valves with a suitable tool (for example, a wire brush). Then carefully inspect the valves.
4.8. Valve plate sizes
40. Replace valves with the following defects: deep marks and scratches on working chamfer 1, cracks, deformation of valve stem 3, warping of valve disc 2, burnout marks. Shallow marks and scratches on the working chamfer can be removed by lapping the valves (see “Lapping valves”).
41. In a specialized workshop, the working chamfer of valves with damage that cannot be removed by lapping can be ground on a special machine. When grinding, you must maintain the dimensions indicated in Fig. 4.8.
4.9. Dimensions of valve seats: a — intake valve seat; b — exhaust valve seat; I - new village; II - saddle after repair
When to replace the cylinder head
The cylinder head is a fairly durable working unit, so it is not subject to repair or complete replacement very often. On cars manufactured in the Russian Federation, the cylinder head has to be removed due to cylinder leakage or when the gasket is worn out.
And sometimes the cylinder head is removed for modification. Removing this unit on a car with any number of valves is quite easy, although some skill may be required.
In this regard, if you need to remove the cylinder head yourself for the first time, then it is best to do this under the supervision of a person who has previously encountered a similar task.
Work process
- Disconnect the negative terminals from the battery.
- The piston of the first cylinder is set to the top dead center position.
- All coolant is drained.
- Fuel pressure decreases.
- The intake pipe of the exhaust system is disconnected from the manifold.
- The cylinder head cover is being dismantled.
- All pipes, electrical wires and hoses are removed. But before you do this, you need to remember or note what was originally connected and where. This is done in order to avoid possible confusion during re-installation.
- There are three bolts on the camshaft belt cover that need to be unscrewed and the cover itself removed.
- The timing belt is removed and completely removed.
- The shafts must be secured against possible rotation.
- The pulley is attached to the camshaft using bolts that must be unscrewed and then the pulley removed.
- The nut securing the rear camshaft cover is unscrewed.
- Unscrew the remaining bolts and remove the cover completely.
- Slightly loosen the tension of the dozen bolts holding the head.
- Then each individual bolt is unscrewed one by one and removed along with the washers.
- The head is released and removed.
- If the head is attached directly to the gasket, a screwdriver or any other long tool should be inserted under the manifold. Next, you need to use this tool as a lever in order to slightly lift the head, and then remove it completely.
- Very carefully, so as not to scratch the surface of the head, it is necessary to remove the remnants of the old gasket. It is best to use a special liquid for this matter.
- We put the new gasket in place.
- We make sure that the shafts are in the top dead center position and all valves on the first cylinder are completely closed.
- We put the bolts back.
- Using a torque wrench, we begin to tighten the bolts one by one.
- We reinstall all removed equipment.
- We adjust the clearances in the valve drive and tension the camshaft belt.
As you can see, repairing the cylinder head on a VAZ-2114, which has 8 valves, is a fairly simple, albeit slightly labor-intensive task, which means that every person who has at least a slight understanding of this unit can handle it.
How to tighten cylinder head bolts correctly?
Before you begin installing the cylinder head, you should first pay attention to the condition of its bolts. They must have a good thread and the length meet the required standards.
The normal overall length of the cylinder head bolt is 135.5 mm. If the bolts removed during gasket replacement meet this parameter, they can be reused. If the bolts have lengthened during engine operation, then they can no longer be used and new ones should be purchased.
Having dealt with the bolts in this way and installing them in place, you should proceed to tightening. It must be done only with a torque wrench. Tightening bolts “by eye” can lead to very serious consequences, including damage to the engine itself.
And so, how to stretch the head onto a VAZ 2114 correctly? Firstly, you should remember that you should start tightening the bolts from the center to the edges.
This diagram looks like this:
Secondly, tightening should be done in four stages (each of which is performed in exactly the same sequence as indicated in the diagram above).
At the first stage, we tighten each of the bolts with a torque wrench with a force equal to 2 kgf/cm2.
At the second stage, we tighten all the bolts with a force of 8 kgf/cm2.
At the third stage, we tighten the bolts, turning each of them at an angle of 90 degrees.
At the fourth stage, we again turn each of the bolts (still following the diagram given at the beginning) at an angle of 90 degrees.
Cylinder head VAZ 2114, 2113, 2115
The content of the article:
Repair of cylinder head VAZ 2114, 2113, 2115
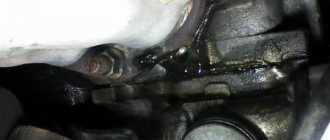
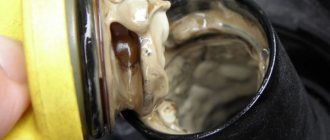
At first I noticed twitching, and then completely white smoke from the muffler “well, I think everyone has arrived,” I open the hood, look in, 100-200 grams of antifreeze have disappeared, it’s good that there are a couple of kilometers left to the house, I got there slowly. The result is a blown cylinder head gasket. I drained the remaining antifreeze, it was 2.5 liters, everything else went into the oil.
- valve cover gasket
- change valve seals on occasion
- also camshaft oil seal
so that nothing gets in the way
when we get it, we take the spider away
We put everything together so it doesn’t get in the way
removed the head, it burned out on the 4th cylinder, you can see how the antifreeze washed the piston, white and shiny
now we wash everything
effects of antifreeze mixed with oil
wash galoshes with diesel fuel and gasoline
The head had to be sharpened; there was some damage in the place where the gasket burned through, but it didn’t work.
We continue the work, took the head back after grinding, now wash everything and blow off any shavings, dried out the valves, removed the valve seals, washed them, we will assemble and install them after work.
before desiccation of valves
Assembly of cylinder head VAZ 2114, 2113, 2115
So we assembled the cylinder head, oh, and this is not an easy task for a beginner. I changed everything that was possible in the cylinder head, installed it, tightened it, and then the assembly process went in full swing, but there was no need to rush. After the assembly, the first launch and failure overtook me for a good amount: the purchase of an oil pump housing, and the reason for this was lack of care during assembly, the damper was not put on correctly, or rather not put in its place, it turned out that during startup it broke off the crankshaft sensor mount for me , as a result, a damper, an oil pump housing, and a gasket were purchased. Assembled, changed - everything is in its place. And then the start, everything is fine, the engine whispers, after some time 5-10 minutes, the engine suddenly stalls and does not start. I was furious. I found the reason the next day. The reason for this was that the crankshaft sensor wire was not secured to the clamp and it ended up being singed on the manifold. I redid the wires. Everything works and I finally left the garage. There weren't many photos, I was busy assembling.
Assembled cylinder head already with adjusted valves
The thermostat was put in place
Here's the new belt
Cylinder head boring VAZ 2114, 2113, 2115
I've had an assembled eight-point head lying around for a long time. The plans are to bore the intake channels to 33mm and the exhaust to 30mm. The valves will be of standard size, only lightweight (T-shaped), 17 grams removed from each valve. By the way, they are already ready. Milling cutters 28-30-31-33mm were made from ball joints. They cut very well. In the near future I will buy bronze guides, I have everything else. We'll see what happens. The cylinder head has already begun to bore. In general, this is what happens.
I wrote that I would install homemade T-valve valves, but I had to install new ones from the store. As a result, I went to buy spare parts for the cylinder head and bought myself new valves. They are practically no different from the previous ones that we made ourselves. In general, we bought bronze guides, upset springs, though they were prosport, but I haven’t heard anything bad about them, and T-shaped valves. Found at a friend's place, crackers, plates and valve stem seals.
Replacing Valve Guides
Critical depletion of guide bushings occurs at a mileage of 150-200 thousand km. You can do the cylinder head repair by replacing the bushings yourself. To replace them you will have to dry out all the valves. Then, using a mandrel to knock out the bushings, remove them from the head body.
It will be a little more difficult to install the new bushings in place. For correct and easy installation, you should use a temperature imbalance - heat the block head (this expands the metal, and therefore the bushing seat), and cool the new bushings to a negative temperature. The head body in the right place should be heated to 100 degrees.
This can be done using an electric stove, placing the cylinder head on it so that the work site is in the zone of maximum heating. Having lubricated the new bushings (cooled in the freezer of a regular refrigerator) with machine oil, we drive them into the mounting sockets. If you follow the recommendations for temperature preparation described above, the bushings will fit in easily, like clockwork.
After the metal has cooled, the bushings must be expanded to a diameter that allows the valve to move without jamming or distortion. In this case, the work must be done so that the valve stem does not dangle. To perform this procedure, you need a special tool - a reamer. The peculiarity is that they need to work only on one side, turning the reamer to the end. A big mistake is to bore the guide bushing on both sides - you will end up having to change the bushing again.
Remember that cylinder head repair is a complex process, the slightest inaccuracy of which can result in wasted nerves and money. As a rule, an oversight makes itself felt after assembling and starting the engine. This does not always happen immediately, but certainly within the first thousand kilometers.