Cylinder head gasket VAZ 2107
The cylinder head gasket is a one-time use item, since its physical properties and geometry change during installation.
What is the cylinder head gasket used for?
The cylinder head gasket is designed to seal the connection between the cylinder block and the head. Even taking into account the fact that these engine components have perfectly flat mating planes, it will not be possible to achieve complete tightness without it, because the pressure in the combustion chambers reaches more than ten atmospheres. In addition to this, the seals also require connection of the oil channels, as well as the cooling jacket channels. Tightness is achieved by uniform compression of the gasket while tightening the connecting elements.
The gasket serves to seal the connection between the head and cylinder block
What are cylinder head gaskets made of?
The cylinder head gasket can be made of different materials:
- metal (copper and aluminum alloys);
- asbestos;
- combinations of metal and asbestos;
- combinations of rubber and asbestos;
- paronitis.
The main requirements for the gasket are resistance to high temperatures and ability to compress. Each of the listed materials has its pros and cons. Products made from multiple layers of metal or asbestos, for example, better withstand high temperatures, but may not provide the best seal. Parts made of rubber and paronite, on the contrary, maximize the connection between the head and the block, but their temperature stability is lower.
Metal cylinder head gaskets for VAZ 2107 are made from copper and aluminum alloys
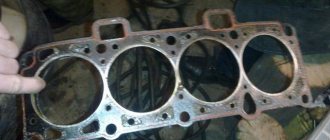
When choosing a gasket, it is better to give preference to a combined product, for example, made of asbestos and metal. Such seals are made of sheet asbestos, but the holes for the cylinders are reinforced with metal rings. Holes for fastening elements are reinforced with the same rings.
When choosing a gasket, it is better to give preference to a combined product
What to consider when choosing a cylinder head gasket
If you are going to replace the gasket, you need to know exactly the characteristics of the engine. The fact is that the “sevens” were equipped with three types of power plants: VAZ 2103, 2105 and 2106, which have different cylinder diameters. For the first it is 76 mm, for the last two it is 79 mm. Gaskets are manufactured according to these dimensions. Therefore, if you purchase a cylinder head seal for a 2103 engine and install it on a 2105 or 2106 power unit, the pistons will naturally tear the edges of the product with all the ensuing consequences. If a gasket with a cylinder hole diameter of 79 mm is installed on a VAZ 2103 engine, the seal will not provide the necessary tightness due to the fact that the part will not completely block the cylinder holes.
Causes and signs of cylinder head gasket failure
The destruction of the seal is characterized by its breakdown or burnout. In the first case, there is slight damage to the part, which in some cases cannot even be seen with the naked eye. When a product burns, the scale of damage is significantly greater. The part is deformed and loses its integrity, leaving joint areas without sealing.
Causes of destruction
The main reasons why a cylinder head gasket fails prematurely include:
- overheating of the power unit;
- incorrect order or tightening torque of the mounting bolts during installation;
- factory defects or low quality materials used to manufacture the part;
- use of low-quality coolant;
- engine malfunctions.
Engine overheating most often causes gasket failure. It usually occurs due to interruptions in the operation of the cooling system (malfunction of the thermostat, radiator fan, fan switch sensor, clogged radiator, etc.). As soon as the driver drives a car with an overheated engine for half a kilometer, the gasket will burn out.
When installing a new seal on a power unit being repaired, it is important to follow the order of tightening the bolts that secure the head to the block. In addition, it is necessary to adhere to the specified tightening torque of the fastening elements. If the bolts are not tightened or overtightened, the gasket will inevitably become deformed and subsequently be punctured.
Most often, the gasket burns out due to engine overheating.
When choosing a replacement seal, you should pay attention not only to its parameters, but also to the manufacturer. Under no circumstances should you buy cheap parts from unknown companies. The result of such savings may be unplanned engine overhauls. This also applies to coolant. Low-quality refrigerant can cause corrosion and damage not only the gasket, but also the head itself.
As for disturbances in the operation of the power plant, processes such as detonation and glow ignition also have a destructive effect on the seal. Therefore, it is worth monitoring the quality of the fuel and the correct adjustment of the ignition timing.
Signs of cylinder head gasket damage
A breakdown or burnout of the gasket can manifest itself in the form of:
- rapid heating and overheating of the engine;
- unstable operation of the power unit;
- oil or coolant leaks from under the cylinder head;
- traces of coolant in the oil and grease in the refrigerant;
- steam in exhaust gases;
- an increase in pressure in the cooling system, accompanied by the appearance of smoke in the expansion tank;
- condensation on the spark plug electrodes.
Symptoms will be different in each individual case. It depends on where exactly the integrity of the seal was damaged. If the gasket is damaged near the edge of the cylinder bore, then, most likely, the power plant will overheat with an increase in pressure in the cooling system. In this case, hot exhaust gases under pressure will break through the seal damage into the cooling system. Naturally, antifreeze or antifreeze will begin to heat up quickly, increasing the temperature of the entire engine. This will increase the pressure in the system, and gas bubbles will appear in the expansion tank.
When a gasket burns out, refrigerant often gets into the oil.
There will definitely be a reverse effect. If coolant enters the combustion chambers, it will disrupt the normal operation of the engine. The engine will begin to stall due to the fact that the fuel-air mixture, diluted with coolant, will not be able to burn. As a result, we will get a noticeable malfunction of the engine at idle, accompanied by exhaust gases in the cooling system, coolant in the combustion chambers and thick white smoke with a characteristic odor from the exhaust pipe.
If the gasket burns out somewhere between the windows of the cooling jacket and the oil channels, it is possible that these two process fluids will mix. In this case, traces of grease will appear in the expansion tank, and antifreeze or antifreeze will appear in the oil.
Oil may get into the cooling system
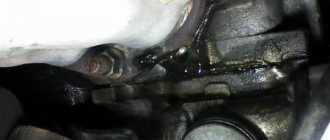
If the gasket is damaged along the edge, oil or coolant leakage is usually observed at the junction of the cylinder head and the cylinder block. In addition, a breakthrough of exhaust gases between the main engine parts is also possible.
If the gasket is damaged and coolant is leaking into the cylinders, thick white smoke will come out of the exhaust pipe.
Self-diagnosis
Diagnosis of gasket failure must be approached comprehensively. In other words, you should not immediately start removing the head when you see white smoke from the exhaust pipe or oil leaks from under the head. To verify that the seal is faulty, follow these steps:
- Inspect the junction of the head and cylinder block around the perimeter. If you find oil or coolant leaks, make sure that it is leaking from under the head.
- Start the engine and notice the color of the exhaust and its smell. If it really looks like thick white steam and smells like antifreeze or antifreeze, turn off the engine and carefully unscrew the expansion tank cap. Take a sniff. If exhaust gases enter the cooling system, the smell of burnt gasoline will come from the tank.
- Without tightening the cap of the expansion tank, start the engine and look at the condition of the refrigerant. It should not contain any gas bubbles or traces of lubricant.
- Turn off the power plant and let it cool. Remove the oil dipstick, inspect it and determine the oil level. If there are traces of a white-brown emulsion on the dipstick, or the oil level has suddenly risen, mixing of process fluids is taking place.
- Let the engine run for 5-7 minutes. Silence it. Unscrew the spark plugs and inspect the electrodes. They must be dry. If there are traces of moisture on them, most likely, refrigerant is entering the cylinders.
Video: signs of cylinder head gasket damage
Replacing the cylinder head gasket VAZ 2109 (21099)
On all carburetor cars of the 2108-09-099 family, replacing the head gasket is quite simple, first remove the cylinder head:
- disconnect the battery terminal (ground wire) and drain the antifreeze;
- remove the air filter housing;
- We pull off the crankcase ventilation hose from the valve cover, having first unscrewed the clamp;
- as on the “Classic”, we disconnect from the carburetor: the gas cable, the choke cable, the gasoline hose from the fuel pump;
- remove all pipes from the cylinder head - vacuum booster, radiator, stove hose;
- unscrew the nuts securing the exhaust pipe; you can get to them from above, from under the hood;
- remove the timing belt cover;
- dismantle the valve cover (2 nuts);
- unscrew the cam gear mounting bolt;
- loosen the tension roller, remove the belt and the gear itself;
- unscrew the bolt securing the iron timing case to the cylinder head;
- we unscrew ten cylinder head bolts, the rest need not be removed (the carburetor, distributor and intake manifold remain in place).
At this point, the removal of the cylinder head is completed, we change the gasket, thoroughly cleaning the surfaces of the cylinder head and block. Labels are set as follows:
- the camshaft marks are aligned along the left edge of the cylinder head (as in the picture);
- The crankshaft marks are aligned on the flywheel (in the gearbox housing window).
After replacing the VAZ 2109 cylinder head gasket, fill in antifreeze and start the engine; as the engine warms up, add coolant to the expansion tank and monitor the engine temperature.
Cylinder head
Essentially, the head is the cylinder block cover that covers the cylinders. It contains the upper parts of the combustion chambers, spark plugs, intake and exhaust ports, as well as the entire gas distribution mechanism. The VAZ 2107 cylinder head is a monolithic part cast from an aluminum alloy, but inside it there are channels where oil and coolant circulate.
The head is the housing for the timing mechanism
Are there any differences in the design of the cylinder head for the carburetor and injection engines of the VAZ 2107
The cylinder heads of the carburetor and injection engines of the “seven” are almost the same. The only difference is the shape of the intake channels. For the former it is round, for the latter it is oval. A manifold from a carburetor car without modifications will not be able to completely block the intake windows. Therefore, if there is a need to replace the head, this point should be taken into account.
The device of the cylinder head of the VAZ 2107
The main task of the cylinder head is to ensure the operation of the gas distribution mechanism. It serves as a housing for all its elements:
- camshaft assembly with “bed”;
- levers;
- valves;
- valve seats;
- guide bushings;
- oil seals;
- springs;
- "plates";
- "crackers";
- retaining rings;
- adjusting bolts with bushings, etc.
The valve mechanism is part of the cylinder head
Replacing the cylinder head gasket VAZ 2110 (2112)
On VAZ 2110 and 2112 cars, a 16-valve four-cylinder engine is often installed; it has almost the same cylinder block, but the cylinder head is different - it is two-shaft. It is somewhat more difficult to remove such a cylinder head; the timing marks are also installed differently.
We replace the PGBC as follows:
- We prepare everything for dismantling the cylinder head (remove the battery terminals, drain the antifreeze);
- completely disconnect the air filter housing with pipes;
- remove the oil filler cap, dismantle the decorative cover of the cylinder head (4 fasteners);
- disconnect the high-voltage wires, remove the ignition module;
- dismantle the upper timing belt casing, the most difficult thing to get to is the lower bolts;
- unscrew the tension roller, remove the timing belt;
- dismantle both camshafts, unscrew the bolts of the iron timing case to the cylinder head. You should immediately remove the dowels carefully, otherwise you may lose them. Before removing the gears, it is recommended to rotate the crankshaft and immediately set the timing belt to the marks;
- remove the intake manifold; after unscrewing the nuts, you need to pull it out of place;
- dismantle the valve cover by unscrewing all its fastening bolts;
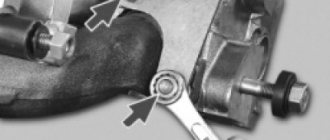
- We disconnect all the existing wires and cylinder head fastenings, as well as the fuel rail, gasoline hoses (we unscrew the fittings with two horns and wrenches). When unscrewing the fittings, it should be taken into account that there is pressure in the fuel system, so it is better to bleed it off first;
- remove the protective cover of the exhaust manifold, disconnect the exhaust pipe of the muffler. It is inconvenient to get there; it is better to unscrew the nuts from below;
- unscrew the thermostat bolts (3 pcs., 5mm hexagon);
- twist the cylinder head mounting bolts (10 pcs.);
- Having disconnected everything that can hold the cylinder head under the hood, remove the cylinder head.
We clean the surfaces, install a new gasket, and mount the cylinder head in place. Before installing the cylinder head, it is necessary to set the piston of the 1st cylinder to TDC, and on the head itself you should check the installation of the camshafts by placing the gears on them - the marks should face up. Having replaced the cylinder head gasket of the VAZ 2110, we start the engine and, as the engine warms up, add antifreeze to the cooling system.
Related articles:
- Replacing the master and working brake cylinders on VAZ cars Replacing the brake cylinder is a simple job, but extremely important; driving with faulty brakes is strictly prohibited. Diagnostics and repair of the brake system (TS) must be carried out [...]
- Types of interior tuning on a VAZ 2107 car Rear-wheel drive VAZ classic cars are no longer produced in Russia, and have recently become less common on the roads, however, the cars are still quite popular and in demand. […]
- Repair of the distributor on VAZ 2101-07 and VAZ 2108-09 cars Repair of the distributor on VAZ cars is necessary when its parts wear out, but if the breakdowns in the device are too serious, it is not advisable to repair the distributor, it is easier […]
Signs of a malfunction of the cylinder head
There are several reasons for the head gasket to burn out on VAZ cars:
The main cause of burnout of the cylinder head is overheating; the engine temperature is determined by the sensor on the instrument cluster. The engine can overheat due to various factors:
- insufficient level of antifreeze (antifreeze) in the cooling system;
- the ignition is set incorrectly (too late);
- the main cooling radiator is clogged;
- Intake and exhaust valves are jammed.
If there is severe overheating, the cylinder head may fail and the piston rings may become stuck. If, after replacing the cylinder head, the gasket burns out again, it is necessary to carry out more serious repairs and deal with the cause of the recurring defect.