Note: The above components may differ depending on the connection scheme you choose. In my case, the connection will be made by connecting the heated mirrors to the heated rear window. Below I will provide three alternative connection methods that can also be used.
To enlarge the image click on it!
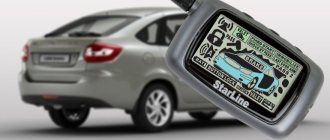
Do-it-yourself installation of heated mirrors on a Lada Granta - step-by-step instructions
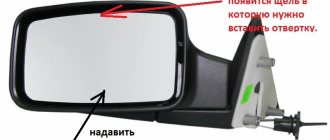
1. First of all, you need to remove the rear view mirror. To do this, bend the mirror and unscrew the latches located in a circle.
2. Next we dismantle the mirror covers. The latches are clearly visible from the side of the removed mirror.
3. After this, we proceed to removing the door card. Everything is simple here, I think you’ll figure it out. For those who still need instructions, read this article, which describes everything in detail.
4. We insert the power wires of the heating element into the hole in which the wiring is laid.
5. Next, you need to disassemble the connecting block; I’ll tell you right away - it’s not an easy task. Pushing the wiring through the block, as well as the rubber corrugation into the interior, is quite difficult. True, if you know certain secrets, you can make your life much easier. To do this, you will need a thin round file, which is very convenient for drilling a hole in the block, into which the “-” power wire for the heated mirrors will then fit perfectly. We do the same with the “+” wire.
6. Next, we pull the wire through the rubber corrugation.
7. We connect the negative wires to the ground screw near the fuse box. I connected the positive wires to the fuse holder and heat-shrink everything.
8. In the bundle of wires we find two gray wires (the first goes to the fuel pump, the second powers the heated rear window , which is what we need).
9. We connect the fuse holder using a continuous clamp and the wire we need. We install a 15 A fuse in the holder.
10. We connect the elements to the “mothers” on the mirrors, after which we connect the heated mirror elements and install the trim.
11. Assembly is carried out in the reverse order and only after checking the functionality of the heated mirrors .
Most popular options
Panoramic (spherical) mirrors
Instead of the usual interior element, you can install a panoramic one. They require a trial period that lasts approximately 2 weeks. Panoramic accessories provide a better view, but “move away” objects. If during this time the driver gets used to distortions and constant recalculation of the distance to objects, the accessory can be left.
The advantages of such models are:
- no blind spots;
- free movement along the rows;
- focus on a panoramic view, rather than on the side elements, and a holistic perception of the road situation at the rear;
- control over the behavior of rear passengers.
The models consist of reflective surfaces of various types. This virtually eliminates blind spots.
Anti-glare
When choosing which mirrors to put on a VAZ 2114, if you often have to drive in poor visibility conditions, pay attention to options with anti-dazzle
Wedge cover
The surfaces of the reflective layers are placed at an angle to each other. Two layer positions, for day and night operation, can be switched manually or electrically. During the day, images are reflected from the mirror surface, and at night from the outer glass surface.
Liquid crystal reflective layer
A layer of liquid crystals is located between two glasses and normally reflects objects with normal brightness. In blinding light, the crystals change their characteristics and reduce the brightness of the image. The transparency of the crystals is determined by an electronic control system.
Tinting
Tinting with special films weakens the light that blinds the driver. But the effectiveness of tinting depends on the individual qualities of the driver.
Lada Kalina Hatchback space › Logbook › Repair of electric headlight corrector on Kalina
Once, standing next to a running car, I heard an incomprehensible noise from the right headlight, as if an electric corrector was working. I turned off the engine - there was no noise; when I tapped the headlight (the headlight was on), the electric corrector was activated for a second. When adjusting the headlights from the passenger compartment, both headlights rise and fall, the right one with a slight delay. I decided to look into this, after reading the forums I found out that the electric corrector needs to be changed, and it is attached with 2 screws from the inside, that is, it is necessary to disassemble the headlight. My headlights are made by Kirzhach, not dismountable (on sealant). Although some take it apart, there’s a lot of fuss and it’s also difficult to glue it back in properly. Also, some somehow manage to unscrew the screws from the inside without disassembling the headlights. I read somewhere about an alternative repair, I did this: 1) Removed the headlight, before that you need to remove the bumper. 2) Disconnected all the bulbs so as not to interfere, and disconnected the corrector from the reflector.
Disconnect the corrector from the reflector
3) I drilled out the corrector mount from the outside, the places are clearly visible from the characteristic pits that appear when casting plastic.
Drilled holes
4) Pull out the corrector through the hole for replacing light bulbs.
We see an imported corrector
5) We disassemble the corrector, and we see that the adjustment pin (servo drive pin) has fallen out of the yellow groove. That is, the pin was not fixed, but simply lay on it and from vibrations it gave a command to the motor.
The whole problem
6) After correcting the jamb, we put the corrector in place and screw it on from the outside by selecting suitable screws. The position of the corrector in the headlight has not changed.
The electric rector is fixed externally
Issue price: 0 ₽ Mileage: 65,000 km
www.drive2.ru
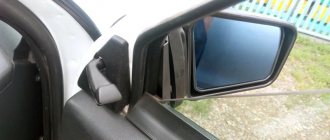
Appearance of Lada Granta Side mirrors
Side mirrors of Lada Granta
The safe movement of a vehicle is ensured by many factors. First of all, this is the serviceability of all systems and electronics. Review is also important. To do this, any vehicle is equipped with special elements - side mirrors. They help assess the road situation on the sides and rear of the car.
Factory models are installed on domestic Grant series vehicles. However, many motorists prefer to improve the appearance of their car and purchase tuned parts.
The most common models are those with the following characteristics:
- presence of anti-reflective coating;
- with turn signal repeaters;
- with and without heating;
- electric drive
Until 2021, luxury Kalinovsky mirrors were installed on Lada Granta sedan cars, with overlays in body color (if you have the “Lux” package) or unpainted. But with the advent of the Liftback body, Granta received a new bumper and side mirrors. Since then, many “grant sellers” want to buy Grant Liftback mirrors. By the way, the restyled version of Granta FL received the same mirrors from Liftback.
Features of mirrors
The main purpose of rear view mirrors is to display what is happening around the outside of the car. The driver uses the mirrors when turning, changing from one lane to another, and always makes sure that there are no other vehicles nearby. This guarantees life safety and machine safety.
If you are looking for Grant mirrors, buying them in our store will not be difficult. Installation is quick and easy. The elements are installed in their standard places. If the mirrors are heated or electric, then it is necessary to connect to the wiring. You can also do this yourself or by contacting an auto electrician.
Modern mirrors presented on our website are completely similar to factory ones. Therefore, there is no need to make additional holes during installation. The main characteristics of the products include:
Durability. They are made from durable material that guarantees resistance to precipitation; plastic does not fade in the sun.
Safety. In the mirrors, the road situation is displayed as clearly as possible, without distortion.
Versatility. Lada Granta mirrors can be purchased in the color of your car.
Now you don’t need to spend a lot of time choosing side mirrors for your Grant. We have collected the best models on the site. Order quality products at an affordable price.
Procedure
Now you can begin installing the heater. First, remove the holder with the mirror from the case. On most cars, it is enough to pry it with a screwdriver or something flat from below and pull it towards you.
Based on the characteristics of the holder, we choose the method of fastening the wire. If the inner surface of the holder is smooth (as in the photo), then stick double-sided tape on it.
Then we lay a piece of wire on this surface. This can be done arbitrarily, for example, in a zigzag or something else. The main thing is to place it so that the thread covers as much of the surface of the holder as possible. In this case, the wire should not intersect anywhere. Scotch tape will hold the nichrome thread well.
If the inner surface of the holder has any protrusions or fastening elements, then it will not be possible to stick the tape. In this case, a soldering iron will help to secure the wire. Everything is simple here - we apply a nichrome thread to the surface and press it with a heated soldering iron. The plastic will begin to melt and the wire will sink into it. Once cooled, the plastic will become hard and will hold the thread. But here it is important not to overdo it with heating the plastic, so as not to “push” it to the mirror. It is enough just to “drown” the wire in it a little and that’s it.
In this way, we fasten the wire along the accessible surface of the holder without touching the fasteners.
When laying the wire, its ends should be placed towards the side of the holder that is closer to the door, and so that they do not touch each other. To these ends we solder terminals for connecting to the wiring or simply the ends of prepared wires. Then the resulting connections need to be insulated.
Lada Kalina Station Wagon Riesling › Logbook › Repair of electric window Lada Kalina
In this blog I will describe my method for repairing a power window. I was inspired to do the repairs myself by the high price of components. When my lift failed, I decided to buy a new one and change it, but when I arrived at the store and found out the cost of a new electric window lift, I decided to try to repair my lift with my own hands (the price of an assembled lift in my city is 1,800 rubles, and the price of an engine with a gearbox is 1,000 rubles). First I needed to determine the cause of the lift failure. Let's consider the main reasons for the failure of cable power windows: 1. The fuse has failed (detected by visual inspection). 2. The relay has failed (to check, remove the relay and place a jumper on pins 30 and 87). 3. Damage to the lift control buttons (detected by visual inspection and testing the lift on and off buttons with a tester). 4. Wire break with loss of power (detected by step-by-step power check with a tester at the nodes and connections of the lift). 5. Breakage of the cable guide rollers (detected by visual inspection; during operation, the engine will be heard, but the lift will not work). 6. Breakage of the lift gear gear (detected by visual inspection; during operation, a characteristic cracking sound will be heard and at this moment the glass stops lowering or rising). 7. Failure of the lift motor armature (with such a defect, power comes to the lift, but it does not react in any way and there is a characteristic smell of burning wiring). 8. Wear of the graphite brushes of the lift motor (at the first stage of the lift’s operation, the glass goes down but does not rise to the top. At the second stage, feedback is heard when the button is pressed, but nothing happens; this is complete wear of the brushes). In my case, after examining and identifying the cause, I concluded that my brushes had failed! And in this post I will describe how to cure this problem with minimal cost. I was faced with the question of where and what brushes to buy? After reading a little on the Internet, I found a post that said that brushes from a VAZ 2106 generator are ideal.
Reviews
| № | Positive |
| 1. | Vitaly: There were no problems connecting the reflector. I installed it myself, the scheme is quite simple and intuitive. |
| 2. | Kirill: in winter the mirror on the left side cracked, I replaced it myself with a new one. There were no difficulties with disassembly, the design is quite simple, the connection diagram consists of two blocks. |
| 3. | Vasily: after a side impact, the right side mirror cracked. I had plenty of free time, so I installed the new one myself. At the same time, I replaced the rubber seal; it was deformed and moisture penetrated inside. |
| 4. | Alexander: after two years of operation of the Lada Granta Liftback, the insulation in the doorway on the wiring was worn out. Replaced the entire block with wires. Now the line is completely new. |
| 5. | Konstantin: when the reflector burst, I didn’t contact the experts, I installed a new one myself. The procedure is simple, the case is held on by three screws, the block with wires is connected to the standard connector. |
| 6. | Victor: the housing on the left mirror was cracked, I bought a new one at the car market. I transferred the filling myself, it turned out to be very simple. I didn’t contact the specialists at the service station, I did everything with my own hands and I advise you. |
| 7. | Gennady: the right turn signal suddenly stopped working, so I disassembled the reflector myself. The reason was poor contact at the terminal. I pressed it with pliers and everything works fine. |
| Negative | |
| 1. | Ignat: the design of the side reflectors is not perfect; they do not fit tightly, despite the presence of a rubber seal. I decided to buy a reflector block from Renault Logan, it has an identical mount. |
| 2. | Vasily: the quality of the wire insulation is poor; after two years of use, Granta replaced it with new wiring. Insulation cannot withstand freezing temperatures. |
| 3. | Sergey: I changed the left side mirror adjustment cables for the second time in a year. Low quality components. |
Conclusion The process of independently replacing side-view mirrors on the Lada Grante Liftback is not at all difficult. The design is fixed with three screws, connection to the power circuit is carried out by two blocks with wires. Following the recommendations given in this manual, replacing a new mirror will take no more than 10 minutes. Negative reviews from some owners are unfounded and are caused by violation of the operating conditions of the technical equipment and failure to comply with maintenance schedules.
Checking the presence of standard heating
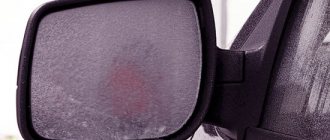
The presence of a heated rear view mirror cannot always be detected at first glance. The fact is that there is often no separate button to turn it on, and many car owners wonder how the heated exterior mirrors are turned on. The function is activated automatically when the rear window heating is turned on. To check if the mirror heater is present:
- Start the engine;
- Turn on the rear window heating;
- Spray the mirrors with water or blow on them;
- Touch it with your hand.
When the heating is running, the water drops dry within 1-2 minutes; when you breathe, the mirror does not fog up, and it is warm to the touch. In the cold season, you can verify the presence of heating by simply observing how long it takes for the mirror to thaw after being parked overnight. If a heating element is located underneath, the defrosting process takes only a few minutes.
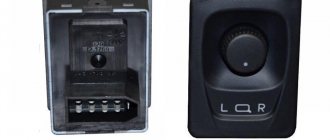
Connection
Connecting the central lock
. We use a circuit of two relays so as not to go under the panel to the central locking unit:
Connecting heated mirrors
(to the wiring harness under the driver's threshold)
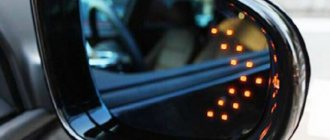
Connecting mirror turn signals
:
- Option 1: Pull the wire from the direction indicator on the fender.
- Option 2: To the wiring harness under the driver's threshold (blue - left turn signal; blue-white - right).
We transfer the wires from the power windows from the standard buttons to a new block with a joystick.
For Lada Kalina and Granta with heated and electric side mirrors (without direction indicators):
- The new mirror has a chip with six wires, but the old one has only five. We pull the sixth contact, which is used to operate the turn signals.
The process of installing exterior mirrors from a liftback on a Lada Granta sedan is also shown in the video:
Are you considering replacing old mirrors with new ones with turn signals?
A special feature of the Lada Granta Liftback is a new modification of the side-view mirrors. By default, they are included as standard, unlike the Lada Granta Sedan, Priora, VAZ 2109, 2108, 21099.
Due to various reasons, such as an accident, collision, impact, reflectors are damaged. The replacement process is not at all complicated; every car enthusiast can do it.
In order to provide methodological assistance to inexperienced owners of the Lada Granta Liftback, we recommend following the instructions below.
Mirrors from viburnum on vaz 2114 installation
On the website you will find information on mirrors from Viburnum to VAZ 2114 - click on us. Everything about diagnosing and repairing a car, only with your own hands and without outside help. How to repair a car yourself at home. We will help you with repairs and repair the car yourself. We know how to restore a car with minimal investment. I have attached video instructions.
Category: Auto repair
Laughter on topic: - AHAHAHHAA - Are you an idiot?! You can't laugh at the sick! Let's go to the morgue!
Published by Admin: at the request of Thaddeus
Car owner review: The best car among the B class.
The modern car owner is provided with a lot of information about whether mirrors from Viburnum will fit on a VAZ 2114 - we invite you to come to us. Free video lesson on car repair, watch with pleasure. How to repair a car yourself at home. We will help you with repairs and repair the car yourself. We know how to restore a car with minimal investment. I have attached video instructions.
Category: Auto repair article
Laughter on topic: - Oh, how I worry about my wife! - What’s wrong with her? - My car is with her.
Published by Admin: at the request of Rudolf
Feedback from a car owner: Economical! Comfortable (for a man 196 cm tall. I can fit comfortably into every car)
AvtoVAZ first began installing side mirrors of the new SE model (with heating, electric drive and turn signal indicators) on the Lada Granta liftback. Then they began to be equipped with Luxe trim levels of the sedan. The following describes how to install and connect standard liftback mirrors with your own hands to simpler versions of the Lada Granta sedan, as well as to the Lada Kalina station wagon and hatchback.
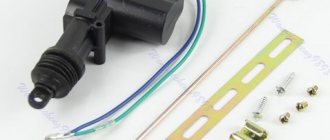
Required
| Name | vendor code | Price, r |
| Heated, electrically adjustable exterior mirrors with turn signals (LED) |
| Joystick/control unit from Lada Kalina (with central locking) | 11180-3709810 | 850 |
| Connector - electric mirror block (female) | CB-00090291 | 150 |
| Block for power window control unit 1118 | CB-00039007 | 50 |
| Connection block to power window button | CB-00033485 | 50 |
| 10 PIN connector with contacts for mirror control | 170 | |
| Wing turn signal plug | 21700-8212104 | 150 |
| Door card blank | 83191 3K030 | 30 |
Replacing the side view mirror Kalina
- Medium flat screwdriver
- Medium Phillips screwdriver
- Pliers
Parts and consumables:
The work is shown on the left outside mirror. Removing the right mirror is similar.
1. Use a flat-head screwdriver to pry off the exterior mirror trim.
2. Remove the lining.
3. Using pliers, remove the locking bracket of the ball joint housing of the handle rod.
4. Using a Phillips screwdriver, unscrew the three screws securing the mirror.
5. Remove the mirror along with the cables and the ball joint.
6. Install the outside mirror in the reverse order.
The article is missing:
- Photo of the instrument
- Photos of parts and consumables
- High-quality photos of repairs
If suddenly, due to unsuccessful parking or, God forbid, your Kalina’s exterior mirrors were damaged during an accident, then the instructions below will be quite useful for replacing these parts yourself. I tried to describe everything in the most accessible language, and the process itself is very simple, so you should not have any difficulties when performing this work.
General information
Modern cars are mostly equipped with a heating system. But vehicles, such as the VAZ, for the most part lack this advantage. However, this does not mean that the situation cannot be corrected. Agree, home craftsmen already redo a lot of things in classic VAZ models. For example, the chassis, engine and much more are being modified. Compared to this, installing a heated mirror system seems like baby talk.
All you need is free time, desire and theoretical knowledge, which you will get from this article. In general, there are two ways to implement the plan. One of them is the installation of heating elements, the second - light bulbs. We will look at each of them, and you can decide which one you like best.
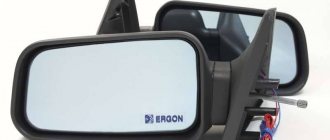
Set of wires for connecting grant mirrors
Wiring kit for connecting electric mirrors.
Important information for ordering!
If you have chosen a harness by catalog number, then when placing an order for it you may not indicate information in the “Vehicle Data” field. An exact match of the catalog number of the presented harness with the catalog number of the previously installed one guarantees its compatibility with the car.
If you are selecting a harness for a car without knowing the exact catalog number of the previously used harness, then when ordering a wiring harness, indicate in the special field:
| Required data: | Example: |
| Intra-factory car model index | VAZ 21099 |
| Year of car production | 2002 |
| Factory index, engine size and number of valves | 21083 1.5l 8kl |
| Fuel supply system | carburetor |
| Type of gearbox and number of gears | 5 manual transmission |
| Name of the vehicle equipment and describe the main features of the equipment | Normal (air conditioning, ABS) |
This information will help you make sure that you have chosen the correct wiring harness for your vehicle!
Kit: 1 Wiring Harness
What is a hydraulic corrector and how does it work?
The hydraulic headlight corrector is installed on the Grant from the factory. This device adjusts the headlights higher or lower depending on the vehicle's load.
You need to adjust it yourself - there is no automatic setting.
The corrector control is located under the light switch handle. Position 0 corresponds to a car with one person - the driver.
The more the machine is loaded, the higher the hydraulic corrector value should be.
Principle of operation:
- the handle controls the hydraulic corrector cylinder;
- the cylinder regulates the pressure in the flexible tubes that go to the pushers;
- pushers are installed in the headlights - the higher the pressure in the tubes, the stronger the liquid inside the pusher presses on the rod;
- the position of the rod deeper/further is responsible for adjusting the headlight higher/lower.
What to do if the hydraulic corrector is broken
Have both or one headlight stopped responding to the hydraulic corrector? Most likely your pusher is broken.
According to the regulations, the entire hydraulic corrector mechanism is replaced as an assembly and cannot be repaired. Price from 400 to 1000 rubles. Order number: 21903718010.
If you want to fix the pushrod, there are two ways.
Table 1. Options for repairing the headlight range control pusher.
| Option 1 is barbaric. No further adjustment. |
|
| Option 2 is humane. We return the corrector to full working condition. |
|
A corrector kit costs about 700 rubles - it may be easier to replace it
How to replace a hydraulic corrector with an electromechanical one
Do you want to replace the hydro with an electric corrector (EMKF)? The process is simple, as there are ready-made solutions from the factory.
Article: EMKF-41. Price 2000-3000 rubles.
To replace, you only need straight hands - depending on the manufacturer of the EMKF:
- dismantle the old hydraulic corrector;
- We install a new corrector control unit in place of the cylinder - we run the wiring according to the instructions;
- we pull the wires through the elastic band along which the hydro pipes went;
- We put the regulators in their standard places in the headlights.
Cost of covers for Kalina mirrors
They cost on average from 500 to 1000 rubles, depending on the shape, color and method of attachment. Unpainted overlays can be purchased for only 200 rubles. Chinese cheap analogues cost very little (100-300 rubles), but are significantly inferior in quality. They are more fragile, brittle and inelastic.
Mirror covers for the Lada Kalina are the simplest but most noticeable tuning element!
The VAZ service station provides complete diagnostics and repairs of the Lada Kalina (1118) sedan.
Our car service specialists have extensive experience in maintaining and repairing VAZ vehicles, and thanks to our own auto parts store, we always have the necessary parts in stock.
View the price list for basic VAZ repair work
Prices for our car service services are significantly lower than the market average, which allows you to carry out high-quality repairs at an affordable price.
STO VAZ provides the following types of services:
VAZ-1118 is a new model of AVTOVAZ LLC, the production of which began in 2004. This is a five-seater passenger car with front-wheel drive, a front engine and an all-metal welded body. Lada Kalina is distinguished by a reinforced structure of the roof, sills and central pillar. Additionally, safety is ensured by bumpers made of impact-resistant polypropylene. The engine is four-cylinder, four-stroke, in-line, eight-valve, with a displacement of 1.6 liters.
Notes:
Adjusting the position of the headlights must be done every 20 thousand km or as needed. On the Lada Kalina, this adjustment operation is not carried out often, since deviations from the norm rarely occur (in most cases, due to road accidents).
Checking and adjusting the headlights of the Lada Kalina VAZ 1118 is carried out with a fully filled fuel tank, a set of tools and a spare wheel.
1. First check the air pressure on all tires of the car with a pressure gauge. If necessary, bring it to normal.
2. Place the Lada Kalina car perpendicular to a smooth wall (for example, a garage) at a distance of 5 m. Place an additional weight weighing 75 kg on the driver’s seat.
3. Mark the screen on the wall as shown in the headlight adjustment diagram.
4. Draw a vertical center line O on the screen, lying in the plane of symmetry of the car (the distance from it to the center of the left and right headlights should be equal). To the left and right of it, draw two more symmetrical lines A and B, which should coincide with the centers of the left and right headlights.
5. At a height h corresponding to the distance of the centers of the headlights from the ground, draw a horizontal line 1, and 75 mm below it - line 2.
6. Turn on the low beam headlights on the Lada Kalina car by turning the headlight range control of the Lada Kalina 1118 to position “0” (this position corresponds to the load of the Lada Kalina car with one driver).
7. Closing each headlight in turn, check that the light limit corresponds to the adjustment diagram previously marked on the screen. The boundary must follow line 2. The inclined segments must begin at the intersection points.
8. Insert the “6” hexagon into the regulator socket through the hole in the upper cross member of the radiator frame.
9. By turning adjuster 1, located closer to the wing, with a hexagon, adjust the position of the headlight beam in the horizontal plane.
10. By turning regulator 2, located closer to the radiator, adjust the position of the light beam in the vertical plane. Make sure that the upper boundary of the light beam coincides with the lower horizontal line, and the break point of the beam (the point of intersection of the horizontal and inclined sections of the light flux) with the vertical line corresponding to the center of the headlight.
11. Similarly, adjust the direction of the light beam of the other headlight.
Note:
Adjust the direction of the light spot for each headlight separately. During adjustment, cover the second headlight with opaque material or disconnect the connector with wires from it.
Scheme for adjusting headlights on a Lada Kalina VAZ 1118 car:
- 1 — horizontal line corresponding to the centers of the headlights;
- 2 - line passing through the centers of light spots;
- A, B - vertical lines corresponding to the centers of the headlights;
- O - center line;
- h is the distance from the centers of the headlights to the floor;
- d is the distance between the centers of the headlight lamps.
Lada Kalina Sedan › Logbook › Installation of electric mirrors. Part 1.
For a long time I wanted to install heated mirrors, but I kept putting it off and didn’t dare... And finally I got around to it, but just installing heating was too easy, plus on the second viburnum, someone folded the mirror and in any case, in addition to heated mirrors, I would have to buy mirrors to the second car. Therefore, I decided to install luxury mirrors for myself, and transfer my manually adjusted ones to car 2. I ordered a set of old-style mirrors (I don’t like mugs) with a drive on the solina-avto website (2600 rubles + 350 delivery). The kit includes all bolts and gasket. The parcel was sent by ZhelDor for 5 days, the mirrors were packaged 5+, so there were no defects from transportation. For interest, while the parcel was in transit, I found out in the service the cost of a full connection: from 3000 to 5000 + in addition to have all the relays, wire fuses, etc. .d., in general, the prices are not adequate, to put it mildly, I decided to install everything myself. Heated mirrors through a separate button, because their operation is required less frequently than the heated rear window.
I bought everything I needed: the ESP unit 352.3769 has been with me for a long time; its cost is about 500 rubles. Rear window heating button 2115 - 82 RUR. 7-pin block for the heating button - 35 RUR. flat fuse holder - 30 RUR. fuse 15A - 5 relay 98.3777-10 - 45 RUR relay block - 25 RUR heat-shrinkable tubes - 63 RUR wires 35 m - 391 RUR. (I took 2 pieces of 10 meters and 3 pieces of 5 meters. It would be nice if they were all different colors, I found only 3 color options, you can have one color, you just have to label each wire so as not to get confused) 5-pin block assembly for mirrors 2 pcs -66r. round terminals 3 pcs. — 36 RUR. upholstery pistons 10 pcs — 30 RUR.
I have minimal experience working with electricians, so I began to study the electrical system. The search for information on installation took quite a long time, because... not on the drive, not on the Kalina forum, it’s almost not there. It’s described more less informatively by local users: Stale-VARevgen56rusStavrr
Well, then there are photos of the process and a minimum of letters, it may be useful to someone... In my case, I couldn’t find connectors for connecting mirrors in stores or at disassembly sites. so I cut it off.
Next you need to find a connector for the ESP unit, it is sold in the Kalino forum, it is not expensive, but delivery by a transport company or by mail increases the price by 200-350 rubles. Therefore, I went the proven route and disassembled the old computer. A suitable connector was in the form of dual USB connectors connecting into one connector on the motherboard. There are also the same single connectors in the area of the power supply, and 4-wire connectors in the place where the floppy disk is connected.
Ghostex › Blog › Installation and connection of heated mirror elements on Granta
In-house made instructions for installing and connecting heated mirrors.
The work was carried out on a grant, a sedan produced in 2015, standard equipment. 1. Heated mirrors. 2. Narrow female terminals 4 pcs. 3. Wires.
We analyze the field of activity
We remove the front door cards, I don’t need to tell you how to remove them.
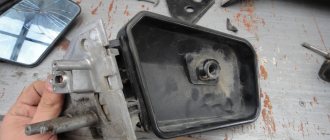
We remove the old mirror elements. We turn the mirror to the right and in the resulting gap we see the mirror latches.
Using a flat screwdriver, carefully pry them off.
We see 4 cover latches behind the mirror
Next, we again take a flat-head screwdriver or, like me, a special plastic gadget, we will remove the mirror housing cover. Place it on the side like this
And in front we release the outer latches.
Then we move the tool further
And release the remaining latches. Remove the cover.
So the mirrors are disassembled.
We take wires with terminals and make such blanks to power the heating.
Let's take our preparations to the place of the mirrors. You will need a metal rod.
We pass it from the door side along with the mechanical drive.
We hook the wires at one end and pull them out. This is how it should be
We connect the mirror and install it in place.
You can now close the mirror, put on the cover.
For those who don’t know, heaters do not have polarity, so we connect one of the wires to ground, and lead the second into the interior.
We connect the ground in a harness to the black wire that goes to the power window button.
We run the second wire in the standard corrugation into the interior; for convenience, we simply drill a 3mm hole in the door connectors and pass the wire through.
We attach the wires in the door coming from the mirror to the door with a special latch-ring, this way we will not press it with the door card and will not dangle inside.
The heated mirrors will be activated together with the heated rear window; we lead the wires to the fuse box.
The fuse block is not very convenient to unscrew, due to the power steering (owners of the standard are lucky), there is a self-tapping screw on the right side of the block. After unscrewing it, we tilt the block for easy connection.
I’ll immediately make a reservation that on this car the fuse block is updated with mini fuses
About safety rules
We have already figured out a little about how to use the first method to heat mirrors with your own hands. “Kalina” or “seven” - you must not forget about safety rules.
Firstly, the connection must be made only through a special fuse, and secondly, the cracks and holes in the side mirror housing must be completely sealed. This is necessary in order to prevent moisture from entering and the possibility of a short circuit.
In addition, always remember not to leave the wires exposed, as this may cause a short circuit in the housing, etc. It is advisable to place the switch in a place convenient for you so that you do not need to be distracted from the road. In principle, following these simple rules is not so difficult.
Kit for connecting electric mirrors to VAZ 2108-09, 2113-14-15, with inner corners of mirrors
Kit for connecting electric mirrors for cars VAZ 2108, VAZ 2109, VAZ 21099, VAZ 2113, VAZ 2114, VAZ 2115
The price is per set.
This kit is designed to connect electrically adjustable and heated side mirrors.
Included: - electric mirror plugs - joystick for controlling electric mirrors - wiring for connecting mirrors - wire connections
The price is per set. Components can be sold separately.
| Automobile: | 2108/2109/21099 , 2113/2114/2115 |
How to make heated mirrors with your own hands
It’s not difficult to make heated mirrors with your own hands. Most often, incandescent lamps or a wire-based heating element system are used for this. The cost of materials is minimal, but the work will take time.
What you will need
To make heated mirrors with your own hands, you will need a set of tools and materials. The list of consumables depends on what type of device the car owner wants to see.
| Lamp | Wire |
| lamp 10 watt | the basis |
| foil | tungsten filaments |
| heat resistant material | Double-sided tape |
| cartridge | wires |
| wires | soldering iron |
| soldering iron | sealant |
| sealant | |
| disassembly tools |
Cost of materials
Do-it-yourself heated rear-view mirrors require extremely low financial costs. So, an incandescent lamp costs about 20 rubles, a cartridge - 30 rubles, wires - 25 rubles / meter, sealant - 100 rubles, adhesive tape 40 rubles. Tungsten filaments can be removed for free from an old kettle, and a soldering iron and screwdriver for disassembling a mirror can be borrowed from friends.
Procedure
As in the case when ready-made components for heating are used, installation of the heater begins with disassembling, washing and drying the mirror. After this, the inside of the housing is lined with a heat-resistant coating and aluminum foil.
A lamp is inserted into the socket, the wires are soldered to the contacts and insulated with sealant. Also, using sealant, insulate the holes through which the wiring comes out. ” alt=””> The heating filaments are glued to the base, after which it is covered on both sides with heat-resistant material. The resulting structure is glued to the inner surface of the mirror, soldered to the contacts of the wires, which are brought out through specially made holes. All open heating elements are insulated with sealant.
An important question is how to turn on homemade heated mirrors. The best option is to have a separate button for this.