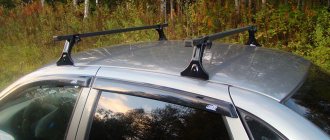
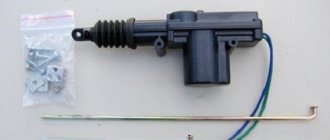
I decided to modify my car a little and implement the trunk opening from the alarm key fob (remotely) and from a button in the cabin. The thing is sometimes very necessary and useful. My car is not standardly equipped with such an option, so let’s start implementing remote trunk opening. First of all, you need to purchase all the consumables, and as always, I use the probably well-known online store aliexpress. I purchased an actuator (or a solenoid, or a door lock actuator), everyone calls it differently, the link to the product is on ali: actuator. I took the one with two wires, the simplest one. Now it costs 199 rubles, although I bought rubles for 130 and I received two of them, although it says that there was only one, maybe they sent 2 by mistake, or maybe because of the fluctuating dollar exchange rate they made one item in the order. All fasteners for the electric lock (that’s what we’ll call it) are included in the kit.
Door lock actuator, actuator, solenoid, electric lock
We also need wires, a relay, a fuse, a button, and electrical connectors. The entire structure can be made by winding wires without bothering with making a board, but I decided to make a board. To do this, we need: a fiberglass board, ferric chloride for etching copper, a laser printer (you can manually mark the tracks on the board), a glossy magazine for transferring the circuit onto the board.
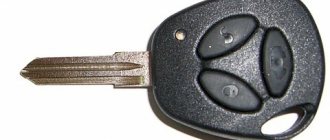
Signal to control the opening of the trunk lock
I have a StarLine Twage A6 car alarm installed, which has additional programmable control channels, one of them is the yellow-black wire (No. 12) - the negative output of additional channel 1. The duration of the control signal is 0.8 seconds, the load current is 300 mA. If you have a different alarm system, then you need to look at the instructions; most likely, this option is also implemented on your alarm system. Well, accordingly, you can make a circuit without an alarm, controlled only by a button.
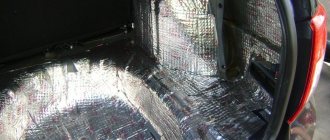
Repairing the trunk release button - using the example of a Chevrolet Cruze
To determine the cause of the breakdown of the Chevrolet Cruze trunk release button, you need to remove it, inspect it and ring it.
- To remove the panel (saber) with the button and license plate lights, you will have to remove the trim on the inside of the trunk lid.
- Under it there will be 4 10mm nuts and 2 yellow plastic clips.
- The nuts are unscrewed, and the clips are carefully pressed inward and snapped off.
- After this, it is enough to disconnect the connector connecting the wires going to the button and the backlight to completely remove the saber.
When visually inspecting the button from the inside, traces of moisture will usually be visible under the transparent silicone sealant filler.
It gets there during rain through small gaps between the button key and the body, or at the place where the wires are connected (there is also a small gap there). Trying to dry the button with a hairdryer without disassembling it will lead to nothing.
In this case, there are only two possible solutions to the problem:
- Buying a new button and replacing it completely.
- Complete disassembly of the button body and cleaning/drying and sealing it.
The first option is the simplest, but there is one “but”: the trunk opening button is not sold separately, but only in a group with two license plate illumination lamps.
The original part costs about 2000 rubles. The Chinese analogue from Aliexpress will cost three times less, but there are doubts about the quality of production. Therefore, before going to the car market for a new button, you can try to repair the “native” one.
For repairs you will need a minimum of tools and materials:
- multimeter (tester);
- screwdriver;
- sharp knife;
- hair dryer;
- sealant or hot glue gun;
- sandpaper-zero.
An electric multimeter is needed to check (“ring”) the button. To do this, just join the contacts button and click on it.
If the multimeter shows resistance, then the button circuit is intact. The absence of resistance indicates a violation of the integrity of the circuit.
The procedure for carrying out restoration repairs:
- Remove the button from its seat. To do this, you will have to remove the hot melt adhesive on which it is attached. This can be done using a knife;
- Remove the rubber cover from the button body and disassemble the button itself;;
- We clean the contacts (if necessary, you can use fine sandpaper), dry the insides with a hairdryer;
- We assemble everything in the reverse order, glue and seal all joints with sealant or hot glue;
- We coat the seat with sealant around the entire perimeter;
- Install the button, let the sealant dry;
- We return the saber to its place.
If the above repair method does not produce results, you will have to buy and replace the entire set (button + license plate backlight).
Soldering a separate trunk button
Replacement occurs according to the following scheme:
- Using a Phillips screwdriver, unscrew the fastenings of the license plate lights (4 self-tapping screws);
- We remove the button from its regular place by removing the hot-melt adhesive;
- We install a new kit: we recommend placing the backlights and the new button on silicone sealant to protect them from moisture and dust.
Sequence of actions for self-installation of an electric lock
- We place the machine within the perimeter of the repair area; you can use a flat platform with unobstructed access around the perimeter. A road overpass or inspection channel in this case is not so effective, since the driver is limited in movement.
- Open the luggage compartment lid, unscrew the two mounting screws, and remove the inner part of the plastic trim.
- We connect the block with two wires (“plus” and “minus”). “Mass” is black. We pack the cables in a corrugated cable, lay it along the inner cavity of the trunk lid, and lead it out into the technical hole.
- We run the wiring in the corrugation under the side decorative inserts and lower it into the lower channel. First remove the plastic covers and sound insulation.
- We go to the fuse block, namely to fuse No. 10A.
- Next, we install a four-pin relay, connect the terminals of the wires from the trunk, fuse and mechanical button. We power the minus from the radio.
- We install a mechanical button instead of a plug under the optics regulator (hydraulic corrector).
- We assemble the casing and check that the system is working properly.
Electric trunk lock Granta liftback installation
For work we will need:
1. Liftback)) 2. Opening button with connector or 2 female wires. 3. Electric drive (installed StarLine SL-2). 4. Cable (approximately 30 cm) and 2 clamps. 5. Electrical tape, wire cutters, wires, flat and Phillips screwdrivers, 8 and 7 wrench.
To install the drive, you need to get rid of the lock rod, probably many people know, it is firmly in place and will not allow the drive to open the lock until you insert the key into the lock, so we install a cable instead, this way you can open the trunk from the outside.
Disassembling the trunk door
We pull off the central plastic (2 pistons and on the edges of the latch)
Unscrew the 2 opened screws and pull them off (on two pistons)
A pair of screws have opened again, unscrew them
We will pull off the main casing from these corners, and before that we unscrew the 2 bolts in the front handles
The trim comes off very easily and this is what's underneath
And here is the thrust of the lock (from the cylinder to the lock itself), we will get rid of it.
The drive we will implement
We select a place for it, I found it here, we make notches for the holes
Pulling off the traction from the larva
We drill holes for the self-tapping screws, put the drive together with our rod inward and just attach it to our place to determine the length of the rod. We hooked up the drive, pulled it out to its full length and the door lock should be open. On the top of the lock there is a ring that you need to pull to open it (it will be clear later in the photo), we bring the rod to the ring and make a notch with wire cutters.
Now we take everything out, the electric drive and the lock itself, by unscrewing 2 bolts with a 8 key. We pull out the right corner of the lock and unhook the second end of the rod, then completely pull out the lock and remove the connector.
Here is the drive rod with a notch, at a distance of 2 cm from the notch we chop off the excess tail with a chisel
Along the notch we bend the rod into the letter “G” and insert it into the lock
Control button combination
To connect, you will need a set of soldering tools (solder, blowtorch, electrical tape or heat shrink tubing), as well as additional parts.
The circuit must include a power relay with a diode. It is this that gives a short-term electrical impulse that opens the trunk door. If the power relay is not included in the kit, it can be purchased separately
It is important that the kit contains a special diode. The peculiarity of this part is that the diode passes a current of a certain charge only in one direction
Accordingly, its correct installation is required. The white strip on the part, indicating the positive side, should be turned towards the red wire, and the negative contact - towards the black and yellow negative cable. For correct connection, you must comply with the diagram below.
How to open the trunk using the StarLine A93 alarm key fob
After activating additional channel one, you can remotely open the luggage compartment. On the Starline A93 2Can 2Lin model and the Lada Granta car, this option is carried out as follows:
- on the key fob, press the second button for a long time until the corresponding melodic signal (at least 3 seconds);
- Then the first key is briefly clicked.
After this, the car blinks its dimensions three times and also gives an impulse to open the trunk. If the security mode is activated, all doors will remain locked, and only the shock sensor will be turned off (for closing the trunk). In this case, the open compartment door will be displayed on the key fob screen.
How to close the trunk using the Starline A93 remote control
The compartment is closed manually due to the fact that modern cars do not have closers. If the car is in security mode, then after five seconds the status will be updated and the compartment lock will be locked. In this case, the bullet will emit a sound signal, and the open door symbol will disappear from the key fob screen. You can open the trunk again either during this time, or after the next command (the second button is long, then the first is short).
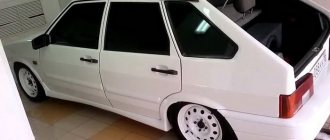
Opening the trunk with a button with your own hands.
Hi all. Well, we finally got around to the trunk to open the trunk with a button. I’ve just been thinking about implementing this idea for a long time, but somehow there wasn’t enough time. Everything is done, it just takes a little time. We will do this using the example of a VAZ 2107 car. So, what do we need:
-Activator -Fuse block (I will drive the plus from the battery) -Fuse -Wire, I took with a reserve of 7m, -Button for opening the trunk of a VAZ 2110, -Terminals “Mother” -5-pin relay (you can have 4, later I’ll explain why I took exactly 5) -Well, you’ll also need electrical tape or heat-shrink tubing
I’ll explain why I took a 5-pin relay, it’s simple, because I opened the alarm book, namely the connection diagram, and it described how to connect a relay of this type, so I decided to take it so as not to look for connection diagrams on the Internet.
Here is my connection diagram:
I will say that this circuit is assembled to retract the activator, it can also be made to push it out, you just need to swap the blue and green wires. Elements of the circuit:
Trunk opening button, VAZ 2110, 3-wire
5-pin relay, 75.3777
After some leisurely work, the wiring is all ready, I took it with a reserve)
Let's get started, the installation process is quite quick, you can easily finish it in a day)
I decided to put the relay under the hood so as not to pull the positive wire too far, and I also have to look for a place under the panel for the relay :)
Through the main hole of all the wires I insert two wires, namely the wire to the button for opening the trunk, and the second directly to the activator itself, the positive wire:
I placed the relay in this place and attached the washer barrel to the mount:
Features of choice - what does the driver need to know?
When purchasing a lock, you should consider how exactly it will be controlled. If it will only be used for opening using a button from the interior, then a standard one will do - its installation is quite easy to do yourself. In order for an electric lock to be activated from the alarm remote control, a more complex electrical mechanism is needed, the connection of which should only be entrusted to an experienced electrician.
Several models of electric locks are sold on the domestic market. By type, they are standard with side fastenings and reinforced (a little more expensive) - they are made of higher quality and are more reliable in use. When purchasing an electric lid drive, it is best to choose a kit with an inertia mechanism. This mechanism does not allow the engine to experience a constant load - if its rod rests against something, it turns off.
The principle of operation of the inertial mechanism is that when the button is pressed, such a mechanism first unwinds, increasing its traction force, and transmits it further to the pushing rod. At this time, a drive with a conventional motor type continues to operate while under load - it can quickly fail due to overheating.
Controlling the trunk opening from the passenger compartment: installation of additional buttons.
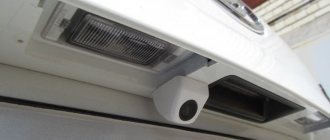
I decided to change the operation of the standard opening button located on the trunk to suit my preferences: now my trunk can be opened from the passenger compartment, and the standard external button has become switchable. Opening the trunk using the standard Ford key fob has not changed, it works as before.
There are a huge number of reasons for the alteration, for example. I’m sitting in a car, the door is open, I’m breathing air, a bad person won’t open the trunk now, well, I don’t want to close the central lock (the button on the dashboard) every time in parking lots while sitting in the car. The outer button is often dirty, especially in the off-season. Etc.
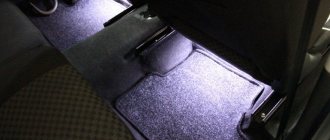
I installed one button and one switch in the cabin on the lower plastic lining of the left front pillar, where the hood opening handle is located (see photo):
1) When you press the button with the “open trunk” symbol, the trunk opens itself and smoothly rises up to the end (I have a sedan, on other body types it may not rise all the way?). This button now works the same way as the standard button on the outside of the trunk lid used to, so naturally, if you locked yourself in the car by pressing the lock button in the center of the dashboard, then my button won’t work either. It is low-current and sends a request to the BCM module to open the trunk, but does not itself control the power circuit of the lock. The button is from a VAZ2110, the price is 55 rubles. 2) The switch serves to block the operation of only the standard external opening button on the trunk lid. In position “0” the external button is completely separated from the control circuit. Well, in “1”, naturally, the external button works as always. The switch was purchased at a car store for 50 rubles.
The specifics of dismantling the trim and removing the glove compartment are described in detail in specialized topics; I will only cite the subtle points.
Sequence of actions for self-installation of an electric lock
- We place the machine within the perimeter of the repair area; you can use a flat platform with unobstructed access around the perimeter. A road overpass or inspection channel in this case is not so effective, since the driver is limited in movement.
- Open the luggage compartment lid, unscrew the two mounting screws, and remove the inner part of the plastic trim.
- We connect the block with two wires (“plus” and “minus”). “Mass” is black. We pack the cables in a corrugated cable, lay it along the inner cavity of the trunk lid, and lead it out into the technical hole.
- We run the wiring in the corrugation under the side decorative inserts and lower it into the lower channel. First remove the plastic covers and sound insulation.
- We go to the fuse block, namely to fuse No. 10A.
- Next, we install a four-pin relay, connect the terminals of the wires from the trunk, fuse and mechanical button. We power the minus from the radio.
- We install a mechanical button instead of a plug under the optics regulator (hydraulic corrector).
- We assemble the casing and check that the system is working properly.
Repairing the trunk release button - using the example of a Chevrolet Cruze
To determine the cause of the breakdown of the Chevrolet Cruze trunk release button, you need to remove it, inspect it and ring it.
- To remove the panel (saber) with the button and license plate lights, you will have to remove the trim on the inside of the trunk lid.
- Under it there will be 4 10mm nuts and 2 yellow plastic clips.
- The nuts are unscrewed, and the clips are carefully pressed inward and snapped off.
- After this, it is enough to disconnect the connector connecting the wires going to the button and the backlight to completely remove the saber.
When visually inspecting the button from the inside, traces of moisture will usually be visible under the transparent silicone sealant filler.
It gets there during rain through small gaps between the button key and the body, or at the place where the wires are connected (there is also a small gap there). Trying to dry the button with a hairdryer without disassembling it will lead to nothing.
In this case, there are only two possible solutions to the problem:
- Buying a new button and replacing it completely.
- Complete disassembly of the button body and cleaning/drying and sealing it.
The first option is the simplest, but there is one “but”: the trunk opening button is not sold separately, but only in a group with two license plate illumination lamps.
The original part costs about 2000 rubles. The Chinese analogue from Aliexpress will cost three times less, but there are doubts about the quality of production. Therefore, before going to the car market for a new button, you can try to repair the “native” one.
For repairs you will need a minimum of tools and materials:
- multimeter (tester);
- screwdriver;
- sharp knife;
- hair dryer;
- sealant or hot glue gun;
- sandpaper-zero.
An electric multimeter is needed to check (“ring”) the button. To do this, just join the contacts button and click on it.
If the multimeter shows resistance, then the button circuit is intact. The absence of resistance indicates a violation of the integrity of the circuit.
The procedure for carrying out restoration repairs:
- Remove the button from its seat. To do this, you will have to remove the hot melt adhesive on which it is attached. This can be done using a knife;
- Remove the rubber cover from the button body and disassemble the button itself;;
- We clean the contacts (if necessary, you can use fine sandpaper), dry the insides with a hairdryer;
- We assemble everything in the reverse order, glue and seal all joints with sealant or hot glue;
- We coat the seat with sealant around the entire perimeter;
- Install the button, let the sealant dry;
- We return the saber to its place.
If the above repair method does not produce results, you will have to buy and replace the entire set (button + license plate backlight).
Soldering a separate trunk button
Replacement occurs according to the following scheme:
- Using a Phillips screwdriver, unscrew the fastenings of the license plate lights (4 self-tapping screws);
- We remove the button from its regular place by removing the hot-melt adhesive;
- We install a new kit: we recommend placing the backlights and the new button on silicone sealant to protect them from moisture and dust.
Installation instructions for the electric trunk lock
If you are lucky with the standard lock, it locks and holds the tailgate well, then there is no need to change it.
In this case, you must have with you:
- window lifter roller;
- door activator;
- steel cable;
- wires with terminals;
- relay with four contacts;
- 10 A fuse.
To automate the opening of the trunk, it is necessary to ensure that the lock latch is pulled. For this purpose, a special roller is installed on the wiper gear housing. The steel cable is pulled through the roller and secured with conventional clamps. Experienced riders often use a bicycle cable because it is durable and flexible. Using it you can quite easily connect the door activator to the lock tongue.
You can connect the entire structure to the cigarette lighter if you do not have the proper knowledge of the car's electrical circuit. You just need to connect the plus from the cigarette lighter to the button and then to the lock. The negative comes from the taillight. Or carry out the operation of the trunk lock 2114 using a special relay.
Self-installation
First of all, it is necessary to secure the electric drive to the trunk lid and provide it with a mechanical connection to the lock itself. To do this, you will have to make two cuts on the lock, and bend the resulting free “tongue”. Thus, we gained access directly to that part of the lock, by pulling which the trunk lid will open. Now we attach the long metal stick from the kit so that the lock can close when the system is operating. It is quite possible that you will have to cut off extra centimeters of this pin.
Now our device is installed properly and all that remains is to connect the electrics. To do this, we will use the diagram below.
Important! When working with electrical equipment, remove the battery!
In most cars, electrics operate on 12V positive voltage. However, if you doubt that everything is the same for you, it is better to check with the car dealer and not use this diagram for connecting
It is very important to make the correct connection of the wires, since the proper operation of your car as a whole depends on it. At best, some options will simply not work correctly; at worst, a short circuit will occur.
And it is not always possible to restore the electrics and electronics of the car after it. And this work will cost a lot of money. In addition to the above, lay wires where standard wiring is already laid. In difficult places, for example, when you have to pull the wire from the passenger compartment to the trunk, it is necessary to use protective corrugated tubes.
Electrical work
To begin with, according to the diagram, we connect all the elements located in the trunk. Now you need to tighten the wires to the driver's door. It all depends on the car model. For some it will be convenient to pull the electrics through the door sills from below, for others the option of protective strips from above is suitable. Immediately secure the wires with cable ties. If the length is not enough, take an additional wire, solder the joint with a soldering iron and rewind it with tape. Let's continue connecting. We connect the negative wire to the electric drive, and then connect the second negative wire to the main control relay. The third, also known as the last wire, needs to be connected to the alarm. To do this, you need to find the control unit; most likely, it is located under the dashboard. In it you will find free contacts for connection.
We check, find the negative one and connect. These are the last steps we need to complete. After this, we return the battery to its place and check the functionality of the system. There are cases when the lock does not have enough traction to close. In this option, it is enough to install an additional spring for the lock and the problem should be eliminated. There is one more point that we have not covered - the remote control button. Installation is very simple, and the connection method is described in the same diagram above. You can use absolutely any analogue for the button, even from power windows. And the location also depends solely on your preferences.
Reviews
Conclusion
In the Lada Granta “Norma” and “Standard” trim levels, a mechanical button for activating the trunk lid is missing. Provided you follow the installation algorithm and purchase original consumables and spare parts, the service life of the relay will exceed 5 years.
Cheap components for the lock, violation of installation technology, short circuit in the circuit contribute to rapid wear and damage to the mechanism. A number of negative reviews are unfounded; the damage was caused by the driver.
Is it necessary to install a negative cable into the interior of the car? Can I get power from the rear lights and side lights? This will save two meters of wire.
Konstantin, it is possible, even necessary. There is no fundamental difference where to connect the minus.
On the Lada Granta from 2021, the trunk opens from a button located on the trunk lid. To make opening the trunk easier, you can install an additional button in the Grant FL's interior.
Standard VAZ button worth 50-100 rubles
We connect the gray wire to Ground in its normal place
We connect the blue wire to the orange one in the Grant FL threshold
The trunk lid of many modern cars (Volkswagen Passat, Chevrolet Cruze, etc.) is equipped with a special button, which can be pressed to open the trunk lid.
During active use of the car and frequent transportation of things in the luggage compartment, this function turns out to be very useful, since there is no need to constantly stick the key into the lock or open the driver's door in order to reach a similar button in the cabin.
Installation and connection of an electric lock to the central locking
Car enthusiasts who have installed an electric lock on the trunk of their car with their own hands recommend using standard kits from retail chains. Installing high-quality components means ensuring the operational reliability of the electric lock. Chinese manufacturers offer good installation kits for trunk lid locks. Machine kits include: electric drives; buttons; rod sets; wires with fuses; relyushki; installation strips. It is impossible to install electric locks without the appropriate tools and auxiliary materials, such as insulating, corrugated tubes, and fasteners.
Having decided to install it yourself, you will have to perform a number of plumbing works on the machine. This includes marking for electric lock components, drilling holes for fasteners, installation, fastening. The sequence of work is similar to the previous ones:
- On the trunk of a particular car, locations for mounting an electric locking device are determined. After marking, installation holes are drilled, the drive and clamp are attached.
- If necessary, the electric lock components are modified. The lock drive rods are installed with preliminary markings.
- The battery terminals are disconnected; according to the electrical diagram, it is necessary to install and lay the wires and connect them to the appropriate contacts and connectors. Use a multimeter to check the correct connections of the electric lock on the trunk of the car. The terminals are connected to the battery.
- The lock is connected to the main central locking button, or to an individual one installed in a convenient place inside the car.
- The operation of the electric lock is checked. If necessary, adjustment and fitting work is carried out.
source
Differences between mechanical and electrical trunk locks
The mechanics of trunk locks - mechanical and electrical; many brands of cars are similar in principle of operation. When installing locking devices, differences in the design features of the products are allowed. To install a lock with your own hands, you need to understand its structure and remember about reliability. The mechanical part, including electric locks, consists of the following mechanisms:
- Locking mechanism drive;
- Drive bracket;
- Locking, including locking parts and fixing the lock;
- Lever, used when opening and closing the trunk;
- Turnkey larvae;
- Latch.
Cars produced by Russian enterprises are mostly supplied with mechanical locks. Car owners have to contact service companies for installation or install it themselves.
Installation of standard electric locks on modern imported cars will be carried out by automakers. Factory installation ensures reliable operation and protection against penetration into the trunk of a car.
To install an electric lock, car owners trade organizations offer kits for car trunks, including:
- Electric drive;
- Mounting block board;
- Buttons or keys for turning on the electric lock;
- Conductors, connection terminals.
An electric lock mounted on a car has positive aspects. Having decided to install an electric locking device, the car owner solves several problems.
In winter, there is no need to warm the mechanical lock cylinder from freezing. The electric lock closes and opens the trunk remotely or from inside the car. The risk of thieves gaining access inside is reduced.
Unpleasant moments arise when the battery suddenly discharges. Experts recommend installing an electric lock that can be unlocked mechanically with a key.
Ways to open the trunk without a key
There are several similar methods. The choice in favor of a particular one depends on the vehicle configuration, the lock mechanism and the manufacturer. Let's take a closer look at them.
From the inside
We are used to hearing the phrases five-door hatchback, three-door sedan. But it doesn’t always occur to you that the outermost odd-numbered door is intended for the luggage compartment. In an emergency, you need to fold down the rear seats and get into the luggage compartment of the body. Use a flashlight or touch to explore the door. Stumbled upon a pen? Open it with confidence.
Car trunk lock mechanism
Tools to help
In most domestic cars, it is impossible to open the trunk from the passenger compartment. One thing is missing: either a handle or that same door. You will have to remove the rear sofa, and then return it to its place and re-weld the hinges to the body. Sometimes this is not an option, since access to the compartment is made difficult by the rigid frames. In this case, a screwdriver or other hand tool will come to the rescue. Insert and turn the trunk lid retaining loop.
If the trunk does not open even in this case, a wrench is needed to remove the lock. The size of the bolts for fastening the actuator is M10 - M15. The procedure is effective if you have the skills to restore the lock yourself.
➤ Trunk button Lada Granta Liftback - quick installation
The Lada Granta Liftback “Norma” and “Standard” configurations do not have a mechanical button for opening the trunk lid. Often, owners are forced to turn off the engine and then run with the key to open the luggage compartment. This is not always convenient or practical, especially in bad weather.
The equipment of the Lada Granta Liftback “Lux” has a button to open the lid. Owners of other assemblies can independently install the trunk button on the Granta Liftback by following the instructions below.
Where to buy a power trunk lock
To protect yourself as much as possible from purchasing non-original spare parts, service center technicians recommend using the services of official representative offices, service stations, dealers, and specialized auto stores.
Do not purchase goods from third-party suppliers who sell spare parts at unusually low prices. Always ask the seller to provide documents identifying the manufacturer, and check that the package includes a warranty card.
Recently, it has been popular to order parts and then install them at a service center. There are many advantages of this method, for example:
- efficiency of delivery;
- professional installation;
- quality guarantee for work performed;
- Possibility of individual ordering for tuning and local upgrades.
Review of Manufacturer Prices
| Name/article | Price, rub.) |
| electric lock 2191-5606010-10 | from 1500 |
| 2191-5606452 | |
| 2191-5605789-00 | —/— |
| 2191-5603652 | —/— |
| 2191-5604521 | —/— |
| Vartex 56526454 | from 1700 |
| Apollo 54654 | —/— |
| FX-F 82665/22 | —/— |
| Monado fd515545 | —/— |
*prices are current as of 10/09/18.
The opinions of the service station masters agreed on the choice of manufacturer - there is not much difference. When purchasing original products, the service life of the equipment exceeds 5 years.
Installation in “makeshift” conditions and poor-quality manufacturing only shorten the period of use of the equipment. Often the owner is to blame for the breakdown, violating the vehicle maintenance regulations.
Preparatory stage
Necessary tools, materials, spare parts:
- electrical cable with a cross section of 0.3 - 0.35 five meters;
- TORX to “10”;
- pliers, side cutters;
- terminals;
- corrugation for laying wiring;
- four-contact relay-regulator;
- mechanical trunk opening button.
Sequence of actions for self-installation of an electric lock
- We place the machine within the perimeter of the repair area; you can use a flat platform with unobstructed access around the perimeter. A road overpass or inspection channel in this case is not so effective, since the driver is limited in movement.
- Open the luggage compartment lid, unscrew the two mounting screws, and remove the inner part of the plastic trim.
- We connect the block with two wires (“plus” and “minus”). “Mass” is black. We pack the cables in a corrugated cable, lay it along the inner cavity of the trunk lid, and lead it out into the technical hole.
- We run the wiring in the corrugation under the side decorative inserts and lower it into the lower channel. First remove the plastic covers and sound insulation.
- We go to the fuse block, namely to fuse No. 10A.
- Next, we install a four-pin relay, connect the terminals of the wires from the trunk, fuse and mechanical button. We power the minus from the radio.
- We install a mechanical button instead of a plug under the optics regulator (hydraulic corrector).
- We assemble the casing and check that the system is working properly.
Trunk button connection diagram
- From the trunk lid lock "minus" and "plus".
- Output “+” to a four-pin relay.
- Connection “+” from fuse “10A”.
- Output “+” from a mechanical button.
- “Minus” is powered from the radio or from any other device. There is no fundamental difference.
Useful video
You can visually familiarize yourself with the possibilities of making a trunk from a button in the video below: At this point, all the work can be considered complete. Ideally, it will take a couple of hours to provide the luggage compartment of your car with automated opening, which is provided on most foreign cars today.
Opening the trunk of a car from a button in the cabin will no longer surprise anyone. Today, such an option on a car can significantly facilitate human labor. Domestic cars have only recently begun to be equipped with such useful options from the factory. But this does not mean at all that this option is not suitable for owners of VAZ-2107 injection and carburetor versions. If desired, you can make a semblance of a foreign car out of any domestic car and vice versa. In this material we will pay attention to the question of how to open the trunk from the button of a VAZ 2107. This procedure is not particularly difficult, especially if there is such a goal.
Convenient button location
Many people do not find anything special in this option, but once you try the electric trunk drive, you immediately begin to appreciate all the advantages. The positive aspects of the option to automatically open the trunk on the VAZ-2107 include:
- Convenience. By the time the driver leaves the cabin, the trunk will already be open.
- Practicality. There is no need to remove the keys from the ignition switch to open the trunk with the key, especially if you have just started the engine and are warming it up.
- Fashion. Almost all modern cars are equipped with such an interesting option, so the “seven” with this function will look more interesting against their background, especially with tuning.
What is required for the work
Before starting the work process, you should purchase the necessary equipment. To carry out the work you will need:
- A button that, when pressed, will activate the electric drive. The best option is a button from a VAZ-2110 car, the cost of which is about 50-80 rubles.
- The relay is four-pin and has a special terminal for it.
- Activator.
- Wires.
- Female and male connectors, as well as electrical tape and heat shrink.
You can easily find any of the components in any auto store, and then install and connect it to your car yourself.
Installation of the activator
Initially, it is necessary to install an activator, which is an electric drive that works to retract or repel, depending on the connection. The first step is to remove the lock and install the activator rod. To remove the lock, you will need to unscrew two nuts.
After this, you need to drill a hole in the side of the lock to insert the rod and connect it to the lock tongue. The rod will need to be bent (secured), it should look something like the one shown in the photo below.
After fixing the rod to the lock, the latter can be installed in place. It is advisable to remember the tilt level of the lock and install it as well, so that you do not have to adjust it during installation. Now you can attach the activator to the trunk. To do this, you will need 2 self-tapping screws and a special plate, which comes with the product. After this, you can manually try to see if the lock will work when opening. When the activator is installed on your VAZ 2107 car, you can proceed to the next stage - connection.
Connecting the product
Before carrying out connection work, be sure to disconnect the negative terminal from the battery. To begin with, we present the diagram according to which the product will function.
The electric lock will be supplied with 12V power directly from the battery, although you can also use a wire from the cigarette lighter. First, connect the wire to the “+” terminal of the battery.
The battery supplies power to the relay, which can be located both in the cabin and in the engine compartment, which will be much more rational. From terminal “86” the wire is fed to the trunk opening button, which can be located in any convenient place on the dashboard. To install the button that will open the trunk lid, you will need to drill a hole of the appropriate diameter in the dashboard.
The wire from the relay terminal “30” is laid through the cabin to the activator. Its length must be at least 5 meters. The wire can be laid together with the standard wiring. This wire must be connected to the green wire of the activator using female-male connectors. The blue wire must be short-circuited to vehicle ground. Now you can check how the electric trunk lock of the VAZ 2107 functions. It is enough to spend 2-3 hours so that the trunk will eventually open using the VAZ 2107 button. After completing the work, do not forget to connect the negative terminal to the battery.
Installing a trunk release button in the interior of any budget car is much simpler than it might seem at first glance.
The whole task is to slightly modify the lock, namely to supplement its mechanism with a special electric drive (activator).
When you press the button, it will operate on the principle of a retractor/extrusion device, opening the lock.
The springs will lift the trunk lid, providing quick and convenient access to the luggage compartment of the car. If the alarm key fob has a separate button for opening the trunk
, then it will perform its functions.
You can do everything yourself, without contacting specialized offices, and without significant material investments.
All you need to buy is:
- electric drive of the trunk lid lock (activator);
- universal four-pin relay;
- fuse block (will be placed on the positive wire for safety reasons);
- the fuse itself (suitable for 10 amperes);
- wire (practice shows that 5 meters is enough, but it’s better to take it with a reserve);
- set of female terminals;
- a standard trunk release button from the “ten” (this is the most reliable and inexpensive option);
- heat shrink tube or electrical tape, plastic clamps.
You can buy a VAZ 2110 trunk opening button, an activator and everything else without any problems at the nearest car market. The cost of the entire set does not exceed 700-800 rubles.
Malfunctions of the ignition switch LADA “Granta”
Ignition switch failures can be divided into two types: electrical and mechanical. Electrical faults include malfunctions of the contact group of the lock, as a result of which individual energy consumers (most often the starter) or the entire Granta electrical system as a whole stop working. This also includes a breakdown of the car's immobilizer. Mechanical malfunctions occur due to breakdown of parts of the ignition switch or contact group, as well as physical wear of the contacts. This also includes cases when, due to poor contact, heating and melting of the plastic parts of the contact group occurs. Signs of a malfunction in the ignition switch of the LADA Granta:
- the key does not turn;
- when turning the key the ignition does not turn on;
- The starter or other electrical appliances do not work.
The last two signs do not necessarily indicate problems specifically in the ignition switch, but they certainly appear when the contact group is faulty.
To eliminate the malfunction, it is necessary to replace the LADA Granta ignition switch or part of it, for example, a contact group.
What is needed to replace the Granta ignition switch
To replace the ignition switch you will need:
- key to 10;
- a thin chisel and a hammer (or a drill with a drill bit to drill out bolts with self-cutting heads);
- screwdriver;
- new ignition switch LADA “Granta” or contact group.