TZ For some reason, all the gazelle writers I know told me that it is impossible to get the handbrake to work normally and it’s easier to just forget about it... but I’m not looking for easy ways and still decided to deal with it once and for all, doing everything conscientiously.
In addition, I was very sorry for the constant torment of the starter... In order to leave the car without moving, I had to turn off the engine every time and put it in gear, and if I needed to move it a little, then start it again and repeat all the steps again. I don’t know how much longer the starter could withstand such a mocking attitude.
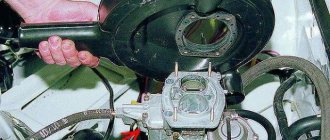
Actually, I didn’t take a photo of the process because I didn’t have time for this, so I had to take screenshots from one of the sites
The Gazelle GAZ-3302 and GAZ-2705 have three independent brake systems: service, spare and parking. The drive of the service brake system on the Gazelle is hydraulic. It is dual-circuit (divided into front and rear circuits), with a vacuum booster, a pressure regulator and a sensor for an emergency drop in the brake fluid level in the reservoir.
The spare system is formed by each circuit of the working one. If one of the brake system circuits fails, the second circuit provides braking of the vehicle, although with less efficiency. The parking system is mechanical, with a cable drive from a hand lever to the brake pads of the rear wheels.
The design of the brake system on the Gazelle GAZ-3302 and GAZ-2705, working and parking brake systems, design features, checking the vacuum brake booster.
The Gazelle GAZ-3302 and GAZ-2705 vehicles are equipped with a dual-circuit service braking system. The system drive is hydraulic. To facilitate drive control, the vehicle is equipped with a vacuum booster. The front wheel brakes are disc, the rear wheels are drum.
Components and parts of the brake system for Gazelle GAZ-3302 and GAZ-2705.
Diagram of the service brake system for Gazelle GAZ-3302 and GAZ-2705.
The brake discs of the front wheels are ventilated. They are mounted on the hub and attached to it with six bolts. The floating brake caliper is attached with two bolts to the steering knuckle. To protect the working surfaces of the disc, a brake shield is installed, which prevents the ingress of dirt and moisture and also provides cooling of the disc. The minimum permissible residual thickness of the front brake pads is 3 mm. The minimum permissible thickness of a worn disc is 19 mm.
Read more: Golf 3 in Taraz
The design of the front wheel brake mechanism on the Gazelle GAZ-3302 and GAZ-2705.
The rear wheel brake pads are driven by a single, double-acting working cylinder. Two split metal thrust rings are installed in the cylinder with interference, each ring is connected to the piston. The piston-thrust ring assembly acts as an automatic device that maintains a constant gap between the friction linings of the shoes as they wear and the working surface of the drum when the rear brake is not locked.
The design of the rear wheel brake mechanism on Gazelle GAZ-3302 and GAZ-2705.
There is a hole in the brake shield, closed with a plug, for visual inspection of the condition of the friction linings of the brake pads. The minimum permissible thickness of the rear brake pads is 1 mm. The maximum permissible internal diameter of the brake drum is 283 mm.
Maximum permissible and adjustable dimensions of the brake system for Gazelle GAZ-3302 and GAZ-2705.
1. Minimum permissible thickness of friction linings of brake pads, mm:
— front wheel brake: 3 — rear wheel brake: 1
2. Minimum permissible thickness of the brake disc, mm: 19 3. Maximum permissible diameter of the rear wheel brake drum, mm: 283 4. Brake pedal travel, mm:
— full: 150 — free: 3-5
5. Gap between the adjusting bolt and the end of the brake booster cover, mm: 1.35-1.65 6. Distance between the centers of the strut axle and the hole for the axle in the rear axle bracket for debugging the pressure regulator, mm: 13-17
Vacuum booster of the service brake system for Gazelle GAZ-3302 and GAZ-2705, design features.
Due to the vacuum in the engine intake pipe, the vacuum brake booster during braking creates additional force on the master cylinder piston pusher in proportion to the force on the pedal.
The vacuum booster is connected to the intake pipe through a hose and a check valve, which maintains vacuum in the booster when the vacuum in the engine intake pipe drops. An adjusting bolt with a lock nut is screwed into the front end of the booster pushrod, providing the required clearance for proper operation of the brake master cylinder.
Main brake cylinder of the service brake system for Gazelle GAZ-3302 and GAZ-2705, design features.
The tandem brake master cylinder consists of two separate compression chambers and creates pressure in two independent circuits of the front and rear brake mechanisms. The first chamber controls the brake cylinders of the rear wheels, the second - the brake cylinders of the front wheels.
The cavity of the master cylinder reservoir is divided into two compartments, each of which feeds one of the chambers of the master cylinder. A brake fluid level sensor is installed in the reservoir cap. The lamp that lights up according to its signal indicates that the tightness of the brake system is broken. If there are no fluid leaks, its level in the master brake cylinder reservoir should be between the MAX and MIN marks. As the brake linings wear, the level drops.
Pressure regulator of the service brake system for Gazelle GAZ-3302 and GAZ-2705, design features.
The brake pressure regulator adjusts the brake fluid pressure in the working cylinders of the rear wheel brakes. Eliminates the possibility of the rear wheels locking before the front wheels. The regulator is mounted on the frame and, through a load spring, reacts to the load perceived by the rear axle.
Design of the parking brake system for Gazelle GAZ-3302 and GAZ-2705, design features.
The parking brake system is mechanical, with a cable drive from a lever installed in the driver's cabin to the brake mechanisms of the rear wheels. When the lever is acted upon through a system of cables and levers, the brake pads are pressed against the drums, braking the car.
Read more: How to find out the gearbox number
Parts of the parking brake system for Gazelle GAZ-3302 and GAZ-2705.
The lever is fixed in the raised position using a ratchet mechanism consisting of a pawl and a gear sector. When the lever is raised, the switch located on the lever mounting bracket turns on the warning lamp in the instrument cluster.
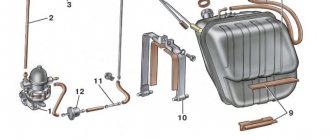
Pipelines of the brake system for Gazelle GAZ-3302 and GAZ-2705 with engines ZMZ-4063, ZMZ-40522 and GAZ-5602.
Checking the operation of the vacuum brake booster of the service brake system on Gazelle GAZ-3302 and GAZ-2705.
Check the operation of the vacuum booster if the pressure on the brake pedal has increased. To do this, press the brake pedal all the way down several times with the engine not running and, keeping the pedal pressed, start the engine. Due to the pressure difference in the booster cavities, the brake pedal must move forward.
If this does not happen, check the tightness of the vacuum booster hose connections and, if necessary, eliminate the air leak. If this does not give a positive result, then the amplifier is faulty and must be replaced.
Checking the tightness of the vacuum brake booster of the working brake system on Gazelle GAZ-3302 and GAZ-2705.
To check the vacuum booster for leaks, open the hood and run the engine for 1 minute. Approximately 30 seconds after the engine has been stopped, press the brake pedal twice. In this case, a characteristic hiss of air entering the amplifier should be heard. Otherwise, replace the amplifier.
Blow out the hose with the check valve at both ends. Air should only flow from the check valve side. Otherwise, replace the check valve.
The handbrake on Gazelle cars is part of the overall braking system, and at the same time it is an independently functioning mechanism. The parking wheel locking system on this car is reliable, durable and easy to maintain. The simplicity of the design allows, if necessary, to carry out repairs without the help of a specialist. Even if you have never performed work of this kind before, adjusting the handbrake on the Gazelle will not seem difficult to you - you just need to be careful and strictly follow the instructions given below in this article.
How to adjust the handbrake on a Gazelle - in our new article
How can you determine when it’s time to tighten the handbrake on a Gazelle? To do this, simply set its lever to the working position and, if it turns out that even after 20 clicks of the ratchet mechanism, the rear wheels are not blocked with the proper force, the handbrake cable should be tightened. You will learn how to do this further.
Why do you need a hydraulic handbrake?
The argument about stretching the cable of a mechanical handbrake is a strong argument, but not the only one or even the main one. This tuning is preferred by lovers of sports driving, since the hydraulic parking brake allows you to brake the rear wheels, and with unequal effectiveness. Under normal conditions, such actions are possible only with remarkable driving skills, and even then not on all cars. Note that with such a radical modification of the car’s brake system, the regulator must be installed between the main brake cylinder and the hydraulic handbrake - only in this case will you be able to redistribute the braking force, which is accentuated on the rear axle shaft, over a fairly large range, while the power of the front brakes will also increase. But remember that, according to the rules for operating vehicles, unauthorized intervention to change the standard design of the brake system is unacceptable if this is not approved by the car manufacturer.
How does the handbrake system work?
Applying the parking brake activates the rear brakes and ensures that the vehicle does not roll, even on a relatively steep incline. However, if the handbrake does not hold the vehicle, there is a problem that must be corrected to ensure the safety of the driver and others.
Parking brake systems vary greatly from one automaker to another and even between different makes and models of cars. In general, they are divided according to the type of brakes and the method of their use.
It is immediately necessary to understand that in the vast majority of cases in passenger cars, parking brakes use the rear wheels and are divided into two types:
- drum - consisting of two semicircular blocks that are located inside a cylindrical drum. If, on one side, they are rigidly fixed, then on the other there is a special piston mechanism that forces the pads to move when using the handbrake;
- disc brakes - consisting of a special brake disc mounted on the car axle and two pads. When you use the handbrake, the pads compress and prevent the car from moving.
The car's braking system can also be mechanical or hydraulic. If in the first option, braking is carried out using a system of cables and the force of a person who puts pressure on the handbrake, then a special piston is used in hydraulics. You should also pay attention to the wheels on the Gazelle, so that if they require replacement, update them in time.
Important! Depending on the type of braking system, the reasons why the handbrake does not hold may vary significantly.
Handbrake parts for GAZ (GAZelle Business, GAZelle Next, Volga, GAZon, Sobol)
- Spare parts catalog
- →
- GAZ spare parts
- →
- Brake system
- →
- Parking brake parts
We are the official representative of the GAZ plant. Therefore, we can guarantee the lowest price and the highest quality of parts for the parking brake and other car parts.
Product Warranty:
provided
Calculation:
cash and non-cash
Delivery:
carried out in Moscow and Russia
Pickup:
available in our store or from warehouse
| Name | Remainder | Availability | Order code | Manufacturer | Price, rub.) | Price, rub | Buy |
| Hand brake drum GAZ-53 51-3507052-G251-3507052-G2 Hand brake drum GAZ-53 | pa-0 ha-0 ar-11 nb-3 K15-0 | Warehouse 14 pcs. | 119465 | GAS | 1424 | 1424 rub. | |
| Plug for rear brake shield Gazelle, Gazelle NEXT, Sable 3302-3508178-103302-3508178-10 Plug for rear brake shield Gazelle, Gazelle NEXT, Sable | pa-0 ha-0 ar-0 nb-0 K15-13 | Magazine 13 pcs. | 102645 | AUTO COMPONENT | 15 | 15 rub. | |
| Plug for rear brake shield Gazelle, Gazelle NEXT. Sable 52-810116452-8101164 Plug for rear brake shield Gazelle, Gazelle NEXT. Sable | pa-0 ha-0 ar-21 nb-560 K15-11 | Magazine 11 pcs. Warehouse 581 pcs. | 106081 | AUTO COMPONENT | 10 | 10 rub. | |
| Repair kit for parking brake drive GAZ-3110, 31105 3110-35089003110-3508900 Repair kit for parking brake drive GAZ-3110, 31105 | pa-0 ha-0 ar-0 nb-0 K15-0 | To order | 106078 | GAS | 441 | 441 rub. | |
| Repair kit for parking brake drive Gazelle, Gazelle NEXT, Sable 3302-35089003302-3508900 Repair kit for parking brake drive Gazelle, Gazelle NEXT, Sable | pa-0 ha-0 ar-2 nb-0 K15-1 | Magazine 1 pc. Warehouse 2 pcs. | 105717 | GAS | 1300 | 1300 rub. | |
| Hand brake lever GAZ-3110, 31105 3110-35080103110-3508010 Hand brake lever GAZ-3110, 31105 | pa-0 ha-0 ar-21 nb-3 K15-0 | Warehouse 24 pcs. | 21041 | GAS | 1756 | 1756 rub. | |
| Hand brake lever GAZ-3307, 3309 33078-350801533078-3508015 Hand brake lever GAZ-3307, 3309 | pa-0 ha-0 ar-2 nb-42 K15-0 | Warehouse 44 pcs. | 138935 | GAS | 3615 | 3615 rub. | |
| Hand brake lever GAZ-3308, 33081, 33086 4301-35080154301-3508015 Hand brake lever GAZ-3308, 33081, 33086 | pa-0 ha-0 ar-3 nb-0 K15-0 | Warehouse 3 pcs. | 138936 | GAS | 4024 | 4024 rub. | |
| Hand brake lever GAZ-66, 3308, 33081 with fork 66-11-350710066-11-3507100 Hand brake lever GAZ-66, 3308, 33081 with fork | pa-0 ha-0 ar-2 nb-9 K15-0 | Warehouse 11 pcs. | 138937 | GAS | 2212 | 2212 rub. | |
| Hand brake lever Gazelle 3302-3508015-013302-3508015-01 Hand brake lever Gazelle | pa-0 ha-0 ar-6 nb-30 K15-2 | Magazine 2 pcs. Warehouse 36 pcs. | 22124 | GAS | 3820 | 3820 rub. | |
| Hand brake lever Gazelle NEXT A21R23-3508015A21R23-3508015 Hand brake lever Gazelle NEXT | pa-0 ha-0 ar-0 nb-4 K15-1 | Magazine 1 pc. Warehouse 4 pcs. | 130542 | GAS | 4450 | 4450 rub. | |
| Hand brake lever Sobol 2217-35080152217-3508015 Hand brake lever Sobol | pa-0 ha-0 ar-4 nb-1 K15-1 | Magazine 1 pc. Warehouse 5 pcs. | 24071 | GAS | 2920 | 2920 rub. | |
| Gazelle NEXT parking brake cable bracket A21R23-1868200-01A21R23-1868200-01 Gazelle NEXT parking brake cable bracket | pa-0 ha-0 ar-10 nb-0 K15-0 | Warehouse 10 pcs. | 104638 | GAS | 16 | 16 rub. | |
| Manual brake lever pawl Gazelle, GAZ-3307, 3308 4301-35080304301-3508030 Manual brake lever pawl Gazelle, GAZ-3307, 3308 | pa-0 ha-0 ar-13 nb-0 K15-1 | Magazine 1 pc. Warehouse 13 pcs. | 104026 | GAS | 490 | 490 rub. | |
| Manual brake lever pawl Sable 2217-35080302217-3508030 Manual brake lever pawl Sable | pa-0 ha-0 ar-0 nb-17 K15-5 | Magazine 5 pcs. Warehouse 17 pcs. | 106076 | GAS | 340 | 340 rub. | |
| Parking brake GAZ-52, 53, 3307 52-350701052-3507010 Parking brake GAZ-52, 53, 3307 | pa-0 ha-0 ar-0 nb-7 K15-0 | Warehouse 7 pcs. | 106413 | GAS | 2837 | 2837 rub. | |
| Parking brake GAZ-66 66-350701066-3507010 Parking brake GAZ-66 | pa-0 ha-0 ar-2 nb-3 K15-0 | Warehouse 5 pcs. | 124906 | GAS | 3380 | 3380 rub. | |
| Parking brake Gazelle NEXT 4.6t left C41R92.3507011C41R92.3507011 Parking brake Gazelle NEXT 4.6t left | pa-0 ha-0 ar-4 nb-0 K15-1 | Magazine 1 pc. Warehouse 4 pcs. | 109687 | GAS | 3780 | 3780 rub. | |
| Parking brake Gazelle NEXT 4.6t right C41R92.3507010C41R92.3507010 Parking brake Gazelle NEXT 4.6t right | pa-0 ha-0 ar-4 nb-0 K15-1 | Magazine 1 pc. Warehouse 4 pcs. | 101202 | GAS | 3780 | 3780 rub. | |
| Hand brake cable GAZ-3110, 31105 left 3110-35081813110-3508181 Hand brake cable GAZ-3110, 31105 left | pa-0 ha-0 ar-11 nb-0 K15-0 | Warehouse 11 pcs. | 127318 | DAAZ | 433 | 433 rub. | |
| Hand brake cable GAZ-31105 left/right since 2007. 31105-3508180/18131105-3508180/181 Hand brake cable GAZ-31105 left/right since 2007. | pa-0 ha-0 ar-0 nb-1 K15-1 | Magazine 1 pc. Warehouse 1 pc. | 117044 | 720 | 720 rub. | ||
| GAZ-31105 right hand brake cable from 2007. 31105-350818031105-3508180 Right hand brake cable GAZ-31105 from 2007. | pa-0 ha-0 ar-1 nb-0 K15-0 | Warehouse 1 pc. | 115865 | 437 | 437 rub. | ||
| Hand brake cable GAZ-3302 (set of 3 pcs.) 3302-35088003302-3508800 Hand brake cable GAZ-3302 (set of 3 pcs.) | pa-0 ha-0 ar-11 nb-0 K15-0 | Warehouse 11 pcs. | 124925 | GAS | 1519 | 1519 rub. | |
| Hand brake cable GAZ-3307, 3309 (3 pieces) 3307-3508800-013307-3508800-01 Hand brake cable GAZ-3307, 3309 (3 pieces) | pa-0 ha-0 ar-8 nb-0 K15-0 | Warehouse 8 pcs. | 124927 | GAS | 1805 | 1805 rub. | |
| Hand brake cable GAZ-3307, 3309 rear left 3307-3508180-023307-3508180-02 Hand brake cable GAZ-3307, 3309 rear left | pa-0 ha-0 ar-21 nb-0 K15-0 | Warehouse 21 pcs. | 122075 | LETZ | 849 | 849 rub. | |
| Hand brake cable GAZ-3307, 3309 rear left G-part 3307-3508181-023307-3508181-02 Hand brake cable GAZ-3307, 3309 rear left G-part | pa-0 ha-0 ar-0 nb-20 K15-0 | Warehouse 20 pcs. | 111343 | GAS | 453 | 453 rub. | |
| Hand brake cable GAZ-3307, 3309 rear right 3307-3508180-023307-3508180-02 Hand brake cable GAZ-3307, 3309 rear right | pa-0 ha-0 ar-4 nb-0 K15-0 | Warehouse 4 pcs. | 120539 | LETZ | 709 | 709 rub. | |
| Hand brake cable GAZ-3307, 3309 rear right G-part 3307-3508180-023307-3508180-02 Hand brake cable GAZ-3307, 3309 rear right G-part | pa-0 ha-0 ar-0 nb-46 K15-0 | Warehouse 46 pcs. | 111344 | GAS | 453 | 453 rub. | |
| Hand brake cable GAZ-3307, 3309 front 3307-3508068-023307-3508068-02 Hand brake cable GAZ-3307, 3309 front | pa-0 ha-0 ar-17 nb-62 K15-0 | Warehouse 79 pcs. | 127329 | LETZ | 451 | 451 rub. | |
| Hand brake cable GAZ-3307, 3309 front G-part 3307-35080683307-3508068 Hand brake cable GAZ-3307, 3309 front G-part | pa-0 ha-0 ar-0 nb-25 K15-0 | Warehouse 25 pcs. | 111345 | GAS | 476 | 476 rub. |
Parts parking brake GAZ 1 - 49 of 49
1
How many “clicks” should you pull the brake lever on a Gazelle?
For optimal wheel fixation, for the new GAZ 3302, 13-15 clicks of the handbrake ratchet mechanism are enough so as not to fear for the immobility of the abandoned car. If after some time it becomes noticeable that the handle has to be raised above the level of the driver’s seat, and 20 or more clicks are needed, then the “handbrake” requires urgent adjustment.
When is it necessary to adjust your car brakes?
Brake adjustment can be divided into full adjustment and current adjustment. A complete brake adjustment involves disassembling the brake mechanism for replacement or adjustment.
Partial adjustment of the brakes is usually carried out on your own in the garage. The main focus here is how the rear brake pressure regulator works. It is especially important to adjust the pressure regulator of the rear brakes after tuning the brake system. Those. if you have replaced drum brakes with disc brakes.
Brake adjustment is carried out when replacing brake pads or replacing a brake disc. And, as a rule, these operations are performed simultaneously, then the brakes are adjusted immediately.
To adjust disc brakes, and brakes in general on various models of foreign cars, there is, first of all, the Operation and Repair Instructions for your car.
Traditional brake adjustments include:
- adjusting the brake drive (brake pedal travel);
- adjustment of the brake mechanisms (the gap between the brake disc and the brake pads), in addition, the rear brake adjuster must be checked and adjusted;
- adjusting the parking brake (handbrake).
Important! Before adjusting the front brakes, it is necessary to check that the bearings are adjusted correctly. And if you have disc brakes installed at the rear, then check the condition of the adjustment of the rear wheel bearings.
Causes of malfunction and their elimination
As a rule, the reasons why the handbrake does not work are quite simple and do not require long or expensive repairs:
- torn cable. One of the common causes is a broken cable on the handbrake or under the car. The problem is solved by simply replacing the cable;
- jammed cable. Due to damage to the sheath in which the cable moves, it may become jammed, preventing you from using the handbrake. And the cable itself consists of many steel strands, which, if damaged, can also prevent proper operation. The solution is to replace the cable;
- dirty brakes. If dust, dirt, ice or reagents that are sprinkled on roads in winter get on the pads, this can cause the brakes to not work properly. The solution is to press the brake pedal several times smoothly while the car is moving. Thanks to friction, the pads will be cleaned;
- incorrect adjustment. It may happen that the cable system is not adjusted properly, the bolt is not tightened correctly, or the length of the cables is incorrectly selected. The solution is to adjust the system and correct tension of the cables;
- pad wear. The pads are subject to abrasion during operation. Every time you apply the brakes, the pads gradually become unusable. The solution is to replace the pads;
- oil in the pads. Oil or brake fluid leaks can cause the car to not hold up with the handbrake. The most important thing in this case is to identify the cause of the leak - it could be the rear axle seal or the brake cylinder. The solution is to eliminate the leak and clean the pads. If the pads are very oily, replace them.
We recommend: Reliable car service: how to find a really good technician for your car
Adjusting the parking brake yourself
Before adjusting the handbrake on the Gazelle, lift the rear of the car and place it on supports. After this, remove the wheels to gain access to the brake mechanism. And you should also know that adjustment procedures are carried out with the lever set to the non-working position (lowered all the way).
Monitor the cable tension - this is important for your safety
To work, you will need a 17" wrench, two 22" wrenches, a "9" tubular wrench and a flat blade screwdriver. Having prepared the necessary set of tools, proceed to adjust the hand brake in accordance with the following list of actions:
- So, first you need to get to the brake mechanism - to do this, use a screwdriver and remove the upper and lower plastic plugs on the brake shield.
- Next, using a key set to “17”, loosen the eccentric nut two turns (no more) and, sliding the pads, unlock the brake drum. To do this, use a tubular wrench to rotate the eccentric bolt in the opposite direction. If the pads lightly touch the drum, this is acceptable. You can control the entire process through special inspection windows, which are located at the bottom of the brake mechanism flap.
- After this, the eccentric nut must be tightened to a torque of 2.4–3.5 kgf/m. If you do not have a torque wrench on hand, tighten by hand with a reasonable amount of force. In this case, rotation of the eccentric itself is unacceptable.
- At this point, the first stage of adjusting the handbrake on the Gazelle car is completed, so install the plugs in place and do the same on the second wheel.
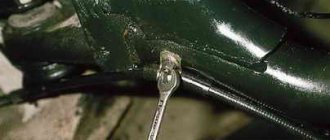
Now it is necessary to install the cable equalizer in a perpendicular position relative to the axis of the vehicle. This is achieved by loosening the cable fastening nuts. By moving the nuts along the threads, you will install the equalizer in the desired position, while eliminating the play between it and the cable tips. After this, the locknuts must be tightened.
With the completion of the described procedure, the process of adjusting the parking brake is not yet completed, since it is necessary to adjust the tension of the central cable. To begin, lift the handbrake lever one click and, by rotating the adjusting nut at the point where the rear end of the cable is attached to the equalizer (after releasing the lock nut), tighten the tension until the wheels begin to slow down slightly. After this, lower the handbrake lever all the way down and turn each rear wheel by hand. A properly adjusted handbrake should not interfere with rotation. In addition, when setting the vehicle to the parking brake, the lever travel should be 15 clicks of the ratchet mechanism.
From this guide you learned how to tighten the handbrake on a Gazelle without outside help. But sometimes, after a correctly performed adjustment, it is not possible to obtain the expected result due to critical wear or stretching of the cables. In this case, the handbrake cable will have to be replaced, which will be discussed below.
Disassembling the parking brake mechanism
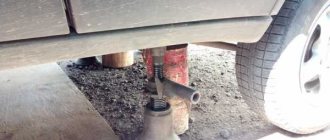
It is more convenient to work on an inspection ditch.
Lower the parking brake lever all the way down.
Unscrew and remove the equalizer axis.
Using two 24mm wrenches, loosen the rear fastening nuts of the central cable sheath and completely unscrew the outer nut.
Using a 10mm wrench, unscrew the bolt securing the cable to the cross member bracket.
Disconnect the cable from the main bracket
Disconnect the cable from the additional bracket.
Remove the driver's seat.
Using a 24mm wrench, unscrew the nut of the front fastening of the central cable 2-3 turns.
Raise the edge of the mat and use a 10mm wrench to unscrew the six nuts securing the mechanism to the floor
Remove the connector from the parking brake warning switch
Remove the cable bracket.
Unsplint the lever axis
Correct adjustment of the handbrake on the Gazelle. Safety first
A necessary manipulation for drivers of cars of the same name - adjusting the hand brake on the Gazelle - is a fairly simple, but extremely responsible job. Safety largely depends on how professionally the process is carried out (everyone knows that in an extreme situation the handbrake is the only means of emergency stopping).
Adjusting the handbrake on the Gazelle consists of several stages, which will be described below. Anyone can do the job without resorting to the services of a car service. The main thing is accuracy, accuracy and scrupulous adherence to instructions.
Handbrake on Gazelle
Evidence that the job was done correctly is that the rear wheelset rotates freely, and the handbrake is activated by moving the lever fifteen clicks.
This option for carrying out repair work is not the only one. In each specific case, specialists will determine the degree of wear of parts and how to replace them. They will also indicate which parts are more profitable to purchase: original ones from the manufacturer or cheaper analogues. In some cases this is justified. As for the AlfaAuto online store, you can purchase all types of spare parts: they are of high quality and have certificates of conformity. In addition, you are guaranteed fast delivery to any region. In the event that you need to replace a part, you will do it without hindrance, as required by law. You can find out the details of concluding an agreement for the supply of parts from the manager, whom you will contact online or by phone.
The final stage
Repeat all the above steps with the other wheel. Do not neglect the plugs: if they are not installed, then, thanks to dirt, sand and water, the next repair will not be as simple as this one.
All that remains is to tighten the handbrake drive. The optimal travel of the parking brake lever is 8-10, but no more than 15 clicks until it is firmly tightened. That's all, actually.
The parking brake should hold the vehicle on a 25% grade when the parking brake lever is moved 15 to 20 teeth (clicks) of the ratchet.
1. To check the correct adjustment of the parking brake, find an overpass or loading ramp with a height of H = 1.25 m and an entrance length of L = 5 m near the parking area of your car. This ratio corresponds to a slope of 25%
2. If there is no such ramp, for a simplified check of the parking brake, place the car on a level surface.
Set the gear shift lever to neutral and fully raise the parking brake lever.
Get out of the car and try to move it.
If you succeed, you need to urgently adjust the parking brake drive
When does adjustment become necessary?
Indications for adjustment are: lever travel of 20 teeth or more (determined by the corresponding number of clicks); repair or replacement of elements related to the brake mechanism.
The presence of any of these circumstances indicates the need for adjustment. The goal is to move the lever no more than 15 clicks
– this value is optimal for all modifications of the Gazelle.
How does the handbrake work?
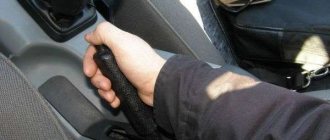
When the driver activates the handbrake, either by pulling the handle between the front seats (3) or by pressing the parking brake pedal under the dashboard, a cable (12) running to the rear of the car is pulled, applying tension to the brake pads. When the driver lowers the handle, the return spring (11) helps return the brake system to its normal configuration.
The system itself is quite simple and banal - the parking brake handle is connected to a cable in a special plastic sheath, in which it can move freely. This cable goes to the adjusting bolt, which can be loosened or tightened. Then it splits into two cables that go to the brakes on the rear wheels.
In simple words, by activating the handbrake, the cable tightens and brings the pads together, which then secure the car.
Replacing parking brake cables
If necessary (corrosion, damage), we replace the parking brake cables for which:
— remove the rear wheels;
Using a 12mm socket, unscrew the two bolts securing the cable to the brake shield.
We remove the cable from the hole in the shield.
Using two 22mm wrenches, loosen the tightening of the adjusting nuts of the cable end.
Unscrew the outer nut from the threaded part of the tip.
We remove the cable from the slot in the bracket.
Use pliers to unscrew the equalizer axis
Having lowered the equalizer down, remove the cable from it. Similarly, disconnect the second cable
We install the cables in the reverse order, and then adjust the drive.
Adjusting the parking brake drive
Lower the parking brake lever to its lowest position.
Use a screwdriver to pry up and remove the two plastic plugs of the brake shield (the wheels have been removed for clarity).
Using the “17” socket, loosen the brake eccentric nut by 1–2 turns.
Using a long “9” socket or a special tubular wrench, turn the eccentric bolt until resistance to rotation is felt, which is caused by the decompression of the pads.
The beginning of the movement of the blocks can also be determined through the inspection windows in the panel.
Using the “17” socket, tighten the eccentric nut to a torque of 2.4–3.5 kgf.m.
At the same time, we hold the bolt from turning with the “9” head.
We similarly adjust the brake mechanism on the other side of the car and install plastic plugs in the brake shields.
We eliminate the play between the cable tips and the depressions on the equalizer, for which:
Using two 24" wrenches, we loosen the tightening of the nuts securing the cable sheath and, by moving the nuts along the threaded part of the sheath, we achieve elimination of the backlash between the cable tip and the cavity on the equalizer
Similarly, we eliminate the play at the other cable end.
Tighten the locknuts of both cables.
In this case, the leveler bar must be perpendicular to the longitudinal axis of the car
Using a ruler or tape measure, measure the distance between the equalizer and the front wall of the bracket.
It should be between 144–150 mm.
If necessary, adjust the position of the central cable in the same way as adjusting the rear cables.
If after this there is play between the tips of the rear cables and the equalizer, repeat the adjustment described above.
When the drive is properly adjusted, the parking brake lever should not move more than 15 sector teeth (clicks).
Source
How to replace handbrake cables
If adjusting the Gazelle hand brake turned out to be insufficiently effective or did not lead to anything at all, therefore, you will have to change the brake pad drive cables. In addition to the critical stretch of the cable, it should be changed if damage is detected during an external inspection. And also an indicator for replacement is corrosion and jamming of the cable in the protective sheath.
In order to successfully complete the task, prepare two “22” wrenches, a “12” socket and pliers. We, in turn, will tell you how to change the handbrake cable on a Gazelle:
- Lift the rear of the car to remove the rear wheels and brake drums and shoes.
- Using a socket on “12”, unscrew the two bolts that secure the protective shell to the brake mechanism.
- After removing the socket cable from the brake shield, you need to move to the cable equalizer and use “22” keys to loosen the lock nut and the adjusting nut.
- Next, you should completely unscrew the outer nut, which will allow you to remove the cable from the bracket slot;
- After this, unsplit the equalizer axle using pliers, then remove the washer and remove the axle.
- Now you need to release the equalizer to remove the drive cable from it.
The second cable is dismantled in the same way. As for installing new parts, you can also use these instructions for this, but in reverse order. After completing the replacement, be sure to adjust the parking brake according to the instructions given in the first part of the article.
Adjustment
- All manipulations are performed in the position when the handbrake is “off”
(the lever is fixed in the lowest position). To access the brake mechanism, remove the plastic plugs located on the brake shield. It is enough to pry them off with a screwdriver; - Then the eccentric nut is loosened
(no more than 2 turns). Further actions consist of moving the brake pads apart - to a position at which the drum is braked, after which the bolt is turned in the opposite direction, as a result of which the brake pads move in the opposite direction. The movement is carried out until the drum begins to rotate; - The process is monitored through inspection windows located in the lower part of the brake shield;
- At the end of the operation, the eccentric nut is tightened with reasonable force. It is important to prevent the eccentric from turning;
- The brake mechanism is adjusted in a similar way on the other side of the car, after which the plastic plugs are installed in place.
Next stage:
installing the leveler in a position “perpendicular” to the axis of the car. To do this, it is necessary to loosen the fastening nuts; they move along the thread until the desired position of the equalizer is reached. The position is fixed using locknuts.
Then:
The handbrake is set to the “one click” position. By rotating the rear end nut (sheath of the central cable), the cable moves to the forward position until the free wheel movement is slowed down. Having tightened – with moderate force – the fixing nuts, turn off the parking brake.
An indicator of operational efficiency will be the free rotation of the rear wheels.
In addition, the “activation” of the handbrake is characterized by a maximum movement of the lever of 15 clicks. In this case, we can safely state: the adjustment was made correctly, the desired result was achieved.
How to separate the brake pads on a Gazelle
The sequence of actions is as follows:
- Place the car on a flat, horizontal platform (ideally on a viewing hole or a lift).
- Place wheel chocks under the front wheels.
- Place the gear lever in the “neutral” position, the handbrake is lowered, and hang the adjustable wheel.
- Remove the two rubber plugs from the inside of it. Bottom - for visual monitoring of the gap between the pads and the drum, as well as their condition. The top one hides the locked eccentric.
- Using a 17mm socket wrench or a sufficiently curved socket wrench, loosen the locknut. Then use a 9 mm socket wrench to rotate the eccentric, visually checking the gap between the pads and the drum. Achieve the “golden mean” when the gap is minimal, but the wheel rotates easily.
- Tighten the locknut, check again for easy rotation, and replace the plugs. The job is half done.
Sources
- https://mazda22.ru/servis/zadnie-tormoza-gazel-ustrojstvo-2.html
- https://prometey96.ru/modeli/ruchnik-gazel.html
- https://7road.ru/novosti-avtovaza/ruchnoj-tormoz-gazel.html
- https://lada-avia.ru/drugoe/podvesti-ruchnik-na-gazeli.html
- https://5star-auto.ru/regulirovka-zadnih-tormoznyh-kolodok-gazel/
- https://OdnaDetal.ru/drugoe/kak-sdelat-ruchnik-na-gazeli.html
- https://lanos-volgograd.ru/regulirovka-trosika-ruchnika-gazel/
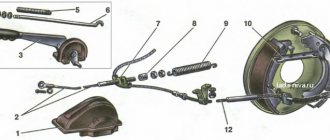
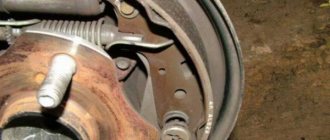
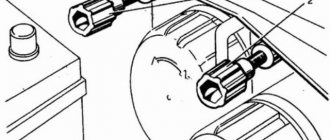
Rear wheel brakes
Rear wheel brake:
- working cylinder fastening bolt;
- working cylinder;
- bleeding valve;
- brake shield;
- block;
- protective case;
- piston;
- thrust ring;
- springs;
- springs;
- expansion link;
- parking brake actuator lever;
- pad mounting plate;
- springs;
- cotter pin;
- screw;
- washers;
- washers;
- bolt;
- plugs;
- eccentric bushings;
- plugs;
- eccentric bushings;
- eccentric;
- eccentric axis;
- screw;
- cups;
- springs;
- kernel.
The brake mechanisms of the rear wheels are shoe, drum type.
Cylinder 2 (Fig. 7.8), pad support with plate 13, pads 5 are fixed on shield 4.
The upper ends of the pads enter the slots of the pistons, and the lower ends touch the support plate, on which they are held by tension springs 9 and 14. Lateral fixation of each pad on the shield is provided at three fastening points, to which spring 28 presses it.
The thrust split metal ring 8 is installed in the brake cylinder with tension. The ring cut is located in the upper part of the cylinder near the bleeder hole. A piston 7 is inserted into the central hole of the thrust ring so that after it is rotated 90°, the slot on the piston rod is parallel to the plane of attachment of the cylinder to the shield. The piston rests against the ring and can move freely in it towards the pads within 1.7-1.9 mm.
As the brake linings and drum wear out, the piston moves in the cylinder during braking, dragging the thrust ring 8 with it. After braking, under the action of the tension springs of the pads, the piston will move relative to the ring by the distance indicated above, which will ensure a constant gap between the pads and the drum.
Brake drums are cast, made of gray cast iron.
The rear brake mechanism includes parts of the parking brake system: drive lever 12, expansion link 11 and adjustment parts 21, 23, 24, 25.
Source